微信小程式模擬下拉式選單開發實例
本文主要跟大家分享微信小程式模擬下拉式選單開發實例,希望能幫助大家。
一.知識點
1.實作動態顯示與隱藏某個控制項
#
  data:{
    open:false
  },
  showitem:function(){
      this.setData({
          open:!this.data.open
      })
},.display_show{
display: block;
}
.display_none{
display: none;
}2.透過data-* 與 e.target.dateset 傳遞參數
    this.setData({
             firstPerson:e.target.dataset.me,
})這時:firstPerson=吃
#3.彈性盒字:display:flex;##
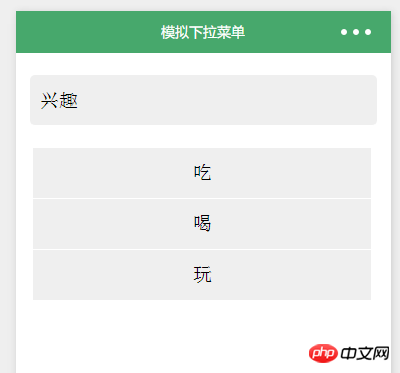
<view class="phone_one" bindtap="clickPerson">
<view class="phone_personal">{{firstPerson}}</view>
<image src="../../image/i.png" class="personal_image {{selectArea ? 'rotateRight' :''}}"></image>
</view> display:flex; justify -content:space-between;
這樣子集就會並列。 justify-content:space-between;這樣子集就會分別在兩個頭
二.事列

1.wxml
<view class="page">
<view class="page_bd">
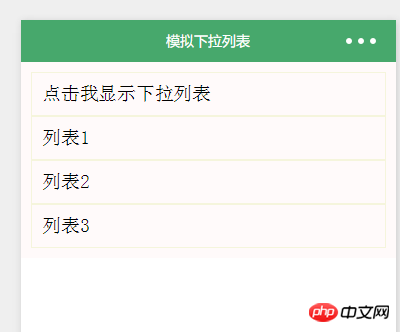
<view class="body_head" bindtap="showitem">点击我显示下拉列表</view>
<navigator url="pages/list/list">
<view class="{{open?'display_show':'display_none'}}">列表1</view>
</navigator>
<navigator url="pages/scroll-view/index">
<view class="{{open?'display_show':'display_none'}}">列表2</view>
</navigator>
<navigator url="pages/scroll-view/index">
<view class="{{open?'display_show':'display_none'}}">列表3</view>
</navigator>
</view>
</view>2.wxss
.page_bd{
    padding: 10px;
    background-color: snow;
}
.body_head{
    border: 1px solid;
    border-color: beige;
    padding: 10px;
}
.display_show{
    display: block;
    border: 1px solid;
    border-color: beige;
    padding: 10px;
}
.display_none{
    display: none;
}
#3.js######
Page({
  data:{
    open:false
  },
  showitem:function(){
      this.setData({
          open:!this.data.open
      })
  },
  onLoad:function(options){
    // 页面初始化 options为页面跳转所带来的参数
  },
  onReady:function(){
    // 页面渲染完成
  },
  onShow:function(){
    // 页面显示
  },
  onHide:function(){
    // 页面隐藏
  },
  onUnload:function(){
    // 页面关闭
  }
})<view class="phone_one" bindtap="clickPerson">
<view class="phone_personal">{{firstPerson}}</view>
<image src="../../image/i.png" class="personal_image {{selectArea ? 'rotateRight' :''}}"></image>
</view>
吃
喝
玩
phone_personal{
  width: 100%;
  color:rgb(34, 154, 181);
  height:100rpx;
  line-height:100rpx;
  text-align: center;
}
.phone_one{
    display:flex;
    position:relative;
    justify-content:space-between;
    background-color:rgb(239, 239, 239);
    width:90%;
    height:100rpx;
    margin:22px auto;
    border-radius:10rpx;
    border-bottom:2rpx solid rgb(255, 255, 255);
    line-height:51px;
    padding-left:10px;
}
.person_box{
  position: relative;
}
.phone_select{
  margin-top:0;
  z-index: 100;
  position: absolute;
}
.select_one{
  text-align: center;
  background-color:rgb(239, 239, 239);
  width:676rpx;
  height:100rpx;
  line-height:100rpx;
  margin:0 5%;
  border-bottom:2rpx solid rgb(255, 255, 255);
}
.personal_image{
  z-index: 100;
  position: absolute;
  right:2.5%;
  width: 34rpx;
  height: 20rpx;
  margin:40rpx 20rpx 40rpx 0;
  transition: All 0.4s ease;
  -webkit-transition: All 0.4s ease;
}
.rotateRight{
  transform: rotate(180deg);
}Page({
data:{
selectPerson:true,
firstPerson:'兴趣',
selectArea:false,
},
//点击选择类型
clickPerson:function(){
var selectPerson = this.data.selectPerson;
if(selectPerson == true){
this.setData({
selectArea:true,
selectPerson:false,
})
}else{
this.setData({
selectArea:false,
selectPerson:true,
})
}
} ,
//点击切换
mySelect:function(e){
this.setData({
firstPerson:e.target.dataset.me,
selectPerson:true,
selectArea:false,
})
},
onLoad:function(options){
// 页面初始化 options为页面跳转所带来的参数
},
onReady:function(){
// 页面渲染完成
},
onShow:function(){
// 页面显示
},
onHide:function(){
// 页面隐藏
},
onUnload:function(){
// 页面关闭
}
})以上是微信小程式模擬下拉式選單開發實例的詳細內容。更多資訊請關注PHP中文網其他相關文章!

熱AI工具

Undresser.AI Undress
人工智慧驅動的應用程序,用於創建逼真的裸體照片

AI Clothes Remover
用於從照片中去除衣服的線上人工智慧工具。

Undress AI Tool
免費脫衣圖片

Clothoff.io
AI脫衣器

Video Face Swap
使用我們完全免費的人工智慧換臉工具,輕鬆在任何影片中換臉!

熱門文章

熱工具

記事本++7.3.1
好用且免費的程式碼編輯器

SublimeText3漢化版
中文版,非常好用

禪工作室 13.0.1
強大的PHP整合開發環境

Dreamweaver CS6
視覺化網頁開發工具

SublimeText3 Mac版
神級程式碼編輯軟體(SublimeText3)
 WPS表格下拉選單怎麼做
Mar 21, 2024 pm 01:31 PM
WPS表格下拉選單怎麼做:選中要設定下拉選單的儲存格後,依序點擊“資料”,“有效性”,再在彈出的對話框中進行對應設定後,以此來下拉我們的選單。 WPS作為一款功能強大的辦公室軟體,其本身擁有的能夠編輯文件、統計數據表格等的功能,為許多需要和文字、數據等打交道的人們提供了很多的便利。而要熟練地運用WPS軟體為我們提供很多方便,就需要我們能夠先掌握住WPS軟體的各種非常基本的操作,在這篇文章裡,小編就給大家分享一下怎麼在用WPS軟體做在出的WPS表格中進行下拉式選單的操作。開啟WPS表格後,先用滑鼠選
 如何列印不含註釋的 Word 文檔
Apr 18, 2023 pm 02:19 PM
對於MicrosoftWord,註解很重要,尤其是當文件在多人之間共用時。每個人都可以透過他/她的評論在文件內容中添加一些內容,並且保留這些評論以供以後參考是非常重要的。但是當你需要列印文件時,你真的需要列印註解嗎?在某些情況下,是的。但對於其他一些情況,這是一個很大的不!在本文中,我們透過2種不同的解決方案解釋瞭如何輕鬆列印Word文件而不列印其上的評論。請記住,評論只是被隱藏,不會被刪除。因此,您絕對不會在此處冒您文件的任何部分的風險,在沒有評論的情況下列印它。希望你喜歡!解決方案1:通
 如何在 Microsoft Word 中新增藝術頁面邊框
Apr 27, 2023 pm 08:25 PM
您是否厭倦了一直在Word文件上看到傳統的黑色邊框?您是否正在尋找如何為您的文件添加一些彩色和藝術邊框以使其更具吸引力和樂趣的方法?在Word文件的不同頁面中添加不同的藝術邊框怎麼樣?或一次將單一藝術邊框應用於文件中的所有頁面?我知道你和我們一樣對這整個藝術邊界的事情感到興奮!直接閱讀本文,了解如何成功地將藝術邊框應用於Word文件。第1部分:如何將相同的藝術頁面邊框應用於Word文檔中的所有頁面第1步:開啟Word文檔,然後按一下頂部功能區中的「設計」標籤。在DESIGN選
 使用Python開發微信小程式
Jun 17, 2023 pm 06:34 PM
隨著行動互聯網技術和智慧型手機的普及,微信成為了人們生活中不可或缺的一個應用。而微信小程式則讓人們可以在不需要下載安裝應用程式的情況下,直接使用小程式來解決一些簡單的需求。本文將介紹如何使用Python來開發微信小程式。一、準備工作在使用Python開發微信小程式之前,需要先安裝相關的Python函式庫。這裡推薦使用wxpy和itchat這兩個函式庫。 wxpy是一個微信機器
 如何在 Excel 中建立帶有符號的下拉列表
Apr 14, 2023 am 09:04 AM
在 Excel 工作表中建立下拉清單很容易,只要它是一個普通的下拉式選單。但是,如果您必須透過添加特殊符號使其特別,或者透過添加一些文字以及符號使其更加特別,該怎麼辦?好吧,聽起來很有趣,但想知道這是否可能?當 Geek Page 隨時為您提供協助時,您有什麼不知道的答案?這篇文章都是關於創建下拉式選單,帶有符號以及符號和文字。希望你喜歡閱讀這篇文章!另請閱讀:如何在 Microsoft Excel 中新增下拉式選單第 1 部分:建立僅包含符號的下拉清單要建立帶有符號的下拉式選單,我們首先需要建立來源
 在 Windows 11 上調整螢幕以監控的 5 種方法(和修復)
Apr 14, 2023 pm 03:28 PM
由於最近世界各地的改進,PC零件現在以廠商建議零售價出售,這促使許多用戶最終構建了他們夢想中的PC。建立PC可能會遇到挑戰,其中一項任務是使您的螢幕適合顯示器的顯示。如果您無法將螢幕安裝到Windows11上的顯示器上,那麼您需要了解的就是這一切。讓我們開始吧。如何以5種方式調整螢幕以在Windows11上監控要讓您的螢幕適合您的顯示器,您可以根據目前設定調整解析度、縮放比例或顯示輸出設定。我們建議您嘗試調整解析度大小以保持視覺品質和dpi。但是,如果這對您不起作用,您可以嚐嚐
 實作微信小程式中的卡片翻轉特效
Nov 21, 2023 am 10:55 AM
實作微信小程式中的卡片翻轉特效在微信小程式中,實現卡片翻轉特效是一種常見的動畫效果,可以提升使用者體驗和介面互動的吸引力。以下將具體介紹如何在微信小程式中實現卡片翻轉的特效,並提供相關程式碼範例。首先,需要在小程式的頁面佈局檔案中定義兩個卡片元素,一個用於顯示正面內容,一個用於顯示背面內容,具體範例程式碼如下:<!--index.wxml-->&l
 支付寶上線「漢字拾光-生僻字」小程序,用於徵集、補充生僻字庫
Oct 31, 2023 pm 09:25 PM
本站10月31日消息,今年5月27日,螞蟻集團宣布啟動“漢字拾光計劃”,最近又迎來新進展:支付寶上線“漢字拾光-生僻字”小程序,用於向社會徵集生僻字,補充生僻字庫,同時提供不同的生僻字輸入體驗,以幫助完善支付寶內的生僻字輸入方法。目前,用戶搜尋「漢字拾光」、「生僻字」等關鍵字就可以進入「生僻字」小程式。在小程式裡,使用者可以提交尚未被系統辨識輸入的生僻字圖片,支付寶工程師確認後,將會對字庫進行補錄入。本站注意到,使用者也可以在小程式體驗最新的拆字輸入法,這項輸入法針對讀音不明確的生僻字設計。用戶拆


