本文主要和大家分享phpstudy本地配置網域存取的方法,希望能幫助大家。

一. hosts設定:
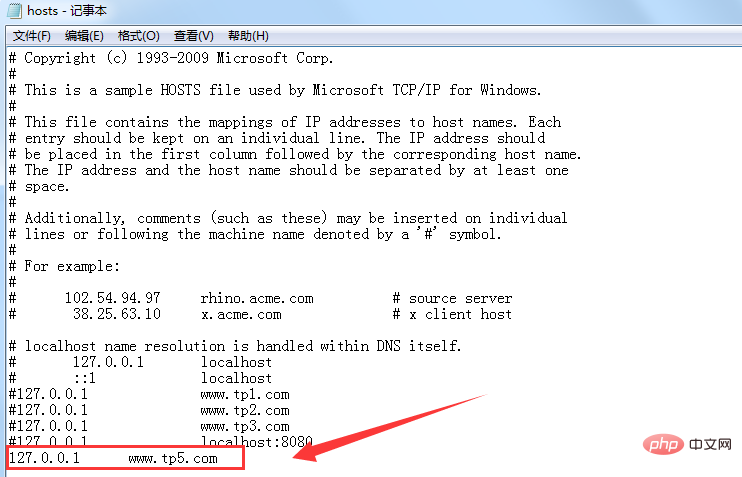
1.用編輯器開啟hosts文件,位置:C:\Windows\System32\drivers\etc目錄下
範例:
在hosts檔案的最後加入以下程式碼:
127.0.0.1 www.tp5.com

二. apache設定:
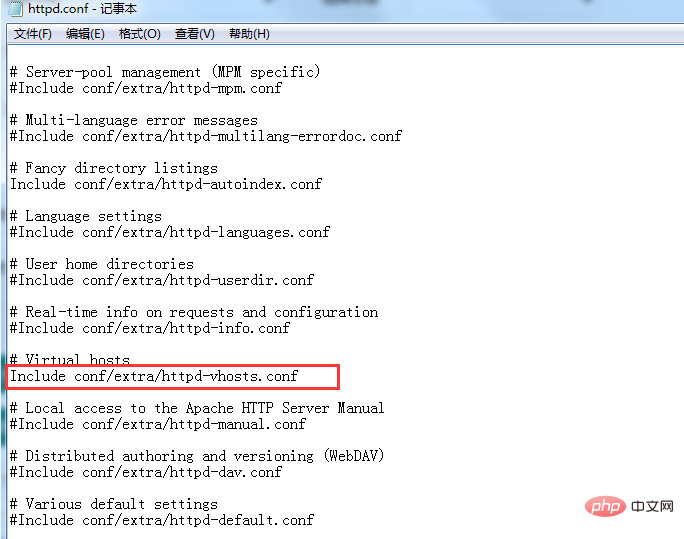
#1 .編輯httpd.conf文件,開啟虛擬主機,位置:在apache的安裝目錄,即phpstudy安裝目錄下的phpStudy\Apache\conf,找到Includeconf/extra/httpd-vhosts.conf,去掉前面的

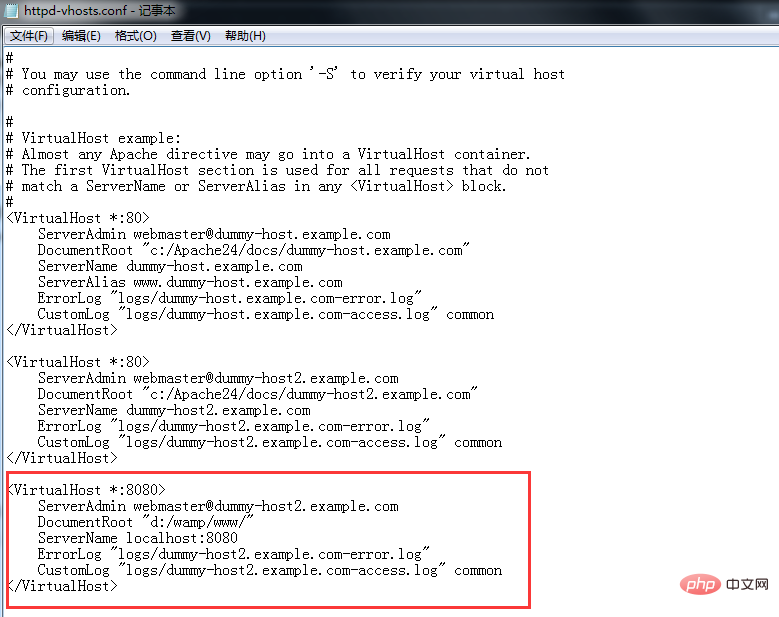
##2. 進入開啟的虛擬主機檔案httpd-vhosts.conf進行網域名稱配置,位置:\phpStudy\Apache\conf\extra目錄下
設定規則:
<VirtualHost *:80>
ServerAdminwebmaster@dummy-host.example.com
DocumentRoot"D:/phpStudy/WWW/要配置域名的项目名"
ServerName 配置的域名
ErrorLog"logs/dummy-host2.example.com-error.log"
CustomLog"logs/dummy-host2.example.com-access.log" common
</VirtualHost>

若想要在Apache的設定中隱藏入口檔案index.php,即使存取位址:localhost/h5.test.cn/index.php/test/index 簡化成localhost/h5.test.cn/test/index,也可以透過網域設定實現,即如下:
<VirtualHost *:80>
DocumentRoot"D:/phpStudy/WWW/h5.test.cn"
ServerNamelocal.h5.test.cn
<IfModuledir_module>
DirectoryIndexindex.php
 </IfModule>
</VirtualHost>
以上設定都完成後,請記住要重新啟動伺服器。
注意:這個時候出現一個問題,就是用localhost訪問本地其他項目就出現訪問不了,這麼多項目,不想每個都去配置一個虛擬域名,既能域訪問,又能localhost就好了,在網路上找到了解決方案:
用上面的方法新增一個名為localhost的網域綁定到www目錄,然後在httpd.conf檔中註解掉ServerName localhost這一行,重啟apache,就都可以訪問了。
相關推薦:
########################################################################
以上是phpstudy本地配置網域存取的方法(圖解步驟)的詳細內容。更多資訊請關注PHP中文網其他相關文章!

