seaborn.heatmap(data, vmin=None, vmax=None,cmap=None, center=None, robust=False, annot=None, fmt ='.2g', annot_kws=None,linewidths=0, linecolor='white', cbar=True, cbar_kws=None, cbar_ax=None,square=False, xticklabels='auto', yticklabels='auto', mask='auto', yticklabels='auto', mask= None, ax=None,**kwargs)
data:矩陣資料集,可以是numpy的陣列(array),也可以是pandas的DataFrame。如果是DataFrame,則df的index/column資訊會分別對應到heatmap的columns和rows,即pt.index是熱力圖的行標,pt.columns是熱力圖的列標
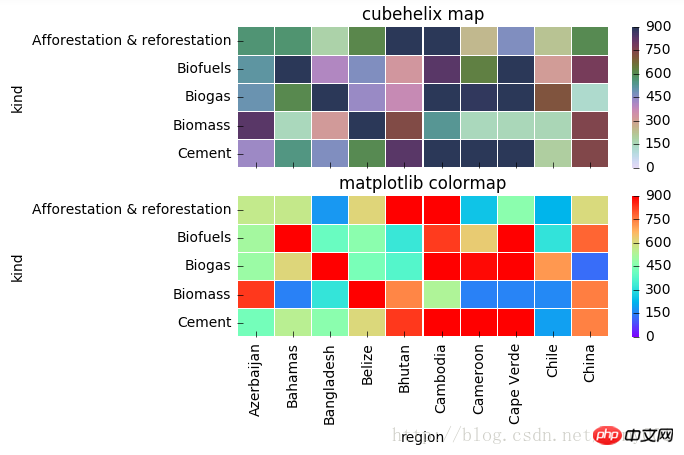
vmax,vmin:分別為熱力圖的顏色取值最大和最小範圍,預設是根據data資料表裡的取值決定
cmap:從數字到色彩空間的映射,取值是matplotlib套件裡的colormap名稱或顏色對象,或表示顏色的清單;改參數預設值:根據center參數設定
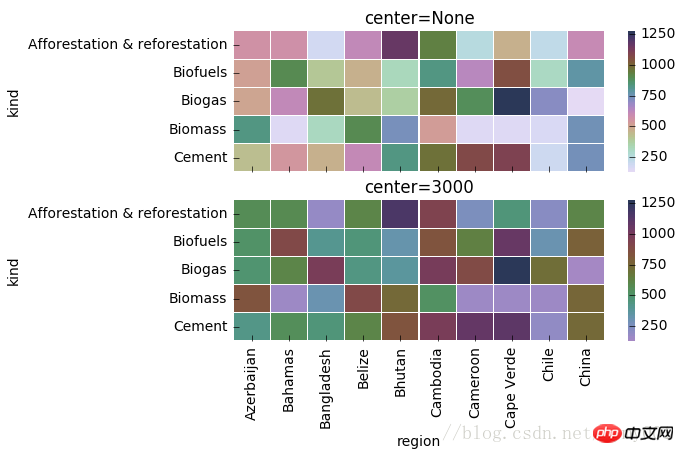
center:資料表取值有差異時,設定熱力圖的色彩中心對齊值;透過設定center值,可以調整產生的影像顏色的整體深淺;設定center資料時,如果有資料溢出,則手動設定的vmax、vmin會自動改變
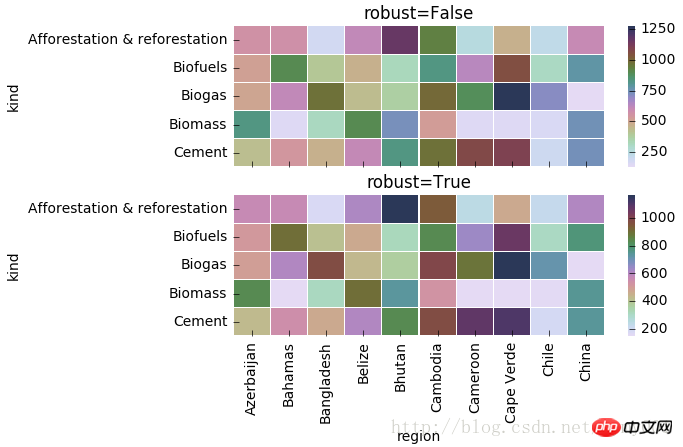
robust:預設取值False;如果是False,且沒設定vmin和vmax的值,熱力圖的顏色映射範圍根據具有穩健性的分位數設定,而不是用極值設定
annot(annotate的縮寫):預設取值False;如果是True,在熱力圖每個方格寫入資料;如果是矩陣,在熱力學圖每個方格寫入該矩陣對應位置資料
##fmt:字串格式程式碼,矩陣上標識數字的資料格式,例如保留小數點後幾位數字
annot_kws:預設取值False;如果是True,設定熱力圖矩陣上數字的大小顏色字體,matplotlib包text類別下的字體設定;官方文件:
linewidths:定義熱力學圖裡“表示兩兩特徵關係的矩陣小塊」之間的間隔大小
linecolor:切分熱力圖上每個矩陣小塊的線的顏色,預設值是'white'
cbar:是否在熱力圖側邊繪製顏色刻度條,預設值是True
cbar_kws:熱力圖側邊繪製顏色刻度條時,相關字體設置,預設值是None
cbar_ax:熱力學圖側邊繪製顏色刻度條時,刻度條位置設置,預設值是None
xticklabels, yticklabels:xticklabels控制每列標籤名的輸出;yticklabels控制每行標籤名的輸出。預設值是auto。如果是True,則以DataFrame的列名作為標籤名。如果是False,則不新增行標籤名。如果是列表,則標籤名稱改為列表中給的內容。如果是整數K,則在圖上每隔K個標籤進行一次標註。 如果是auto,則自動選擇標籤的標註間距,將標籤名稱不重疊的部分(或全部)輸出
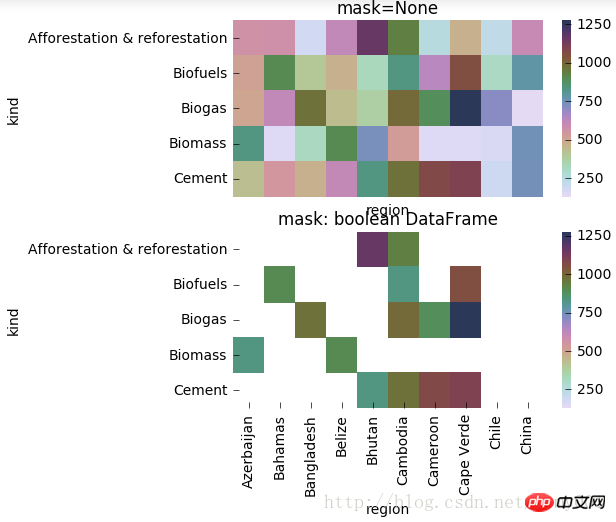
mask:控制某個矩陣區塊是否顯示出來。預設值是None。如果是布林型的DataFrame,則將DataFrame裡True的位置用白色覆蓋掉
ax:設定作圖的座標軸,一般畫多個子圖時需要修改不同的子圖的該值
**kwargs:All other keyword arguments are passed to ax.pcolormesh
#cmap(颜色)

import matplotlib.pyplot as plt
% matplotlib inline

f, (ax1,ax2) = plt.subplots(figsize = (6,4),nrows=2)

# cmap用cubehelix map颜色
cmap = sns.cubehelix_palette(start = 1.5, rot = 3, gamma=0.8, as_cmap = True)
sns.heatmap(pt, linewidths = 0.05, ax = ax1, vmax=900, vmin=0, cmap=cmap)
ax1.set_title('cubehelix map')
ax1.set_xlabel('')
ax1.set_xticklabels([]) #设置x轴图例为空值
ax1.set_ylabel('kind')

# cmap用matplotlib colormap
sns.heatmap(pt, linewidths = 0.05, ax = ax2, vmax=900, vmin=0, cmap='rainbow')
# rainbow为 matplotlib 的colormap名称
ax2.set_title('matplotlib colormap')
ax2.set_xlabel('region')
ax2.set_ylabel('kind')
#center的用法(颜色)f, (ax1,ax2) = plt.subplots(figsize = (6, 4),nrows=2)

cmap = sns.cubehelix_palette(start = 1.5, rot = 3, gamma=0.8, as_cmap = True)
sns.heatmap(pt, linewidths = 0.05, ax = ax1, cmap=cmap, center=None )
ax1.set_title('center=None')
ax1.set_xlabel('')
ax1.set_xticklabels([]) #设置x轴图例为空值ax1.set_ylabel('kind')# 当center设置小于数据的均值时,生成的图片颜色要向0值代表的颜色一段偏移sns.heatmap(pt, linewidths = 0.05, ax = ax2, cmap=cmap, center=200)
ax2.set_title('center=3000')
ax2.set_xlabel('region')
ax2.set_ylabel('kind')
#robust的用法(颜色)f, (ax1,ax2) = plt.subplots(figsize = (6,4),nrows=2)

cmap = sns.cubehelix_palette(start = 1.5, rot = 3, gamma=0.8, as_cmap = True)

sns.heatmap(pt, linewidths = 0.05, ax = ax1, cmap=cmap, center=None, robust=False )
ax1.set_title('robust=False')
ax1.set_xlabel('')
ax1.set_xticklabels([]) #设置x轴图例为空值ax1.set_ylabel('kind')

sns.heatmap(pt, linewidths = 0.05, ax = ax2, cmap=cmap, center=None, robust=True )
ax2.set_title('robust=True')
ax2.set_xlabel('region')
ax2.set_ylabel('kind')
#annot(矩阵上数字),annot_kws(矩阵上数字的大小颜色字体)matplotlib包text类下的字体设置import numpy as np
np.random.seed(20180316)
x = np.random.randn(4, 4)

f, (ax1, ax2) = plt.subplots(figsize=(6,6),nrows=2)

sns.heatmap(x, annot=True, ax=ax1)

sns.heatmap(x, annot=True, ax=ax2, annot_kws={'size':9,'weight':'bold', 'color':'blue'})# Keyword arguments for ax.text when annot is True.  http://stackoverflow.com/questions/35024475/seaborn-heatmap-key-words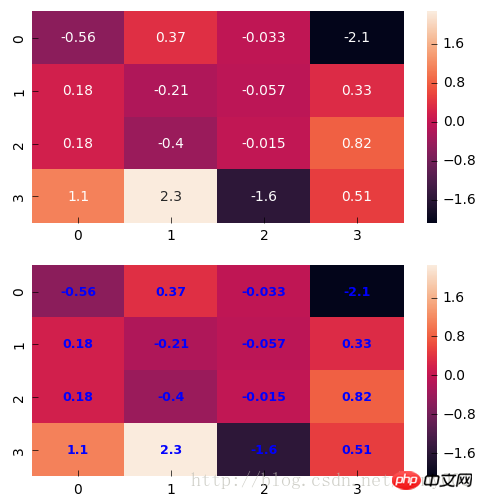
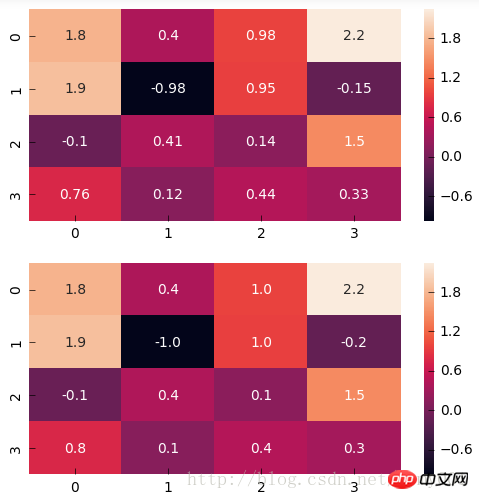
#fmt(字符串格式代码,矩阵上标识数字的数据格式,比如保留小数点后几位数字)import numpy as np
np.random.seed(0)
x = np.random.randn(4,4)

f, (ax1, ax2) = plt.subplots(figsize=(6,6),nrows=2)

sns.heatmap(x, annot=True, ax=ax1)

sns.heatmap(x, annot=True, fmt='.1f', ax=ax2)
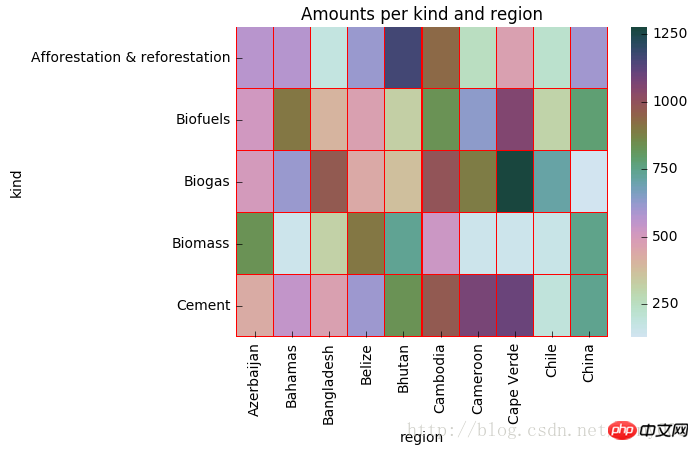
#linewidths(矩阵小块的间隔),linecolor(切分热力图矩阵小块的线的颜色)import matplotlib.pyplot as plt
f, ax = plt.subplots(figsize = (6,4))
cmap = sns.cubehelix_palette(start = 1, rot = 3, gamma=0.8, as_cmap = True)
sns.heatmap(pt, cmap = cmap, linewidths = 0.05, linecolor= 'red', ax = ax)
ax.set_title('Amounts per kind and region')
ax.set_xlabel('region')
ax.set_ylabel('kind')
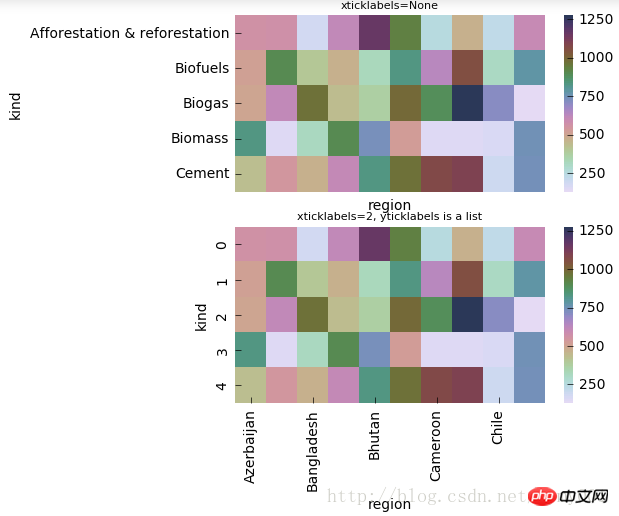
#xticklabels,yticklabels横轴和纵轴的标签名输出import matplotlib.pyplot as plt
f, (ax1,ax2) = plt.subplots(figsize = (5,5),nrows=2)

cmap = sns.cubehelix_palette(start = 1.5, rot = 3, gamma=0.8, as_cmap = True)

p1 = sns.heatmap(pt, ax=ax1, cmap=cmap, center=None, xticklabels=False)
ax1.set_title('xticklabels=None',fontsize=8)

p2 = sns.heatmap(pt, ax=ax2, cmap=cmap, center=None, xticklabels=2, yticklabels=list(range(5)))
ax2.set_title('xticklabels=2, yticklabels is a list',fontsize=8)
ax2.set_xlabel('region')
#mask对某些矩阵块的显示进行覆盖 f, (ax1,ax2) = plt.subplots(figsize = (5,5),nrows=2) cmap = sns.cubehelix_palette(start = 1.5, rot = 3, gamma=0.8, as_cmap = True) p1 = sns.heatmap(pt, ax=ax1, cmap=cmap, xticklabels=False, mask=None) ax1.set_title('mask=None') ax1.set_ylabel('kind') p2 = sns.heatmap(pt, ax=ax2, cmap=cmap, xticklabels=True, mask=(pt<800)) #mask对pt进行布尔型转化,结果为True的位置用白色覆盖 ax2.set_title('mask: boolean DataFrame') ax2.set_xlabel('region') ax2.set_ylabel('kind')
f,(ax1,ax2) = plt.subplots(figsize=(4,6),nrows=2)
x = np.array([[1,2,3],[2,0,1],[-1,-2,0]])
sns.heatmap(x, annot=True, ax=ax1)
sns.heatmap(x, mask=x < 1, ax=ax2, annot=True, annot_kws={"weight": "bold"})   #把小于1的区域覆盖掉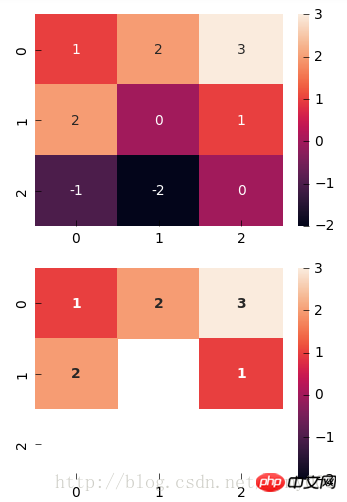
以上是python如何實現視覺化熱力學圖的詳細內容。更多資訊請關注PHP中文網其他相關文章!


