PyQt5每天必學之佈局管理
這篇文章主要為大家詳細介紹了PyQt5每天必學之佈局管理的相關資料,具有一定的參考價值,感興趣的小伙伴們可以參考一下
在GUI編程中有一個不容忽視的部分,那就是佈局管理。佈局管理掌控著我們的控制項在應用程式視窗如何擺放。佈局管理可以透過兩種方式來完成。我們可以使用絕對定位或佈局類別兩種方法來控製程式視窗中的控制項位置。
絕對定位
每個控制項會依照程式設計師指定的位置放置。當您使用絕對定位,我們要了解以下限制:
如果我們調整視窗的大小控制項的大小和位置保持不變
在不同平台上應用程式看起來可能會不同
更改字體可能會破壞應用程式的佈局
- ##如果決定改變佈局,我們必須每個控制項徹底的加以修改,這是繁瑣且耗時的
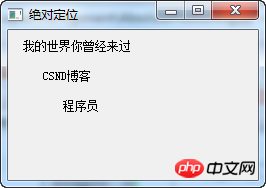
#!/usr/bin/python3
# -*- coding: utf-8 -*-

"""
PyQt5 教程

这个例子显示了在窗口中使用绝对定位的三个标签。

作者:我的世界你曾经来过
博客:http://blog.csdn.net/weiaitaowang
最后编辑:2016年7月31日
"""

import sys
from PyQt5.QtWidgets import QApplication, QWidget, QLabel

class Example(QWidget):

 def __init__(self):
  super().__init__()

  self.initUI()

 def initUI(self):

  lbl1 = QLabel('我的世界你曾经来过', self)
  lbl1.move(15, 10)

  lbl2 = QLabel('CSND博客', self)
  lbl2.move(35, 40)

  lbl3 = QLabel('程序员', self)
  lbl3.move(55, 70)

  self.setGeometry(300, 300, 250, 150)
  self.setWindowTitle('绝对定位')
  self.show()

if __name__ == '__main__':

 app = QApplication(sys.argv)
 ex = Example()
 sys.exit(app.exec_())
lbl1 = QLabel('我的世界你曾经来过', self)
lbl1.move(15, 10)

Box layout盒子佈局
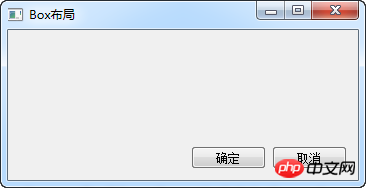
佈局管理使用佈局類別的方式更加靈活、實用。它是將一個控制項放在視窗中的首選方式。 QHBoxLayout和QVBoxLayout分別是水平和垂直對齊控制項的基本版面配置類別。 試想一下,我們希望把兩個按鈕在程式的右下角。要建立這樣一個佈局,我們可以使用一橫一縱兩個框。要創造必要的空餘空間,我們將增加一個拉伸因子(stretch factor)。#!/usr/bin/python3 # -*- coding: utf-8 -*- """ PyQt5 教程 在这个例子中,我们在窗口的右下角放置两个按钮。 作者:我的世界你曾经来过 博客:http://blog.csdn.net/weiaitaowang 最后编辑:2016年7月31日 """ import sys from PyQt5.QtWidgets import (QApplication, QWidget, QPushButton, QVBoxLayout, QHBoxLayout) class Example(QWidget): def __init__(self): super().__init__() self.initUI() def initUI(self): okButton = QPushButton('确定') cancelButton = QPushButton('取消') hbox = QHBoxLayout() hbox.addStretch(1) hbox.addWidget(okButton) hbox.addWidget(cancelButton) vbox = QVBoxLayout() vbox.addStretch(1) vbox.addLayout(hbox) self.setLayout(vbox) self.setGeometry(300, 300, 350, 150) self.setWindowTitle('Box布局') self.show() if __name__ == '__main__': app = QApplication(sys.argv) ex = Example() sys.exit(app.exec_())
okButton = QPushButton('确定')
 cancelButton = QPushButton('取消')
hbox = QHBoxLayout()
hbox.addStretch(1)
hbox.addWidget(okButton)
hbox.addWidget(cancelButton)
vbox = QVBoxLayout()
vbox.addStretch(1)
vbox.addLayout(hbox)
self.setLayout(vbox)

QGridLayout網格佈局
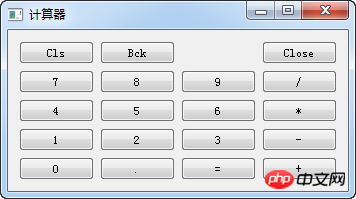
最常用的佈局類別是網格佈局。這種佈局將該空間分成行和列。要建立一個網格佈局,我們使用QGridLayout 的類別。#!/usr/bin/python3
# -*- coding: utf-8 -*-
"""
PyQt5 教程
在这个例子中,我们使用网格布局创建一个计算器的框架。
作者:我的世界你曾经来过
博客:http://blog.csdn.net/weiaitaowang
最后编辑:2016年7月31日
"""
import sys
from PyQt5.QtWidgets import (QApplication, QWidget,
QPushButton, QGridLayout)
class Example(QWidget):
def __init__(self):
super().__init__()
self.initUI()
def initUI(self):
grid = QGridLayout()
self.setLayout(grid)
 names = ['Cls', 'Bck', '', 'Close',
  '7', '8', '9', '/',
  '4', '5', '6', '*',
  '1', '2', '3', '-',
  '0', '.', '=', '+',]
positions = [(i, j) for i in range(5) for j in range(4)]
for position, name in zip(positions, names):

   if name == '':
    continue
   button = QPushButton(name)
   grid.addWidget(button, *position)
self.move(300, 150)
self.setWindowTitle('计算器')
self.show()
if __name__ == '__main__':
app = QApplication(sys.argv)
ex = Example()
sys.exit(app.exec_())grid = QGridLayout() self.setLayout(grid)
names = ['Cls', 'Bck', '', 'Close', '7', '8', '9', '/', '4', '5', '6', '*', '1', '2', '3', '-', '0', '.', '=', '+',]
positions = [(i, j) for i in range(5) for j in range(4)]
for position, name in zip(positions, names):
if name == '':
continue
button = QPushButton(name)
grid.addWidget(button, *position)
擴充網格佈局
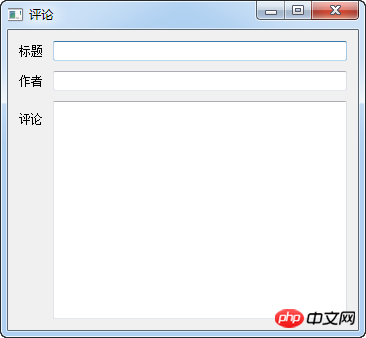
視窗中的控制項可以跨越網格中的多個列或行。在下面的例子中,我們說明這一點。#!/usr/bin/python3 # -*- coding: utf-8 -*- """ PyQt5 教程 在这个例子中,我们使用GridLayout的跨行创建了一个更复杂的窗口布局。 作者:我的世界你曾经来过 博客:http://blog.csdn.net/weiaitaowang 最后编辑:2016年7月31日 """ import sys from PyQt5.QtWidgets import (QApplication, QWidget, QLabel, QTextEdit, QLineEdit, QGridLayout) class Example(QWidget): def __init__(self): super().__init__() self.initUI() def initUI(self): title = QLabel('标题') author = QLabel('作者') review = QLabel('评论') titleEdit = QLineEdit() authorEdit = QLineEdit() reviewEdit = QTextEdit() grid =QGridLayout() grid.setSpacing(10) grid.addWidget(title, 1, 0) grid.addWidget(titleEdit, 1, 1) grid.addWidget(author, 2, 0) grid.addWidget(authorEdit, 2, 1) grid.addWidget(review, 3, 0) grid.addWidget(reviewEdit, 3, 1, 5, 1) self.setLayout(grid) self.setGeometry(300, 300, 350, 300) self.setWindowTitle('评论') self.show() if __name__ == '__main__': app = QApplication(sys.argv) ex = Example() sys.exit(app.exec_())
grid =QGridLayout()
grid.setSpacing(10)
grid.addWidget(reviewEdit, 3, 1, 5, 1)

#
以上是PyQt5每天必學之佈局管理的詳細內容。更多資訊請關注PHP中文網其他相關文章!

熱AI工具

Undresser.AI Undress
人工智慧驅動的應用程序,用於創建逼真的裸體照片

AI Clothes Remover
用於從照片中去除衣服的線上人工智慧工具。

Undress AI Tool
免費脫衣圖片

Clothoff.io
AI脫衣器

Video Face Swap
使用我們完全免費的人工智慧換臉工具,輕鬆在任何影片中換臉!

熱門文章

熱工具

記事本++7.3.1
好用且免費的程式碼編輯器

SublimeText3漢化版
中文版,非常好用

禪工作室 13.0.1
強大的PHP整合開發環境

Dreamweaver CS6
視覺化網頁開發工具

SublimeText3 Mac版
神級程式碼編輯軟體(SublimeText3)
 如何利用Redis實現分散式事務管理
Nov 07, 2023 pm 12:07 PM
如何利用Redis實現分散式事務管理引言:隨著網際網路的快速發展,分散式系統的使用越來越廣泛。在分散式系統中,事務管理是一項重要的挑戰。傳統的事務管理方式在分散式系統中難以實現,且效率低。而利用Redis的特性,我們可以輕鬆實現分散式事務管理,提高系統的效能和可靠性。一、Redis簡介Redis是一種基於記憶體的資料儲存系統,具有高效的讀寫效能和豐富的數據
 pyqt5怎麼安裝
Nov 30, 2023 pm 02:05 PM
pyqt5安裝步驟:1、確保電腦上已安裝Python和pip;2、在終端機或命令提示字元中輸入「pip install PyQt5」指令來安裝PyQt5;3、安裝完成後,可以在Python腳本中導入PyQt5模組並開始使用;4、可以輸入「pip install PyQt5.QtGui」指令來安裝一些特定功能或元件;5、遇到任何問題,可以嘗試升級pip和setuptools。
 如何實現Java中的學生成績管理功能?
Nov 04, 2023 pm 12:00 PM
如何實現Java中的學生成績管理功能?在現代教育系統中,學生成績管理是一項非常重要的任務。透過對學生成績的管理,學校能夠更好地監測學生的學習進度、了解他們的弱點和優勢,並根據這些資訊做出更有針對性的教學計劃。在這篇文章中,我們將討論如何使用Java程式語言來實現學生成績管理功能。首先,我們需要確定學生成績的資料結構。通常,學生成績可以被表示為一個包含學生訊息
 WordPress網頁錯位現象解決攻略
Mar 05, 2024 pm 01:12 PM
WordPress網頁錯位現象解決攻略在WordPress網站開發中,有時候我們會遇到網頁元素錯位的情況,這可能是由於不同裝置上的螢幕尺寸、瀏覽器相容性或CSS樣式設定不當所致。要解決這種錯位現象,我們需要仔細分析問題、找出可能的原因,並逐步進行除錯和修復。本文將分享一些常見的WordPress網頁錯位問題以及對應的解決攻略,同時提供具體的程式碼範例,幫助開
 如何使用HTML和CSS建立響應式輪播圖佈局
Oct 20, 2023 pm 04:24 PM
如何使用HTML和CSS建立一個響應式輪播圖佈局在現代的網頁設計中,輪播圖是一個常見的元素。它能夠吸引用戶的注意力,展示多個內容或圖片,並且能夠自動切換。在本文中,我們將介紹如何使用HTML和CSS建立一個響應式的輪播圖佈局。首先,我們需要建立一個基本的HTML結構,並且加入所需的CSS樣式。以下是一個簡單的HTML結構:<!DOCTYPEhtml&g
 win10右鍵選單管理打不開怎麼辦
Jan 04, 2024 pm 07:07 PM
我們在使用win10系統的時候,使用滑鼠去右鍵桌面或是右鍵選單的時候,發現選單等都打不開,無法正常的去使用電腦了,這時候就需要恢復系統來解決問題。 win10右鍵選單管理打不開:1、先開啟我們的控制面板,然後點選。 2、然後點選安全性和維護下的。 3.再點擊右側的來恢復系統即可。 4.如果還是無法使用,是看是否是滑鼠本身出了問題。 5.如果確定滑鼠沒有問題的話,按下+,輸入。 6.執行完畢後,重啟電腦即可。
 介紹win7裡的視窗排列方式
Dec 26, 2023 pm 04:37 PM
當我們同時開啟多個視窗時,win7具有將多個視窗以不同方式排列然後同時顯示的功能,能夠讓我們更清晰地查看到每個視窗的內容。那麼win7窗口排列方式有幾種呢,他們分別都是什麼樣的呢,下面就跟著小編一起來看一下吧。 win7視窗排列方式有幾種答案:三種,分別是層疊視窗、堆疊顯示視窗和並排顯示視窗。當我們開啟多個視窗時,可以右鍵點擊任務欄空白處。就可以看到三種視窗排列方式了。一、層疊視窗:二、堆疊顯示視窗:三、並排顯示視窗:
 CSS中contain的語法使用場景
Feb 21, 2024 pm 02:00 PM
CSS中contain的語法使用場景在CSS中,contain是一個有用的屬性,用於指定元素的內容是否獨立於其外部樣式和佈局。它可以幫助開發者更好地控制頁面佈局和優化效能。本文將介紹contain屬性的語法使用場景,並提供具體的程式碼範例。 contain屬性的語法如下:contain:layout|paint|size|style|'none'|'stric


