

PyQt實現介面翻轉切換效果

這篇文章主要為大家詳細介紹了PyQt實現界面翻轉切換效果,具有一定的參考價值,感興趣的小伙伴們可以參考一下
PyQt實現界面翻轉切換效果是用qt的場景功能來實現的,用到了QGraphicsView,QGraphicsLinearLayout,QGraphicsWidget等有關qt場景的函式庫。算是對qt場景的一個小小的嘗試,涉及內容不深,程序效果並是隨心所欲,需要去進一步的改善和提高。暫且先把程式碼貼在此處,供大家學習和指正。
工程包含四個類別:
介面A,TestMainWindow,用來作為翻轉效果的A面。
介面B,TestMainWindowTwo,用來作為翻轉效果的B面。
繪圖介面:TestGraphicWidget,用來繪製介面A和B。
主介面:MainWindow,是一個全螢幕的透明窗口,是整個效果展現的總舞台,內部包含一個QGraphicsScene和一個QGraphicsView,用來展示效果中的介面翻轉和介面替換。
整個效果的原理總結為幾點:
#首先,將整個效果所需的所有介面加入TestGraphicWidget中,在將TestGraphicWidget放入QGraphicsScene中,再經QGraphicsScene加入主介面。
然後,介面切換實現,兩個函數,非常簡單,要顯示A,就把B移除並隱藏,要顯示B,則把A移除並隱藏。
def setOne(self):
  self.twoWidget.hide()
  self.oneWidget.show()
  self.layout.removeItem(self.twoTestWidget)
  self.layout.addItem(self.oneTestWidget)
  self.view.update()

def setTwo(self):
  self.oneWidget.hide()
  self.twoWidget.show()
  self.layout.removeItem(self.oneTestWidget)
  self.layout.addItem(self.twoTestWidget)
  self.view.update()
然後是最重要的,翻轉效果的實現,用的是TestGraphicWidget特有的翻轉方法,參數可以根據實景情況調整。
def transeformR(self,count):
  r = self.form.boundingRect()
  for i in range(1,count):
    self.form.setTransform(QTransform()
                .translate(r.width() / 2, r.height() / 2)
                .rotate(91.00/count*i - 360 * 1, Qt.YAxis)
                .translate(-r.width() / 2, -r.height() / 2))
    self.waitMethod()
    self.view.update()

  self.form.setTransform(QTransform()
                .translate(r.width() / 2, r.height() / 2)
                .rotate(270 - 360 * 1, Qt.YAxis)
                .translate(-r.width() / 2, -r.height() / 2))
  self.view.update()
  if self.formflag %2 == 0:
    self.setOne()
  else:
    self.setTwo()

  for i in range(1,count):
    self.form.setTransform(QTransform()
                  .translate(r.width() / 2, r.height() / 2)
                  .rotate(270 + 93.00/count*i - 360 * 1, Qt.YAxis)
                  .translate(-r.width() / 2, -r.height() / 2))
    self.waitMethod()
self.view.update()而且提供了兩種讓程式等待但介面不會卡死的方法:
def sleep(self,msec):

  dieTime = QTime.currentTime().addMSecs(msec)

  print dieTime,QTime.currentTime()
  #a = 0
  while( QTime.currentTime() < dieTime ):
    #print "000000000000"
    QCoreApplication.processEvents(QEventLoop.AllEvents, 100)


def waitMethod(self):
  tt = QElapsedTimer()
  tt.start()

  q = QEventLoop()
  t = QTimer()
  t.setSingleShot(True)
  self.connect(t, SIGNAL("timeout()"), q.quit)
  t.start(1)  # 5s timeout
  q.exec_()
  if(t.isActive()):
    t.stop()
  else:
    pass

print tt.elapsed()下面黏上原始碼,供參考,這個原始碼可以直接運行,內部的偵錯資訊可以忽略:
#coding:utf-8
'''''
Created on 2015 7 15
@author: guowu
'''
from PyQt4.QtGui import QWidget, QTextEdit, QPushButton, QGraphicsScene,\
QGraphicsWidget, QGraphicsLinearLayout, QGraphicsView, QApplication,\
QTransform, QHBoxLayout, QPainter, QLabel, QGraphicsLayoutItem, QFont,\
QPixmap, QBrush
from PyQt4.QtCore import Qt, QTime, QCoreApplication, QEventLoop, QObject,\
SIGNAL, QPoint, QTimer, QBasicTimer, QElapsedTimer, QPointF
import sys
import time
class TestGraphicWidget(QGraphicsWidget):
def __init__(self,parent=None):
super(TestGraphicWidget,self).__init__(parent)
self.setWindowFlags(Qt.Window)
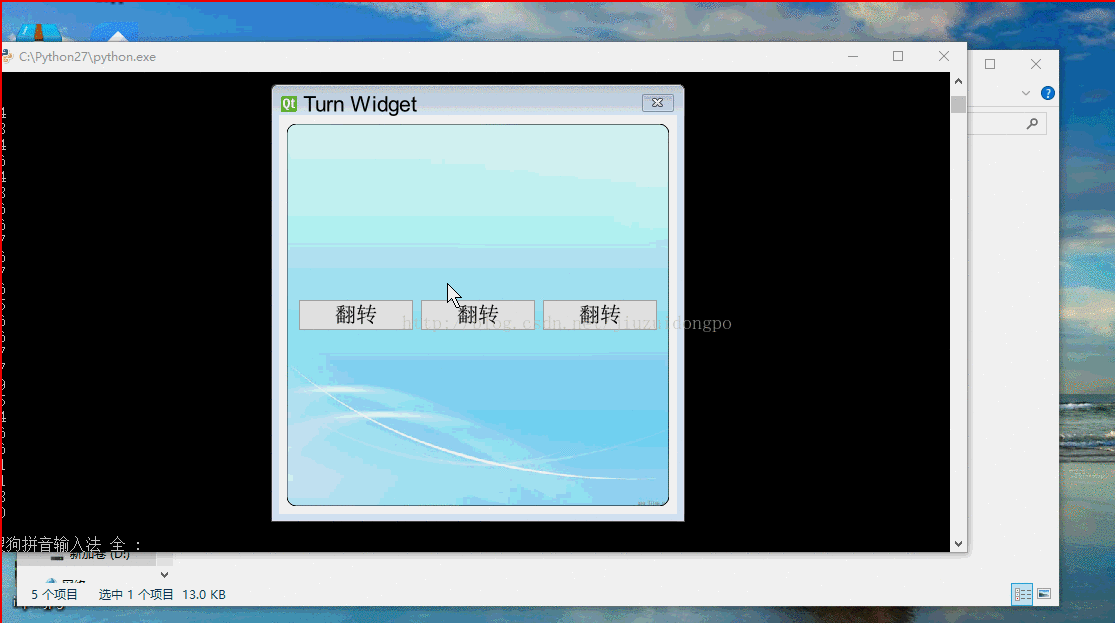
self.setWindowTitle("Turn Widget")
self.resize(400,400)
#self.setPos(QPoint(0,0))
self.mousePressed = False
def closeEvent(self,event):
print "closeclosetest"
self.emit(SIGNAL("startTurn"))
def mouseMoveEvent(self, event):
print "move move"
if self.mousePressed:
#self.move(self.pos() + event.pos() - self.currentPos)
self.setPos(self.pos() + event.pos() - self.currentPos)
def mousePressEvent(self, event):
if event.buttons() == Qt.LeftButton:
self.currentPos = event.pos()
self.mousePressed = True
class TestMainWindow(QWidget):
def __init__(self,parent=None):
super(TestMainWindow,self).__init__(parent)
#self.setStyleSheet("background: transparent;border:0px;")
self.setAttribute(Qt.WA_TranslucentBackground,True)
self.firstButton = QPushButton(u"翻转")
self.secondButton = QPushButton(u"翻转")
self.thirdButton = QPushButton(u"翻转")
self.mainLayout = QHBoxLayout(self)
self.mainLayout.addWidget(self.firstButton)
self.mainLayout.addWidget(self.secondButton)
self.mainLayout.addWidget(self.thirdButton)
self.connect(self.firstButton, SIGNAL("clicked()"), self.startTurn)
self.connect(self.secondButton, SIGNAL("clicked()"), self.startTurn)
self.connect(self.thirdButton, SIGNAL("clicked()"), self.startTurn)
def startTurn(self):
self.emit(SIGNAL("buttonclicked"))
def closeEvent(self,event):
print "closeclosetest"
self.emit(SIGNAL("startTurn"))
def paintEvent(self,event):
#print "paintevent"
painter = QPainter(self)
painter.setRenderHint(QPainter.SmoothPixmapTransform, True)#像素光滑
painter.setRenderHint(QPainter.Antialiasing, True)#反锯齿
pix = QPixmap("cloud-bak.jpg").scaled(self.width(),self.height())
painter.setBrush(QBrush(pix))
painter.drawRoundRect(self.rect(),5,5)
class TestMainWindowTwo(QWidget):
def __init__(self,parent=None):
super(TestMainWindowTwo,self).__init__(parent)
#self.setStyleSheet("QWidget{background: transparent;border:0px;}")
self.setAttribute(Qt.WA_TranslucentBackground,True)
self.firstButton = QPushButton(u"p翻转")
self.secondButton = QPushButton(u"p翻转")
self.thirdButton = QPushButton(u"p翻转")
self.mainLayout = QHBoxLayout(self)
self.mainLayout.addWidget(self.firstButton)
self.mainLayout.addWidget(self.secondButton)
self.mainLayout.addWidget(self.thirdButton)
self.connect(self.firstButton, SIGNAL("clicked()"), self.startTurn)
self.connect(self.secondButton, SIGNAL("clicked()"), self.startTurn)
self.connect(self.thirdButton, SIGNAL("clicked()"), self.startTurn)
def startTurn(self):
self.emit(SIGNAL("buttonclicked"))
def paintEvent(self,event):
#print "paintevent"
painter = QPainter(self)
painter.setRenderHint(QPainter.SmoothPixmapTransform, True)#像素光滑
painter.setRenderHint(QPainter.Antialiasing, True)#反锯齿
pix = QPixmap("login.jpg").scaled(self.width(),self.height())
painter.setBrush(QBrush(pix))
painter.drawRoundRect(self.rect(),5,5)
class MainWindow(QWidget):
def __init__(self,parent=None):
super(MainWindow,self).__init__(parent)
#self.setStyleSheet("QGraphicsView{background:rgb(0,0,0,0);border:0px;}")
self.formflag = 0
self.scene = QGraphicsScene()
self.setWindowFlags(Qt.FramelessWindowHint|Qt.WindowStaysOnTopHint)
self.setAttribute(Qt.WA_TranslucentBackground,True)
#创建部件,并关联它们的信号和槽
self.oneWidget = TestMainWindow()
self.connect(self.oneWidget, SIGNAL("buttonclicked"),self.startTurn)
self.twoWidget = TestMainWindowTwo()
self.connect(self.twoWidget, SIGNAL("buttonclicked"),self.startTurn)
#self.textEdit = QGraphicsLayoutItem(self.edit)
self.oneTestWidget = self.scene.addWidget(self.oneWidget)
self.twoTestWidget = self.scene.addWidget(self.twoWidget)
self.form = TestGraphicWidget()
self.connect(self.form, SIGNAL("startTurn"),self.close)
#将部件添加到布局管理器中
self.layout = QGraphicsLinearLayout(self.form)
self.layout.setSpacing(0)
self.layout.addItem(self.oneTestWidget)
self.layout.addItem(self.twoTestWidget)
self.layout.removeItem(self.twoTestWidget)
self.twoWidget.hide()
#创建图形部件,设置其为一个顶层窗口,然后在其上应用布局
#self.form.setWindowFlags(Qt.Window|Qt.FramelessWindowHint)
#self.form.setWindowTitle("Widget Item")
#self.form.setLayout(layout)
self.scene.addItem(self.form)
#self.form.setPos(QPointF(0,0))
#self.form.hide()
self.view = QGraphicsView(self.scene,self)
#self.view.setScene(self.scene)
self.view.setRenderHint(QPainter.Antialiasing)
self.view.setViewportUpdateMode(QGraphicsView.BoundingRectViewportUpdate)
self.view.resize(QApplication.desktop().width(),QApplication.desktop().height())
self.view.setStyleSheet("background: transparent;border:0px;")
self.view.setWindowFlags(Qt.FramelessWindowHint)
self.view.setHorizontalScrollBarPolicy(Qt.ScrollBarAlwaysOff)
self.view.setVerticalScrollBarPolicy(Qt.ScrollBarAlwaysOff)
self.view.move(QPoint(0,0))
#self.view.setAttribute(Qt.WA_TranslucentBackground,True)
#self.form.resize(500,500)
#self.form.setWindowFlags(Qt.FramelessWindowHint)
#for(int i=1;i<=360;i++)
def setOne(self):
self.twoWidget.hide()
self.oneWidget.show()
self.layout.removeItem(self.twoTestWidget)
self.layout.addItem(self.oneTestWidget)
self.view.update()
def setTwo(self):
self.oneWidget.hide()
self.twoWidget.show()
self.layout.removeItem(self.oneTestWidget)
self.layout.addItem(self.twoTestWidget)
self.view.update()
def transeformT(self,count):
r = self.form.boundingRect()
for i in range(1,count):
print "............."
self.form.setTransform(QTransform()
.translate(r.width() / 2, r.height() / 2)
.rotate(364.00/count*i - 360 * 1, Qt.YAxis)
.translate(-r.width() / 2, -r.height() / 2))
self.waitMethod()
#self.sleep(1)
#time.sleep(1)
self.view.update()
#
def transeformS(self,count):
r = self.form.boundingRect()
for i in range(1,count):
print "............."
self.form.setTransform(QTransform()
.translate(r.width() / 2, r.height() / 2)
.rotate(182.00/count*i - 360 * 1, Qt.YAxis)
.translate(-r.width() / 2, -r.height() / 2))
self.waitMethod()
self.view.update()
def transeformR(self,count):
r = self.form.boundingRect()
for i in range(1,count):
print "............."
self.form.setTransform(QTransform()
.translate(r.width() / 2, r.height() / 2)
.rotate(91.00/count*i - 360 * 1, Qt.YAxis)
.translate(-r.width() / 2, -r.height() / 2))
self.waitMethod()
self.view.update()
self.form.setTransform(QTransform()
.translate(r.width() / 2, r.height() / 2)
.rotate(270 - 360 * 1, Qt.YAxis)
.translate(-r.width() / 2, -r.height() / 2))
self.view.update()
if self.formflag %2 == 0:
self.setOne()
else:
self.setTwo()
for i in range(1,count):
self.form.setTransform(QTransform()
.translate(r.width() / 2, r.height() / 2)
.rotate(270 + 93.00/count*i - 360 * 1, Qt.YAxis)
.translate(-r.width() / 2, -r.height() / 2))
self.waitMethod()
self.view.update()
def transeformB(self,count):
r = self.form.boundingRect()
for i in range(1,count):
print "............."
self.form.setTransform(QTransform()
.translate(r.width(), r.height())
.rotate(91.00/count*i - 360 * 1, Qt.YAxis)
.translate(-r.width(), -r.height()))
self.waitMethod()
self.view.update()
self.form.setTransform(QTransform()
.translate(r.width(), r.height())
.rotate(270 - 360 * 1, Qt.YAxis)
.translate(-r.width(), -r.height()))
self.view.update()
for i in range(1,count):
self.form.setTransform(QTransform()
.translate(r.width(), r.height())
.rotate(270 + 93.00/count*i - 360 * 1, Qt.YAxis)
.translate(-r.width(), -r.height()))
self.waitMethod()
self.view.update()
def transeform(self):
print self.form.pos()
#self.scene.itemAt(QPointF)
rxx = self.scene.itemsBoundingRect()
rx = self.form.boundingRect()
r = self.form.geometry()
print r,rx,rxx
for i in range(1,361):
print self.form.pos()
print "............."
#print r.width(),r.height()
transform = QTransform()
transform.translate(r.width() / 2, r.height()/2)#中心点,原点
transform.rotate(i - 360 * 1, Qt.YAxis)#绕X轴旋转角度
self.form.setTransform(transform)
# self.form.setTransform(QTransform()
# .translate(r.width() / 2, r.height() / 2)
# .rotate(i - 360 * 1, Qt.YAxis)
# .translate(-r.width() / 2, -r.height() / 2))
# self.form.setTransform(QTransform()
# .translate(250, 250)
# .rotate(i - 360 * 1, Qt.YAxis)
# .translate(-250, -250))
self.waitMethod()
self.view.update()
#
def startTurn(self):
self.formflag += 1
self.transeformR(30)
#self.transeform()
#self.form.close()
#self.view.close()
def closeEvent(self,event):
print "close"
self.form.close()
self.view.close()
self.close()
def sleep(self,msec):
dieTime = QTime.currentTime().addMSecs(msec)
print dieTime,QTime.currentTime()
#a = 0
while( QTime.currentTime() < dieTime ):
#print "000000000000"
QCoreApplication.processEvents(QEventLoop.AllEvents, 100)
def waitMethod(self):
tt = QElapsedTimer()
tt.start()
q = QEventLoop()
t = QTimer()
t.setSingleShot(True)
self.connect(t, SIGNAL("timeout()"), q.quit)
t.start(1) # 5s timeout
q.exec_()
if(t.isActive()):
t.stop()
else:
pass
print tt.elapsed()
if __name__ == "__main__":
app = QApplication(sys.argv)
font = QFont()
font.setPointSize(16)
font.setFamily(("Roman Times"))
app.setFont(font)
c = MainWindow()
c.show()
c.move(QPoint(0,0))
app.exec_()相關推薦:
#
以上是PyQt實現介面翻轉切換效果的詳細內容。更多資訊請關注PHP中文網其他相關文章!

熱AI工具

Undresser.AI Undress
人工智慧驅動的應用程序,用於創建逼真的裸體照片

AI Clothes Remover
用於從照片中去除衣服的線上人工智慧工具。

Undress AI Tool
免費脫衣圖片

Clothoff.io
AI脫衣器

Video Face Swap
使用我們完全免費的人工智慧換臉工具,輕鬆在任何影片中換臉!

熱門文章
熱工具

記事本++7.3.1
好用且免費的程式碼編輯器

SublimeText3漢化版
中文版,非常好用

禪工作室 13.0.1
強大的PHP整合開發環境

Dreamweaver CS6
視覺化網頁開發工具

SublimeText3 Mac版
神級程式碼編輯軟體(SublimeText3)


 解決Pyqt5安裝報錯的最佳方法揭示!
Jan 04, 2024 am 10:26 AM
解決Pyqt5安裝報錯的最佳方法揭示!
Jan 04, 2024 am 10:26 AM
Pyqt5安裝報錯?快速解決方法大揭秘! PyQt5是一款受歡迎的PythonGUI開發工具包,許多開發者喜歡使用它來創建漂亮的圖形使用者介面。然而,在安裝PyQt5時,有時候會遇到一些報錯。本文將介紹一些常見的PyQt5安裝報錯,並提供解決方法,幫助您順利安裝PyQt5。報錯:「Nomodulenamed'PyQt5'」這個錯誤通常是因為PyQt5模組
 win11家庭版切換專業版操作教學_win11家庭版切換專業版操作教學
Mar 20, 2024 pm 01:58 PM
win11家庭版切換專業版操作教學_win11家庭版切換專業版操作教學
Mar 20, 2024 pm 01:58 PM
Win11家庭版怎麼轉換成Win11專業版?在Win11系統中,分為了家庭版、專業版、企業版等,而大部分Win11筆電都是預先安裝Win11家用版系統。而今天小編就帶給大家win11家庭版切換專業版操作步驟!1、先在win11桌面此電腦上右鍵屬性。 2、點選更改產品金鑰或升級windows。 3、然後進入後點選更改產品金鑰。 4.再輸入啟動金鑰:8G7XN-V7YWC-W8RPC-V73KB-YWRDB,選擇下一步。 5.接著就會提示成功,這樣就可以將win11家用版升級win11專業版了。
 小米14Ultra如何切換4g和5g?
Feb 23, 2024 am 11:49 AM
小米14Ultra如何切換4g和5g?
Feb 23, 2024 am 11:49 AM
小米14Ultra是今年小米中非常火熱的機型之一,小米14Ultra不僅升級了處理器以及各種配置,而且還為用戶們帶來了很多新的功能應用,從小米14Ultra銷售就可以看出來手機的火爆程度,不過有一些常用的功能可能你還沒了解。那麼小米14Ultra如何切換4g和5g呢?下面小編就來為大家介紹一下具體的內容吧!小米14Ultra怎麼換4g和5g? 1.打開手機的設定選單。 2、設定選單中尋找並選擇「網路」、「行動網路」的選項。 3.在行動網路設定中,會看到「首選網路類型」選項。 4、點選或選擇該選項,會看到
 快速解決pyqt5安裝錯誤的步驟指南
Jan 19, 2024 am 09:32 AM
快速解決pyqt5安裝錯誤的步驟指南
Jan 19, 2024 am 09:32 AM
如果你正在學習Python並且想要開發GUI應用程序,那麼PyQt5是一個非常好的選擇。它是Python下PyQt函式庫的一個綁定版本,可以非常方便地實現對Qt圖形函式庫的呼叫和開發。不過,有時候你可能會在安裝PyQt5時遇到一些問題。本指南將為你提供一些快速解決安裝報錯問題的步驟,同時具體附上程式碼實例。確保Python版本正確PyQt5是基於Python的函式庫,因此首
 pyqt5安裝錯誤的解決方案詳解
Jan 19, 2024 am 09:37 AM
pyqt5安裝錯誤的解決方案詳解
Jan 19, 2024 am 09:37 AM
pyqt5安裝錯誤的解決方案詳解,附具體程式碼範例引言:PyQt5是一款強大且受歡迎的PythonGUI圖形介面開發工具。安裝PyQt5時,常常會遇到一些報錯,這給開發者帶來了許多困擾。本文將詳細介紹幾種常見的PyQt5安裝錯誤及對應的解決方案,並附上程式碼範例供參考。一、安裝報錯:Command"pythonsetup.pyegg_info"faile
 pyqt5安裝錯誤的常見問題及解決方法
Jan 19, 2024 am 10:00 AM
pyqt5安裝錯誤的常見問題及解決方法
Jan 19, 2024 am 10:00 AM
隨著Python的流行,PyQt5成為了許多人快速進行GUI開發的首選工具之一,但是,安裝問題也是不可避免的。以下是幾個PyQt5安裝的常見問題及其解決方法。 PyQt5安裝時報錯提示找不到sip模組的解決方法這個問題通常在使用pip安裝PyQt5時出現。這個錯誤的原因是缺少sip模組的依賴,所以需要先手動安裝sip模組。命令列輸入以下程式碼:pipinsta
 Win10系統如何實現雙系統切換
Jan 03, 2024 pm 05:41 PM
Win10系統如何實現雙系統切換
Jan 03, 2024 pm 05:41 PM
很多朋友剛接觸win系統的時候可能用不習慣,電腦裡存雙系統,這時候其實是可以雙系統切換的,下面就一起來看看兩個系統切換的詳細步驟吧。 win10系統如何兩個系統切換方法一、快捷鍵切換1、按下“win”+“R”鍵開啟運行2、在運行框中輸入“msconfig”點擊“確定”3、在打開的“系統配置”介面中選擇自己需要的系統點擊“設為預設值”,完成後“重新啟動”即可完成切換方法二、開機時選擇切換1、擁有雙系統時開機會出現一個選擇操作介面,可以使用鍵盤“上下”鍵進行選擇系統
 切換蘋果電腦雙系統啟動方式
Feb 19, 2024 pm 06:50 PM
切換蘋果電腦雙系統啟動方式
Feb 19, 2024 pm 06:50 PM
蘋果雙系統開機怎麼切換蘋果電腦作為一款功能強大的設備,除了搭載自家的macOS作業系統外,也可以選擇安裝其他作業系統,例如Windows,從而實現雙系統的切換。那麼在開機時,我們要如何切換這兩個系統呢?本文就來為大家介紹一下在蘋果電腦上如何實現雙系統的切換。首先,在安裝雙系統之前,我們需要確認自己的蘋果電腦是否支援雙系統切換。一般來說,蘋果電腦都是基於
