

jQuery實作某入口網站導覽頁圖片拖曳排序
這次帶給大家jQuery實作某入口網站導覽頁圖片拖曳排序,jQuery實作某入口網站導覽頁圖片拖曳排序的注意事項有哪些,以下就是實戰案例,一起來看一下。

小提示:瀏覽器中如果無法正常執行,可以嘗試切換瀏覽模式。
為大家分享的360導航頁圖示拖曳排序效果代碼如下
<!DOCTYPE html PUBLIC "-//W3C//DTD XHTML 1.0 Transitional//EN" "http://www.w3.org/TR/xhtml1/DTD/xhtml1-transitional.dtd">
<html xmlns="http://www.w3.org/1999/xhtml">
<head>
<meta http-equiv="Content-Type" content="text/html; charset=utf-8" />
<title>图标拖动排序效果代码</title>
<script src="js/jq.js"></script>
<script>
$(function() {
function Pointer(x, y) {
this.x = x ;
this.y = y ;
}
function Position(left, top) {
this.left = left ;
this.top = top ;
}
$(".item_content .item").each(function(i) {
this.init = function() { // 初始化
this.box = $(this).parent() ;
$(this).attr("index", i).css({
position : "absolute",
left : this.box.offset().left,
top : this.box.offset().top
}).appendTo(".item_content") ;
this.drag() ;
},
this.move = function(callback) { // 移动
$(this).stop(true).animate({
left : this.box.offset().left,
top : this.box.offset().top
}, 500, function() {
if(callback) {
callback.call(this) ;
}
}) ;
},
this.collisionCheck = function() {
var currentItem = this ;
var direction = null ;
$(this).siblings(".item").each(function() {
if(
currentItem.pointer.x > this.box.offset().left &&
currentItem.pointer.y > this.box.offset().top &&
(currentItem.pointer.x < this.box.offset().left + this.box.width()) &&
(currentItem.pointer.y < this.box.offset().top + this.box.height())
) {
// 返回对象和方向
if(currentItem.box.offset().top < this.box.offset().top) {
direction = "down" ;
} else if(currentItem.box.offset().top > this.box.offset().top) {
direction = "up" ;
} else {
direction = "normal" ;
}
this.swap(currentItem, direction) ;
}
}) ;
},
this.swap = function(currentItem, direction) { // 交换位置
if(this.moveing) return false ;
var directions = {
normal : function() {
var saveBox = this.box ;
this.box = currentItem.box ;
currentItem.box = saveBox ;
this.move() ;
$(this).attr("index", this.box.index()) ;
$(currentItem).attr("index", currentItem.box.index()) ;
},
down : function() {
// 移到上方
var box = this.box ;
var node = this ;
var startIndex = currentItem.box.index() ;
var endIndex = node.box.index(); ;
for(var i = endIndex; i > startIndex ; i--) {
var prevNode = $(".item_content .item[index="+ (i - 1) +"]")[0] ;
node.box = prevNode.box ;
$(node).attr("index", node.box.index()) ;
node.move() ;
node = prevNode ;
}
currentItem.box = box ;
$(currentItem).attr("index", box.index()) ;
},
up : function() {
// 移到上方
var box = this.box ;
var node = this ;
var startIndex = node.box.index() ;
var endIndex = currentItem.box.index(); ;
for(var i = startIndex; i < endIndex; i++) {
var nextNode = $(".item_content .item[index="+ (i + 1) +"]")[0] ;
node.box = nextNode.box ;
$(node).attr("index", node.box.index()) ;
node.move() ;
node = nextNode ;
}
currentItem.box = box ;
$(currentItem).attr("index", box.index()) ;
}
}
directions[direction].call(this) ;
},
this.drag = function() { // 拖拽
var oldPosition = new Position() ;
var oldPointer = new Pointer() ;
var isDrag = false ;
var currentItem = null ;
$(this).mousedown(function(e) {
e.preventDefault() ;
oldPosition.left = $(this).position().left ;
oldPosition.top = $(this).position().top ;
oldPointer.x = e.clientX ;
oldPointer.y = e.clientY ;
isDrag = true ;
currentItem = this ;
}) ;
$(document).mousemove(function(e) {
var currentPointer = new Pointer(e.clientX, e.clientY) ;
if(!isDrag) return false ;
$(currentItem).css({
"opacity" : "0.8",
"z-index" : 999
}) ;
var left = currentPointer.x - oldPointer.x + oldPosition.left ;
var top = currentPointer.y - oldPointer.y + oldPosition.top ;
$(currentItem).css({
left : left,
top : top
}) ;
currentItem.pointer = currentPointer ;
// 开始交换位置
currentItem.collisionCheck() ;
}) ;
$(document).mouseup(function() {
if(!isDrag) return false ;
isDrag = false ;
currentItem.move(function() {
$(this).css({
"opacity" : "1",
"z-index" : 0
}) ;
}) ;
}) ;
}
this.init() ;
}) ;
}) ;
</script>
<style>
.item_content ul {
list-style:none;
}
.item_content ul li {
width:200px;
height:120px;
float:left;
margin:10px
}
.item_content {
width:740px;
height:460px;
border:1px solid #ccc;
margin:0 auto;
}
.item_content .item {
width:200px;
height:120px;
line-height:120px;
text-align:center;
cursor:pointer;
background:#ccc;
}
.item_content .item img {
width:200px;
height:120px;
border-radius:6px;
}
</style>
</head>
<body>
<p class="item_container">
<p class="item_content">
<ul>
<li>
<p class="item">
<img src="images/youku.png" />
</p>
</li>
<li>
<p class="item">
<img src="images/jd.png" />
</p>
</li>
<li>
<p class="item">
<img src="images/taobao.png" />
</p>
</li>
<li>
<p class="item">
<img src="images/fenghuan.png" />
</p>
</li>
<li>
<p class="item">
<img src="images/souhu.png" />
</p>
</li>
<li>
<p class="item">
<img src="images/wangyi.png" />
</p>
</li>
<li>
<p class="item">
<img src="images/renren.png" />
</p>
</li>
<li>
<p class="item">
<img src="images/360.png" />
</p>
</li>
<li>
<p class="item">
<img src="images/360game.png" />
</p>
</li>
</ul>
</p>
</p>
<p style="text-align:center;margin:50px 0; font:normal 14px/24px 'MicroSoft YaHei';">
<p>适用浏览器:IE8、360、FireFox、Chrome、Safari、Opera、傲游、搜狗、世界之窗. </p>
</p>
</body>
</html>相信看了本文案例你已經掌握了方法,更多精彩請關注php中文網其它相關文章!
推薦閱讀:
以上是jQuery實作某入口網站導覽頁圖片拖曳排序的詳細內容。更多資訊請關注PHP中文網其他相關文章!

熱AI工具

Undresser.AI Undress
人工智慧驅動的應用程序,用於創建逼真的裸體照片

AI Clothes Remover
用於從照片中去除衣服的線上人工智慧工具。

Undress AI Tool
免費脫衣圖片

Clothoff.io
AI脫衣器

Video Face Swap
使用我們完全免費的人工智慧換臉工具,輕鬆在任何影片中換臉!

熱門文章
熱工具

記事本++7.3.1
好用且免費的程式碼編輯器

SublimeText3漢化版
中文版,非常好用

禪工作室 13.0.1
強大的PHP整合開發環境

Dreamweaver CS6
視覺化網頁開發工具

SublimeText3 Mac版
神級程式碼編輯軟體(SublimeText3)


 小紅書發布自動儲存圖片怎麼解決?發布自動保存圖片在哪裡?
Mar 22, 2024 am 08:06 AM
小紅書發布自動儲存圖片怎麼解決?發布自動保存圖片在哪裡?
Mar 22, 2024 am 08:06 AM
隨著社群媒體的不斷發展,小紅書已經成為越來越多年輕人分享生活、發現美好事物的平台。許多用戶在發布圖片時遇到了自動儲存的問題,這讓他們感到十分困擾。那麼,如何解決這個問題呢?一、小紅書發布自動儲存圖片怎麼解決? 1.清除快取首先,我們可以嘗試清除小紅書的快取資料。步驟如下:(1)開啟小紅書,點選右下角的「我的」按鈕;(2)在個人中心頁面,找到「設定」並點選;(3)向下捲動,找到「清除快取」選項,點擊確認。清除快取後,重新進入小紅書,嘗試發布圖片看是否解決了自動儲存的問題。 2.更新小紅書版本確保你的小
 抖音評論裡怎麼發圖片?評論區圖片入口在哪裡?
Mar 21, 2024 pm 09:12 PM
抖音評論裡怎麼發圖片?評論區圖片入口在哪裡?
Mar 21, 2024 pm 09:12 PM
隨著抖音短影片的火爆,用戶們在留言區互動變得更加豐富多彩。有些用戶希望在評論中分享圖片,以便更好地表達自己的觀點或情感。那麼,抖音評論裡怎麼發圖片呢?本文將為你詳細解答這個問題,並為你提供一些相關的技巧和注意事項。一、抖音評論裡怎麼發圖片? 1.開啟抖音:首先,你需要開啟抖音APP,並登入你的帳號。 2.找到評論區:瀏覽或發布短影片時,找到想要評論的地方,點擊「評論」按鈕。 3.輸入評論內容:在留言區輸入你的評論內容。 4.選擇傳送圖片:在輸入評論內容的介面,你會看到一個「圖片」按鈕或「+」號按鈕,點
 ppt怎麼讓圖片一張一張出來
Mar 25, 2024 pm 04:00 PM
ppt怎麼讓圖片一張一張出來
Mar 25, 2024 pm 04:00 PM
在PowerPoint中,讓圖片逐一顯示是常用的技巧,可以透過設定動畫效果來實現。本指南詳細介紹了實現此技巧的步驟,包括基本設定、圖片插入、新增動畫、調整動畫順序和時間。此外,還提供了進階設定和調整,例如使用觸發器、調整動畫速度和順序,以及預覽動畫效果。透過遵循這些步驟和技巧,使用者可以輕鬆地在PowerPoint中設定圖片逐一出現,從而提升簡報的視覺效果並吸引觀眾的注意力。
 在 iPhone 上讓圖片更清晰的 6 種方法
Mar 04, 2024 pm 06:25 PM
在 iPhone 上讓圖片更清晰的 6 種方法
Mar 04, 2024 pm 06:25 PM
Apple最近的iPhone可以透過清晰的細節、飽和度和亮度來捕捉回憶。但有時,您可能會遇到一些問題,這些問題可能會導致影像看起來不那麼清晰。儘管iPhone相機上的自動對焦已經取得了長足的進步,可以讓您快速拍照,但相機在某些情況下可能會錯誤地對焦錯誤的拍攝對象,從而使照片在不需要的區域更加模糊。如果iPhone上的照片看起來失焦或整體缺乏清晰度,以下貼文應該可以幫助您使它們更清晰。如何在iPhone上讓圖片更清晰[6種方法]您可以嘗試使用本機的「照片」應用程式來清理照片。如果您需要更多功能和選項
 網頁圖片載入不出來怎麼辦? 6種解決辦法
Mar 15, 2024 am 10:30 AM
網頁圖片載入不出來怎麼辦? 6種解決辦法
Mar 15, 2024 am 10:30 AM
有網友發現打開瀏覽器網頁,網頁上的圖片遲遲加載不出來,是怎麼回事?檢查過網路是正常的,那是哪裡出現了問題呢?下面小編就來跟大家介紹一下網頁圖片載入不出來的六種解決方法。網頁圖片載入不出來: 1、網速問題網頁顯示不出圖片有可能是因為電腦的網路速度比較慢,電腦中開啟的軟體比較多, 而我們造訪的圖片比較大,這就可能因為載入逾時,導致圖片顯示不出來, 可以將比較佔網速的軟體將關掉,可以去任務管理器查看一下。 2、造訪人數過多 網頁顯示不出圖片還有可能是因為我們造訪的網頁,在同時段造訪的
 wps文檔中兩張圖片怎麼並排
Mar 20, 2024 pm 04:00 PM
wps文檔中兩張圖片怎麼並排
Mar 20, 2024 pm 04:00 PM
在使用wps辦公室軟體時,我們發現不單單只用一種形式,文字裡會加入表格和圖片,表格裡也可以加入圖片等等,這些都是合併使用的,讓整個文件的內容看起來更豐富,如果需要在文件中插入兩張圖片,而且需要並排排列。我們接下來的課程就可以解決這個問題:wps文件中兩張圖片怎麼並排。 1.首先要開啟WPS軟體,找到你想要調整的圖片。左鍵點擊圖片會彈出一個選單欄,選擇「頁面佈局」。 2、在文字環繞中選擇「緊密型環繞」。 3.當需要的圖片都確認設定為「緊密型文字環繞」之後,便可以把圖片隨意拖動到合適的位置,點擊第一張圖片
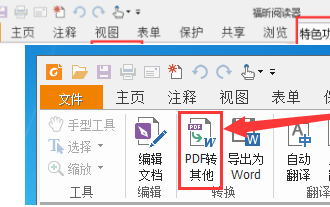 福昕PDF閱讀器如何將pdf文件轉成jpg圖片-福昕PDF閱讀器將pdf文件轉成jpg圖片的方法
Mar 04, 2024 pm 05:49 PM
福昕PDF閱讀器如何將pdf文件轉成jpg圖片-福昕PDF閱讀器將pdf文件轉成jpg圖片的方法
Mar 04, 2024 pm 05:49 PM
你們是不是也在使用福昕PDF閱讀器軟體呢?那麼你們知道福昕PDF閱讀器如何將pdf文檔轉成jpg圖片嗎?下面這篇文章就為大夥帶來了福昕PDF閱讀器將pdf文檔轉成jpg圖片的方法,有興趣的夥伴們快來下文看看吧。先啟動福昕PDF閱讀器,接著在頂部工具列找到“特色功能”,然後選擇“PDF轉其他”功能。在接下來,開啟一個名為「福昕pdf線上轉換」的網頁。在頁面上方右側點選「登入」按鈕進行登錄,然後開啟「PDF轉圖片」功能。之後點擊上傳按鈕並將想要轉換成圖片的pdf檔加入進來,加入完畢後點擊「開始轉
 jQuery中如何使用PUT請求方式?
Feb 28, 2024 pm 03:12 PM
jQuery中如何使用PUT請求方式?
Feb 28, 2024 pm 03:12 PM
jQuery中如何使用PUT請求方式?在jQuery中,發送PUT請求的方法與發送其他類型的請求類似,但需要注意一些細節和參數設定。 PUT請求通常用於更新資源,例如更新資料庫中的資料或更新伺服器上的檔案。以下是在jQuery中使用PUT請求方式的具體程式碼範例。首先,確保引入了jQuery庫文件,然後可以透過以下方式發送PUT請求:$.ajax({u
