

Angular5對元件標籤新增樣式class步驟說明
這次帶給大家Angular5對元件標籤添加樣式class步驟說明,Angular5對元件標籤添加樣式class的注意事項有哪些,下面就是實戰案例,一起來看一下。
在Angular 5為元件本身的標籤新增樣式有兩種方法:
方式一:使用@Component的host屬性
@Component({
 selector : 'myComponent',
 host : {
  '[style.color]' : "'red'",
  '[style.background-color]' : 'backgroundColor'
 }
})
class MyComponent {
 backgroundColor: string;
 constructor() {
  this.backgroundColor = 'blue';
 }
}在host配置裡新增屬性,等於標籤上綁定屬性的用法一樣。
設定style:
'[style.color]': "'red'":注意red值雙引號裡還有一個單引號。
'[style.background-color]':'backgroundColor':這裡是引用了元件裡的變數backgroudColor。
這種方式的好處是可以在樣式上使用元件的變數。
設定class:
@Component({
 selector : 'myComponent',
 host : {
  '[class.myclass]' : 'showMyClass'
 }
})
class MyComponent {
 showMyClass = false;
 constructor() {
 }
 toggleMyClass() {
  this.showMyClass = !this.showMyClass;
 }
}方式二:在樣式裡使用:host選擇器
@Component({
 selector : 'myComponent',
 styles : [`
  :host {
   color: red;
   background-color: blue;
  }
 `]
})
class MyComponent {}相信看了本文案例你已經掌握了方法,更多精彩請關注php中文網其它相關文章!
推薦閱讀:
#以上是Angular5對元件標籤新增樣式class步驟說明的詳細內容。更多資訊請關注PHP中文網其他相關文章!

熱AI工具

Undresser.AI Undress
人工智慧驅動的應用程序,用於創建逼真的裸體照片

AI Clothes Remover
用於從照片中去除衣服的線上人工智慧工具。

Undress AI Tool
免費脫衣圖片

Clothoff.io
AI脫衣器

Video Face Swap
使用我們完全免費的人工智慧換臉工具,輕鬆在任何影片中換臉!

熱門文章
熱工具

記事本++7.3.1
好用且免費的程式碼編輯器

SublimeText3漢化版
中文版,非常好用

禪工作室 13.0.1
強大的PHP整合開發環境

Dreamweaver CS6
視覺化網頁開發工具

SublimeText3 Mac版
神級程式碼編輯軟體(SublimeText3)


 macOS:如何更改桌面小工具的顏色
Oct 07, 2023 am 08:17 AM
macOS:如何更改桌面小工具的顏色
Oct 07, 2023 am 08:17 AM
在macOSSonoma中,小工具不必隱藏在螢幕外,也不必像在先前版本的Apple的macOS中那樣在通知中心面板中被遺忘。相反,它們可以直接放置在Mac的桌面上–它們也是互動的。不使用時,macOS桌面小工具會採用單色樣式淡入背景,從而減少干擾,並允許您專注於活動應用程式或視窗中手邊的任務。但是,當您單擊桌面時,它們將恢復為全彩色。如果您喜歡單調的外觀,並且希望在桌面上保留這一方面的統一性,那麼有一種方法可以使其永久化。以下步驟示範了它是如何完成的。開啟“系統設定”應用
 win11新增硬碟教學
Jan 05, 2024 am 09:39 AM
win11新增硬碟教學
Jan 05, 2024 am 09:39 AM
在購買電腦的時候,不一定會選擇很大的硬碟,這時候如果我們想在win11新增硬碟,可以先安裝購買的新硬碟,然後在電腦裡新增分割區就可以了。 win11新增硬碟教學:1、首先,我們拆開主機,找到硬碟的插槽。 2.找到後,我們先接上“數據線”,一般會有防呆設計,插不進去反個方向即可。 3.隨後將新的硬碟插入硬碟插槽。 4.插入後,將資料線的另一頭接到電腦的主機板上。 5.安裝完成後,就可以裝回主機,並開機了。 6.開機後,我們右鍵“此電腦”,開啟“電腦管理”7、開啟後,點選左下角的“磁碟管理”8、隨後在右邊可以
 米家怎麼加電視
Mar 25, 2024 pm 05:00 PM
米家怎麼加電視
Mar 25, 2024 pm 05:00 PM
許多用戶在現代生活中越來越青睞小米智慧家庭互聯的電子生態,那麼連接米家APP後,你就可以輕鬆用手機來控制連接設備,但是很多用戶們還不知如何將自己的家居添加米家app中,那麼這篇教學攻略將為大家帶來具體連接方法步驟攻略,希望能幫助到各位有需要的小夥伴們。 1.下載米家APP後,建立或登入小米帳號。 2.添加方法:當全新的設備通電後,將手機靠近設備並打開小米電視,正常情況下會彈出連接提示,選擇“確定”即進入設備連接流程。若無提示彈出,也可以手動新增設備,方法是:進入智慧型家庭APP後,點選左下方第1
 Win11快速建立桌面捷徑的教學課程
Dec 27, 2023 pm 04:29 PM
Win11快速建立桌面捷徑的教學課程
Dec 27, 2023 pm 04:29 PM
在win11中,我們可以透過新增桌面捷徑的方法在桌面上快速啟動軟體或文件,而且只需要右鍵需要的文件就可以操作了。 win11新增桌面捷徑:1、開啟“此電腦”,找到你想要新增桌面捷徑的檔案或軟體。 2、找到後,右鍵選取它,點選「顯示更多選項」3、再選擇「傳送到」-「桌面捷徑」4、操作完成後,就可以在桌面上找到捷徑了。
 在MetaMask錢包中如何連接到Polygon網路? MetaMask錢包連接到Polygon網路的教學指南
Jan 19, 2024 pm 04:36 PM
在MetaMask錢包中如何連接到Polygon網路? MetaMask錢包連接到Polygon網路的教學指南
Jan 19, 2024 pm 04:36 PM
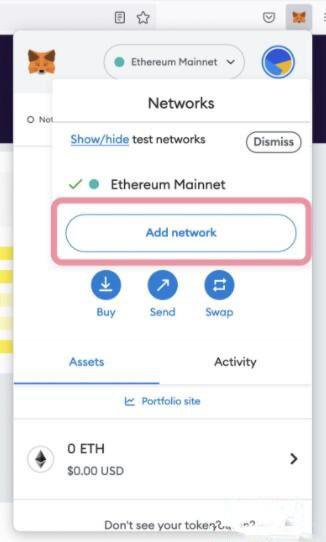
如何新增PolygonMainnet網路要將MATIC(Polygon)與Metamask連結使用,您需要新增一個名為「PolygonMainnet」的專用網路。使用錯誤的網路位址進行轉入會導致出現問題,所以在轉出$MATIC之前,請務必使用「PolygonMainnet」網路。 Metamask錢包預設連接到以太坊主網,但我們可以很簡單地添加“PolygonMainnet”並使用$MATIC。只需簡單的複製和貼上幾個步驟,就能完成。首先,在Metamask錢包中,點擊右上角的網路選項,選擇「C
 Vue中如何將浮水印到圖片中?
Aug 19, 2023 pm 12:37 PM
Vue中如何將浮水印到圖片中?
Aug 19, 2023 pm 12:37 PM
Vue中如何將浮水印到圖片中? Vue是一種流行的JavaScript框架,被廣泛使用於建立Web應用程式。有時我們需要在Vue應用程式中為圖片添加浮水印,以保護圖片的版權或增加圖片的可識別性。在本文中,我將向大家介紹一種在Vue中添加浮水印到圖片的方法,並提供對應的程式碼範例。第一步,我們需要在Vue中引入一個用於添加浮水印的第三方函式庫。推薦使用watermarkj
 Tampermonkey怎麼加入新腳本-Tampermonkey怎麼刪除腳本
Mar 18, 2024 pm 12:10 PM
Tampermonkey怎麼加入新腳本-Tampermonkey怎麼刪除腳本
Mar 18, 2024 pm 12:10 PM
Tampermonkey油猴Chrome擴充功能是一款使用者腳本管理插件,透過腳本提高了使用者的效率和瀏覽體驗,那麼Tampermonkey要怎麼加入新腳本呢?怎麼刪除腳本呢?下面就讓小編給大家解答吧!Tampermonkey怎麼加入新腳本:1、這裡拿GreasyFork來舉例子,打開GreasyFork網頁,輸入要按照的腳本,小編這裡選擇的一鍵離線下載2、選擇一個腳本,進入腳本頁面後可以看到安裝此腳本的按鈕3、點選安裝此腳本,來到安裝介面。這裡點擊安裝就可以了4、我們可以在以安裝的腳本中看到安裝好的一鍵
![Outlook卡在新增帳戶[修復]](https://img.php.cn/upload/article/000/887/227/171116770937641.jpg?x-oss-process=image/resize,m_fill,h_207,w_330) Outlook卡在新增帳戶[修復]
Mar 23, 2024 pm 12:21 PM
Outlook卡在新增帳戶[修復]
Mar 23, 2024 pm 12:21 PM
當您在Outlook中新增帳戶時遇到問題時,可以嘗試以下解決方案來解決。通常這可能是由網路連線故障、使用者設定檔損壞或其他暫時性問題引起的。透過本文提供的方法,您可以輕鬆解決這些問題,確保您的Outlook能夠正常運作。 Outlook卡在新增帳戶如果您的Outlook在新增帳戶時卡住,請使用下面提到的這些修復程式:中斷並重新連接網路暫時停用防毒軟體建立新的Outlook設定檔嘗試在安全模式下新增帳戶停用IPv6運行Microsoft支援和恢復助理修復辦公室應用程式Outlook新增帳戶需
