這次帶給大家畢達哥拉斯樹怎樣用JS實現,畢達哥拉斯樹用JS實現的注意事項有哪些,下面就是實戰案例,一起來看一下。
效果如下:

主要方法
-
translate()
rotate()
rect()
push()
pop()
map()
#主要想法
##遞迴
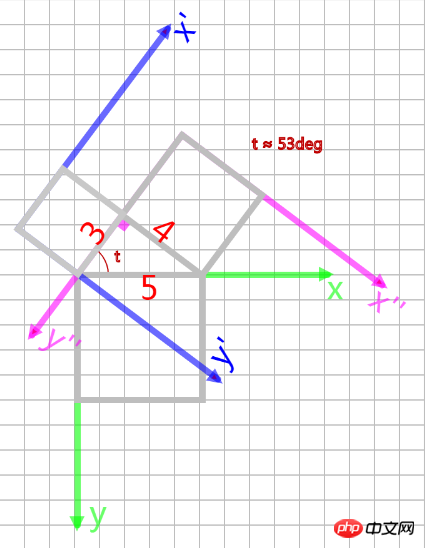
草圖

#程式分解
一、畢達哥拉斯樹的遞歸函數
1 2 3 4 5 6 7 8 9 10 11 12 13 14 15 16 17 18 19 20 21 | function Pythagorian(x){
noStroke();
fill(107, 142, 35,map(x, 0, a, 150, 255));
rect(0,0,x,x);
if(x <= 3) return 0;
push();
rotate(PI / 2 - t);
translate(0,-x/5 * 3 - x/5*4);
Pythagorian(x/5*4);
pop();
push();
rotate( - t);
translate(0,-x/5 * 3);
Pythagorian(x/5*3);
pop();
}
|
登入後複製
#二、宣告變數、建立畫布
1 2 3 4 5 6 7 8 | var a = 100;
var t;
function setup(){
t = 53.1301024 / 360 * 2 * PI;
createCanvas(windowWidth, windowHeight);
background(255);
noLoop();
}
|
登入後複製
#三、開始繪製畢達哥拉斯樹
###
1 2 3 4 | function draw(){
translate(windowWidth/2, windowHeight - a * 2);
Pythagorian(a);
}
|
登入後複製
###繪製畢達哥拉斯樹完整程式碼###
1 2 3 4 5 6 7 8 9 10 11 12 13 14 15 16 17 18 19 20 21 22 23 24 25 26 27 28 29 30 31 32 33 | var a = 100;
var t;
function setup(){
t = 53.1301024 / 360 * 2 * PI;
createCanvas(windowWidth, windowHeight);
background(255);
noLoop();
}
function draw(){
translate(windowWidth/2, windowHeight - a * 2);
Pythagorian(a);
}
function Pythagorian(x){
noStroke();
fill(107, 142, 35,map(x, 0, a, 150, 255));
rect(0,0,x,x);
if(x <= 3) return 0;
push();
rotate(PI / 2 - t);
translate(0,-x/5 * 3 - x/5*4);
Pythagorian(x/5*4);
pop();
push();
rotate( - t);
translate(0,-x/5 * 3);
Pythagorian(x/5*3);
pop();
}
|
登入後複製
###相信看了本文案例你已經掌握了方法,更多精彩請關注php中文網其它相關文章! ######推薦閱讀:#########JS原始值與參考值有哪些儲存方式###############Vue如何將篩選器格式化###############Angular中第三方UI框架、控制項使用步驟詳解#########
以上是畢達哥拉斯樹怎麼用JS實現的詳細內容。更多資訊請關注PHP中文網其他相關文章!


