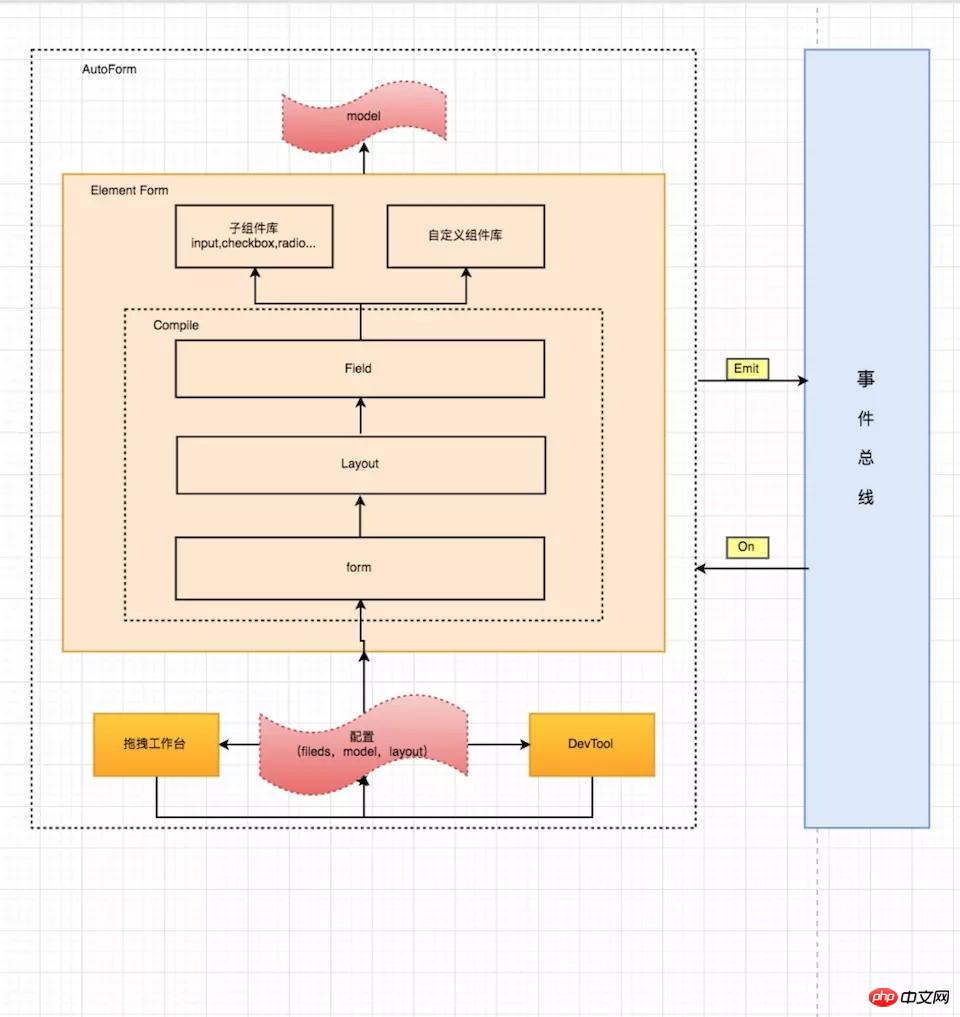
這篇文章透過實例給大家分享了vue自動化表單的操作方法以及相關的程式碼做了描述,有興趣的朋友可以跟著學習下。
背景
B端系統表單較多,且表單可能含有較多欄位
欄位較多的表單帶來了大片HTML程式碼
在大片HTML中,混雜著參數綁定、事件處理等邏輯,不利於維護
技術堆疊Vue,Element(預設表單佈局)適合中後台專案快速開發
目標
透過json配置快速產生表單的vue plugin。
設計目標
減少html 重複片段
#表單欄位元件可擴充
事件、連動透過eventbus 解耦
校驗可擴充
表單版面可自訂
視覺化設定
大概方案設計

使用
安裝
npm install charlie-autoform charlie-autoform_component_lib
原始碼:https://charlielau.github.io/autoform/#/component/autoform
引入外掛程式
import AutoForm from 'charlie-autoform';
import AutoForm_component_lib from 'charlie-autoform_component_lib';

Vue.use(AutoForm);
Vue.use(AutoForm_component_lib);
基本上使用
demo.vue
<template>
<p>
<auto-form ref="tagForm1" :model="model1" :fields="fields1" :layout="layout">
<el-form-item class="clearfix">
<el-button type="primary">立即创建</el-button>
<el-button>取消</el-button>
</el-form-item>
</auto-form>
</p>
</template>
<script>
export default {
data() {
return {
model2: {
name: '',
type: []
},
layout2: {
align: 'left',
labelWidth: '100px',
custom: false, //是否自定义布局
inline: true //是否内联
},
fields2: [
{
key: 'name',
type: 'input',
templateOptions: {
label: '审批人'
}
},
{
key: 'region',
type: 'select',
templateOptions: {
label: '活动区域',
placeholder: '请选择活动区域',
options: [
{
label: '区域一',
value: 'shanghai'
},
{
label: '区域二',
value: 'beijing'
}
],
validators:[ //校验
// {required:true,message:'必填'}
// ""
]
}
}
]
};
}
};
</script>
#
Vue.$autoform.RegisterDir(()=>require.context('./components/autoform', 'c'));//目录
Vue.$autoform.Register(Vue,[Components...],{prefix: "c"}) //组件对象cHello.vue
// PATH:/components/autoform/cHello.vue
<template>
<p>
<p>
<p>基本的变量可以通过"mixins"获取,这里有开发组件需要的一些变量</p>
<p>自定义子组件:Hello</p>
<p>当前field: {{field}}</p>
<p>整个model: {{model}}</p>
<p>当前model: {{model[field.name]}}</p>
<p>layout: {{layout}}</p>
<p>字段相关配置to: {{to}}</p>
</p>
</p>
</template>
<script>
import {baseField} from "charlie-autoform";
export default {
mixins: [baseField],
name: 'cHello',
data () {
return {};
},
methods: {},
mounted(){
//this.eventBus 事件总线
}
};
</script>成果
#目前應用再多個系統定性:維護成本降低、關注點分離相關推薦:定量:表單開發效率提升50%
以上是vue自動化表單實例分析的詳細內容。更多資訊請關注PHP中文網其他相關文章!


