Vue.js實作可設定登入表單步驟詳解
這次帶給大家Vue.js實作可設定登入表單步驟詳解,Vue.js實作可設定登入表單的注意事項有哪些,以下就是實戰案例,一起來看一下。
業務場景
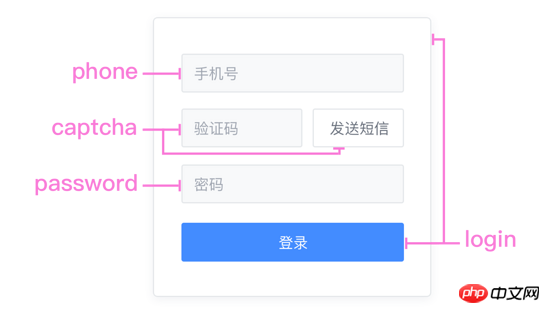
在之前,專案只支援手機號碼密碼登錄,前端是直接把表單寫死的,後來有客戶希望能支持驗證碼登錄,有的客戶還希望能有手機號驗證碼密碼的登入方式…所以登入方式的彈性需要可設定的表單支持,於是我把登入元件做了拆分。

以表單元素為粒度,分離出了手機號碼、密碼、簡訊驗證碼這幾個元件,它們內部都有自己的表單驗證方法,透過組合可以快速完成登入、註冊、找回密碼等表單元件。高內聚低耦合、高內聚低耦合…跟著念十遍~
.
├ common
├ captcha.vue
|  ├ password.vue
|  └ phone.vue
├ login
|  └ index.vue
├ register
|  └ index.vue
└ resetPassword
  └ index.vue
這裡我們將login作為父元件,讀取服務端返回的登入配置並在模板做條件渲染,登入時調用子元件內部的表單驗證,最後透過Vuex拿到資料呼叫介面。整個可設定登入表單的邏輯就是醬子,接下來上程式碼。
程式碼
請求服務端設定資料:
/* 参数说明:
 * 'password': 密码登录
 * 'captcha': 短信验证码登录
 * 'password_or_captcha': 密码或短信登录
 * 'password_with_captcha': 密码+短信登录
 */
config: {
 login_methods: 'password'
}登入元件的核心渲染程式碼(pug):
.login-card
 .login-header
   h3 登录
 .login-content
  phone(ref="phone")
  password(
   v-if="isPasswordMode"
   ref="password"
  )
  captcha(
   v-if="isCaptchaMode"
   ref="captcha"
  )
  template(v-if="isPasswordWithCaptchaMode")
   captcha(ref="captcha")
   password(ref="password")

  template(v-if="isPasswordOrCaptchaMode")
   ...
  el-button(@click="login") 登录
登入時需要三個步驟:表單驗證、組裝資料、呼叫介面:
async login () {
 if (!this.validate()) return
 const loginData = this.getLoginData()
 await this.postLogin(loginData)
 ...
}登入的表單驗證其實是對目前登入方式中所有元件的validate() 方法進行邏輯判斷:
validate () {
 const phone = this.$refs.phone.validate()
 let isPass = false

 if (this.isPasswordMode) {
  if (this.$refs.password) isPass = this.$refs.password.validate()
 }

 if (this.isCaptchaMode) {
  if (this.$refs.captcha) isPass = this.$refs.captcha.validate()
 }

 if (this.isPasswordWithCaptchaMode) ...

 if (this.isPasswordOrCaptchaMode) ...

 isPass = phone && isPass
 return isPass
}每個子元件都是完整的表單,驗證也由自己完成,password元件範本:
.login-password
 el-form(
  :model="form"
  :rules="rules"
  ref="form"
  @submit.native.prevent=""
 )
  el-form-item(prop="password")
   el-input(
    v-model="form.password"
    type="password"
    name="password"
   )
W3C: When there is only one single-line text input field in a form, the user agent should accept Enter in that field as a request to submit the form.
需要注意,根據W3C標準, 當一個form元素中只有一個輸入框時,在該輸入框中按下回車會自動提交表單。透過在
password元件的表單驗證:
validate () {
 let res = false
 this.$refs.form.validate((valid) => {
  res = valid
 })
 return res
}最後從Vuex拿到所有表單數據,進行組裝:
computed: {
 ...mapState('login', {
  phone: state => state.phone,
  password: state => state.password,
  captcha: state => state.captcha
 }),
},
methods: {
 ...
 getLoginData () {
  let mode = ''
  const phone = this.phone
  ...
  const data = { phone }

  if (this.isPasswordMode) {
   mode = 'password'
   data.password = password
  }
  if (this.isCaptchaMode) {
   mode = 'captcha'
   data.captcha = captcha
  }
  if (this.isPasswordWithCaptchaMode) ...
  if (this.isPasswordOrCaptchaMode) ...
  data.mode = mode
  return data
 }
}補充:
vue.js 全選與取消全選的實例代碼
new Vue({
  el: '#app',
  data: {
    checked: false,
    checkedNames: [],
    checkedArr: ["Runoob", "Taobao", "Google"]
  },
  methods: {
    changeAllChecked: function() {
      if (this.checked) {
        this.checkedNames = this.checkedArr
      } else {
        this.checkedNames = []
      }
    }
  },
  watch: {
    "checkedNames": function() {
      if (this.checkedNames.length == this.checkedArr.length) {
        this.checked = true
      } else {
        this.checked = false
      }
    }
  }
})#相信看了本文案例你已經掌握了方法,更多精彩請關注php中文網其它相關文章!
推薦閱讀:
以上是Vue.js實作可設定登入表單步驟詳解的詳細內容。更多資訊請關注PHP中文網其他相關文章!

熱AI工具

Undresser.AI Undress
人工智慧驅動的應用程序,用於創建逼真的裸體照片

AI Clothes Remover
用於從照片中去除衣服的線上人工智慧工具。

Undress AI Tool
免費脫衣圖片

Clothoff.io
AI脫衣器

Video Face Swap
使用我們完全免費的人工智慧換臉工具,輕鬆在任何影片中換臉!

熱門文章

熱工具

記事本++7.3.1
好用且免費的程式碼編輯器

SublimeText3漢化版
中文版,非常好用

禪工作室 13.0.1
強大的PHP整合開發環境

Dreamweaver CS6
視覺化網頁開發工具

SublimeText3 Mac版
神級程式碼編輯軟體(SublimeText3)
 如何使用WebSocket和JavaScript實現線上語音辨識系統
Dec 17, 2023 pm 02:54 PM
如何使用WebSocket和JavaScript實現線上語音辨識系統引言:隨著科技的不斷發展,語音辨識技術已成為了人工智慧領域的重要組成部分。而基於WebSocket和JavaScript實現的線上語音辨識系統,具備了低延遲、即時性和跨平台的特點,成為了廣泛應用的解決方案。本文將介紹如何使用WebSocket和JavaScript來實現線上語音辨識系
 WebSocket與JavaScript:實現即時監控系統的關鍵技術
Dec 17, 2023 pm 05:30 PM
WebSocket與JavaScript:實現即時監控系統的關鍵技術引言:隨著互聯網技術的快速發展,即時監控系統在各個領域中得到了廣泛的應用。而實現即時監控的關鍵技術之一就是WebSocket與JavaScript的結合使用。本文將介紹WebSocket與JavaScript在即時監控系統中的應用,並給出程式碼範例,詳細解釋其實作原理。一、WebSocket技
 如何利用JavaScript和WebSocket實現即時線上點餐系統
Dec 17, 2023 pm 12:09 PM
如何利用JavaScript和WebSocket實現即時線上點餐系統介紹:隨著網路的普及和技術的進步,越來越多的餐廳開始提供線上點餐服務。為了實現即時線上點餐系統,我們可以利用JavaScript和WebSocket技術。 WebSocket是一種基於TCP協定的全雙工通訊協議,可實現客戶端與伺服器的即時雙向通訊。在即時線上點餐系統中,當使用者選擇菜餚並下訂單
 如何使用WebSocket和JavaScript實現線上預約系統
Dec 17, 2023 am 09:39 AM
如何使用WebSocket和JavaScript實現線上預約系統在當今數位化的時代,越來越多的業務和服務都需要提供線上預約功能。而實現一個高效、即時的線上預約系統是至關重要的。本文將介紹如何使用WebSocket和JavaScript來實作一個線上預約系統,並提供具體的程式碼範例。一、什麼是WebSocketWebSocket是一種在單一TCP連線上進行全雙工
 JavaScript與WebSocket:打造高效率的即時天氣預報系統
Dec 17, 2023 pm 05:13 PM
JavaScript和WebSocket:打造高效的即時天氣預報系統引言:如今,天氣預報的準確性對於日常生活以及決策制定具有重要意義。隨著技術的發展,我們可以透過即時獲取天氣數據來提供更準確可靠的天氣預報。在本文中,我們將學習如何使用JavaScript和WebSocket技術,來建立一個高效的即時天氣預報系統。本文將透過具體的程式碼範例來展示實現的過程。 We
 簡易JavaScript教學:取得HTTP狀態碼的方法
Jan 05, 2024 pm 06:08 PM
JavaScript教學:如何取得HTTP狀態碼,需要具體程式碼範例前言:在Web開發中,經常會涉及到與伺服器進行資料互動的場景。在與伺服器進行通訊時,我們經常需要取得傳回的HTTP狀態碼來判斷操作是否成功,並根據不同的狀態碼來進行對應的處理。本篇文章將教你如何使用JavaScript來取得HTTP狀態碼,並提供一些實用的程式碼範例。使用XMLHttpRequest
 JavaScript與WebSocket:打造高效率的即時影像處理系統
Dec 17, 2023 am 08:41 AM
JavaScript是一種廣泛應用於Web開發的程式語言,而WebSocket則是一種用於即時通訊的網路協定。結合二者的強大功能,我們可以打造一個高效率的即時影像處理系統。本文將介紹如何利用JavaScript和WebSocket來實作這個系統,並提供具體的程式碼範例。首先,我們需要明確指出即時影像處理系統的需求和目標。假設我們有一個攝影機設備,可以擷取即時的影像數
 如何在JavaScript中取得HTTP狀態碼的簡單方法
Jan 05, 2024 pm 01:37 PM
JavaScript中的HTTP狀態碼取得方法簡介:在進行前端開發中,我們常常需要處理與後端介面的交互,而HTTP狀態碼就是其中非常重要的一部分。了解並取得HTTP狀態碼有助於我們更好地處理介面傳回的資料。本文將介紹使用JavaScript取得HTTP狀態碼的方法,並提供具體程式碼範例。一、什麼是HTTP狀態碼HTTP狀態碼是指當瀏覽器向伺服器發起請求時,服務


