

Vue建置分頁組件步驟詳解
這次帶給大家Vue建構分頁元件步驟詳解,Vue建構分頁元件的注意事項有哪些,以下就是實戰案例,一起來看一下。
Web應用程式中資源分頁不僅對效能很有幫助,而且從使用者體驗的角度來說也是非常有用的。在這篇文章中,將了解如何使用Vue建立動態和可用的分頁元件。
基本結構
分頁元件應該允許使用者訪問第一個和最後一個頁面,向前和向後移動,並直接切換到近距離的頁面。
大多數應用程式在使用者每次變更頁面時都會發出API請求。我們需要確保元件允許這樣做,但是我們不希望在元件內發出這樣的請求。這樣,我們將確保元件在整個應用程式中是可重複使用的,並且請求都是在操作或服務層中進行的。我們可以透過使用使用者點擊的頁面的數字觸發事件來實現此目的。
有幾種可能的方法來實作API端點上的分頁。對於這個例子,我們假設API告訴我們每個頁面的結果數量、頁面總數和目前頁面。這些將會是我們的動態 props 。
相反,如果API只告訴記錄的總數,那麼我們可以透過將結果的數量除以每一頁的結果數來計算頁數: totalResults / resultsPerPage 。
我們想要渲染一個按鈕到第一頁、 上一頁、 頁面數量範圍、 下一頁和最後一頁:
[first] [next] [1] [2 ] [3] [previous] [last]
例如像下圖這樣的一個效果:

儘管我們希望渲染一個系列的頁面,但並不希望渲染所有可用頁面。讓我們允許在我們的元件中設定一個最多可見按鈕的 props 。
既然我們知道了我們想要的元件要做成什麼,需要哪些數據,我們就可以設定HTML結構和所需的 props 。
<template id="pagination">
  <ul class="pagination">
    <li>
      <button type="button">« First</button>
    </li>
    <li>
      <button type="button">«</button>
    </li>
    <!-- 页数的范围 -->
    <li>
      <button type="button">Next »</button>
    </li>
    <li>
      <button type="button">»</button>
    </li>
  </ul>
</template>
Vue.component('pagination', {
  template: '#pagination',
  props: {
    maxVisibleButtons: {
      type: Number,
      required: false,
      default: 3
    },
    totalPages: {
      type: Number,
      required: true
    },
    total: {
      type: Number,
      required: true
    },
    currentPage: {
      type: Number,
      required: true
    }
  }
})上面的程式碼註冊了一個pagination 元件,如果呼叫這個元件:
<p id="app">
  <pagination></pagination>
</p>
這個時候看到的效果如下:

#注意,為了能讓元件看起來好看一點,為元件添加了一點樣式。
事件監聽
現在我們需要通知父元件,當使用者點擊按鈕時,使用者點擊了哪個按鈕。
我們需要為每個按鈕新增一個事件監聽器。 v-on 指令 允許偵聽DOM事件。在本例中,我將使用 v-on 的快捷鍵 來偵聽單擊事件。
為了通知父節點,我們將使用 $emit 方法 來發出一個帶有頁面點擊的事件。
我們也要確保分頁按鈕只有在頁面可用時才唯一一個目前狀態。為了這樣做,將使用 v-bind 將 disabled 屬性的值與目前頁面綁定。我們還是使用 :v-bind 的快捷鍵 : 。
為了保持我們的 template 乾淨,將使用 computed 屬性 來檢查按鈕是否已停用。使用 computed 也會被緩存,這意味著只要 currentPage 不會更改,對相同計算屬性的幾個訪問將返回先前計算的結果,而不必再次運行該函數。
<template id="pagination">
  <ul class="pagination">
    <li>
      <button type="button" @click="onClickFirstPage" :disabled="isInFirstPage">« First</button>
    </li>
    <li>
      <button type="button" @click="onClickPreviousPage" :disabled="isInFirstPage">«</button>
    </li>
    <li v-for="page in pages">
      <button type="button" @click="onClickPage(page.name)" :disabled="page.isDisabled"> {{ page.name }}</button>
    </li>
    <li>
      <button type="button" @click="onClickNextPage" :disabled="isInLastPage">Next »</button>
    </li>
    <li>
      <button type="button" @click="onClickLastPage" :disabled="isInLastPage">»</button>
    </li>
  </ul>
</template>
Vue.component('pagination', {
  template: '#pagination',
  props: {
    maxVisibleButtons: {
      type: Number,
      required: false,
      default: 3
    },
    totalPages: {
      type: Number,
      required: true
    },
    total: {
      type: Number,
      required: true
    },
    currentPage: {
      type: Number,
      required: true
    }
  },
  computed: {
    isInFirstPage: function () {
      return this.currentPage === 1
    },
    isInLastPage: function () {
      return this.currentPage === this.totalPages
    }
  },
  methods: {
    onClickFirstPage: function () {
      this.$emit('pagechanged', 1)
    },
    onClickPreviousPage: function () {
      this.$emit('pagechanged', this.currentPage - 1)
    },
    onClickPage: function (page) {
      this.$emit('pagechanged', page)
    },
    onClickNextPage: function () {
      this.$emit('pagechanged', this.currentPage + 1)
    },
    onClickLastPage: function () {
      this.$emit('pagechanged', this.totalPages)
    }
  }
})在呼叫pagination 元件時,將totalPages 和total 以及currentPage 傳到元件中:
<p id="app">
  <pagination :total-pages="11" :total="120" :current-page="currentPage"></pagination>
</p>
let app = new Vue({
  el: '#app',
  data () {
    return {
      currentPage: 2
    }
  }
})執行上面的程式碼,將會報錯:
## 
Vue.component('pagination', {
  template: '#pagination',
  props: {
    maxVisibleButtons: {
      type: Number,
      required: false,
      default: 3
    },
    totalPages: {
      type: Number,
      required: true
    },
    total: {
      type: Number,
      required: true
    },
    currentPage: {
      type: Number,
      required: true
    }
  },
  computed: {
    isInFirstPage: function () {
      return this.currentPage === 1
    },
    isInLastPage: function () {
      return this.currentPage === this.totalPages
    },
    startPage: function () {
      if (this.currentPage === 1) {
        return 1
      }
      if (this.currentPage === this.totalPages) {
        return this.totalPages - this.maxVisibleButtons + 1
      }
      return this.currentPage - 1
    },
    endPage: function () {
      return Math.min(this.startPage + this.maxVisibleButtons - 1, this.totalPages)
    },
    pages: function () {
      const range = []
      for (let i = this.startPage; i <= this.endPage; i+=1) {
        range.push({
          name: i,
          isDisabled: i === this.currentPage
        })
      }
      return range
    }
  },
  methods: {
    onClickFirstPage: function () {
      this.$emit('pagechanged', 1)
    },
    onClickPreviousPage: function () {
      this.$emit('pagechanged', this.currentPage - 1)
    },
    onClickPage: function (page) {
      this.$emit('pagechanged', page)
    },
    onClickNextPage: function () {
      this.$emit('pagechanged', this.currentPage + 1)
    },
    onClickLastPage: function () {
      this.$emit('pagechanged', this.totalPages)
    }
  }
})
新增樣式 现在我们的组件实现了最初想要的所有功能,而且添加了一些样式,让它看起来更像一个分页组件,而不仅像是一个列表。 我们还希望用户能够清楚地识别他们所在的页面。让我们改变表示当前页面的按钮的颜色。 为此,我们可以使用对象语法将HTML类绑定到当前页面按钮上。当使用对象语法绑定类名时,Vue将在值发生变化时自动切换类。 虽然 v-for 中的每个块都可以访问父作用域范围,但是我们将使用 method 来检查页面是否处于 active 状态,以便保持我们的 templage 干净。 接下来,在 pages 中添加当前状态: 这个时候你看到效果如下: 但依然还存在一点点小问题,当你在点击别的按钮时, active 状态并不会随着切换: 继续添加代码改变其中的效果: 在调用组件时: 这个时候的效果如下了: 到这里,基本上实现了咱想要的分页组件效果。 无障碍化处理 熟悉Bootstrap的同学都应该知道,Bootstrap中的组件都做了无障碍化的处理,就是在组件中添加了WAI-ARIA相关的设计。比如在分页按钮上添加 aria-label 相关属性: 在我们这个组件中,也相应的添加有关于WAI-ARIA相关的处理: 这样有关于 aria 相关的属性就加上了: 相信看了本文案例你已经掌握了方法,更多精彩请关注php中文网其它相关文章! 推荐阅读:Vue.component('pagination', {
template: '#pagination',
props: {
maxVisibleButtons: {
type: Number,
required: false,
default: 3
},
totalPages: {
type: Number,
required: true
},
total: {
type: Number,
required: true
},
currentPage: {
type: Number,
required: true
}
},
computed: {
isInFirstPage: function () {
return this.currentPage === 1
},
isInLastPage: function () {
return this.currentPage === this.totalPages
},
startPage: function () {
if (this.currentPage === 1) {
return 1
}
if (this.currentPage === this.totalPages) {
return this.totalPages - this.maxVisibleButtons + 1
}
return this.currentPage - 1
},
endPage: function () {
return Math.min(this.startPage + this.maxVisibleButtons - 1, this.totalPages)
},
pages: function () {
const range = []
for (let i = this.startPage; i <= this.endPage; i+=1) {
range.push({
name: i,
isDisabled: i === this.currentPage
})
}
return range
}
},
methods: {
onClickFirstPage: function () {
this.$emit('pagechanged', 1)
},
onClickPreviousPage: function () {
this.$emit('pagechanged', this.currentPage - 1)
},
onClickPage: function (page) {
this.$emit('pagechanged', page)
},
onClickNextPage: function () {
this.$emit('pagechanged', this.currentPage + 1)
},
onClickLastPage: function () {
this.$emit('pagechanged', this.totalPages)
},
isPageActive: function (page) {
return this.currentPage === page;
}
}
})<li v-for="page in pages">
<button type="button" @click="onClickPage(page.name)" :disabled="page.isDisabled" :class="{active: isPageActive(page.name)}"> {{ page.name }}</button>
</li>
let app = new Vue({
  el: '#app',
  data () {
    return {
      currentPage: 2
    }
  },
  methods: {
    onPageChange: function (page) {
      console.log(page)
      this.currentPage = page;
    }
  }
})<p id="app">
<pagination :total-pages="11" :total="120" :current-page="currentPage" @pagechanged="onPageChange"></pagination>
</p>

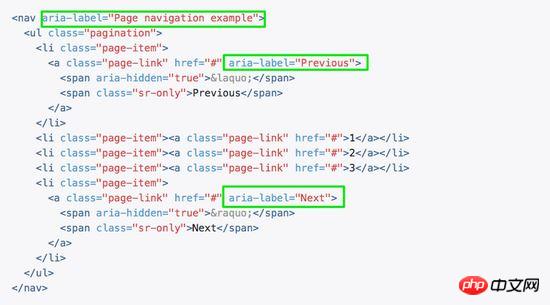
<template id="pagination">
  <ul class="pagination" aria-label="Page navigation">
    <li>
      <button type="button" @click="onClickFirstPage" :disabled="isInFirstPage" aria-label="Go to the first page">« First</button>
    </li>
    <li>
      <button type="button" @click="onClickPreviousPage" :disabled="isInFirstPage" aria-label="Previous">«</button>
    </li>
    <li v-for="page in pages">
      <button type="button" @click="onClickPage(page.name)" :disabled="page.isDisabled" :aria-label="`Go to page number ${page.name}`"> {{ page.name }}</button>
    </li>
    <li>
      <button type="button" @click="onClickNextPage" :disabled="isInLastPage" aria-label="Next">Next »</button>
    </li>
    <li>
      <button type="button" @click="onClickLastPage" :disabled="isInLastPage" aria-label="Go to the last page">»</button>
    </li>
  </ul>
</template>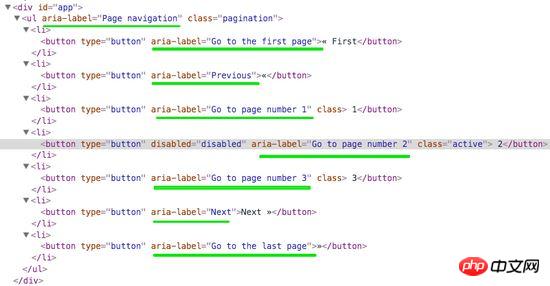
以上是Vue建置分頁組件步驟詳解的詳細內容。更多資訊請關注PHP中文網其他相關文章!

熱AI工具

Undresser.AI Undress
人工智慧驅動的應用程序,用於創建逼真的裸體照片

AI Clothes Remover
用於從照片中去除衣服的線上人工智慧工具。

Undress AI Tool
免費脫衣圖片

Clothoff.io
AI脫衣器

Video Face Swap
使用我們完全免費的人工智慧換臉工具,輕鬆在任何影片中換臉!

熱門文章
熱工具

記事本++7.3.1
好用且免費的程式碼編輯器

SublimeText3漢化版
中文版,非常好用

禪工作室 13.0.1
強大的PHP整合開發環境

Dreamweaver CS6
視覺化網頁開發工具

SublimeText3 Mac版
神級程式碼編輯軟體(SublimeText3)


 如何在iPhone中使Google地圖成為預設地圖
Apr 17, 2024 pm 07:34 PM
如何在iPhone中使Google地圖成為預設地圖
Apr 17, 2024 pm 07:34 PM
iPhone上的預設地圖是Apple專有的地理位置供應商「地圖」。儘管地圖越來越好,但它在美國以外的地區運作不佳。與谷歌地圖相比,它沒有什麼可提供的。在本文中,我們討論了使用Google地圖成為iPhone上的預設地圖的可行性步驟。如何在iPhone中使Google地圖成為預設地圖將Google地圖設定為手機上的預設地圖應用程式比您想像的要容易。請依照以下步驟操作–先決條件步驟–您必須在手機上安裝Gmail。步驟1–開啟AppStore。步驟2–搜尋“Gmail”。步驟3–點選Gmail應用程式旁
 升級微信最新版本的步驟(輕鬆掌握微信最新版本的升級方法)
Jun 01, 2024 pm 10:24 PM
升級微信最新版本的步驟(輕鬆掌握微信最新版本的升級方法)
Jun 01, 2024 pm 10:24 PM
不斷推出新版本以提供更好的使用體驗,微信作為中國的社交媒體平台之一。升級微信至最新版本是非常重要的,家人和同事的聯繫、為了保持與朋友、及時了解最新動態。 1.了解最新版本的特性與改進了解最新版本的特性與改進非常重要,在升級微信之前。效能改進和錯誤修復,透過查看微信官方網站或應用程式商店中的更新說明、你可以了解新版本所帶來的各種新功能。 2.檢查目前微信版本我們需要檢查目前手機上已安裝的微信版本、在升級微信之前。點擊,打開微信應用“我”然後選擇,菜單“關於”在這裡你可以看到當前微信的版本號,。 3.打開應
 此 Apple ID 尚未在 iTunes Store 中使用:修復
Jun 10, 2024 pm 05:42 PM
此 Apple ID 尚未在 iTunes Store 中使用:修復
Jun 10, 2024 pm 05:42 PM
使用AppleID登入iTunesStore時,可能會在螢幕上拋出此錯誤提示「此AppleID尚未在iTunesStore中使用」。沒有什麼可擔心的錯誤提示,您可以按照這些解決方案集進行修復。修正1–更改送貨地址此提示出現在iTunesStore中的主要原因是您的AppleID個人資料中沒有正確的地址。步驟1–首先,開啟iPhone上的iPhone設定。步驟2–AppleID應位於所有其他設定的頂部。所以,打開它。步驟3–在那裡,打開“付款和運輸”選項。步驟4–使用面容ID驗證您的存取權限。步驟
 Shazam應用程式在iPhone中無法運作:修復
Jun 08, 2024 pm 12:36 PM
Shazam應用程式在iPhone中無法運作:修復
Jun 08, 2024 pm 12:36 PM
iPhone上的Shazam應用程式有問題? Shazam可協助您透過聆聽歌曲找到歌曲。但是,如果Shazam無法正常工作或無法識別歌曲,則必須手動對其進行故障排除。修復Shazam應用程式不會花費很長時間。因此,無需再浪費時間,請按照以下步驟解決Shazam應用程式的問題。修正1–禁用粗體文字功能iPhone上的粗體文字可能是Shazam無法正常運作的原因。步驟1–您只能從iPhone設定執行此操作。所以,打開它。步驟2–接下來,開啟其中的「顯示和亮度」設定。步驟3–如果您發現啟用了“粗體文本
 Win11系統管理員權限取得步驟詳解
Mar 08, 2024 pm 09:09 PM
Win11系統管理員權限取得步驟詳解
Mar 08, 2024 pm 09:09 PM
Windows11作為微軟最新推出的作業系統,深受廣大用戶喜愛。在使用Windows11的過程中,有時候我們需要取得系統管理員權限,以便進行一些需要權限的操作。接下來將詳細介紹在Windows11中取得系統管理員權限的步驟。第一步,點擊“開始功能表”,在左下角可以看到Windows圖標,點擊該圖標即可開啟“開始功能表”。第二步,在「開始功能表」中尋找並點擊「
 iPhone螢幕截圖不起作用:如何修復
May 03, 2024 pm 09:16 PM
iPhone螢幕截圖不起作用:如何修復
May 03, 2024 pm 09:16 PM
螢幕截圖功能在您的iPhone上不起作用嗎?截圖非常簡單,因為您只需同時按住「提高音量」按鈕和「電源」按鈕即可抓取手機螢幕。但是,還有其他方法可以在設備上捕獲幀。修復1–使用輔助觸控使用輔助觸控功能截取螢幕截圖。步驟1–轉到您的手機設定。步驟2–接下來,點選以開啟「輔助功能」設定。步驟3–開啟「觸摸」設定。步驟4–接下來,開啟「輔助觸控」設定。步驟5–打開手機上的「輔助觸控」。步驟6–打開“自訂頂級選單”以存取它。步驟7–現在,您只需將這些功能中的任何一個連結到螢幕擷取即可。因此,點擊那裡的首
 iPhone中缺少時鐘應用程式:如何修復
May 03, 2024 pm 09:19 PM
iPhone中缺少時鐘應用程式:如何修復
May 03, 2024 pm 09:19 PM
您的手機中缺少時鐘應用程式嗎?日期和時間仍將顯示在iPhone的狀態列上。但是,如果沒有時鐘應用程序,您將無法使用世界時鐘、碼錶、鬧鐘等多項功能。因此,修復時鐘應用程式的缺失應該是您的待辦事項清單的首位。這些解決方案可以幫助您解決此問題。修復1–放置時鐘應用程式如果您錯誤地從主畫面中刪除了時鐘應用程序,您可以將時鐘應用程式放回原位。步驟1–解鎖iPhone並開始向左側滑動,直到到達「應用程式庫」頁面。步驟2–接下來,在搜尋框中搜尋「時鐘」。步驟3–當您在搜尋結果中看到下方的「時鐘」時,請按住它並
 iPhone上的蜂窩數據網路速度慢:修復
May 03, 2024 pm 09:01 PM
iPhone上的蜂窩數據網路速度慢:修復
May 03, 2024 pm 09:01 PM
在iPhone上面臨滯後,緩慢的行動數據連線?通常,手機上蜂窩互聯網的強度取決於幾個因素,例如區域、蜂窩網絡類型、漫遊類型等。您可以採取一些措施來獲得更快、更可靠的蜂窩網路連線。修復1–強制重啟iPhone有時,強制重啟設備只會重置許多內容,包括蜂窩網路連線。步驟1–只需按一次音量調高鍵並放開即可。接下來,按降低音量鍵並再次釋放它。步驟2–過程的下一部分是按住右側的按鈕。讓iPhone完成重啟。啟用蜂窩數據並檢查網路速度。再次檢查修復2–更改資料模式雖然5G提供了更好的網路速度,但在訊號較弱
