

css3實作求婚小動畫

這篇文章主要介紹了關於css3實現求婚小動畫,有著一定的參考價值,現在分享給大家,有需要的朋友可以參考一下
昨天在微信公眾號中看到這篇文章,瞬間覺得css太強大了,只要你想做,everything is possible!
先放張效果圖

#然後一步一步分析一下:
首先是剛出現的新郎的動畫
.w-m img{
	margin-right: 0;
	float: right;
	margin-top: 60px;
	animation: toWoman 0.5s ease .5s both;
}
@keyframes toWoman{
	0%{
		opacity: 0;
		transform: translate(-200px);
	}
	100%{
		opacity: 1;
		transform: translate(0);
	}
}裡面用到的知識點:
animation:是一個簡寫屬性,用來設定六個動畫屬性
animation -name 規定需要綁定到選擇器的keyframe 名稱
animation-duration 規定完成動畫所花費的時間,以秒或毫秒計
#animation-timing-function 規定動畫的速度曲線
animation-delay 規定在動畫開始前的延遲
animation-iteration-count 規定動畫應該要播放的次數
##animation -direction 規定是否應該輪流反向播放動畫
#keyframes:讓開發者透過指定動畫中特定時間點必須展現的關鍵影格樣式(或停留點)來控制CSS動畫的中間環節。這讓開發者能夠控制動畫中的更多細節而不是全部讓瀏覽器自動處理
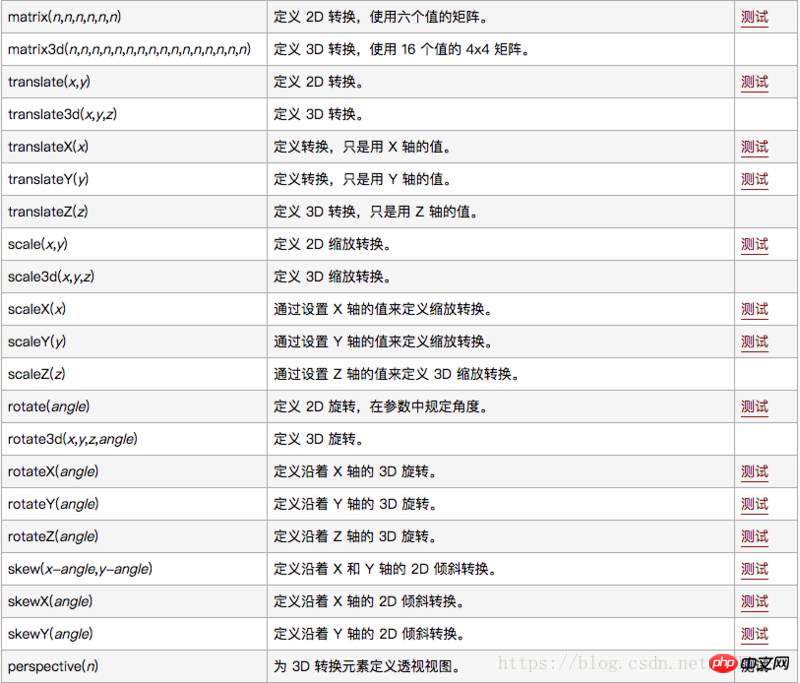
#transform 向元素應用2D 或3D 轉換。此屬性允許我們對元素進行旋轉、縮放、移動或傾斜
 #
#
然后是那朵花的css
.w-f{
    position: absolute;
    z-index: 20;
    left: 50%;
    margin-left: -30px;
    margin-top: 75px;
}
.w-f img{
	width: 60px;
	animation: show 0.4s ease 1s both;
}

@keyframes show{
	0%{
		opacity: 0;
		transform: scale(0.1,0.1);
	}
	100%{
		opacity: 1;
		transform: scale(1,1);
	}
}文字部分的css
.w-t-m{
	position: absolute;
	left: 50%;
	z-index: 10;
	line-height: 80px;
	color: #ff720a;
	letter-spacing: 5px;
	opacity: 0;
	animation: titleBloom 1s linear 1s both;
	font-size: 26px;
    margin-left: -125px;
}
@keyframes titleBloom{
	0% {
	    transform: translate(-50px);
	}
	100% {
		opacity: 1;
	    transform: translate(0);
	}
}文字边烟花的效果
.w-t img{
	opacity: 0;
    animation: bloom 2s ease 1.2s infinite;
}
.w-t img.boom2{
	float: right;
	animation: bloom 2s ease 1.5s infinite;
}
.w-t img.boom3{
	position: absolute;
	margin-top: 40px;
	animation: bloom 2s ease 1.4s infinite;
}
@keyframes bloom{
	0% {
	    transform: scale(0,0);
	}
	100% {
		opacity: 1;
	    transform: scale(1,1);
	}
}最后几束花的效果
.w-fls{
	width: 820px;
	margin: 0 auto;
}
.w-fls img{
	height: 120px;
	z-index: 400;
	animation: showFlows 0.4s ease 2.3s both;
}
@keyframes showFlows{
	0%{
		opacity: 0;
		transform: translate(0,200px);
	}
	100%{
		opacity: 1;
		transform: translate(0);
	}
}
.w-2{
	margin-top: -130px;
	padding-left: 100px;
}
.w-2 img{
	animation: showFlows 0.4s ease 2.7s both;
}写到这里,觉得前端开发原来是这么有趣的一件事哈~
相关推荐:
以上是css3實作求婚小動畫的詳細內容。更多資訊請關注PHP中文網其他相關文章!

熱AI工具

Undresser.AI Undress
人工智慧驅動的應用程序,用於創建逼真的裸體照片

AI Clothes Remover
用於從照片中去除衣服的線上人工智慧工具。

Undress AI Tool
免費脫衣圖片

Clothoff.io
AI脫衣器

Video Face Swap
使用我們完全免費的人工智慧換臉工具,輕鬆在任何影片中換臉!

熱門文章
熱工具

記事本++7.3.1
好用且免費的程式碼編輯器

SublimeText3漢化版
中文版,非常好用

禪工作室 13.0.1
強大的PHP整合開發環境

Dreamweaver CS6
視覺化網頁開發工具

SublimeText3 Mac版
神級程式碼編輯軟體(SublimeText3)


 vue中怎麼用bootstrap
Apr 07, 2025 pm 11:33 PM
vue中怎麼用bootstrap
Apr 07, 2025 pm 11:33 PM
在 Vue.js 中使用 Bootstrap 分為五個步驟:安裝 Bootstrap。在 main.js 中導入 Bootstrap。直接在模板中使用 Bootstrap 組件。可選:自定義樣式。可選:使用插件。
 HTML,CSS和JavaScript的角色:核心職責
Apr 08, 2025 pm 07:05 PM
HTML,CSS和JavaScript的角色:核心職責
Apr 08, 2025 pm 07:05 PM
HTML定義網頁結構,CSS負責樣式和佈局,JavaScript賦予動態交互。三者在網頁開發中各司其職,共同構建豐富多彩的網站。
 了解HTML,CSS和JavaScript:初學者指南
Apr 12, 2025 am 12:02 AM
了解HTML,CSS和JavaScript:初學者指南
Apr 12, 2025 am 12:02 AM
WebDevelovermentReliesonHtml,CSS和JavaScript:1)HTMLStructuresContent,2)CSSStyleSIT和3)JavaScriptAddSstractivity,形成thebasisofmodernWebemodernWebExexperiences。
 bootstrap怎麼寫分割線
Apr 07, 2025 pm 03:12 PM
bootstrap怎麼寫分割線
Apr 07, 2025 pm 03:12 PM
創建 Bootstrap 分割線有兩種方法:使用 標籤,可創建水平分割線。使用 CSS border 屬性,可創建自定義樣式的分割線。
 bootstrap怎麼設置框架
Apr 07, 2025 pm 03:27 PM
bootstrap怎麼設置框架
Apr 07, 2025 pm 03:27 PM
要設置 Bootstrap 框架,需要按照以下步驟:1. 通過 CDN 引用 Bootstrap 文件;2. 下載文件並將其託管在自己的服務器上;3. 在 HTML 中包含 Bootstrap 文件;4. 根據需要編譯 Sass/Less;5. 導入定製文件(可選)。設置完成後,即可使用 Bootstrap 的網格系統、組件和样式創建響應式網站和應用程序。
 bootstrap怎麼插入圖片
Apr 07, 2025 pm 03:30 PM
bootstrap怎麼插入圖片
Apr 07, 2025 pm 03:30 PM
在 Bootstrap 中插入圖片有以下幾種方法:直接插入圖片,使用 HTML 的 img 標籤。使用 Bootstrap 圖像組件,可以提供響應式圖片和更多樣式。設置圖片大小,使用 img-fluid 類可以使圖片自適應。設置邊框,使用 img-bordered 類。設置圓角,使用 img-rounded 類。設置陰影,使用 shadow 類。調整圖片大小和位置,使用 CSS 樣式。使用背景圖片,使用 background-image CSS 屬性。
 bootstrap按鈕怎麼用
Apr 07, 2025 pm 03:09 PM
bootstrap按鈕怎麼用
Apr 07, 2025 pm 03:09 PM
如何使用 Bootstrap 按鈕?引入 Bootstrap CSS創建按鈕元素並添加 Bootstrap 按鈕類添加按鈕文本
 bootstrap怎麼調整大小
Apr 07, 2025 pm 03:18 PM
bootstrap怎麼調整大小
Apr 07, 2025 pm 03:18 PM
要調整 Bootstrap 中元素大小,可以使用尺寸類,具體包括:調整寬度:.col-、.w-、.mw-調整高度:.h-、.min-h-、.max-h-
