這次帶給大家如何使用vue註冊元件,使用vue註冊元件的注意事項有哪些,以下就是實戰案例,一起來看一下。
一、介紹
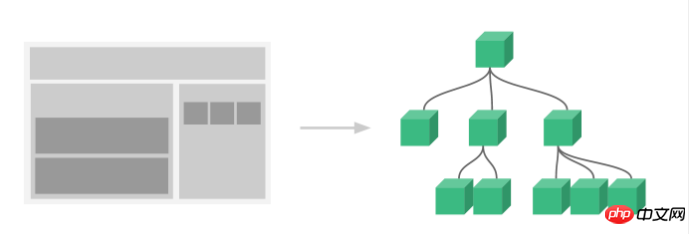
元件系統是Vue.js其中一個重要的概念,它提供了一個抽象,讓我們可以使用獨立可重複使用的小元件來建構大型應用,任一類型的應用介面都可以抽象化為一個元件樹

那麼什麼是元件呢?
元件可以擴充HTML元素,封裝可重複使用的HTML程式碼,我們可以將元件視為自訂的HTML元素。
二、如何註冊元件
Vue.js的元件的使用有3個步驟:建立元件建構器、註冊組件和使用組件。

下面用程式碼示範這三步驟
<!DOCTYPE html>
<html>
 <body>
  <p id="app">
   <!-- 注意: #app是Vue实例挂载的元素,应该在挂载元素范围内使用组件-->
   <my-component></my-component>
  </p>
 </body>
 <script src="https://cdn.jsdelivr.net/npm/vue/dist/vue.js"></script>
 <script>
  <!-- 1.创建一个组件构造器 -->
  var myComponent = Vue.extend({
   template: '<p>This is my first component!</p>'
  })

  <!-- 2.注册组件,并指定组件的标签,组件的HTML标签为<my-component> -->
  Vue.component('my-component', myComponent)

  <!-- 3.通过id=app进行挂载 -->
  new Vue({
   el: '#app'
  });

 </script>
</html>運行結果如下:

# 一、 全域註冊和局部註冊
呼叫Vue.component()註冊元件時,元件的註冊是全域性的,這表示該元件可以在任何Vue範例下使用。
如果不需要全域註冊,或是讓元件使用在其它元件內,可以用選項物件的components屬性實現局部註冊。
我自己的理解只要是component就代表全域元件,components代表局部元件
上面的範例可以改為局部註冊的方式:
<!DOCTYPE html>
<html>
 <body>
  <p id="app">
   <!-- 3. my-component只能在#app下使用-->
   <my-component></my-component>
  </p>
 </body>
 <script src="js/vue.js"></script>
 <script>
  // 1.创建一个组件构造器
  var myComponent = Vue.extend({
   template: '<p>This is my first component!</p>'
  })

  new Vue({
   el: '#app',
   components: {
   // 2. 将myComponent组件注册到Vue实例下
    'my-component' : myComponent
   }
  });
 </script>
</html>由於my-componentent元件是註冊在#app元素對應的Vue實例下的,所以它不能在其它Vue實例下使用。
<p id="app2">
 <!-- 不能使用my-component组件,因为my-component是一个局部组件,它属于#app-->
 <my-component></my-component>
</p>
<script>
 new Vue({
  el: '#app2'
 });
</script>二、元件註冊語法糖
# 以上元件註冊的方式有些繁瑣,Vue.js為了簡化這個過程,提供了註冊語法糖
// 全局注册,my-component1是标签名称
Vue.component('my-component1',{
 template: '<p>This is the first component!</p>'
})
var vm1 = new Vue({
 el: '#app1'
}) Vue.component()的第1個參數是標籤名稱,第2個參數是選項對象,使用選項對象的template屬性定義元件範本。
使用這種方式,Vue在背後會自動地呼叫Vue.extend()。
components實作局部註冊
var vm2 = new Vue({
 el: '#app2',
 components: {
  // 局部注册,my-component2是标签名称
  'my-component2': {
   template: '<p>This is the second component!</p>'
  },
  // 局部注册,my-component3是标签名称
  'my-component3': {
   template: '<p>This is the third component!</p>'
  }
 }
}三、父元件和子元件
我們可以在元件中定義並使用其他元件,這就構成了父子組件的關係。
<!DOCTYPE html>
<html>
 <body>
  <p id="app">
   <parent-component>
   </parent-component>
  </p>
 </body>
 <script src="https://cdn.jsdelivr.net/npm/vue/dist/vue.js"></script>
 <script>

  var Child = Vue.extend({
   template: '<p>This is a child component!</p>'
  })

  var Parent = Vue.extend({
   // 在Parent组件内使用<child-component>标签
   template :'<p>This is a Parent component</p><child-component></child-component>',
   components: {
    // 局部注册Child组件,该组件只能在Parent组件内使用
    'child-component': Child
   }
  })

  // 全局注册Parent组件
  Vue.component('parent-component', Parent)

  new Vue({
   el: '#app'
  })

 </script>
</html>這段程式碼的運作結果如下

四、使用script或template標籤
儘管語法糖簡化了組件註冊,但在template選項中拼接HTML元素比較麻煩,這也導致了HTML和JavaScript的高耦合性。
慶幸的是,Vue.js提供了兩種方式將定義在JavaScript中的HTML模板分離出來。
<!DOCTYPE html>
<html lang="en">
<head>
 <meta charset="UTF-8">
 <title>vue组件</title>
 <script src="js/vue.js"></script>
</head>
<body>
 <p id="app1">
  <my-com></my-com>
  <my-com1></my-com1>
 </p>
 <template id="myCom">
  <p>这是template标签构建的组件</p>
 </template>
 <script type="text/x-template" id="myCom1">
  <p>这是script标签构建的组件</p>
 </script>
 <script src="https://cdn.jsdelivr.net/npm/vue/dist/vue.js"></script>
 <script>
  Vue.component('my-com1', {
   template: '#myCom1'
  });
  var app1 = new Vue({
   el: '#app1',
   components: {
    'my-com': {
     template: '#myCom'
    }
   }
  });
 </script>
</body>
</html>運行結果:

注意:使用


