

使用Vue製作圖片輪播組件思路詳解
這篇文章主要介紹了使用Vue製作圖片輪播組件思路詳解,需要的朋友可以參考下
之前一直都沒有認真的寫過一個組件。以前在寫業務代碼的過程中,都是用的別人封裝好的組件,這次嘗試著寫了一個圖片輪播組件,雖然比不上知名的輪播組件,但它的功能基本完整,而且在寫這個組件的過程中,學的東西也很多,在這裡也給大家分享出來,如有疏漏,歡迎指正!
在製作這個組件之前,筆者google了不少關於輪播的文章,發現實現一個輪播的思路雖然各有不同,但是大的邏輯其實差不多,本文主要依據慕課網上焦點輪播圖特效這堂課,不過慕課網主要用原生JS寫,而筆者則用Vue進行了重構,並且進行了一點修改。完成後的元件效果圖如下:
一、理清思路,瞭解需求與原理
1. 要寫一個什麼樣的輪播?
點擊右側箭頭時,圖片向左滑動到下一張;點擊左側箭頭時,圖片向右滑到下一張
點擊下面的小圓點,滑到對應的圖片,對應小圓點的樣式也發生改變
要有過渡效果,要緩緩滑動過去
當滑鼠hover到圖片上時,輪播暫停,當滑鼠leave時,輪播繼續
自動播放功能
無限滾動,即在滾動到最後一張時,再點擊下一張時會繼續向左滑動到第一張,而不是整個拉到第一張,這裡有點難
2. 理解無限輪播的原理
#我們先看原理圖:
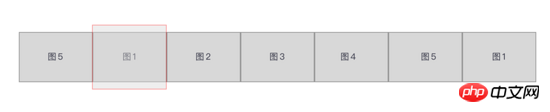
圖中紅線區域即是我們看到的圖片,這個輪播只展示5張圖片,但是在它的首尾各還有兩張圖片,在圖1前面放置了圖5,在圖5後面放置了圖1,之所以這麼做,是為了做無限滾動。無限滾動的原理在於:當整個圖向左側滾動到右邊的圖5時,會繼續向前走到圖1,在完全顯示出圖1後,會以肉眼看不到的速度向右側拉回到最左邊的圖1。這樣,即使再向左側滑動看到的就是圖2了。
如下圖:在最後的圖1完成過渡完全顯示出來後,再將整個清單瞬間向右拉到左側的圖1。另一張邊界圖圖5的滾動也是,不過方向相反。


#二、先讓圖片切換起來
##1.佈局和準備
<template>
<p id="slider">
<p class="window"> // window上图中红线框
<ul class="container" :style="containerStyle"> //注意这里的:style //这是图片列表,排成一排
<li> //列表最前面的辅助图,它和图5一样,用于无限滚动
<img :src="sliders[sliders.length - 1].img" alt="">
</li>
<li v-for="(item, index) in sliders" :key="index"> //通过v-for渲染的需要展示的5张图
<img :src="item.img" alt="">
</li>
<li> //列表最后面的辅助图,它和图1一样,用于无限滚动
<img :src="sliders[0].img" alt="">
</li>
</ul>
<ul class="direction"> //两侧的箭头
<li class="left">
<svg class="icon" width="30px" height="30.00px" viewBox="0 0 1024 1024" version="1.1" xmlns="http://www.w3.org/2000/svg"><path fill="#ffffff" d="M481.233 904c8.189 0 16.379-3.124 22.628-9.372 12.496-12.497 12.496-32.759 0-45.256L166.488 512l337.373-337.373c12.496-12.497 12.496-32.758 0-45.255-12.498-12.497-32.758-12.497-45.256 0l-360 360c-12.496 12.497-12.496 32.758 0 45.255l360 360c6.249 6.249 14.439 9.373 22.628 9.373z" /></svg>
</li>
<li class="right">
<svg class="icon" width="30px" height="30.00px" viewBox="0 0 1024 1024" version="1.1" xmlns="http://www.w3.org/2000/svg"><path fill="#ffffff" d="M557.179 904c-8.189 0-16.379-3.124-22.628-9.372-12.496-12.497-12.496-32.759 0-45.256L871.924 512 534.551 174.627c-12.496-12.497-12.496-32.758 0-45.255 12.498-12.497 32.758-12.497 45.256 0l360 360c12.496 12.497 12.496 32.758 0 45.255l-360 360c-6.249 6.249-14.439 9.373-22.628 9.373z" /></svg>
</li>
</ul>
<ul class="dots"> //下面的小圆点
<li v-for="(dot, i) in sliders" :key="i"
:class="{dotted: i === (currentIndex-1)}"
>
</li>
</ul>
</p>
</p>
</template>
<script>
export default {
name: 'slider',
data () {
return {
sliders:[
{
img:'../../static/images/1.jpg'
},
{
img:'../../static/images/2.jpg'
},
{
img:'../../static/images/3.jpg'
},
{
img:'../../static/images/4.jpg'
},
{
img:'../../static/images/5.jpg'
}
],
currentIndex:1,
distance:-600
}
},
computed:{
containerStyle() { //这里用了计算属性,用transform来移动整个图片列表
return {
transform:`translate3d(${this.distance}px, 0, 0)`
}
}
}
}
</script># 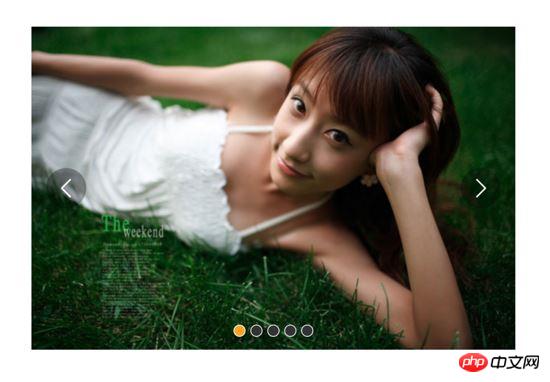
- window是紅線框, 寬度為600px ,它不會動,移動的是包裹著圖片的container,它的移動方式用: style="max-width:90%" ,這是一個計算屬性,用transform:translate3d(${this.distance, 0, 0}) 來控制左右移動
- data裡的distance 和currentIndex 是關鍵, distance 控制移動的距離,預設是-600,顯示7張圖片中的第二張,也就是圖1。 currentIndex 是window顯示的圖片的索引,這裡預設是1,也是7張圖片中第2張。
- 需要展示的只有5張圖片,但是在圖1前了一張圖5、在圖5後面放了一張圖1來做無限滾動,原理前面說過了
- 當點擊右側的箭頭,container向左移動, distance 會越來越小;當點擊左側的箭頭,container向右移動, distance 會越來越大,方向不要弄錯
2. 圖片切換
#我們在左側和右側的箭頭上新增點擊事件:
<ul class="direction">
    <li class="left" @click="move(600, 1)">
     <svg class="icon" width="30px" height="30.00px" viewBox="0 0 1024 1024" version="1.1" xmlns="http://www.w3.org/2000/svg"><path fill="#ffffff" d="M481.233 904c8.189 0 16.379-3.124 22.628-9.372 12.496-12.497 12.496-32.759 0-45.256L166.488 512l337.373-337.373c12.496-12.497 12.496-32.758 0-45.255-12.498-12.497-32.758-12.497-45.256 0l-360 360c-12.496 12.497-12.496 32.758 0 45.255l360 360c6.249 6.249 14.439 9.373 22.628 9.373z" /></svg>
    </li>
    <li class="right" @click="move(600, -1)">
     <svg class="icon" width="30px" height="30.00px" viewBox="0 0 1024 1024" version="1.1" xmlns="http://www.w3.org/2000/svg"><path fill="#ffffff" d="M557.179 904c-8.189 0-16.379-3.124-22.628-9.372-12.496-12.497-12.496-32.759 0-45.256L871.924 512 534.551 174.627c-12.496-12.497-12.496-32.758 0-45.255 12.498-12.497 32.758-12.497 45.256 0l360 360c12.496 12.497 12.496 32.758 0 45.255l-360 360c-6.249 6.249-14.439 9.373-22.628 9.373z" /></svg>
    </li>
   </ul>
   ......
   methods:{
      move(offset, direction) {
        this.distance += this.distance * direction
        if (this.distance < -3000) this.distance = -600
        if (this.distance > -600) this.distance = -3000
      }
   }
可以看到,图片切换效果已经出来了,但是下面的小圆点没有跟着变换。接下来我们把这个效果加上。从上面的html代码可以看到, :class="{dotted: i === (currentIndex - 1)}" ,小圆点的切换效果和data里的currentIndex值相关,我们只要随着图片切换变动currentIndex值就可以了。
修改move方法里的代码:
......
move(offset, direction) {
  direction === -1 ? this.currentIndex++ : this.currentIndex--
  if (this.currentIndex > 5) this.currentIndex = 1
  if (this.currentIndex < 1) this.currentIndex = 5
  this.distance = this.distance + offset * direction
  if (this.distance < -3000) this.distance = -600
  if (this.distance > -600) this.distance = -3000
}上面的添加的三行代码很好理解,如果是点击右侧箭头,container就是向左移动, this.currentIndex 就是减1,反之就是加1。
效果:
可以看到,小圆点的切换效果已经出来了。
三、过渡动画
上面的代码已经实现了切换,但是没有动画效果,显的非常生硬,接下来就是给每个图片的切换过程添加过渡效果。
这个轮播组件笔者并没有使用Vue自带的class钩子,也没有直接使用css的transition属性,而是用慕课网原作者讲的setTimeout方法加递归来实现。
其实我也试过使用Vue的钩子,但是总有一些小问题解决不掉;比如下面找到的这个例子:例子
这个例子在过渡的边界上有一些问题,我也遇到了,而且还是时有时无。而如果使用css的transition过渡方法,在处理边界的无限滚动上总会在chrome浏览器上有一下闪动,即使添加了 -webkit-transform-style:preserve-3d; 和 -webkit-backface-visibility:hidden 也还是没用,而且要配合transition的 transitionend 事件对于IE浏览器的支持也不怎么好。
如果大家有看到更好的办法,请在评论中留言哦~
下面我们来写这个过渡效果,主要是改写:
methods:{
  move(offset, direction) {
    direction === -1 ? this.currentIndex++ : this.currentIndex--
    if (this.currentIndex > 5) this.currentIndex = 1
    if (this.currentIndex < 1) this.currentIndex = 5

    const destination = this.distance + offset * direction
    this.animate(destination, direction)
  },
  animate(des, direc) {
    if ((direc === -1 && des < this.distance) || (direc === 1 && des > this.distance)) {
      this.distance += 30 * direc
      window.setTimeout(() => {
        this.animate(des, direc)
      }, 20)
    } else {
      this.distance = des
      if (des < -3000) this.distance = -600
      if (des > -600) this.distance = -3000
   }
  }
}上面的代码是这个轮播我觉得最麻烦、也是最难理解的地方。
来理解一下:首先,我们对于move方法进行了改写,因为要一点点的移动,所以要先算出要移动到的目标距离。然后,我们写一个animate函数来实现这个过渡。这个animate函数接收两个参数,一个是要移动到的距离,另一个是方向。 如果我们点击了右侧的箭头,container要向左侧移动,要是没有移动到目标距离,就在 this.distance 减去一定的距离,如果减去后还是没有到达,在20毫米以后再调用这个 this.animate ,如此不断移动,就形成了过渡效果。而如果移动到了目标距离,那就将目标距离赋值给 this.distance ,然后再进行边界和无限滚动的判断。
当然,使用 window.setInterval() 也可以实现这个效果,而且会稍微好理解一点,因为没有用到递归:
methods:{
  move(offset, direction) {
    direction === -1 ? this.currentIndex++ : this.currentIndex--
    if (this.currentIndex > 5) this.currentIndex = 1
    if (this.currentIndex < 1) this.currentIndex = 5

    const destination = this.distance + offset * direction
    this.animate(destination, direction)
  },
  animate(des, direc) {
    const temp = window.setInterval(() => {
      if ((direc === -1 && des < this.distance) || (direc === 1 && des > this.distance)) {
        this.distance += 30 * direc
      } else {
        window.clearInterval(temp)
        this.distance = des
        if (des < -3000) this.distance = -600
        if (des > -600) this.distance = -3000
      }
    }, 20)
  }
}实现出来的效果如下:

四、简单节流一下
写到这里,效果是出来了,但是会有一点问题,如果多次快速点击,就会有可能出现下面这种情况:

出现这种情况的原因很简单,因为是使用定时器过渡,所以连续快速点击就会出现错乱,简单节流一下就好了: 在过渡完成之前点击箭头无效,其实就是设了一个闸,第一次点击把闸打开,在闸再次打开之前,让一部分代码无法执行,然后再在恰当的时机把闸打开。
我们把这个闸设在move函数里:
move(offset, direction) {
  if (!this.transitionEnd) return //这里是闸
  this.transitionEnd = false    //开闸以后再把闸关上
  direction === -1 ? this.currentIndex++ : this.currentIndex--
  if (this.currentIndex > 5) this.currentIndex = 1
  if (this.currentIndex < 1) this.currentIndex = 5

  const destination = this.distance + offset * direction
  this.animate(destination, direction)
}this.transitionEnd 是这个闸的钥匙,我们把它放到data里:
this.transitionEnd: true
这个闸一开始默认的状态是开着的,第一次点击以后,这个闸就关上了, this.tranisitonEnd = false ,在再次打开之前,后面的代码都执行不了。接下来就是在恰当的时机把这个闸打开,而这个恰当的时机就是过渡完成时,也就是在 animate函数 里:
animate(des, direc) {
  if (this.temp) {
    window.clearInterval(this.temp)
    this.temp = null
  }
  this.temp = window.setInterval(() => {
    if ((direc === -1 && des < this.distance) || (direc === 1 && des > this.distance)) {
     this.distance += 30 * direc
    } else {
     this.transitionEnd = true   //闸再次打开
     window.clearInterval(this.temp)
     this.distance = des
     if (des < -3000) this.distance = -600
     if (des > -600) this.distance = -3000
    }
  }, 20)
}这下快速点击就没有之前的那个问题了:

五、点击小圆点实现图片过渡切换
到目前为止的代码:
<template>
<p id="slider">
<p class="window">
<ul class="container" :style="containerStyle">
<li>
<img :src="sliders[sliders.length - 1].img" alt="">
</li>
<li v-for="(item, index) in sliders" :key="index">
<img :src="item.img" alt="">
</li>
<li>
<img :src="sliders[0].img" alt="">
</li>
</ul>
<ul class="direction">
<li class="left" @click="move(600, 1)">
<svg class="icon" width="30px" height="30.00px" viewBox="0 0 1024 1024" version="1.1" xmlns="http://www.w3.org/2000/svg"><path fill="#ffffff" d="M481.233 904c8.189 0 16.379-3.124 22.628-9.372 12.496-12.497 12.496-32.759 0-45.256L166.488 512l337.373-337.373c12.496-12.497 12.496-32.758 0-45.255-12.498-12.497-32.758-12.497-45.256 0l-360 360c-12.496 12.497-12.496 32.758 0 45.255l360 360c6.249 6.249 14.439 9.373 22.628 9.373z" /></svg>
</li>
<li class="right" @click="move(600, -1)">
<svg class="icon" width="30px" height="30.00px" viewBox="0 0 1024 1024" version="1.1" xmlns="http://www.w3.org/2000/svg"><path fill="#ffffff" d="M557.179 904c-8.189 0-16.379-3.124-22.628-9.372-12.496-12.497-12.496-32.759 0-45.256L871.924 512 534.551 174.627c-12.496-12.497-12.496-32.758 0-45.255 12.498-12.497 32.758-12.497 45.256 0l360 360c12.496 12.497 12.496 32.758 0 45.255l-360 360c-6.249 6.249-14.439 9.373-22.628 9.373z" /></svg>
</li>
</ul>
<ul class="dots">
<li v-for="(dot, i) in sliders" :key="i"
:class="{dotted: i === (currentIndex-1)}"
>
</li>
</ul>
</p>
</p>
</template>
<script>
export default {
name: 'slider',
data () {
return {
sliders:[
{
img:'../../static/images/1.jpg'
},
{
img:'../../static/images/2.jpg'
},
{
img:'../../static/images/3.jpg'
},
{
img:'../../static/images/4.jpg'
},
{
img:'../../static/images/5.jpg'
}
],
currentIndex:1,
distance:-600,
transitionEnd: true
}
},
computed:{
containerStyle() {
return {
transform:`translate3d(${this.distance}px, 0, 0)`
}
}
},
methods:{
move(offset, direction) {
if (!this.transitionEnd) return
this.transitionEnd = false
direction === -1 ? this.currentIndex++ : this.currentIndex--
if (this.currentIndex > 5) this.currentIndex = 1
if (this.currentIndex < 1) this.currentIndex = 5
const destination = this.distance + offset * direction
this.animate(destination, direction)
},
animate(des, direc) {
if (this.temp) {
window.clearInterval(this.temp)
this.temp = null
}
this.temp = window.setInterval(() => {
if ((direc === -1 && des < this.distance) || (direc === 1 && des > this.distance)) {
this.distance += 30 * direc
} else {
this.transitionEnd = true
window.clearInterval(this.temp)
this.distance = des
if (des < -3000) this.distance = -600
if (des > -600) this.distance = -3000
}
}, 20)
}
}
}
</script>接下来我们要实现点击下面的小圆点来实现过渡和图片切换。
<ul class="dots">
  <li v-for="(dot, i) in sliders" :key="i"
  :class="{dotted: i === (currentIndex-1)}"
  @click = jump(i+1)>
  </li>
</ul>在点击小圆点的时候我们调用 jump 函数,并将索引 i+1 传给它。 这里需要特别注意,小圆点的索引和图片对应的索引不一致,图片共7张,而5个小圆点对应的是图片中中间的5张,所以我们才传 i+1 。
jump(index) {
  const direction = index - this.currentIndex >= 0 ? -1 : 1 //获取滑动方向
  const offset = Math.abs(index - this.currentIndex) * 600  //获取滑动距离
  this.move(offset, direction)
}上面的代码有一个问题,在jump函数里调用move方法,move里对于currentIndex的都是 +1 ,而点击小圆点可能是将 currentIndex 加或者减好多个,所以要对move里的代码修改下:
direction === -1 ? this.currentIndex += offset/600 : this.currentIndex -= offset/600
改一行,根据offset算出currentIndex就行了。
但是又有一个问题,长距离切换速度太慢,如下:

所以我们需要控制一下速度,让滑动一张图片耗费的时间和滑动多张图片耗费的时间一样,给move和animate函数添加一个speed参数,还要再算一下:
jump(index) {
  const direction = index - this.currentIndex >= 0 ? -1 : 1
  const offset = Math.abs(index - this.currentIndex) * 600
  const jumpSpeed = Math.abs(index - this.currentIndex) === 0 ? this.speed : Math.abs(index - this.currentIndex) * this.speed
  this.move(offset, direction, jumpSpeed)
}六、自动播放与暂停
前面的写的差不多了,到这里就非常简单了,写一个函数play:
play() {
  if (this.timer) {
    window.clearInterval(this.timer)
    this.timer = null
  }
  this.timer = window.setInterval(() => {
    this.move(600, -1, this.speed)
  }, 4000)
}除了初始化以后自动播放,还要通过mouseover和mouseleave来控制暂停与播放:
stop() {
  window.clearInterval(this.timer)
  this.timer = null
}七、 两处小坑
1. window.onblur 和 window.onfocus
写到这里,基本功能都差不多了。但是如果把页面切换到别的页面,导致轮播图所在页面失焦,过一段时间再切回来会发现轮播狂转。原因是页面失焦以后,setInterval停止运行,但是如果切回来就会一次性把该走的一次性走完。解决的方法也很简单,当页面失焦时停止轮播,页面聚焦时开始轮播。
window.onblur = function() { this.stop() }.bind(this)
window.onfocus = function() { this.play() }.bind(this)2. window.setInterval() 小坑
当定时器 window.setInterval() 在多个异步回调中使用时,就有可能在某种机率下开启多个执行队列, 所以为了保险起见,不仅应该在该清除时清除定时器,还要在每次使用之前也清除一遍 。
八、用props简单写两个对外接口
props: {
  initialSpeed: {
   type: Number,
   default: 30
  },
  initialInterval: {
   type: Number,
   default: 4
  }
},
data() {
  ......
  speed: this.initialSpeed
},
computed:{
  interval() {
    return this.initialInterval * 1000
  }
}然后再在相应的地方修改下就可以了。
完整的代码如下:
<template>
<p id="slider">
<p class="window" @mouseover="stop" @mouseleave="play">
<ul class="container" :style="containerStyle">
<li>
<img :src="sliders[sliders.length - 1].img" alt="">
</li>
<li v-for="(item, index) in sliders" :key="index">
<img :src="item.img" alt="">
</li>
<li>
<img :src="sliders[0].img" alt="">
</li>
</ul>
<ul class="direction">
<li class="left" @click="move(600, 1, speed)">
<svg class="icon" width="30px" height="30.00px" viewBox="0 0 1024 1024" version="1.1" xmlns="http://www.w3.org/2000/svg"><path fill="#ffffff" d="M481.233 904c8.189 0 16.379-3.124 22.628-9.372 12.496-12.497 12.496-32.759 0-45.256L166.488 512l337.373-337.373c12.496-12.497 12.496-32.758 0-45.255-12.498-12.497-32.758-12.497-45.256 0l-360 360c-12.496 12.497-12.496 32.758 0 45.255l360 360c6.249 6.249 14.439 9.373 22.628 9.373z" /></svg>
</li>
<li class="right" @click="move(600, -1, speed)">
<svg class="icon" width="30px" height="30.00px" viewBox="0 0 1024 1024" version="1.1" xmlns="http://www.w3.org/2000/svg"><path fill="#ffffff" d="M557.179 904c-8.189 0-16.379-3.124-22.628-9.372-12.496-12.497-12.496-32.759 0-45.256L871.924 512 534.551 174.627c-12.496-12.497-12.496-32.758 0-45.255 12.498-12.497 32.758-12.497 45.256 0l360 360c12.496 12.497 12.496 32.758 0 45.255l-360 360c-6.249 6.249-14.439 9.373-22.628 9.373z" /></svg>
</li>
</ul>
<ul class="dots">
<li v-for="(dot, i) in sliders" :key="i"
:class="{dotted: i === (currentIndex-1)}"
@click = jump(i+1)
>
</li>
</ul>
</p>
</p>
</template>
<script>
export default {
name: 'slider',
props: {
initialSpeed: {
type: Number,
default: 30
},
initialInterval: {
type: Number,
default: 4
}
},
data () {
return {
sliders:[
{
img:'../../static/images/1.jpg'
},
{
img:'../../static/images/2.jpg'
},
{
img:'../../static/images/3.jpg'
},
{
img:'../../static/images/4.jpg'
},
{
img:'../../static/images/5.jpg'
}
],
currentIndex:1,
distance:-600,
transitionEnd: true,
speed: this.initialSpeed
}
},
computed:{
containerStyle() {
return {
transform:`translate3d(${this.distance}px, 0, 0)`
}
},
interval() {
return this.initialInterval * 1000
}
},
mounted() {
this.init()
},
methods:{
init() {
this.play()
window.onblur = function() { this.stop() }.bind(this)
window.onfocus = function() { this.play() }.bind(this)
},
move(offset, direction, speed) {
if (!this.transitionEnd) return
this.transitionEnd = false
direction === -1 ? this.currentIndex += offset/600 : this.currentIndex -= offset/600
if (this.currentIndex > 5) this.currentIndex = 1
if (this.currentIndex < 1) this.currentIndex = 5
const destination = this.distance + offset * direction
this.animate(destination, direction, speed)
},
animate(des, direc, speed) {
if (this.temp) {
window.clearInterval(this.temp)
this.temp = null
}
this.temp = window.setInterval(() => {
if ((direc === -1 && des < this.distance) || (direc === 1 && des > this.distance)) {
this.distance += speed * direc
} else {
this.transitionEnd = true
window.clearInterval(this.temp)
this.distance = des
if (des < -3000) this.distance = -600
if (des > -600) this.distance = -3000
}
}, 20)
},
jump(index) {
const direction = index - this.currentIndex >= 0 ? -1 : 1
const offset = Math.abs(index - this.currentIndex) * 600
const jumpSpeed = Math.abs(index - this.currentIndex) === 0 ? this.speed : Math.abs(index - this.currentIndex) * this.speed
this.move(offset, direction, jumpSpeed)
},
play() {
if (this.timer) {
window.clearInterval(this.timer)
this.timer = null
}
this.timer = window.setInterval(() => {
this.move(600, -1, this.speed)
}, this.interval)
},
stop() {
window.clearInterval(this.timer)
this.timer = null
}
}
}
</script>上面是我整理给大家的,希望今后会对大家有帮助。
相关文章:
以上是使用Vue製作圖片輪播組件思路詳解的詳細內容。更多資訊請關注PHP中文網其他相關文章!

熱AI工具

Undresser.AI Undress
人工智慧驅動的應用程序,用於創建逼真的裸體照片

AI Clothes Remover
用於從照片中去除衣服的線上人工智慧工具。

Undress AI Tool
免費脫衣圖片

Clothoff.io
AI脫衣器

Video Face Swap
使用我們完全免費的人工智慧換臉工具,輕鬆在任何影片中換臉!

熱門文章
熱工具

記事本++7.3.1
好用且免費的程式碼編輯器

SublimeText3漢化版
中文版,非常好用

禪工作室 13.0.1
強大的PHP整合開發環境

Dreamweaver CS6
視覺化網頁開發工具

SublimeText3 Mac版
神級程式碼編輯軟體(SublimeText3)


 小紅書發布自動儲存圖片怎麼解決?發布自動保存圖片在哪裡?
Mar 22, 2024 am 08:06 AM
小紅書發布自動儲存圖片怎麼解決?發布自動保存圖片在哪裡?
Mar 22, 2024 am 08:06 AM
隨著社群媒體的不斷發展,小紅書已經成為越來越多年輕人分享生活、發現美好事物的平台。許多用戶在發布圖片時遇到了自動儲存的問題,這讓他們感到十分困擾。那麼,如何解決這個問題呢?一、小紅書發布自動儲存圖片怎麼解決? 1.清除快取首先,我們可以嘗試清除小紅書的快取資料。步驟如下:(1)開啟小紅書,點選右下角的「我的」按鈕;(2)在個人中心頁面,找到「設定」並點選;(3)向下捲動,找到「清除快取」選項,點擊確認。清除快取後,重新進入小紅書,嘗試發布圖片看是否解決了自動儲存的問題。 2.更新小紅書版本確保你的小
 抖音評論裡怎麼發圖片?評論區圖片入口在哪裡?
Mar 21, 2024 pm 09:12 PM
抖音評論裡怎麼發圖片?評論區圖片入口在哪裡?
Mar 21, 2024 pm 09:12 PM
隨著抖音短影片的火爆,用戶們在留言區互動變得更加豐富多彩。有些用戶希望在評論中分享圖片,以便更好地表達自己的觀點或情感。那麼,抖音評論裡怎麼發圖片呢?本文將為你詳細解答這個問題,並為你提供一些相關的技巧和注意事項。一、抖音評論裡怎麼發圖片? 1.開啟抖音:首先,你需要開啟抖音APP,並登入你的帳號。 2.找到評論區:瀏覽或發布短影片時,找到想要評論的地方,點擊「評論」按鈕。 3.輸入評論內容:在留言區輸入你的評論內容。 4.選擇傳送圖片:在輸入評論內容的介面,你會看到一個「圖片」按鈕或「+」號按鈕,點
 ppt怎麼讓圖片一張一張出來
Mar 25, 2024 pm 04:00 PM
ppt怎麼讓圖片一張一張出來
Mar 25, 2024 pm 04:00 PM
在PowerPoint中,讓圖片逐一顯示是常用的技巧,可以透過設定動畫效果來實現。本指南詳細介紹了實現此技巧的步驟,包括基本設定、圖片插入、新增動畫、調整動畫順序和時間。此外,還提供了進階設定和調整,例如使用觸發器、調整動畫速度和順序,以及預覽動畫效果。透過遵循這些步驟和技巧,使用者可以輕鬆地在PowerPoint中設定圖片逐一出現,從而提升簡報的視覺效果並吸引觀眾的注意力。
 在 iPhone 上讓圖片更清晰的 6 種方法
Mar 04, 2024 pm 06:25 PM
在 iPhone 上讓圖片更清晰的 6 種方法
Mar 04, 2024 pm 06:25 PM
Apple最近的iPhone可以透過清晰的細節、飽和度和亮度來捕捉回憶。但有時,您可能會遇到一些問題,這些問題可能會導致影像看起來不那麼清晰。儘管iPhone相機上的自動對焦已經取得了長足的進步,可以讓您快速拍照,但相機在某些情況下可能會錯誤地對焦錯誤的拍攝對象,從而使照片在不需要的區域更加模糊。如果iPhone上的照片看起來失焦或整體缺乏清晰度,以下貼文應該可以幫助您使它們更清晰。如何在iPhone上讓圖片更清晰[6種方法]您可以嘗試使用本機的「照片」應用程式來清理照片。如果您需要更多功能和選項
 如何使用HTML、CSS和jQuery實現圖片合併展示的進階功能
Oct 27, 2023 pm 04:36 PM
如何使用HTML、CSS和jQuery實現圖片合併展示的進階功能
Oct 27, 2023 pm 04:36 PM
如何使用HTML、CSS和jQuery實現圖片合併展示的高級功能概述:在網頁設計中,圖片展示是一個重要的環節,而圖片合併展示是提高頁面加載速度和提升用戶體驗的常用技巧之一。本文將介紹如何使用HTML、CSS和jQuery來實現圖片合併展示的進階功能,並提供具體的程式碼範例。一、HTML佈局:首先,我們需要在HTML中建立一個容器來展示合併後的圖片。可以使用di
 網頁圖片載入不出來怎麼辦? 6種解決辦法
Mar 15, 2024 am 10:30 AM
網頁圖片載入不出來怎麼辦? 6種解決辦法
Mar 15, 2024 am 10:30 AM
有網友發現打開瀏覽器網頁,網頁上的圖片遲遲加載不出來,是怎麼回事?檢查過網路是正常的,那是哪裡出現了問題呢?下面小編就來跟大家介紹一下網頁圖片載入不出來的六種解決方法。網頁圖片載入不出來: 1、網速問題網頁顯示不出圖片有可能是因為電腦的網路速度比較慢,電腦中開啟的軟體比較多, 而我們造訪的圖片比較大,這就可能因為載入逾時,導致圖片顯示不出來, 可以將比較佔網速的軟體將關掉,可以去任務管理器查看一下。 2、造訪人數過多 網頁顯示不出圖片還有可能是因為我們造訪的網頁,在同時段造訪的
 如何安裝Win10舊版元件DirectPlay
Dec 28, 2023 pm 03:43 PM
如何安裝Win10舊版元件DirectPlay
Dec 28, 2023 pm 03:43 PM
不少用戶在玩win10的的一些遊戲的時候總是會遇到一些問題,比如說卡屏和花屏等等情況,這個時候我們是可以採用打開directplay這個功能來解決的,而且功能的操作方法也很簡單。 win10舊版元件directplay怎麼安裝1、在搜尋框裡面輸入「控制台」然後開啟2、檢視方式選擇大圖示3、找到「程式與功能」4、點選左側的啟用或關閉win功能5、選擇舊版這裡的勾選上就可以了
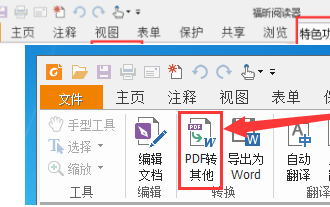 福昕PDF閱讀器如何將pdf文件轉成jpg圖片-福昕PDF閱讀器將pdf文件轉成jpg圖片的方法
Mar 04, 2024 pm 05:49 PM
福昕PDF閱讀器如何將pdf文件轉成jpg圖片-福昕PDF閱讀器將pdf文件轉成jpg圖片的方法
Mar 04, 2024 pm 05:49 PM
你們是不是也在使用福昕PDF閱讀器軟體呢?那麼你們知道福昕PDF閱讀器如何將pdf文檔轉成jpg圖片嗎?下面這篇文章就為大夥帶來了福昕PDF閱讀器將pdf文檔轉成jpg圖片的方法,有興趣的夥伴們快來下文看看吧。先啟動福昕PDF閱讀器,接著在頂部工具列找到“特色功能”,然後選擇“PDF轉其他”功能。在接下來,開啟一個名為「福昕pdf線上轉換」的網頁。在頁面上方右側點選「登入」按鈕進行登錄,然後開啟「PDF轉圖片」功能。之後點擊上傳按鈕並將想要轉換成圖片的pdf檔加入進來,加入完畢後點擊「開始轉
