如何使用vue設定多頁面
这次给大家带来如何使用vue配置多页面,使用vue配置多页面的注意事项有哪些,下面就是实战案例,一起来看一下。
1.安装环境
①安装node.js 并添加入环境变量PATH
②安装淘宝NPM镜像
$ npm install -g cnpm --registry=https://registry.npm.taobao.org
③安装webpack
npm install webpack -g
④安装vue-cli脚手架
npm install -g vue-cli
⑤创建项目模板 vue init wepack vue-multipage-demo
⑥cmd进入到要放项目的文件夹
⑦安装 cnpm install
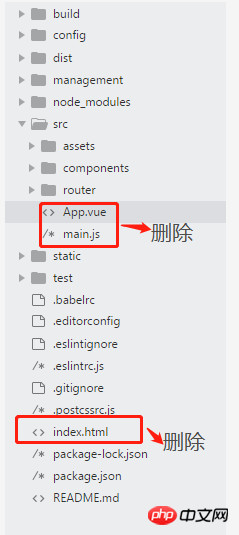
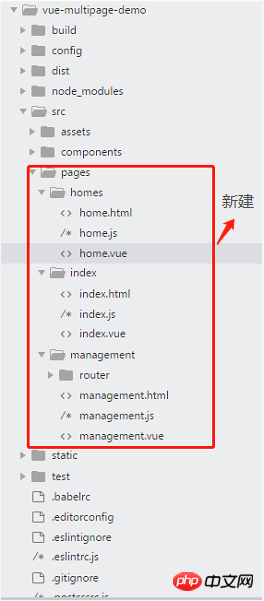
2.目录结构调整


3.配置文件修改
①添加依赖 glob (返回目录中的所有子文件)
npm install glob
②修改build文件夹中的utils.js文件
//新增代码
var glob = require('glob');
// 页面模板
var HtmlWebpackPlugin = require('html-webpack-plugin');
// 取得相应的页面路径,因为之前的配置,所以是src文件夹下的pages文件夹
var PAGE_PATH = path.resolve(dirname, '../src/pages');
// 用于做相应的merge处理
var merge = require('webpack-merge');
//多入口配置
// 通过glob模块读取pages文件夹下的所有对应文件夹下的js后缀文件,如果该文件存在
// 那么就作为入口处理
exports.entries = function () {
 var entryFiles = glob.sync(PAGE_PATH + '/*/*.js')
 var map = {}
 entryFiles.forEach((filePath) => {
  var filename = filePath.substring(filePath.lastIndexOf('\/') + 1, filePath.lastIndexOf('.'))
  map[filename] = filePath
 })
 return map
}
//多页面输出配置
// 与上面的多页面入口配置相同,读取pages文件夹下的对应的html后缀文件,然后放入数组中
exports.htmlPlugin = function () {
 let entryHtml = glob.sync(PAGE_PATH + '/*/*.html')
 let arr = []
 entryHtml.forEach((filePath) => {
  let filename = filePath.substring(filePath.lastIndexOf('\/') + 1, filePath.lastIndexOf('.'))
  let conf = {
   // 模板来源
   template: filePath,
   // 文件名称
   filename: filename + '.html',
   // 页面模板需要加对应的js脚本,如果不加这行则每个页面都会引入所有的js脚本
   chunks: ['manifest', 'vendor', filename],
   inject: true
  }
  if (process.env.NODE_ENV === 'production') {
   conf = merge(conf, {
    minify: {
     removeComments: true,
     collapseWhitespace: true,
     removeAttributeQuotes: true
    },
    chunksSortMode: 'dependency'
   })
  }
  arr.push(new HtmlWebpackPlugin(conf))
 })
 return arr
}③修改webpack.base.conf.js文件
function resolve (dir) {
 return path.join(dirname, '..', dir)
}
const createLintingRule = () => ({
 test: /\.(js|vue)$/,
 loader: 'eslint-loader',
 enforce: 'pre',
 include: [resolve('src'), resolve('test')],
 options: {
 formatter: require('eslint-friendly-formatter'),
 emitWarning: !config.dev.showEslintErrorsInOverlay
 }
})
module.exports = {
 context: path.resolve(dirname, '../'),
//注释代码开始
 // entry: {
 // app: './src/main.js'
 // },
//注释代码结束
//新增代码开始
 entry: utils.entries(),
//新增代码结束
 output: {
 path: config.build.assetsRoot,
 filename: '[name].js',
 publicPath: process.env.NODE_ENV === 'production'
  ? config.build.assetsPublicPath
  : config.dev.assetsPublicPath
 },
 resolve: {
 extensions: ['.js', '.vue', '.json'],
 alias: {
  'vue$': 'vue/dist/vue.esm.js',
  '@': resolve('src'),
 }
 },
 module: {
 rules: [
  ...(config.dev.useEslint ? [createLintingRule()] : []),
  {
  test: /\.vue$/,
  loader: 'vue-loader',
  options: vueLoaderConfig
  },
  {
  test: /\.js$/,
  loader: 'babel-loader',
  include: [resolve('src'), resolve('test'), resolve('node_modules/webpack-dev-server/client')]
  },
  {
  test: /\.(png|jpe?g|gif|svg)(\?.*)?$/,
  loader: 'url-loader',
  options: {
   limit: 10000,
   name: utils.assetsPath('img/[name].[hash:7].[ext]')
  }
  },
  {
  test: /\.(mp4|webm|ogg|mp3|wav|flac|aac)(\?.*)?$/,
  loader: 'url-loader',
  options: {
   limit: 10000,
   name: utils.assetsPath('media/[name].[hash:7].[ext]')
  }
  },
  {
  test: /\.(woff2?|eot|ttf|otf)(\?.*)?$/,
  loader: 'url-loader',
  options: {
   limit: 10000,
   name: utils.assetsPath('fonts/[name].[hash:7].[ext]')
  }
  }
 ]
 },
 node: {
 // prevent webpack from injecting useless setImmediate polyfill because Vue
 // source contains it (although only uses it if it's native).
 setImmediate: false,
 // prevent webpack from injecting mocks to Node native modules
 // that does not make sense for the client
 dgram: 'empty',
 fs: 'empty',
 net: 'empty',
 tls: 'empty',
 child_process: 'empty'
 }
}④修改webpack.dev.conf.js文件
 plugins: [
 new webpack.DefinePlugin({
  'process.env': require('../config/dev.env')
 }),
 new webpack.HotModuleReplacementPlugin(),
 new webpack.NamedModulesPlugin(), // HMR shows correct file names in console on update.
 new webpack.NoEmitOnErrorsPlugin(),
 // https://github.com/ampedandwired/html-webpack-plugin
 //多页面输出配置
 //注释代码开始
  // new HtmlWebpackPlugin({
  // filename: 'index.html',
  // template: 'index.html',
  // inject: true
  // }),
 //注释代码结束
 // copy custom static assets
 new CopyWebpackPlugin([
  {
  from: path.resolve(dirname, '../static'),
  to: config.dev.assetsSubDirectory,
  ignore: ['.*']
  }
 ])
 //新增代码开始
 ].concat(utils.htmlPlugin())
 //新增代码结束
})⑤修改webpack.prod.conf.js文件
   'use strict'
 const path = require('path')
 const utils = require('./utils')
 const webpack = require('webpack')
 const config = require('../config')
 const merge = require('webpack-merge')
 const baseWebpackConfig = require('./webpack.base.conf')
 const CopyWebpackPlugin = require('copy-webpack-plugin')
 const HtmlWebpackPlugin = require('html-webpack-plugin')
 const ExtractTextPlugin = require('extract-text-webpack-plugin')
 const OptimizeCSSPlugin = require('optimize-css-assets-webpack-plugin')
 const UglifyJsPlugin = require('uglifyjs-webpack-plugin')
 const env = process.env.NODE_ENV === 'testing'
  ? require('../config/test.env')
  : require('../config/prod.env')
 const webpackConfig = merge(baseWebpackConfig, {
  module: {
  rules: utils.styleLoaders({
   sourceMap: config.build.productionSourceMap,
   extract: true,
   usePostCSS: true
  })
  },
  devtool: config.build.productionSourceMap ? config.build.devtool : false,
  output: {
  path: config.build.assetsRoot,
  filename: utils.assetsPath('js/[name].[chunkhash].js'),
  chunkFilename: utils.assetsPath('js/[id].[chunkhash].js')
  },
  plugins: [
  // http://vuejs.github.io/vue-loader/en/workflow/production.html
  new webpack.DefinePlugin({
   'process.env': env
  }),
  new UglifyJsPlugin({
   uglifyOptions: {
   compress: {
    warnings: false
   }
   },
   sourceMap: config.build.productionSourceMap,
   parallel: true
  }),
  // extract css into its own file
  new ExtractTextPlugin({
   filename: utils.assetsPath('css/[name].[contenthash].css'),
   // Setting the following option to `false` will not extract CSS from codesplit chunks.
   // Their CSS will instead be inserted dynamically with style-loader when the codesplit chunk has been loaded by webpack.
   // It's currently set to `true` because we are seeing that sourcemaps are included in the codesplit bundle as well when it's `false`,
   // increasing file size: https://github.com/vuejs-templates/webpack/issues/1110
   allChunks: true,
  }),
  // Compress extracted CSS. We are using this plugin so that possible
  // duplicated CSS from different components can be deduped.
  new OptimizeCSSPlugin({
   cssProcessorOptions: config.build.productionSourceMap
   ? { safe: true, map: { inline: false } }
   : { safe: true }
  }),
  // generate dist index.html with correct asset hash for caching.
  // you can customize output by editing /index.html
  // see https://github.com/ampedandwired/html-webpack-plugin
  //注释代码开始
  // new HtmlWebpackPlugin({
  // filename: process.env.NODE_ENV === 'testing'
  //  ? 'index.html'
  //  : config.build.index,
  // template: 'index.html',
  // inject: true,
  // minify: {
  //  removeComments: true,
  //  collapseWhitespace: true,
  //  removeAttributeQuotes: true
  //  // more options:
  //  // https://github.com/kangax/html-minifier#options-quick-reference
  // },
   // necessary to consistently work with multiple chunks via CommonsChunkPlugin
  // chunksSortMode: 'dependency'
  // }),
  //注释代码结束
  // keep module.id stable when vendor modules does not change
  new webpack.HashedModuleIdsPlugin(),
  // enable scope hoisting
  new webpack.optimize.ModuleConcatenationPlugin(),
  // split vendor js into its own file
  new webpack.optimize.CommonsChunkPlugin({
   name: 'vendor',
   minChunks (module) {
   // any required modules inside node_modules are extracted to vendor
   return (
    module.resource &&
    /\.js$/.test(module.resource) &&
    module.resource.indexOf(
    path.join(dirname, '../node_modules')
    ) === 0
   )
   }
  }),
  // extract webpack runtime and module manifest to its own file in order to
  // prevent vendor hash from being updated whenever app bundle is updated
  new webpack.optimize.CommonsChunkPlugin({
   name: 'manifest',
   minChunks: Infinity
  }),
  // This instance extracts shared chunks from code splitted chunks and bundles them
  // in a separate chunk, similar to the vendor chunk
  // see: https://webpack.js.org/plugins/commons-chunk-plugin/#extra-async-commons-chunk
  new webpack.optimize.CommonsChunkPlugin({
   name: 'app',
   async: 'vendor-async',
   children: true,
   minChunks: 3
  }),
  // copy custom static assets
  new CopyWebpackPlugin([
   {
   from: path.resolve(dirname, '../static'),
   to: config.build.assetsSubDirectory,
   ignore: ['.*']
   }
  ])
  //修改代码开始
  ].concat(utils.htmlPlugin())
  //修改代码结束
 })
 if (config.build.productionGzip) {
  const CompressionWebpackPlugin = require('compression-webpack-plugin')
  webpackConfig.plugins.push(
  new CompressionWebpackPlugin({
   asset: '[path].gz[query]',
   algorithm: 'gzip',
   test: new RegExp(
   '\\.(' +
   config.build.productionGzipExtensions.join('|') +
   ')$'
   ),
   threshold: 10240,
   minRatio: 0.8
  })
  )
 }
 if (config.build.bundleAnalyzerReport) {
  const BundleAnalyzerPlugin = require('webpack-bundle-analyzer').BundleAnalyzerPlugin
  webpackConfig.plugins.push(new BundleAnalyzerPlugin())
 }
module.exports = webpackConfig相信看了本文案例你已经掌握了方法,更多精彩请关注php中文网其它相关文章!
推荐阅读:
以上是如何使用vue設定多頁面的詳細內容。更多資訊請關注PHP中文網其他相關文章!

熱AI工具

Undresser.AI Undress
人工智慧驅動的應用程序,用於創建逼真的裸體照片

AI Clothes Remover
用於從照片中去除衣服的線上人工智慧工具。

Undress AI Tool
免費脫衣圖片

Clothoff.io
AI脫衣器

Video Face Swap
使用我們完全免費的人工智慧換臉工具,輕鬆在任何影片中換臉!

熱門文章

熱工具

記事本++7.3.1
好用且免費的程式碼編輯器

SublimeText3漢化版
中文版,非常好用

禪工作室 13.0.1
強大的PHP整合開發環境

Dreamweaver CS6
視覺化網頁開發工具

SublimeText3 Mac版
神級程式碼編輯軟體(SublimeText3)
 crystaldiskmark是什麼軟體? -crystaldiskmark如何使用?
Mar 18, 2024 pm 02:58 PM
CrystalDiskMark是一款適用於硬碟的小型HDD基準測試工具,可快速測量順序和隨機讀取/寫入速度。接下來就讓小編為大家介紹一下CrystalDiskMark,以及crystaldiskmark如何使用吧~一、CrystalDiskMark介紹CrystalDiskMark是一款廣泛使用的磁碟效能測試工具,用於評估機械硬碟和固態硬碟(SSD)的讀取和寫入速度和隨機I/O性能。它是一款免費的Windows應用程序,並提供用戶友好的介面和各種測試模式來評估硬碟效能的不同方面,並被廣泛用於硬體評
 Linux系統中GDM的工作原理及配置方法
Mar 01, 2024 pm 06:36 PM
標題:Linux系統中GDM的工作原理及設定方法在Linux作業系統中,GDM(GNOMEDisplayManager)是一種常見的顯示管理器,用於控制圖形使用者介面(GUI)登入和使用者會話管理。本文將介紹GDM的工作原理和設定方法,以及提供具體的程式碼範例。一、GDM的工作原理GDM是GNOME桌面環境下的顯示管理器,負責啟動X伺服器並提供登入介面,使用者輸
 foobar2000怎麼下載? -foobar2000怎麼使用
Mar 18, 2024 am 10:58 AM
foobar2000是一款能隨時收聽音樂資源的軟體,各種音樂無損音質帶給你,增強版本的音樂播放器,讓你得到更全更舒適的音樂體驗,它的設計理念是將電腦端的高級音頻播放器移植到手機上,提供更便捷高效的音樂播放體驗,介面設計簡潔明了易於使用它採用了極簡的設計風格,沒有過多的裝飾和繁瑣的操作能夠快速上手,同時還支持多種皮膚和主題,根據自己的喜好進行個性化設置,打造專屬的音樂播放器支援多種音訊格式的播放,它還支援音訊增益功能根據自己的聽力情況調整音量大小,避免過大的音量對聽力造成損害。接下來就讓小編為大
 百度網盤app怎麼用
Mar 27, 2024 pm 06:46 PM
在如今雲端儲存已成為我們日常生活和工作中不可或缺的一部分。百度網盤作為國內領先的雲端儲存服務之一,憑藉其強大的儲存功能、高效的傳輸速度以及便捷的操作體驗,贏得了廣大用戶的青睞。而且無論你是想要備份重要文件、分享資料,還是在線上觀看影片、聽取音樂,百度網盤都能滿足你的需求。但很多用戶可能對百度網盤app的具體使用方法還不了解,那麼這篇教學就將為大家詳細介紹百度網盤app如何使用,還有疑惑的用戶們就快來跟著本文詳細了解一下吧!百度雲網盤怎麼用:一、安裝首先,下載並安裝百度雲軟體時,請選擇自訂安裝選
 網易信箱大師怎麼用
Mar 27, 2024 pm 05:32 PM
網易郵箱,作為中國網友廣泛使用的一種電子郵箱,一直以來以其穩定、高效的服務贏得了用戶的信賴。而網易信箱大師,則是專為手機使用者打造的信箱軟體,它大大簡化了郵件的收發流程,讓我們的郵件處理變得更加便利。那麼網易信箱大師該如何使用,具體又有哪些功能呢,下文中本站小編將為大家帶來詳細的內容介紹,希望能幫助到大家!首先,您可以在手機應用程式商店搜尋並下載網易信箱大師應用程式。在應用寶或百度手機助手中搜尋“網易郵箱大師”,然後按照提示進行安裝即可。下載安裝完成後,我們打開網易郵箱帳號並進行登錄,登入介面如下圖所示
 BTCC教學:如何在BTCC交易所綁定使用MetaMask錢包?
Apr 26, 2024 am 09:40 AM
MetaMask(中文也叫小狐狸錢包)是一款免費的、廣受好評的加密錢包軟體。目前,BTCC已支援綁定MetaMask錢包,綁定後可使用MetaMask錢包進行快速登錄,儲值、買幣等,且首次綁定還可獲得20USDT體驗金。在BTCCMetaMask錢包教學中,我們將詳細介紹如何註冊和使用MetaMask,以及如何在BTCC綁定並使用小狐狸錢包。 MetaMask錢包是什麼? MetaMask小狐狸錢包擁有超過3,000萬用戶,是當今最受歡迎的加密貨幣錢包之一。它可免費使用,可作為擴充功能安裝在網絡
 了解Linux Bashrc:功能、設定與使用方法
Mar 20, 2024 pm 03:30 PM
了解LinuxBashrc:功能、配置與使用方法在Linux系統中,Bashrc(BourneAgainShellruncommands)是一個非常重要的配置文件,其中包含了系統啟動時自動運行的各種命令和設定。 Bashrc文件通常位於使用者的家目錄下,是一個隱藏文件,它的作用是為使用者自訂設定Bashshell的環境。一、Bashrc的功能設定環境
 教你使用 iOS 17.4「失竊裝置保護」新進階功能
Mar 10, 2024 pm 04:34 PM
Apple在周二推出了iOS17.4更新,為iPhone帶來了一系列新功能和修復。這次更新包含了全新的表情符號,同時歐盟用戶也能夠下載其他應用程式商店。此外,更新還加強了對iPhone安全性的控制,引入了更多的「失竊設備保護」設定選項,為用戶提供更多選擇和保障。 "iOS17.3首次引入了「失竊設備保護」功能,為用戶的敏感資料增加了額外的安全保障。當用戶不在家等熟悉地點時,該功能要求用戶首次輸入生物特徵信息,並在一小時後再次輸入資訊才能存取和更改某些數據,如修改AppleID密碼或關閉失竊設備保護功能


