

如何使用VueJs元件父子通訊(附程式碼)
這次帶給大家如何使用VueJs元件父子通訊(附程式碼),使用VueJs元件父子通訊的注意事項有哪些,下面就是實戰案例,一起來看一下。
元件(父子通訊)
一、概括
在一個元件內定義另一個元件,稱為父子組件。
但要注意的是:1.子元件只能在父元件內部使用(寫在父親元件tempalte);
上的資料,每個元件實例的作用域是獨立的;
那如何完成父子如何完成通訊,簡單一句話:props down, events up :父元件透過props 向下傳遞資料給子元件,子元件透過events 給父元件發送
父傳子:Props
子傳父:子:$emit(eventName) 父$on(eventName)
父存取子:ref
下面對三個進行案例講解:
二、父傳子:Props
元件實例的作用域是孤立的。這表示不能 (也不應該) 在子元件的範本內直接引用父元件的資料。要讓子元件使用父元件的數據,需要透過子元件的props 選項
使用Prop傳遞資料包括靜態和動態兩種形式,以下先介紹靜態props
#1、靜態props
<script src="https://unpkg.com/vue"></script>
<p id="example">
 <parent></parent>
</p>
<script>
 //要想子组件能够获取父组件的,那么在子组件必须申明:props
 var childNode = {
  template: '<p>{{message}}</p>',
  props: ['message']
 }
 //这里的message要和上面props中值一致
 var parentNode = {
  template: `
   <p class="parent">
   <child message="我是"></child>
   <child message="徐小小"></child>
   </p>`,
  components: {
   'child': childNode
  }
 };
 // 创建根实例
 new Vue({
  el: '#example',
  components: {
   'parent': parentNode
  }
 })
</script>效果:

命名約定:
對於props宣告的屬性來說,在父級HTML範本中,屬性名需要使用中劃線寫法
子級props屬性宣告時,使用小駝峰或中劃線寫法都可以;而子級模板使用從父級傳來的變數時,需要使用對應的小駝峰寫法
上面這句話什麼意思呢?
<script>
 //这里需要注意的是props可以写成['my-message']或者['myMessage']都是可以的
 //但是template里的属性名,只能是驼峰式{{myMessage}},如果也写成{{my-message}}那么是无效的
 var childNode = {
  template: '<p>{{myMessage}}</p>',
  props: ['myMessage']
 }
 //这里的属性名为my-message
 var parentNode = {
  template: `
   <p class="parent">
   <child my-message="我是"></child>
   <child my-message="徐小小"></child>
   </p>`,
  components: {
   'child': childNode
  }
 };
</script>如果我們childNode中的myMessage改為{{my-message}}看運作結果:

2.動態props
在模板中,要動態地綁定父元件的資料到子模板的props,與綁定到任何普通的HTML特性相類似,就是用v-bind。每當父元件的資料變化時,該變化也會傳導給子元件
 var childNode = {
  template: '<p>{{myMessage}}</p>',
  props: ['my-message']
    }
 var parentNode = {
  template: `
 <p class="parent">
 <child :my-message="data1"></child>
 <child :my-message="data2"></child>
 </p>`,
  components: {
   'child': childNode
  },
  data() {
   return {
    'data1': '111',
    'data2': '222'
   }
  }
};3、傳遞數字
初學者常犯的一個錯誤是使用字面量語法來傳遞數值
<script src="https://unpkg.com/vue"></script>
<p id="example">
 <parent></parent>
</p>
<script>
 var childNode = {
  template: '<p>{{myMessage}}的类型是{{type}}</p>',
  props: ['myMessage'],
  computed: {
   type() {
    return typeof this.myMessage
   }
  }
 }
 var parentNode = {
  template: `
 <p class="parent">
 <my-child my-message="1"></my-child>
 </p>`,
  components: {
   'myChild': childNode
  }
 };
 // 创建根实例
 new Vue({
  el: '#example',
  components: {
   'parent': parentNode
  }
 })
</script>結果:

因為它是一個字面上prop,它的值是字串 "1" 而不是number。如果想傳遞一個實際的number,就需要使用v-bind,從而讓它的值被當作JS表達式計算
如何把String轉成number呢,其實只要改一個地方。
 var parentNode = {
  template: `
 <p class="parent">
 //只要把父组件my-message="1"改成:my-message="1"结果就变成number类型
 <my-child :my-message="1"></my-child>
 </p>`,
};當然你如果想透過v-bind想傳一個string類型,那該怎麼做呢?
我們可以使用動態props,在data屬性中設定對應的數字1
var parentNode = {
 template: `
 <p class="parent">
 <my-child :my-message="data"></my-child>
 </p>`,
 components: {
 'myChild': childNode
 },
 //这里'data': 1代表就是number类型,'data': "1"那就代表String类型
 data(){
 return {
  'data': 1
 }
 }
};三、子轉父:$emit
# 關於$emit的用法
1、父元件可以使用props 把資料傳給子元件。
2、子元件可以使用 $emit 觸發父元件的自訂事件。
子主鍵
<template>
<p class="train-city">
<span @click='select(`大连`)'>大连</span>
</p>
</template>
<script>
export default {
name:'trainCity',
methods:{
select(val) {
let data = {
cityname: val
};
this.$emit('showCityName',data);//select事件触发后,自动触发showCityName事件
}
}
}
</script>父元件
<template>
 <trainCity @showCityName="updateCity" :index="goOrtoCity"></trainCity> //监听子组件的showCityName事件。
<template>
<script>
export default {
 name:'index',
 data () {
 return {
  toCity:"北京"
 }
 }
 methods:{
 updateCity(data){//触发子组件城市选择-选择城市的事件
  this.toCity = data.cityname;//改变了父组件的值
  console.log('toCity:'+this.toCity)
 }
 }
}
</script>結果為:toCity: 大連
第二個案例
<script src="https://unpkg.com/vue"></script>
 <p id="counter-event-example">
  <p>{{ total }}</p>
  <button-counter v-on:increment1="incrementTotal"></button-counter>
  <button-counter v-on:increment2="incrementTotal"></button-counter>
 </p>
<script>
 Vue.component('button-counter', {
  template: '<button v-on:click="increment">{{ counter }}</button>',
  //组件数据就是需要函数式,这样的目的就是让每个button-counter不共享一个counter
  data: function() {
   return {
    counter: 0
   }
  },
  methods: {
   increment: function() {
   //这里+1只对button的值加1,如果要父组件加一,那么就需要$emit事件
    this.counter += 1;
    this.$emit('increment1', [12, 'kkk']);
   }
  }
 });
 new Vue({
  el: '#counter-event-example',
  data: {
   total: 0
  },
  methods: {
   incrementTotal: function(e) {
    this.total += 1;
    console.log(e);
   }
  }
 });
</script>詳細解說:
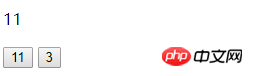
1:button-counter作为父主键,父主键里有个button按钮。
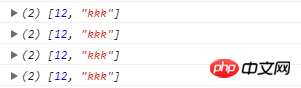
2:两个button都绑定了click事件,方法里: this.$emit('increment1', [12, 'kkk']);,那么就会去调用父类v-on所监听的increment1事件。
3:当increment1事件被监听到,那么执行incrementTotal,这个时候才会把值传到父组件中,并且调用父类的方法。
4:这里要注意第二个button-counter所对应的v-on:'increment2,而它里面的button所对应是this.$emit('increment1', [12, 'kkk']);所以第二个button按钮是无法把值传给他的父主键的。
示例:一个按钮点击一次那么它自身和上面都会自增1,而第二个按钮只会自己自增,并不影响上面这个。
还有就是第一个按钮每点击一次,后台就会打印一次如下:
四、ref ($refs)用法
ref 有三种用法
1.ref 加在普通的元素上,用this.ref.name 获取到的是dom元素
2.ref 加在子组件上,用this.ref.name 获取到的是组件实例,可以使用组件的所有方法。
3.如何利用v-for 和ref 获取一组数组或者dom 节点
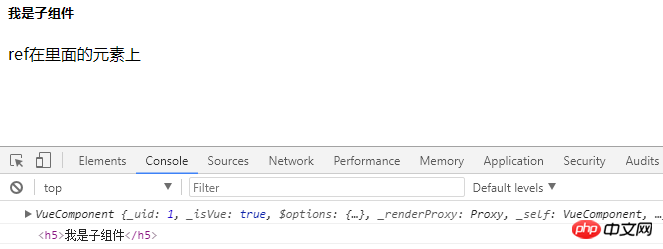
1.ref 加在普通的元素上,用this.ref.name 获取到的是dom元素
<script src="https://unpkg.com/vue"></script>
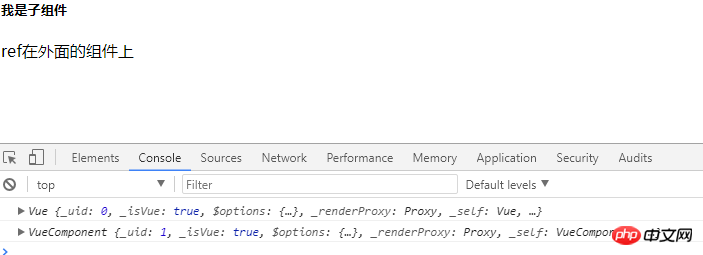
<p id="ref-outside-component" v-on:click="consoleRef">
<component-father ref="outsideComponentRef">
</component-father>
<p>ref在外面的组件上</p>
</p>
<script>
var refoutsidecomponentTem = {
template: "<p class='childComp'><h5>我是子组件</h5></p>"
};
var refoutsidecomponent = new Vue({
el: "#ref-outside-component",
components: {
"component-father": refoutsidecomponentTem
},
methods: {
consoleRef: function() {
console.log(this.); // #ref-outside-component vue实例
console.log(this.$refs.outsideComponentRef); // p.childComp vue实例
}
}
});
</script>效果:当在p访问内点击一次:
2.ref使用在外面的元素上
<script src="https://unpkg.com/vue"></script>
<!--ref在外面的元素上-->
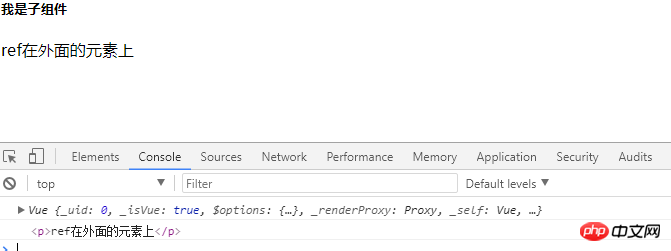
<p id="ref-outside-dom" v-on:click="consoleRef">
<component-father>
</component-father>
<p ref="outsideDomRef">ref在外面的元素上</p>
</p>
<script>
var refoutsidedomTem = {
template: "<p class='childComp'><h5>我是子组件</h5></p>"
};
var refoutsidedom = new Vue({
el: "#ref-outside-dom",
components: {
"component-father": refoutsidedomTem
},
methods: {
consoleRef: function() {
console.log(this); // #ref-outside-dom vue实例
console.log(this.$refs.outsideDomRef); // <p> ref在外面的元素上</p>
}
}
});
</script>效果:当在p访问内点击一次:
3.ref使用在里面的元素上---局部注册组件
<script src="https://unpkg.com/vue"></script>
<!--ref在里面的元素上-->
<p id="ref-inside-dom">
<component-father>
</component-father>
<p>ref在里面的元素上</p>
</p>
<script>
var refinsidedomTem = {
template: "<p class='childComp' v-on:click='consoleRef'>" +
"<h5 ref='insideDomRef'>我是子组件</h5>" +
"</p>",
methods: {
consoleRef: function() {
console.log(this); // p.childComp vue实例
console.log(this.$refs.insideDomRef); // <h5 >我是子组件</h5>
}
}
};
var refinsidedom = new Vue({
el: "#ref-inside-dom",
components: {
"component-father": refinsidedomTem
}
});
</script>效果:当在click范围内点击一次:
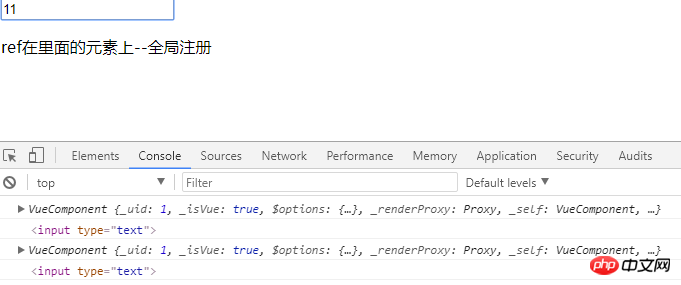
4.ref使用在里面的元素上---全局注册组件
<script src="https://unpkg.com/vue"></script>
<!--ref在里面的元素上--全局注册-->
<p id="ref-inside-dom-all">
<ref-inside-dom-quanjv></ref-inside-dom-quanjv>
</p>
<script>
//v-on:input指当input里值发生改变触发showinsideDomRef事件
Vue.component("ref-inside-dom-quanjv", {
template: "<p class='insideFather'> " +
"<input type='text' ref='insideDomRefAll' v-on:input='showinsideDomRef'>" +
" <p>ref在里面的元素上--全局注册 </p> " +
"</p>",
methods: {
showinsideDomRef: function() {
console.log(this); //这里的this其实还是p.insideFather
console.log(this.$refs.insideDomRefAll); // <input type="text">
}
}
});
var refinsidedomall = new Vue({
el: "#ref-inside-dom-all"
});
</script>效果:当我第一次输入1时,值已改变出发事件,当我第二次在输入时在触发一次事件,所以后台应该打印两次
相信看了本文案例你已经掌握了方法,更多精彩请关注php中文网其它相关文章!
推荐阅读:
以上是如何使用VueJs元件父子通訊(附程式碼)的詳細內容。更多資訊請關注PHP中文網其他相關文章!

熱AI工具

Undresser.AI Undress
人工智慧驅動的應用程序,用於創建逼真的裸體照片

AI Clothes Remover
用於從照片中去除衣服的線上人工智慧工具。

Undress AI Tool
免費脫衣圖片

Clothoff.io
AI脫衣器

Video Face Swap
使用我們完全免費的人工智慧換臉工具,輕鬆在任何影片中換臉!

熱門文章
熱工具

記事本++7.3.1
好用且免費的程式碼編輯器

SublimeText3漢化版
中文版,非常好用

禪工作室 13.0.1
強大的PHP整合開發環境

Dreamweaver CS6
視覺化網頁開發工具

SublimeText3 Mac版
神級程式碼編輯軟體(SublimeText3)


 如何使用磁力鏈接
Feb 18, 2024 am 10:02 AM
如何使用磁力鏈接
Feb 18, 2024 am 10:02 AM
磁力連結是一種用於下載資源的連結方式,相較於傳統的下載方式更為便利和有效率。使用磁力連結可以透過點對點的方式下載資源,而不需要依賴中介伺服器。本文將介紹磁力連結的使用方法及注意事項。一、什麼是磁力連結磁力連結是一種基於P2P(Peer-to-Peer)協定的下載方式。透過磁力鏈接,使用者可以直接連接到資源的發布者,從而完成資源的共享和下載。與傳統的下載方式相比,磁
 如何使用mdf和mds文件
Feb 19, 2024 pm 05:36 PM
如何使用mdf和mds文件
Feb 19, 2024 pm 05:36 PM
mdf檔案和mds檔案怎麼用隨著電腦科技的不斷進步,我們可以透過多種方式來儲存和共享資料。在數位媒體領域,我們經常會遇到一些特殊的文件格式。在這篇文章中,我們將討論一種常見的文件格式—mdf和mds文件,並介紹它們的使用方法。首先,我們需要了解mdf檔案和mds檔案的含義。 mdf是CD/DVD鏡像檔的副檔名,而mds檔則是mdf檔的元資料檔。
 crystaldiskmark是什麼軟體? -crystaldiskmark如何使用?
Mar 18, 2024 pm 02:58 PM
crystaldiskmark是什麼軟體? -crystaldiskmark如何使用?
Mar 18, 2024 pm 02:58 PM
CrystalDiskMark是一款適用於硬碟的小型HDD基準測試工具,可快速測量順序和隨機讀取/寫入速度。接下來就讓小編為大家介紹一下CrystalDiskMark,以及crystaldiskmark如何使用吧~一、CrystalDiskMark介紹CrystalDiskMark是一款廣泛使用的磁碟效能測試工具,用於評估機械硬碟和固態硬碟(SSD)的讀取和寫入速度和隨機I/O性能。它是一款免費的Windows應用程序,並提供用戶友好的介面和各種測試模式來評估硬碟效能的不同方面,並被廣泛用於硬體評
 foobar2000怎麼下載? -foobar2000怎麼使用
Mar 18, 2024 am 10:58 AM
foobar2000怎麼下載? -foobar2000怎麼使用
Mar 18, 2024 am 10:58 AM
foobar2000是一款能隨時收聽音樂資源的軟體,各種音樂無損音質帶給你,增強版本的音樂播放器,讓你得到更全更舒適的音樂體驗,它的設計理念是將電腦端的高級音頻播放器移植到手機上,提供更便捷高效的音樂播放體驗,介面設計簡潔明了易於使用它採用了極簡的設計風格,沒有過多的裝飾和繁瑣的操作能夠快速上手,同時還支持多種皮膚和主題,根據自己的喜好進行個性化設置,打造專屬的音樂播放器支援多種音訊格式的播放,它還支援音訊增益功能根據自己的聽力情況調整音量大小,避免過大的音量對聽力造成損害。接下來就讓小編為大
 pip鏡像來源簡易指南:輕鬆掌握使用方法
Jan 16, 2024 am 10:18 AM
pip鏡像來源簡易指南:輕鬆掌握使用方法
Jan 16, 2024 am 10:18 AM
輕鬆上手:如何使用pip鏡像來源隨著Python在全球的普及,pip成為了Python套件管理的標準工具。然而,許多開發者在使用pip安裝套件時面臨的常見問題是速度慢。這是因為預設情況下,pip從Python官方來源或其他外部來源下載包,而這些來源可能位於海外伺服器,導致下載速度緩慢。為了提高下載速度,我們可以使用pip鏡像來源。什麼是pip鏡像來源?簡單來說,就
 百度網盤app怎麼用
Mar 27, 2024 pm 06:46 PM
百度網盤app怎麼用
Mar 27, 2024 pm 06:46 PM
在如今雲端儲存已成為我們日常生活和工作中不可或缺的一部分。百度網盤作為國內領先的雲端儲存服務之一,憑藉其強大的儲存功能、高效的傳輸速度以及便捷的操作體驗,贏得了廣大用戶的青睞。而且無論你是想要備份重要文件、分享資料,還是在線上觀看影片、聽取音樂,百度網盤都能滿足你的需求。但很多用戶可能對百度網盤app的具體使用方法還不了解,那麼這篇教學就將為大家詳細介紹百度網盤app如何使用,還有疑惑的用戶們就快來跟著本文詳細了解一下吧!百度雲網盤怎麼用:一、安裝首先,下載並安裝百度雲軟體時,請選擇自訂安裝選
 BTCC教學:如何在BTCC交易所綁定使用MetaMask錢包?
Apr 26, 2024 am 09:40 AM
BTCC教學:如何在BTCC交易所綁定使用MetaMask錢包?
Apr 26, 2024 am 09:40 AM
MetaMask(中文也叫小狐狸錢包)是一款免費的、廣受好評的加密錢包軟體。目前,BTCC已支援綁定MetaMask錢包,綁定後可使用MetaMask錢包進行快速登錄,儲值、買幣等,且首次綁定還可獲得20USDT體驗金。在BTCCMetaMask錢包教學中,我們將詳細介紹如何註冊和使用MetaMask,以及如何在BTCC綁定並使用小狐狸錢包。 MetaMask錢包是什麼? MetaMask小狐狸錢包擁有超過3,000萬用戶,是當今最受歡迎的加密貨幣錢包之一。它可免費使用,可作為擴充功能安裝在網絡
 網易信箱大師怎麼用
Mar 27, 2024 pm 05:32 PM
網易信箱大師怎麼用
Mar 27, 2024 pm 05:32 PM
網易郵箱,作為中國網友廣泛使用的一種電子郵箱,一直以來以其穩定、高效的服務贏得了用戶的信賴。而網易信箱大師,則是專為手機使用者打造的信箱軟體,它大大簡化了郵件的收發流程,讓我們的郵件處理變得更加便利。那麼網易信箱大師該如何使用,具體又有哪些功能呢,下文中本站小編將為大家帶來詳細的內容介紹,希望能幫助到大家!首先,您可以在手機應用程式商店搜尋並下載網易信箱大師應用程式。在應用寶或百度手機助手中搜尋“網易郵箱大師”,然後按照提示進行安裝即可。下載安裝完成後,我們打開網易郵箱帳號並進行登錄,登入介面如下圖所示
