

利用vue如何實現裁切圖片同時實現放大、縮小、旋轉功能(詳細教學)
這篇文章主要介紹了vue實現裁切圖片同時實現放大、縮小、旋轉功能,現在分享給大家,也給大家做個參考。
本篇文章主要介紹了vue實現裁切圖片同時實現放大、縮小、旋轉功能,分享給大家,具體如下:
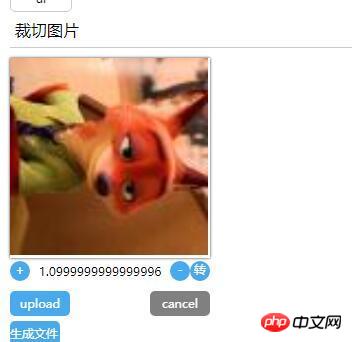
實現效果:
裁切指定區域內的圖片
旋轉圖片
圖片
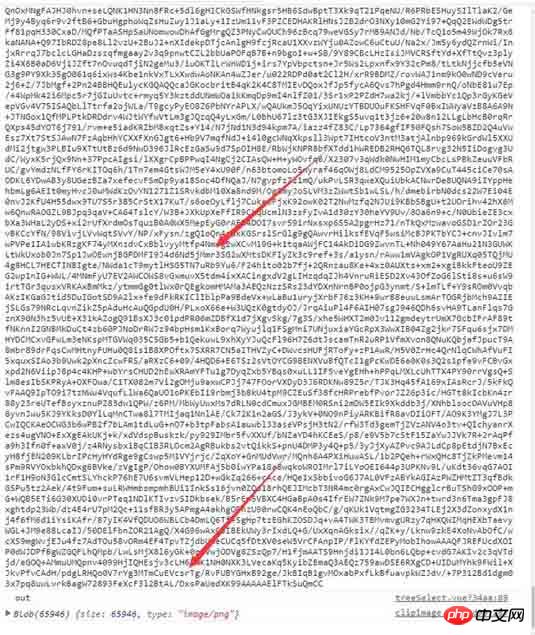
##輸出bolb 格式資料提供給formData 物件
 #效果圖
#效果圖


利用h5 FileReader 對象, 取得 “上傳到瀏覽器的檔案” ,檔案形式為base64形式, 把base64 賦給canvas的上下文。
- 然後在canvas 元素上加入對(mousedown)監聽事件。當使用者滑鼠左鍵在canvas按下:
掛載對 window 物件mouseup 事件, 清除 mousemove事件的綁定。 (同時該事件觸發後會被刪除)
剩下的 放大、縮小 、 旋轉 是對 canvas 物件的操作/座標系統的操作。具體api詳見mdn canvas 文件程式碼
dom.jsexport const on = ({el, type, fn}) => {
if (typeof window) {
if (window.addEventListener) {
el.addEventListener(type, fn, false)
} else {
el.attachEvent(`on${type}`, fn)
}
}
}
export const off = ({el, type, fn}) => {
if (typeof window) {
if (window.addEventListener) {
el.removeEventListener(type, fn)
} else {
el.detachEvent(`on${type}`, fn)
}
}
}
export const once = ({el, type, fn}) => {
const hyFn = (event) => {
try {
fn(event)
}
finally {
off({el, type, fn: hyFn})
}
}
on({el, type, fn: hyFn})
}
// 最后一个
export const fbTwice = ({fn, time = 300}) => {
let [cTime, k] = [null, null]
// 获取当前时间
const getTime = () => new Date().getTime()
// 混合函数
const hyFn = () => {
const ags = argments
return () => {
clearTimeout(k)
k = cTime = null
fn(...ags)
}
}
return () => {
if (cTime == null) {
k = setTimeout(hyFn(...arguments), time)
cTime = getTime()
} else {
if ( getTime() - cTime < 0) {
// 清除之前的函数堆 ---- 重新记录
clearTimeout(k)
k = null
cTime = getTime()
k = setTimeout(hyFn(...arguments), time)
}
}}
}
export const contains = function(parentNode, childNode) {
if (parentNode.contains) {
return parentNode != childNode && parentNode.contains(childNode)
} else {
return !!(parentNode.compareDocumentPosition(childNode) & 16)
}
}
export const addClass = function (el, className) {
if (typeof el !== "object") {
console.log('el is not elem')
return null
}
let classList = el['className']
classList = classList === '' ? [] : classList.split(/\s+/)
if (classList.indexOf(className) === -1) {
classList.push(className)
el.className = classList.join(' ')
} else {
console.warn('warn className current')
}
}
export const removeClass = function (el, className) {
let classList = el['className']
classList = classList === '' ? [] : classList.split(/\s+/)
classList = classList.filter(item => {
return item !== className
})
el.className = classList.join(' ')
}
export const delay = ({fn, time}) => {
let oT = null
let k = null
return () => {
// 当前时间
let cT = new Date().getTime()
const fixFn = () => {
k = oT = null
fn()
}
if (k === null) {
oT = cT
k = setTimeout(fixFn, time)
return
}
if (cT - oT < time) {
oT = cT
clearTimeout(k)
k = setTimeout(fixFn, time)
}
}
}
export const Event = function () {
// 类型
this.typeList = {}
}
Event.prototype.on = function ({type, fn}){
if (this.typeList.hasOwnProperty(type)) {
this.typeList[type].push(fn)
} else {
this.typeList[type] = []
this.typeList[type].push(fn)
}
}
Event.prototype.off = function({type, fn}) {
if (this.typeList.hasOwnProperty(type)) {
let list = this.typeList[type]
let index = list.indexOf(fn)
if (index !== -1 ) {
list.splice(index, 1)
}
} else {
console.warn('not has this type')
}
}
Event.prototype.once = function ({type, fn}) {
const fixFn = () => {
fn()
this.off({type, fn: fixFn})
}
this.on({type, fn: fixFn})
}
Event.prototype.trigger = function (type){
if (this.typeList.hasOwnProperty(type)) {
this.typeList[type].forEach(fn => {
fn()
})
}
}##元件模板
<template>
<p class="jc-clip-image" :style="{width: `${clip.width}`}">
<canvas ref="ctx"
:width="clip.width"
:height="clip.height"
@mousedown="handleClip($event)"
>
</canvas>
<input type="file" ref="file" @change="readFileMsg($event)">
<p class="clip-scale-btn">
<a class="add" @click="handleScale(false)">+</a>
<a @click="rotate" class="right-rotate">转</a>
<a class="poor" @click="handleScale(true)">-</a>
<span>{{scale}}</span>
</p>
<p class="upload-warp">
<a class="upload-btn" @click="dispatchUpload($event)">upload</a>
<a class="upload-cancel">cancel</a>
</p>
<p class="create-canvas">
<a class="to-send-file" @click="outFile" title="请打开控制台">生成文件</a>
</p>
</p>
</template>
<script>
import {on, off, once} from '../../utils/dom'
export default {
ctx: null,
file: null,
x: 0, // 点击canvas x 鼠标地址
y: 0,// 点击canvas y 鼠标地址
xV: 0, // 鼠标移动 x距离
yV: 0, // 鼠标移动 y距离
nX: 0, // 原始坐标点 图像 x
nY: 0,// 原始坐标点 图像 y
img: null,
props: {
src: {
type: String,
default: null
},
clip: {
type: Object,
default () {
return {width: '200px', height: '200px'}
}
}
},
data () {
return {
isShow: false,
base64: null,
scale: 1.5, //放大比例
deg: 0 //旋转角度
}
},
computed: {
width () {
const {clip} = this
return parseFloat(clip.width.replace('px', ''))
},
height () {
const {clip} = this
return parseFloat(clip.height.replace('px', ''))
}
},
mounted () {
const {$options, $refs, width, height} = this
// 初始化 canvas file nX nY
Object.assign($options, {
ctx: $refs.ctx.getContext('2d'),
file: $refs.file,
nX: -width / 2,
nY: -height / 2
})
},
methods: {
// 旋转操作
rotate () {
const {$options, draw} = this
this.deg = (this.deg + Math.PI /2)% (Math.PI * 2)
draw($options.img, $options.nX + $options.xV, $options.nY + $options.yV, this.scale, this.deg)
},
// 处理放大
handleScale (flag) {
const {$options, draw, deg} = this
flag && this.scale > 0.1 && (this.scale = this.scale - 0.1)
!flag && this.scale < 1.9 && (this.scale = this.scale + 0.1)
$options.img && draw($options.img, $options.nX + $options.xV, $options.nY + $options.yV, this.scale, deg)
},
// 模拟file 点击事件
dispatchUpload (e) {
this.clearState()
const {file} = this.$options
e.preventDefault()
file.click()
},
// 读取 input file 信息
readFileMsg () {
const {file} = this.$options
const {draw, createImage, $options: {nX, nY}, scale, deg} = this
const wFile = file.files[0]
const reader = new FileReader()
reader.onload = (e) => {
const img = createImage(e.target.result, (img) => {
draw(img, nX, nY, scale, deg)
})
file.value = null
}
reader.readAsDataURL(wFile)
},
// 生成 图像
createImage (src, cb) {
const img = new Image()
this.$el.append(img)
img.className = 'base64-hidden'
img.onload = () => {
cb(img)
}
img.src = src
this.$options.img = img
},
// 操作画布画图
draw (img, x = 0, y = 0, scale = 0.5,deg = Math.PI ) {
const {ctx} = this.$options
let {width, height} = this
// 图片尺寸
let imgW = img.offsetWidth
let imgH = img.offsetHeight
ctx.save()
ctx.clearRect( 0, 0, width, height)
ctx.translate( width / 2, height / 2, img)
ctx.rotate(deg)
ctx.drawImage(img, x, y, imgW * scale, imgH * scale)
ctx.restore()
},
// ... 事件绑定
handleClip (e) {
const {handleMove, $options, deg} = this
if (!$options.img) {
return
}
Object.assign(this.$options, {
x: e.screenX,
y: e.screenY
})
on({
el: window,
type: 'mousemove',
fn: handleMove
})
once({
el: window,
type: 'mouseup',
fn: (e) =>{
console.log('down')
switch (deg) {
case 0: {
Object.assign($options, {
nX: $options.nX + $options.xV,
nY: $options.nY + $options.yV,
xV: 0,
yV: 0
})
break;
}
case Math.PI / 2: {
Object.assign($options, {
nX: $options.nY + $options.yV,
nY: $options.nX - $options.xV,
xV: 0,
yV: 0
})
break;
}
case Math.PI: {
Object.assign($options, {
nX: $options.nX - $options.xV,
nY: $options.nY - $options.yV,
xV: 0,
yV: 0
})
break;
}
default: {
// $options.nY - $options.yV, $options.nX + $options.xV
Object.assign($options, {
nX: $options.nY - $options.yV,
nY: $options.nX + $options.xV,
xV: 0,
yV: 0
})
}
}
off({
el: window,
type: 'mousemove',
fn: handleMove
})
}
})
},
// ... 处理鼠标移动
handleMove (e){
e.preventDefault()
e.stopPropagation()
const {$options, draw, scale, deg} = this
Object.assign($options, {
xV: e.screenX - $options.x,
yV: e.screenY - $options.y
})
switch (deg) {
case 0: {
draw($options.img, $options.nX + $options.xV, $options.nY + $options.yV, scale, deg)
break;
}
case Math.PI / 2: {
draw($options.img, $options.nY + $options.yV, $options.nX - $options.xV, scale, deg)
break;
}
case Math.PI: {
draw($options.img, $options.nX - $options.xV, $options.nY - $options.yV, scale, deg)
break;
}
default: {
draw($options.img, $options.nY - $options.yV, $options.nX + $options.xV, scale, deg)
break;
}
}
},
// 清除状态
clearState () {
const {$options, width, height} = this
if ($options.img) {
this.$el.removeChild($options.img)
Object.assign($options, {
x: 0,
y: 0,
xV: 0,
yV: 0,
nX: -width / 2,
nY: -height / 2,
img: null,
})
}
},
// 输出文件
outFile () {
const {$refs: {ctx}} = this
console.log(ctx.toDataURL())
ctx.toBlob((blob) => {console.log(blob)})
}
}
}
</script>
<style>
@component-namespace jc {
@component clip-image{
position: relative;
width: 100%;
canvas {
position: relative;
width: 100%;
height: 100%;
cursor: pointer;
box-shadow: 0 0 3px #333;
}
input {
display: none;
}
.base64-hidden {
position: absolute;
top: 0;
left: 0;
display: block;
width: 100%;
height: auto;
z-index: -999;
opacity: 0;
}
.clip-scale-btn {
position: relative;
@utils-clearfix;
margin-bottom: 5px;
text-align: center;
a {
float: left;
width: 20px;
height: 20px;
border-radius: 50%;
color: #fff;
background: #49a9ee;
text-align: center;
cursor: pointer;
}
&>.poor, &>.right-rotate {
float: right;
}
&>span{
position: absolute;
z-index: -9;
top: 0;
left: 0;
display: block;
position: relative;
width: 100%;
text-align: center;
height: 20px;
line-height: 20px;
}
}
.upload-warp {
@utils-clearfix;
.upload-btn,.upload-cancel {
float: left;
display:inline-block;
width: 60px;
height: 25px;
line-height: 25px;
color: #fff;
border-radius: 5px;
background: #49a9ee;
box-shadow: 0 0 0 #333;
text-align: center;
top: 0;
left: 0;
right: 0;
bottom: 0;
margin: auto;
cursor: pointer;
margin-top: 5px;
}
.upload-cancel{
background: gray;
float: right;
}
}
.to-send-file {
margin-top: 5px;
display: block;
width: 50px;
height: 25px;
line-height: 25px;
color: #fff;
border-radius: 5px;
background: #49a9ee;
cursor: pointer;
}
}#利用vue2.0中swiper元件實作輪播(詳細教學)
##################以上是利用vue如何實現裁切圖片同時實現放大、縮小、旋轉功能(詳細教學)的詳細內容。更多資訊請關注PHP中文網其他相關文章!

熱AI工具

Undresser.AI Undress
人工智慧驅動的應用程序,用於創建逼真的裸體照片

AI Clothes Remover
用於從照片中去除衣服的線上人工智慧工具。

Undress AI Tool
免費脫衣圖片

Clothoff.io
AI脫衣器

Video Face Swap
使用我們完全免費的人工智慧換臉工具,輕鬆在任何影片中換臉!

熱門文章
熱工具

記事本++7.3.1
好用且免費的程式碼編輯器

SublimeText3漢化版
中文版,非常好用

禪工作室 13.0.1
強大的PHP整合開發環境

Dreamweaver CS6
視覺化網頁開發工具

SublimeText3 Mac版
神級程式碼編輯軟體(SublimeText3)


 小紅書發布自動儲存圖片怎麼解決?發布自動保存圖片在哪裡?
Mar 22, 2024 am 08:06 AM
小紅書發布自動儲存圖片怎麼解決?發布自動保存圖片在哪裡?
Mar 22, 2024 am 08:06 AM
隨著社群媒體的不斷發展,小紅書已經成為越來越多年輕人分享生活、發現美好事物的平台。許多用戶在發布圖片時遇到了自動儲存的問題,這讓他們感到十分困擾。那麼,如何解決這個問題呢?一、小紅書發布自動儲存圖片怎麼解決? 1.清除快取首先,我們可以嘗試清除小紅書的快取資料。步驟如下:(1)開啟小紅書,點選右下角的「我的」按鈕;(2)在個人中心頁面,找到「設定」並點選;(3)向下捲動,找到「清除快取」選項,點擊確認。清除快取後,重新進入小紅書,嘗試發布圖片看是否解決了自動儲存的問題。 2.更新小紅書版本確保你的小
 抖音評論裡怎麼發圖片?評論區圖片入口在哪裡?
Mar 21, 2024 pm 09:12 PM
抖音評論裡怎麼發圖片?評論區圖片入口在哪裡?
Mar 21, 2024 pm 09:12 PM
隨著抖音短影片的火爆,用戶們在留言區互動變得更加豐富多彩。有些用戶希望在評論中分享圖片,以便更好地表達自己的觀點或情感。那麼,抖音評論裡怎麼發圖片呢?本文將為你詳細解答這個問題,並為你提供一些相關的技巧和注意事項。一、抖音評論裡怎麼發圖片? 1.開啟抖音:首先,你需要開啟抖音APP,並登入你的帳號。 2.找到評論區:瀏覽或發布短影片時,找到想要評論的地方,點擊「評論」按鈕。 3.輸入評論內容:在留言區輸入你的評論內容。 4.選擇傳送圖片:在輸入評論內容的介面,你會看到一個「圖片」按鈕或「+」號按鈕,點
 ppt怎麼讓圖片一張一張出來
Mar 25, 2024 pm 04:00 PM
ppt怎麼讓圖片一張一張出來
Mar 25, 2024 pm 04:00 PM
在PowerPoint中,讓圖片逐一顯示是常用的技巧,可以透過設定動畫效果來實現。本指南詳細介紹了實現此技巧的步驟,包括基本設定、圖片插入、新增動畫、調整動畫順序和時間。此外,還提供了進階設定和調整,例如使用觸發器、調整動畫速度和順序,以及預覽動畫效果。透過遵循這些步驟和技巧,使用者可以輕鬆地在PowerPoint中設定圖片逐一出現,從而提升簡報的視覺效果並吸引觀眾的注意力。
 在 iPhone 上讓圖片更清晰的 6 種方法
Mar 04, 2024 pm 06:25 PM
在 iPhone 上讓圖片更清晰的 6 種方法
Mar 04, 2024 pm 06:25 PM
Apple最近的iPhone可以透過清晰的細節、飽和度和亮度來捕捉回憶。但有時,您可能會遇到一些問題,這些問題可能會導致影像看起來不那麼清晰。儘管iPhone相機上的自動對焦已經取得了長足的進步,可以讓您快速拍照,但相機在某些情況下可能會錯誤地對焦錯誤的拍攝對象,從而使照片在不需要的區域更加模糊。如果iPhone上的照片看起來失焦或整體缺乏清晰度,以下貼文應該可以幫助您使它們更清晰。如何在iPhone上讓圖片更清晰[6種方法]您可以嘗試使用本機的「照片」應用程式來清理照片。如果您需要更多功能和選項
 網頁圖片載入不出來怎麼辦? 6種解決辦法
Mar 15, 2024 am 10:30 AM
網頁圖片載入不出來怎麼辦? 6種解決辦法
Mar 15, 2024 am 10:30 AM
有網友發現打開瀏覽器網頁,網頁上的圖片遲遲加載不出來,是怎麼回事?檢查過網路是正常的,那是哪裡出現了問題呢?下面小編就來跟大家介紹一下網頁圖片載入不出來的六種解決方法。網頁圖片載入不出來: 1、網速問題網頁顯示不出圖片有可能是因為電腦的網路速度比較慢,電腦中開啟的軟體比較多, 而我們造訪的圖片比較大,這就可能因為載入逾時,導致圖片顯示不出來, 可以將比較佔網速的軟體將關掉,可以去任務管理器查看一下。 2、造訪人數過多 網頁顯示不出圖片還有可能是因為我們造訪的網頁,在同時段造訪的
 華為手機如何實現雙微信登入?
Mar 24, 2024 am 11:27 AM
華為手機如何實現雙微信登入?
Mar 24, 2024 am 11:27 AM
華為手機如何實現雙微信登入?隨著社群媒體的興起,微信已成為人們日常生活中不可或缺的溝通工具之一。然而,許多人可能會遇到一個問題:在同一部手機上同時登入多個微信帳號。對於華為手機用戶來說,實現雙微信登入並不困難,本文將介紹華為手機如何實現雙微信登入的方法。首先,華為手機自帶的EMUI系統提供了一個很方便的功能-應用程式雙開。透過應用程式雙開功能,用戶可以在手機上同
 wps文檔中兩張圖片怎麼並排
Mar 20, 2024 pm 04:00 PM
wps文檔中兩張圖片怎麼並排
Mar 20, 2024 pm 04:00 PM
在使用wps辦公室軟體時,我們發現不單單只用一種形式,文字裡會加入表格和圖片,表格裡也可以加入圖片等等,這些都是合併使用的,讓整個文件的內容看起來更豐富,如果需要在文件中插入兩張圖片,而且需要並排排列。我們接下來的課程就可以解決這個問題:wps文件中兩張圖片怎麼並排。 1.首先要開啟WPS軟體,找到你想要調整的圖片。左鍵點擊圖片會彈出一個選單欄,選擇「頁面佈局」。 2、在文字環繞中選擇「緊密型環繞」。 3.當需要的圖片都確認設定為「緊密型文字環繞」之後,便可以把圖片隨意拖動到合適的位置,點擊第一張圖片
 福昕PDF閱讀器如何將pdf文件轉成jpg圖片-福昕PDF閱讀器將pdf文件轉成jpg圖片的方法
Mar 04, 2024 pm 05:49 PM
福昕PDF閱讀器如何將pdf文件轉成jpg圖片-福昕PDF閱讀器將pdf文件轉成jpg圖片的方法
Mar 04, 2024 pm 05:49 PM
你們是不是也在使用福昕PDF閱讀器軟體呢?那麼你們知道福昕PDF閱讀器如何將pdf文檔轉成jpg圖片嗎?下面這篇文章就為大夥帶來了福昕PDF閱讀器將pdf文檔轉成jpg圖片的方法,有興趣的夥伴們快來下文看看吧。先啟動福昕PDF閱讀器,接著在頂部工具列找到“特色功能”,然後選擇“PDF轉其他”功能。在接下來,開啟一個名為「福昕pdf線上轉換」的網頁。在頁面上方右側點選「登入」按鈕進行登錄,然後開啟「PDF轉圖片」功能。之後點擊上傳按鈕並將想要轉換成圖片的pdf檔加入進來,加入完畢後點擊「開始轉
