

在vue-cli中使用vue-router搭建底部導覽列(詳細教學)
這篇文章主要介紹了基於vue-cli vue-router搭建底部導航欄移動前端專案,專案中主要用了Flex佈局,以及viewport相關知識,已達到適應各終端螢幕的目的。需要的朋友可以參考下
vue.js學習踩坑第一步
1.首先安裝vue-cli腳手架
#不多贅述,主要參考Vue 爬坑之路(一)- 使用vue-cli 建構專案
2.專案呈現效果

專案呈現網址:www.zhoupeng520.cn/index.html
專案中主要使用了Flex佈局,以及viewport相關知識,已達到適應各終端螢幕的目的
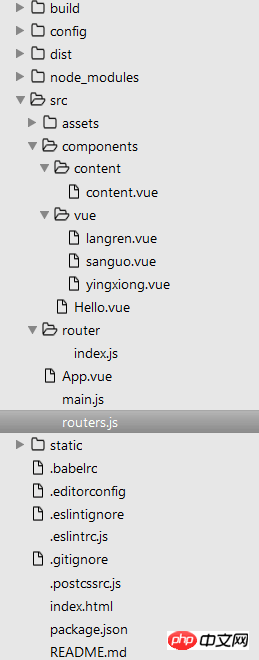
# 3.專案主要目錄
4主要程式碼如下
(1)App.vue
<template>
 <p id="app">
 <router-view class="view"></router-view>
 <p class="nav">
  <router-link class="nav-item" to="/langren">狼人杀</router-link>
  <router-link class="nav-item" to="/sanguo">三国杀</router-link>
  <router-link class="nav-item" to="/yingxiong">英雄杀</router-link>
 </p>
 </p>
</template>
<script>
</script>
<style>
 #app{
 height: 100%;
 display: flex;
 flex-direction: column;
 flex: 1;
 }
 .nav{
 height: 80px;
 line-height: 80px;
 display: flex;
 text-align: center;
 }
 .nav-item{
 flex: 1;
 text-decoration: none;
 }
 .nav-item:link,.nav-item:visited{
 background-color: white;
 color: black;
 }
 .nav-item:hover,.nav-item:active{
 color: white;
 background-color: #C8C6C6;
 }
</style>(2)main.js
// The Vue build version to load with the `import` command
// (runtime-only or standalone) has been set in webpack.base.conf with an alias.
import Vue from 'vue';
import VueRouter from 'vue-router';
import router from './router';
import App from './App';
Vue.config.productionTip = false;
Vue.use(VueRouter);
/* eslint-disable no-new */
new Vue({
el: '#app',
router,
template: '</App>',
render: h => h(App)
});(3)index.js //這個就是路由的設定
這個可以直接寫進main.js 也可像我一樣在main. js中引入,各有各的好處
import Vue from 'vue';
import VueRouter from 'vue-router';
Vue.use(VueRouter);

const router = new VueRouter({
 routes: [{
  path: '/langren',
  component: require('../components/vue/langren.vue')
 }, {
  path: '/sanguo',
  component: require('../components/vue/sanguo.vue')
 }, {
  path: '/yingxiong',
  component: require('../components/vue/yingxiong.vue')
 }, {
  path: '/',
  component: require('../components/content/content.vue')
 }]
});
export default router;也可以直接寫一個routers.js放在src目錄下
(4)router.js
import langren from './components/vue/langren.vue';
import sanguo from './components/vue/sanguo.vue';
import yingxiong from './components/vue/yingxiong.vue';
const routers = [
 {
  path: '/langren',
  component: langren
 },
 {
  path: '/sanguo',
  component: sanguo
 },
 {
  path: '/yingxiong',
  component: yingxiong
 }
];
export default routers;(5 )content.vue
<template>
 <p class="content"><p>我是content!</p></p>
</template>
<script type="text/ecmascript-6">
 export default {};
</script>
<style lang="stylus" rel="stylesheet/stylus">
 .content
  height:100%
  background:blue
  flex:1
  display:flex;
  justify-content:center
  align-items:center
</style>langren.vue / sanguo.vue / yingxiong.vue 程式碼和這個一樣只是顏色和p中字段改了下。
主要程式碼就這些了。
5.另外寫一下主要遇到的報錯以及解決方法
(1)由於是用來es6的語法,所以要遵循它的一些語法規則,所以有的程式碼最後要多一行空行,有的要加分號,有的要加空格,根據報錯來進行更改
(2)semi//indent//no-tabs報錯,在.eslintrc.js更改程式碼如下,主要加入了最後幾行。
// http://eslint.org/docs/user-guide/configuring
module.exports = {
 root: true,
 parser: 'babel-eslint',
 parserOptions: {
 sourceType: 'module'
 },
 env: {
 browser: true,
 },
 // https://github.com/feross/standard/blob/master/RULES.md#javascript-standard-style
 extends: 'standard',
 // required to lint *.vue files
 plugins: [
 'html'
 ],
 // add your custom rules here
 'rules': {
 // allow paren-less arrow functions
 'arrow-parens': 0,
 // allow async-await
 'generator-star-spacing': 0,
 // allow debugger during development
 'no-debugger': process.env.NODE_ENV === 'production' ? 2 : 0,
 'semi': ['error', 'always'],
 'indent': 0,
 'space-before-function-paren': 0,
 "no-tabs":"off"
 }
}上面是我整理給大家的,希望今後會對大家有幫助。
相關文章:
Servlet3.0與純javascript透過Ajax互動的實例詳解
使用Angular CLI產生Angular 5專案教學詳解#
以上是在vue-cli中使用vue-router搭建底部導覽列(詳細教學)的詳細內容。更多資訊請關注PHP中文網其他相關文章!

熱AI工具

Undresser.AI Undress
人工智慧驅動的應用程序,用於創建逼真的裸體照片

AI Clothes Remover
用於從照片中去除衣服的線上人工智慧工具。

Undress AI Tool
免費脫衣圖片

Clothoff.io
AI脫衣器

Video Face Swap
使用我們完全免費的人工智慧換臉工具,輕鬆在任何影片中換臉!

熱門文章
熱工具

記事本++7.3.1
好用且免費的程式碼編輯器

SublimeText3漢化版
中文版,非常好用

禪工作室 13.0.1
強大的PHP整合開發環境

Dreamweaver CS6
視覺化網頁開發工具

SublimeText3 Mac版
神級程式碼編輯軟體(SublimeText3)


 Vue應用程式中遇到vue-router的錯誤「NavigationDuplicated: Avoided redundant navigation to current location」 – 怎麼解決?
Jun 24, 2023 pm 02:20 PM
Vue應用程式中遇到vue-router的錯誤「NavigationDuplicated: Avoided redundant navigation to current location」 – 怎麼解決?
Jun 24, 2023 pm 02:20 PM
Vue應用程式中遇到vue-router的錯誤「NavigationDuplicated:Avoidedredundantnavigationtocurrentlocation」–怎麼解決? Vue.js作為快速且靈活的JavaScript框架在前端應用開發中越來越受歡迎。 VueRouter是Vue.js的一個程式碼庫,用來進行路由管理。然而,有時

 Vue和Vue-Router: 如何在元件之間共用資料?
Dec 17, 2023 am 09:17 AM
Vue和Vue-Router: 如何在元件之間共用資料?
Dec 17, 2023 am 09:17 AM
Vue和Vue-Router:如何在元件之間共用資料?簡介:Vue是一個流行的JavaScript框架,用於建立使用者介面。 Vue-Router是Vue的官方路由管理器,用於實現單一頁面應用程式。在Vue應用中,元件是建構使用者介面的基本單位。在許多情況下,我們需要在不同的元件之間共享資料。本文將介紹一些方法,幫助你在Vue和Vue-Router中實現資料共享,以及
 在Vue應用程式中使用vue-router時出現「Error: Avoided redundant navigation to current location」怎麼解決?
Jun 24, 2023 pm 05:39 PM
在Vue應用程式中使用vue-router時出現「Error: Avoided redundant navigation to current location」怎麼解決?
Jun 24, 2023 pm 05:39 PM
在Vue應用程式中使用vue-router時,有時會出現「Error:Avoidedredundantnavigationtocurrentlocation」的錯誤訊息。這個錯誤訊息的意思是“避免了到當前位置的冗餘導航”,通常是因為重複點擊了同一個連結或使用了相同的路由路徑導致的。那麼,要怎麼解決這個問題呢?使用exact修飾符在定義router
 在Vue應用程式中使用vue-router時出現「Error: Invalid route component: xxx」怎麼解決?
Jun 25, 2023 am 11:52 AM
在Vue應用程式中使用vue-router時出現「Error: Invalid route component: xxx」怎麼解決?
Jun 25, 2023 am 11:52 AM
Vue是一個流行的前端框架,它允許開發者快速建立高效、可重複使用的web應用程式。 Vue-router是Vue框架中的插件,可幫助開發者輕鬆管理應用程式的路由和導航。但是,在使用Vue-router的過程中,有時候會遇到一個常見的錯誤:「Error:Invalidroutecomponent:xxx」。這篇文章將介紹這個錯誤的原因和解決方法。原因在Vu
 Vue-Router: 如何使用路由元資訊來管理路由?
Dec 18, 2023 pm 01:21 PM
Vue-Router: 如何使用路由元資訊來管理路由?
Dec 18, 2023 pm 01:21 PM
Vue-Router:如何使用路由元資訊來管理路由?簡介:Vue-Router是Vue.js官方的路由管理器,它可以幫助我們快速建立單頁應用程式(SPA)。除了常見的路由功能外,Vue-Router還支援使用路由元資訊來管理和控制路由。路由元資訊是可以附加到路由上的自訂屬性,它可以幫助我們實作一些特殊的邏輯或權限控制。一、什麼是路由元資訊?路由元資訊是
 在Vue應用程式中使用vue-router時出現「Error: Failed to resolve async component: xxx」怎麼解決?
Jun 24, 2023 pm 06:28 PM
在Vue應用程式中使用vue-router時出現「Error: Failed to resolve async component: xxx」怎麼解決?
Jun 24, 2023 pm 06:28 PM
在Vue應用中使用vue-router是一種常見的方式來實現路由控制。然而,在使用vue-router的時候,有時會出現「Error:Failedtoresolveasynccomponent:xxx」的錯誤,這是由於非同步元件載入錯誤導致的。在本文中,我們將探討這個問題,並提供解決方案。理解非同步元件載入原理在Vue中,元件可以被同步或非同步地創建
 在Vue應用程式中使用vue-router時出現「Uncaught TypeError: Cannot read property 'push' of undefined」怎麼解決?
Aug 18, 2023 pm 09:24 PM
在Vue應用程式中使用vue-router時出現「Uncaught TypeError: Cannot read property 'push' of undefined」怎麼解決?
Aug 18, 2023 pm 09:24 PM
最近我嘗試在Vue應用中使用vue-router,但我遇到了一個問題:「UncaughtTypeError:Cannotreadproperty'push'ofundefined」。這個問題的原因是什麼,以及該如何解決呢?首先,讓我們來了解一下vue-router。 vue-router是Vue.js官方的路由管理插件,可以幫助我們建立單頁應用程式(SPA
