詳細解讀plotly.js 繪圖庫使用教學(詳細教學)
本篇文章主要介紹了詳解plotly.js 繪圖庫入門使用教程,現在分享給大家,也給大家做個參考。
本文介紹了plotly.js 繪圖庫入門使用教程,分享給大家,具體如下:
Plotly
緣起
這兩天想在前端展現數學函數影像,猜測應該要有成熟的js 函式庫。
於是,簡單的進行了嘗試。
最後決定使用plotly.js,其他的像是function-plot 看起來也不錯,以後有時間再看。
Plotly
plotly.js is the open source JavaScript graphing library that powers Plotly.
Plotly 可以稱為迄今最優秀的繪圖庫,沒有之一。
簡單案例
#程式碼
#<!DOCTYPE html>
<html>
<head>
<meta charset="UTF-8">
<title>plot 绘制图像</title>
</head>
<body>
<p id="tester" style="width:600px;height:250px;"></p>
</body>
<script src="https://cdn.plot.ly/plotly-1.2.0.min.js"></script>
<!-- test -->
<script>
TESTER = document.getElementById('tester');
Plotly.plot(TESTER, [{
x: [1, 2, 3, 4, 5],
y: [1, 2, 4, 8, 16]
}], {
margin: {t: 0}
});
</script>
</html>效果

點圖
繪製數學影像
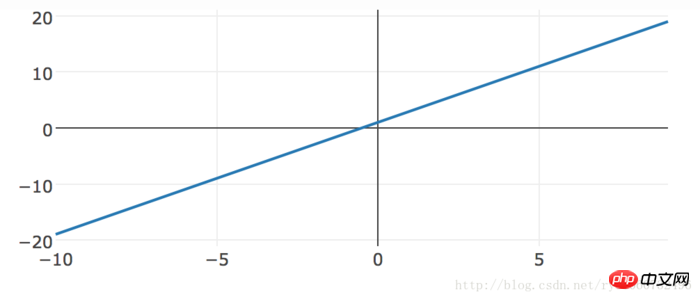
數學影像繪圖的原理。比如說 y = 2*x 1,其實就是一系列 (x,y) 的點連結而成的圖像。
程式碼
<p id="math-function" style="width:600px;height:250px;"></p>
<script src="https://cdn.plot.ly/plotly-1.2.0.min.js"></script>
<script>
TESTER = document.getElementById('math-function');
var x = [], y = [];
for(var i = -10; i < 10; i += 1) {
x.push(i);
y.push(2*i+1);
}
Plotly.plot(TESTER, [{
x: x,
y: y
}], {
margin: {t: 0}
});
</script>#效果

函數圖像
上面是我整理給大家的,希望今後會對大家有幫助。
相關文章:
透過webpack專案如何實現調試以及獨立打包設定檔(詳細教學)
透過vue -cli webpack專案如何實作修改專案名稱
##
以上是詳細解讀plotly.js 繪圖庫使用教學(詳細教學)的詳細內容。更多資訊請關注PHP中文網其他相關文章!

熱AI工具

Undresser.AI Undress
人工智慧驅動的應用程序,用於創建逼真的裸體照片

AI Clothes Remover
用於從照片中去除衣服的線上人工智慧工具。

Undress AI Tool
免費脫衣圖片

Clothoff.io
AI脫衣器

Video Face Swap
使用我們完全免費的人工智慧換臉工具,輕鬆在任何影片中換臉!

熱門文章

熱工具

記事本++7.3.1
好用且免費的程式碼編輯器

SublimeText3漢化版
中文版,非常好用

禪工作室 13.0.1
強大的PHP整合開發環境

Dreamweaver CS6
視覺化網頁開發工具

SublimeText3 Mac版
神級程式碼編輯軟體(SublimeText3)
 如何使用WebSocket和JavaScript實現線上語音辨識系統
Dec 17, 2023 pm 02:54 PM
如何使用WebSocket和JavaScript實現線上語音辨識系統引言:隨著科技的不斷發展,語音辨識技術已成為了人工智慧領域的重要組成部分。而基於WebSocket和JavaScript實現的線上語音辨識系統,具備了低延遲、即時性和跨平台的特點,成為了廣泛應用的解決方案。本文將介紹如何使用WebSocket和JavaScript來實現線上語音辨識系
 WebSocket與JavaScript:實現即時監控系統的關鍵技術
Dec 17, 2023 pm 05:30 PM
WebSocket與JavaScript:實現即時監控系統的關鍵技術引言:隨著互聯網技術的快速發展,即時監控系統在各個領域中得到了廣泛的應用。而實現即時監控的關鍵技術之一就是WebSocket與JavaScript的結合使用。本文將介紹WebSocket與JavaScript在即時監控系統中的應用,並給出程式碼範例,詳細解釋其實作原理。一、WebSocket技
 Win11系統下如何顯示檔案後綴?詳細解讀
Mar 09, 2024 am 08:24 AM
Win11系統下如何顯示檔案後綴?詳細解讀在Windows11作業系統中,檔案後綴是指檔案名稱後面的點及其後面的字符,用來表示檔案的類型。在預設情況下,Windows11系統會隱藏檔案的後綴,這樣在檔案總管中只能看到檔案的名稱而無法直觀地了解檔案的類型。然而,對於某些使用者來說,顯示文件後綴是非常必要的,因為它能幫助他們更好地辨識文件類型以及進行相關操
 如何利用JavaScript和WebSocket實現即時線上點餐系統
Dec 17, 2023 pm 12:09 PM
如何利用JavaScript和WebSocket實現即時線上點餐系統介紹:隨著網路的普及和技術的進步,越來越多的餐廳開始提供線上點餐服務。為了實現即時線上點餐系統,我們可以利用JavaScript和WebSocket技術。 WebSocket是一種基於TCP協定的全雙工通訊協議,可實現客戶端與伺服器的即時雙向通訊。在即時線上點餐系統中,當使用者選擇菜餚並下訂單
 電腦中的cookie資料在哪個資料夾?詳細解讀
Jan 19, 2024 am 10:19 AM
隨著網路的不斷發展,人們越來越離不開瀏覽器。而在瀏覽器中,大家都會或多或少用到cookie這個東西。然而,很多人並不知道cookie資料在哪個資料夾中,今天就來詳細解讀一下。首先,我們要先了解cookie是什麼。簡單來說,cookie是由瀏覽器儲存的一段文字訊息,用於保存使用者在瀏覽器中的一些個人設定或記錄使用者的歷史操作等等。當使用者再次開啟同一個網站時,c
 如何使用WebSocket和JavaScript實現線上預約系統
Dec 17, 2023 am 09:39 AM
如何使用WebSocket和JavaScript實現線上預約系統在當今數位化的時代,越來越多的業務和服務都需要提供線上預約功能。而實現一個高效、即時的線上預約系統是至關重要的。本文將介紹如何使用WebSocket和JavaScript來實作一個線上預約系統,並提供具體的程式碼範例。一、什麼是WebSocketWebSocket是一種在單一TCP連線上進行全雙工
 JavaScript與WebSocket:打造高效率的即時天氣預報系統
Dec 17, 2023 pm 05:13 PM
JavaScript和WebSocket:打造高效的即時天氣預報系統引言:如今,天氣預報的準確性對於日常生活以及決策制定具有重要意義。隨著技術的發展,我們可以透過即時獲取天氣數據來提供更準確可靠的天氣預報。在本文中,我們將學習如何使用JavaScript和WebSocket技術,來建立一個高效的即時天氣預報系統。本文將透過具體的程式碼範例來展示實現的過程。 We
 簡易JavaScript教學:取得HTTP狀態碼的方法
Jan 05, 2024 pm 06:08 PM
JavaScript教學:如何取得HTTP狀態碼,需要具體程式碼範例前言:在Web開發中,經常會涉及到與伺服器進行資料互動的場景。在與伺服器進行通訊時,我們經常需要取得傳回的HTTP狀態碼來判斷操作是否成功,並根據不同的狀態碼來進行對應的處理。本篇文章將教你如何使用JavaScript來取得HTTP狀態碼,並提供一些實用的程式碼範例。使用XMLHttpRequest


