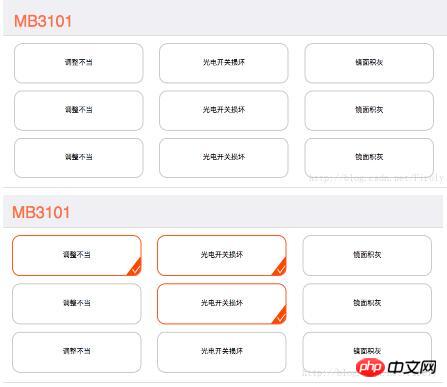
下面我就為大家分享一篇利用vue.js實現被選中狀態的改變方法,具有很好的參考價值,希望對大家有幫助。
在使用原型實現使不選中狀態改變之後,接觸到vue,就想著能不能使用vue再把功能實現一邊,在上篇中的頁面並沒有動態實現頁面,所有的數據也都是直接寫在html。而使用vue之後,已經能夠實現頁面根據資料的多少動態產生。而且程式碼量也大幅減少。
html部分的程式碼:
<p data-role="page " class="page ">
 <p class="center " id="app">
 <p class="group ">
 <ul>
 <li v-for = "todo in todos ">
  <p class="groupheader ">
  <p class="Gheadertext ">{{todo.groupheader}}</p>
  </p>
  <p class = "groupbody ">
  <ul class="list ">
  <li v-for="cell in todo.groupbody" v-on:click="exchange($event)" class="groupcell">
  <p class="celltext">
   {{ cell.text }}
  </p>
  <img class="selectimg" src="img/select.png ">
  </li>
  </ul>
  </p>
  </li>
 </ul>
 </p>
 </p>
</p>資料程式碼:
var datas = {
 todos :[
 {
 groupheader : 'MB3101',
 groupbody:[
  { text: '调整不当'},
  { text: '光电开关损坏' },
  { text: '镜面积灰' },
  { text: '调整不当' },
  { text: '光电开关损坏' },
  { text: '镜面积灰' },
  { text: '调整不当' },
  { text: '光电开关损坏' },
  { text: '镜面积灰' },
 ]
 },
 {
 groupheader : 'MB3102',
 groupbody:[
  { text: '调整不当' },
  { text: '光电开关损坏' },
  { text: '镜面积灰' },
  { text: '调整不当' },
  { text: '光电开关损坏' },
  { text: '镜面积灰' },
  { text: '调整不当' },
  { text: '光电开关损坏' },
  { text: '镜面积灰' },
 ]
 },
 {
 groupheader : 'MB3103',
 groupbody:[
  { text: '调整不当' },
  { text: '光电开关损坏' },
  { text: '镜面积灰' },
  { text: '调整不当' },
  { text: '光电开关损坏' },
  { text: '镜面积灰' },
  { text: '调整不当' },
  { text: '光电开关损坏' },
  { text: '镜面积灰' },
 ]
 }
 ]
}js部分的程式碼:
new Vue({
 el: '#app',
 data:datas,
 methods:{
 exchange:function(event){
  //获取被点击的元素对象
  var a = event.target;
  //获取被点击元素中的子元素<img>
  var cellimg = a.getElementsByTagName("img")[0];
  if(a.className == "groupcell") {
  a.className = "selectcell";
  cellimg.style.display = "block";
 }
 else if(a.className == "selectcell") {
  a.className = "groupcell";
  cellimg.style.display = "none";
 }
 }
 }
})#效果如圖所示:

上面是我整理給大家的,希望今後會對大家有幫助。
相關文章:
以上是使用vue.js如何實作被選取的改變方法的詳細內容。更多資訊請關注PHP中文網其他相關文章!


