透過微信小程式如何實現手勢圖案鎖定螢幕
這篇文章主要為大家詳細介紹了微信小程式實現手勢圖案鎖定螢幕功能,具有一定的參考價值,有興趣的小夥伴們可以參考一下
本文實例為大家分享了微信小程式手勢圖案鎖定畫面的具體程式碼,供大家參考,具體內容如下
參考
H5lock
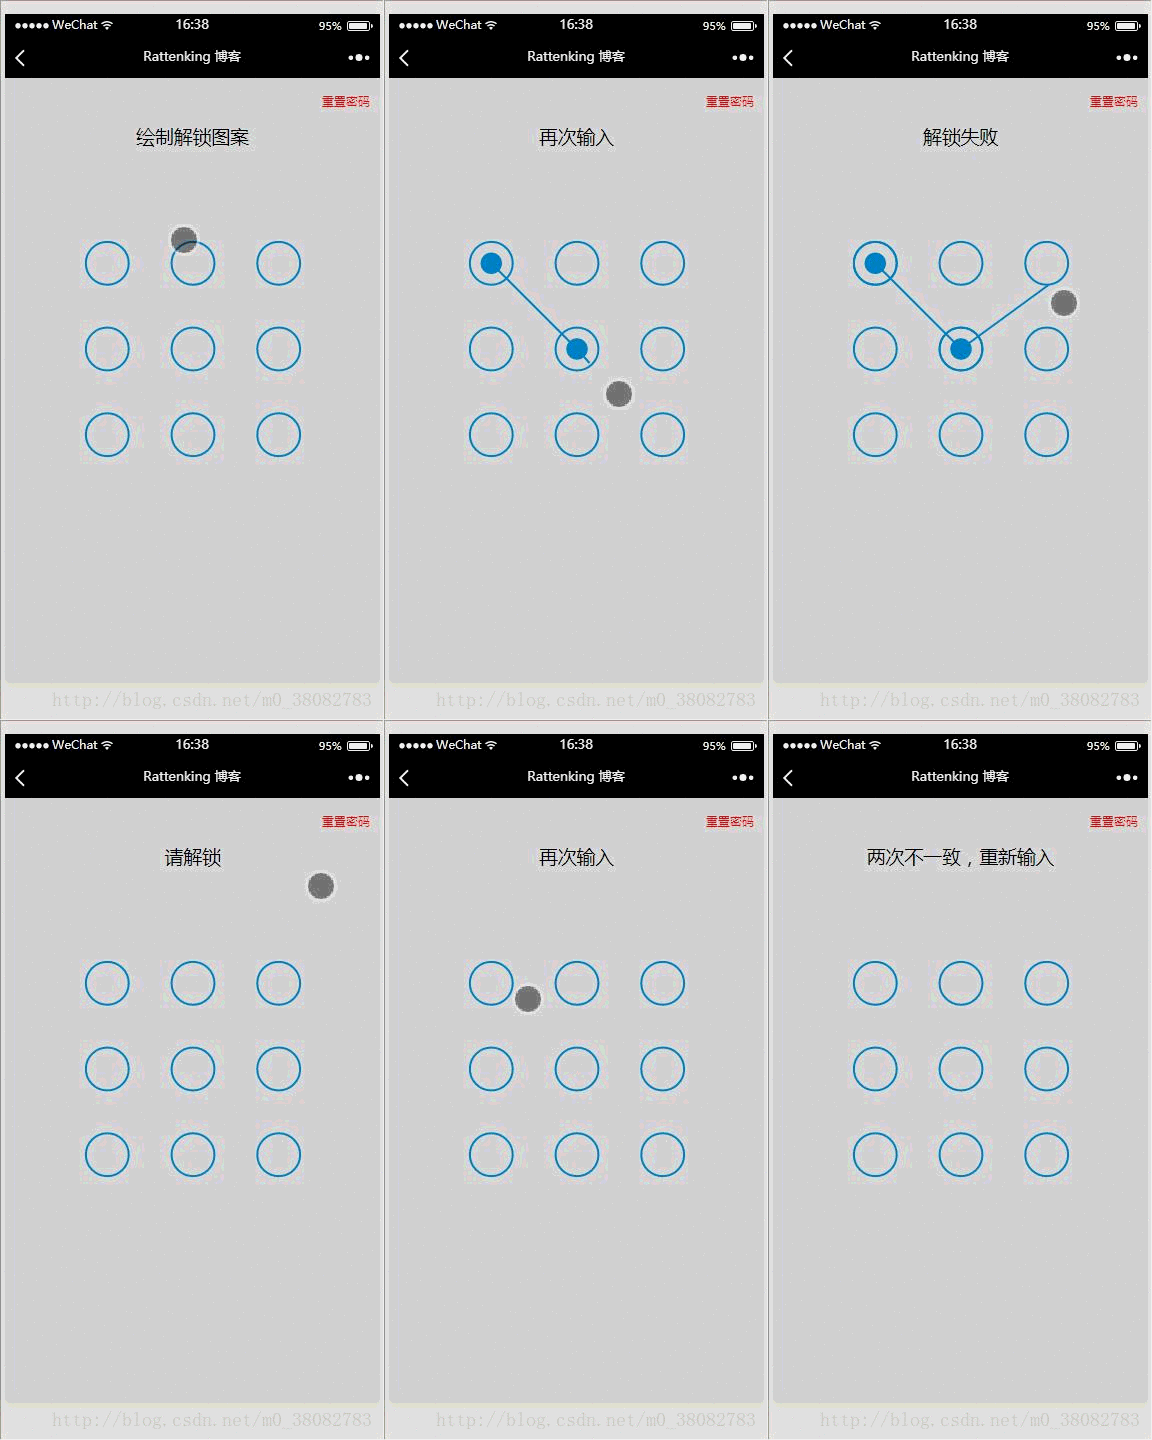
效果圖

WXML
<view class="container">
  <view class="reset" bindtap="resetPwd">重置密码</view>
  <view class="title">{{title}}</view>
  <canvas canvas-id="canvas" class="canvas" bindtouchend="onTouchEnd"
   bindtouchstart="onTouchStart" bindtouchmove="onTouchMove"></canvas>
</view>JS
var Locker = class {
constructor(page,opt){
var obj = opt || {};
this.page = page;
this.width = obj.width || 300;
this.height = obj.height || 300;
this.canvasId = obj.id || 'canvas';
this.cleColor = obj.cleColor || '#CFE6FF';
this.cleCenterColor = obj.cleCenterColor || '#CFE6FF';
var chooseType = obj.chooseType || 3;
// 判断是否缓存有chooseType,有就用缓存,没有就用传入的值
this.chooseType = Number(wx.getStorageSync('chooseType')) || chooseType;
this.init();
}
init(){
this.pswObj = wx.getStorageSync('passwordxx') ? {
step: 2,
spassword: JSON.parse(wx.getStorageSync('passwordxx'))
} : {};
this.makeState();
// 创建 canvas 绘图上下文(指定 canvasId)
this.ctx = wx.createCanvasContext(this.canvasId,this);
this.touchFlag = false;
this.lastPoint = [];
// 绘制圆
this.createCircle();
// canvas绑定事件
this.bindEvent();
}
makeState() {
if (this.pswObj.step == 2) {
this.page.setData({ title:'请解锁'});
} else if (this.pswObj.step == 1) {
// pass
} else {
// pass
}
}
// 画圆方法
drawCle(x,y){
// 设置边框颜色。
this.ctx.setStrokeStyle(this.cleColor); // 注意用set
// 设置线条的宽度。
this.ctx.setLineWidth(2); // 注意用set
// 开始创建一个路径,需要调用fill或者stroke才会使用路径进行填充或描边。
this.ctx.beginPath();
// 画一条弧线。
this.ctx.arc(x, y, this.r, 0, Math.PI * 2, true);
// 关闭一个路径
this.ctx.closePath();
// 画出当前路径的边框。默认颜色色为黑色。
this.ctx.stroke();
// 将之前在绘图上下文中的描述(路径、变形、样式)画到 canvas 中。
this.ctx.draw(true);
}
// 计算两点之间的距离的方法
getDis(a, b) {
return Math.sqrt(Math.pow(a.x - b.x, 2) + Math.pow(a.y - b.y, 2));
}
// 创建解锁点的坐标,根据canvas的大小(默认300px)来平均分配半径
createCircle() {
var n = this.chooseType;
var count = 0;
// 计算圆半径
this.r = this.width / (2 + 4 * n);
this.arr = [];
this.restPoint = [];
var r = this.r;
// 获取圆心坐标,以及当前圆所代表的数
for (var i = 0; i < n; i++) {
for (var j = 0; j < n; j++) {
count++;
var obj = {
x: j * 4 * r + 3 * r,
y: i * 4 * r + 3 * r,
index: count
};
this.arr.push(obj);
this.restPoint.push(obj);
}
}
// 清空画布
this.ctx.clearRect(0, 0, this.width, this.height);
// 绘制所有的圆
this.arr.forEach(current => {this.drawCle(current.x, current.y);});
}
// 设置密码绘制
getPosition(e) { // 获取touch点相对于canvas的坐标
var po = {
x: e.touches[0].x,
y: e.touches[0].y
};
return po;
}
precisePosition(po){
var arr = this.restPoint.filter(current => Math.abs(po.x - current.x) < this.r && Math.abs(po.y - current.y) < this.r);
return arr[0];
}
drawPoint(obj) { // 初始化圆心
for (var i = 0; i < this.lastPoint.length; i++) {
this.ctx.setFillStyle(this.cleCenterColor); // 注意用set方法
this.ctx.beginPath();
this.ctx.arc(this.lastPoint[i].x, this.lastPoint[i].y, this.r / 2, 0, Math.PI * 2, true);
this.ctx.closePath();
this.ctx.fill();
this.ctx.draw(true);
}
}
drawLine(po) {// 解锁轨迹
this.ctx.beginPath();
this.ctx.lineWidth = 3;
this.ctx.moveTo(this.lastPoint[0].x,this.lastPoint[0].y);
for (var i = 1; i < this.lastPoint.length; i++) {
this.ctx.lineTo(this.lastPoint[i].x, this.lastPoint[i].y);
}
this.ctx.lineTo(po.x, po.y);
this.ctx.stroke();
this.ctx.closePath();
this.ctx.draw(true);
}
pickPoints(fromPt, toPt) {
var lineLength = this.getDis(fromPt, toPt);
var dir = toPt.index > fromPt.index ? 1 : -1;
var len = this.restPoint.length;
var i = dir === 1 ? 0 : (len - 1);
var limit = dir === 1 ? len : -1;
while (i !== limit) {
var pt = this.restPoint[i];
if (this.getDis(pt, fromPt) + this.getDis(pt, toPt) === lineLength) {
this.drawPoint(pt.x, pt.y);
this.lastPoint.push(pt);
this.restPoint.splice(i, 1);
if (limit > 0) {
i--;
limit--;
}
}
i += dir;
}
}
update(po) {// 核心变换方法在touchmove时候调用
this.ctx.clearRect(0, 0, this.width, this.height);
for (var i = 0; i < this.arr.length; i++) { // 每帧先把面板画出来
this.drawCle(this.arr[i].x, this.arr[i].y);
}
this.drawPoint(this.lastPoint);// 每帧花轨迹
this.drawLine(po, this.lastPoint);// 每帧画圆心
for (var i = 0; i < this.restPoint.length; i++) {
var pt = this.restPoint[i];
if (Math.abs(po.x - pt.x) < this.r && Math.abs(po.y - pt.y) < this.r) {
this.drawPoint(pt.x, pt.y);
this.pickPoints(this.lastPoint[this.lastPoint.length - 1], pt);
break;
}
}
}
checkPass(psw1, psw2) {// 检测密码
var p1 = '',
p2 = '';
for (var i = 0; i < psw1.length; i++) {
p1 += psw1[i].index + psw1[i].index;
}
for (var i = 0; i < psw2.length; i++) {
p2 += psw2[i].index + psw2[i].index;
}
return p1 === p2;
}
storePass(psw) {// touchend结束之后对密码和状态的处理
if (this.pswObj.step == 1) {
if (this.checkPass(this.pswObj.fpassword, psw)) {
this.pswObj.step = 2;
this.pswObj.spassword = psw;
this.page.setData({title:'密码保存成功'});
this.drawStatusPoint('#2CFF26');
wx.setStorageSync('passwordxx', JSON.stringify(this.pswObj.spassword));
wx.setStorageSync('chooseType', this.chooseType);
} else {
this.page.setData({ title: '两次不一致,重新输入' });
this.drawStatusPoint('red');
delete this.pswObj.step;
}
} else if (this.pswObj.step == 2) {
if (this.checkPass(this.pswObj.spassword, psw)) {
this.page.setData({ title: '解锁成功' });
this.drawStatusPoint('#2CFF26');
} else {
this.drawStatusPoint('red');
this.page.setData({ title: '解锁失败' });
}
} else {
this.pswObj.step = 1;
this.pswObj.fpassword = psw;
this.page.setData({ title: '再次输入' });
}
}
drawStatusPoint(type) { // 初始化状态线条
for (var i = 0; i < this.lastPoint.length; i++) {
this.ctx.strokeStyle = type;
this.ctx.beginPath();
this.ctx.arc(this.lastPoint[i].x, this.lastPoint[i].y, this.r, 0, Math.PI * 2, true);
this.ctx.closePath();
this.ctx.stroke();
this.ctx.draw(true);
}
}
updatePassword() {
wx.removeStorageSync('passwordxx');
wx.removeStorageSync('chooseType');
this.pswObj = {};
this.page.setData({ title: '绘制解锁图案' });
this.reset();
}
reset() {
this.makeState();
this.createCircle();
}
bindEvent(){
var self = this;
this.page.onTouchStart = function(e){
var po = self.getPosition(e);
self.lastPoint = [];
for (var i = 0; i < self.arr.length; i++) {
if (Math.abs(po.x - self.arr[i].x) < self.r && Math.abs(po.y - self.arr[i].y) < self.r) {
self.touchFlag = true;
self.drawPoint(self.arr[i].x, self.arr[i].y);
self.lastPoint.push(self.arr[i]);
self.restPoint.splice(i, 1);
break;
}
}
}
this.page.onTouchMove = function(e){
if (self.touchFlag) {
self.update(self.getPosition(e));
}
}
this.page.onTouchEnd = function(e){
if (self.touchFlag) {
self.touchFlag = false;
self.storePass(self.lastPoint);
setTimeout(function () {
self.reset();
}, 300);
}
}
}
}
module.exports = Locker;上面是我整理給大家的,希望今後會對大家有幫助。
相關文章:
#以上是透過微信小程式如何實現手勢圖案鎖定螢幕的詳細內容。更多資訊請關注PHP中文網其他相關文章!

熱AI工具

Undresser.AI Undress
人工智慧驅動的應用程序,用於創建逼真的裸體照片

AI Clothes Remover
用於從照片中去除衣服的線上人工智慧工具。

Undress AI Tool
免費脫衣圖片

Clothoff.io
AI脫衣器

Video Face Swap
使用我們完全免費的人工智慧換臉工具,輕鬆在任何影片中換臉!

熱門文章

熱工具

記事本++7.3.1
好用且免費的程式碼編輯器

SublimeText3漢化版
中文版,非常好用

禪工作室 13.0.1
強大的PHP整合開發環境

Dreamweaver CS6
視覺化網頁開發工具

SublimeText3 Mac版
神級程式碼編輯軟體(SublimeText3)
 神秘的JavaScript:它的作用以及為什麼重要
Apr 09, 2025 am 12:07 AM
JavaScript是現代Web開發的基石,它的主要功能包括事件驅動編程、動態內容生成和異步編程。 1)事件驅動編程允許網頁根據用戶操作動態變化。 2)動態內容生成使得頁面內容可以根據條件調整。 3)異步編程確保用戶界面不被阻塞。 JavaScript廣泛應用於網頁交互、單頁面應用和服務器端開發,極大地提升了用戶體驗和跨平台開發的靈活性。
 誰得到更多的Python或JavaScript?
Apr 04, 2025 am 12:09 AM
Python和JavaScript開發者的薪資沒有絕對的高低,具體取決於技能和行業需求。 1.Python在數據科學和機器學習領域可能薪資更高。 2.JavaScript在前端和全棧開發中需求大,薪資也可觀。 3.影響因素包括經驗、地理位置、公司規模和特定技能。
 如何使用JavaScript將具有相同ID的數組元素合併到一個對像中?
Apr 04, 2025 pm 05:09 PM
如何在JavaScript中將具有相同ID的數組元素合併到一個對像中?在處理數據時,我們常常會遇到需要將具有相同ID�...
 JavaScript難以學習嗎?
Apr 03, 2025 am 12:20 AM
學習JavaScript不難,但有挑戰。 1)理解基礎概念如變量、數據類型、函數等。 2)掌握異步編程,通過事件循環實現。 3)使用DOM操作和Promise處理異步請求。 4)避免常見錯誤,使用調試技巧。 5)優化性能,遵循最佳實踐。
 如何實現視差滾動和元素動畫效果,像資生堂官網那樣?
或者:
怎樣才能像資生堂官網一樣,實現頁面滾動伴隨的動畫效果?
Apr 04, 2025 pm 05:36 PM
實現視差滾動和元素動畫效果的探討本文將探討如何實現類似資生堂官網(https://www.shiseido.co.jp/sb/wonderland/)中�...
 console.log輸出結果差異:兩次調用為何不同?
Apr 04, 2025 pm 05:12 PM
深入探討console.log輸出差異的根源本文將分析一段代碼中console.log函數輸出結果的差異,並解釋其背後的原因。 �...
 前端開發中如何實現類似 VSCode 的面板拖拽調整功能?
Apr 04, 2025 pm 02:06 PM
探索前端中類似VSCode的面板拖拽調整功能的實現在前端開發中,如何實現類似於VSCode...


