這篇文章給大家透過程式碼實例分析了vue.js資料傳遞以及資料分發slot的相關知識,有這方面興趣的朋友參考下吧。
一、元件間的資料傳遞
1.父元件取得子元件的資料
*子元件把自己的數據,傳送到父級
*vm.$emit(事件名稱,資料);
*v-on: @
範例用法:當點擊send按鈕的時候,「111 」變成「我是子元件的資料」
<!DOCTYPE html>
<html lang="en">
<head>
<meta charset="UTF-8">
<title>父级获取子级的数据</title>
<script src="bower_components/vue/dist/vue.js"></script>
<style>
</style>
</head>
<body>
<p>
<aaa>
</aaa>
</p>
<template>
<span>我是父级 -> {{msg}}</span>
//自动调用get方法,@child-msg和下面的this.$emit('child-msg',this.a)相对应
<bbb @child-msg="get"></bbb>
</template>
<template>
<h3>子组件-</h3>
<input type="button" value="send" @click="send">
</template>
<script>
var vm=new Vue({
el:'#box',
data:{
a:'aaa'
},
components:{
'aaa':{
data:function(){
return {
msg:111,
msg2:'我是父组件的数据'
}
},
template:'#aaa',
methods:{
//这里的msg实际上就是子组件传递给父组件的数据
get:function(msg){
this.msg=msg;
}
},
components:{
'bbb':{
data:function(){
return {
a:'我是子组件的数据'
}
},
template:'#bbb',
methods:{
send:function(){
this.$emit('child-msg',this.a);
}
}
}
}
}
}
});
</script>
</body>
</html>2、子元件取得父元件的資料
在呼叫子元件:
子元件之內:
props:['m','myMsg']
props:{
'm':String,
'myMsg':Number
}<!DOCTYPE html>
<html lang="en">
<head>
<meta charset="UTF-8">
<title>自己获取父级的数据</title>
<script src="bower_components/vue/dist/vue.js"></script>
<style>
</style>
</head>
<body>
<p>
<p>{{a}}</p>
<aaa>
{{msg}}
</aaa>
</p>
<template>
<h1>11111</h1>
<bbb :mmm="msg2" :my-msg="msg"></bbb>
</template>
<script>
var vm=new Vue({
el:'#box',
data:{
a:'a'
},
components:{
'aaa':{
data:function(){
return {
msg:111,
msg2:'我是父组件的数据'
}
},
template:'#aa',
components:{
'bbb':{
props:{
'mmm':String,
'myMsg':Number
},
template:'<h3>我是bbb组件->{{mmm}} <br> {{myMsg}}</h3>'
}
}
}
}
});
</script>
</body>
</html>運行結果:

、內容分發:
Vue.js提供了一個混合父元件內容與子元件自己模版的方式:slot,用來佔一個位置
#1、基本用法
<!DOCTYPE html>
<html lang="en">
<head>
<meta charset="UTF-8">
<title>slot保留原来的位置</title>
<script src="bower_components/vue/dist/vue.js"></script>
<style>
</style>
</head>
<body>
<p>
<aaa>
<ul>
<li>1111</li>
<li>2222</li>
<li>3333</li>
</ul>
</aaa>
<hr>
<aaa>
</aaa>
</p>
<template>
<h1>xxxx</h1>
<slot>这是默认的情况</slot>
<p>welcome vue</p>
</template>
<script>
var vm=new Vue({
el:'#box',
data:{
a:'aaa'
},
components:{
'aaa':{
template:'#aaa'
}
}
});
</script>
</body>
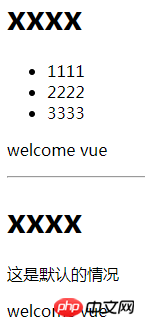
</html>運行結果:ul標籤裡面的內容沒有被覆蓋,如果不使用slot,ul標籤裡的內容將會被覆蓋

2、slot的name屬性
<!DOCTYPE html>
<html lang="en">
<head>
<meta charset="UTF-8">
<title>slot中name属性的使用</title>
<script src="bower_components/vue/dist/vue.js"></script>
<style>
</style>
</head>
<body>
<p>
<aaa>
<ul slot="ul-slot"> //这里slot的名字要与下面slot中name属性相对应
<li>1111</li>
<li>2222</li>
<li>3333</li>
</ul>
<ol slot="ol-slot"> //用法同上
<li>111</li>
<li>222</li>
<li>333</li>
</ol>
</aaa>
<hr>
<aaa>
</aaa>
</p>
<template>
<h1>xxxx</h1>
<slot name="ol-slot">这是默认的情况</slot> //设置name属性,给slot命名
<p>welcome vue</p>
<slot name="ul-slot">这是默认的情况2</slot>
</template>
<script>
var vm=new Vue({
el:'#box',
data:{
a:'aaa'
},
components:{
'aaa':{
template:'#aaa'
}
}
});
</script>
</body>
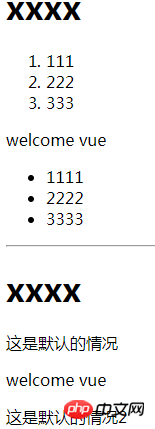
</html>運行結果:

#上面是我整理給大家的,希望今後對大家有幫助。
相關文章:
以上是在vue.js中如何實作資料分發slot的詳細內容。更多資訊請關注PHP中文網其他相關文章!


