

如何對Angular4+router進行使用
這次帶給大家怎麼對Angular4 router進行使用,對Angular4 router進行使用的注意事項有哪些,下面就是實戰案例,一起來看一下。
router,也就是路由,是前端中一個比較重要的概念。透過router把特定的位址和對應的頁面關聯後分離出來,以達到解耦的目的。在src/app目錄下方新建一個detail的資料夾,建立一個名為gundam-detail.component的檔案。
import { Component } from '@angular/core';
import { Gundam } from '../../model/gundam';
@Component({
  template: `
    <p *ngIf="selectedGundam">
    <span>{{selectedGundam.name}}</span>
    <span>{{selectedGundam.type}}</span>
    </p>
  `
})
export class GundamDetailComponent {
    selectedGundam: Gundam;
}ps:有關命名,基本上是採用xxx “-” “業務類型” “元件類型”的命名方式,至少官方文件上是這麼推薦的。當然給組件取名叫豬頭三也可以,但是標準的命名可以增加組件的可讀性。即便是不介意隨意起名坑後來的維護者,誰也不能確定很久以後自己不會再對同一段程式碼進行重構。所以,做人還是要厚道。不寫註釋也就算了,取名還是規範一點好。
ps2:有關分包的方式,有的人喜歡把view放一起、controller放一起,再根據邏輯進一步細分;也有人是倒過來,先分邏輯再分view和controller。這個好像沒有什麼統一的定論,我個人是喜歡後一種,所以本項目採用後一種分法。
目前文件裡沒什麼東西,只是簡單的把app.component.ts裡的temple搬過來而已。
先明確需求,再開始寫router。
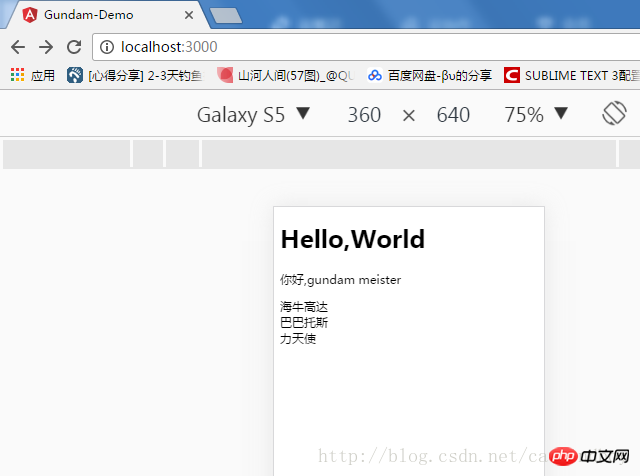
需求:點選gundam清單頁面中的任一item,可以跳到該gundam的詳情頁。
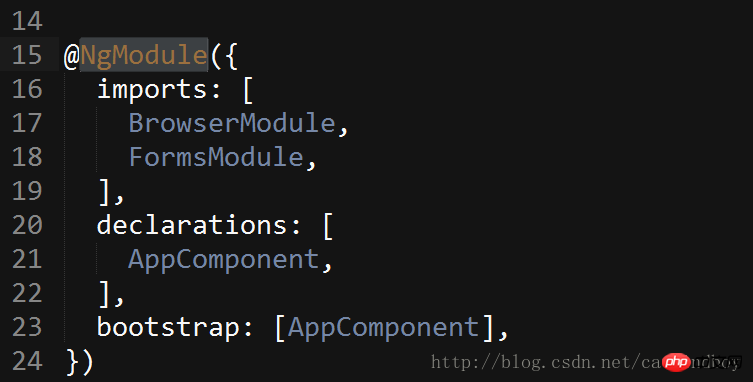
作為angular的元件,希望在頁面中使用router,必須先在app.module.ts裡宣告。
ps:之前的業務和app.module.ts沒什麼關係,但這並不是說它不重要。 app.module.ts相當於android的mainifist文件,對整個專案進行統籌管理。
開啟app.module.ts:
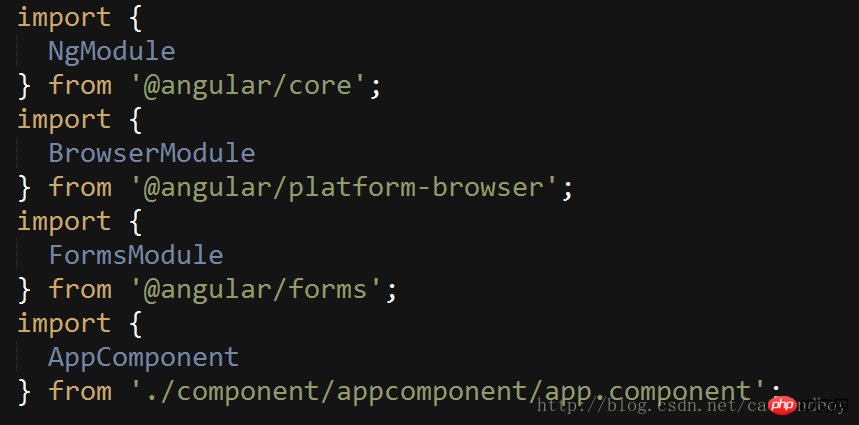
#imports:在元件頁面裡用到基礎類別。
declarations:現有custom元件宣告。
bootstrap:可以理解為Android的main launch,專案啟動時從那個元件進入。
需要使用router前先引入:
import { RouterModule } from '@angular/router';因為要呼叫RouterModule的forRoot方法,RouterModule.forRoot 又是專案中用到的基礎類,所以需要寫在imports裡。
 imports: [
  BrowserModule,
  FormsModule,
  RouterModule.forRoot()
 ],
RouterModule.forRoot 接受兩個參數,第一個是route數組來表示跳轉,第二個參數常年忽略,我也不知道有什麼用。
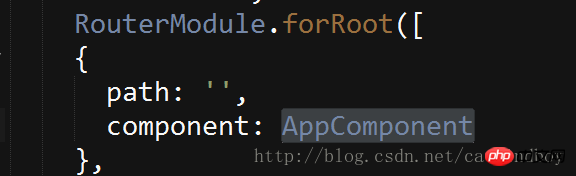
route類別包含2個比較關鍵的屬性:path和component,透過存取path,可以找到唯一的component。
在forRoot裡新增上包含主頁和詳情頁2個component的route陣列。
RouterModule.forRoot([
  {
    path: '',
    component: AppComponent
  },
  {
    path: '',
    component: GundamDetailComponent
  }
])app.module.ts現在看起來是這樣的:
import {
NgModule
} from '@angular/core';
import {
BrowserModule
} from '@angular/platform-browser';
import {
FormsModule
} from '@angular/forms';
import { RouterModule }  from '@angular/router';
import {
AppComponent
} from './component/appcomponent/app.component';
import { GundamDetailComponent } from './component/detail/gundam-detail.component';
@NgModule({
  imports: [
    BrowserModule,
    FormsModule,
    RouterModule.forRoot([
      {
        path: '',
        component: AppComponent
      },
      {
        path: '',
        component: GundamDetailComponent
      }
      ])
  ],
  declarations: [
    AppComponent,
    GundamDetailComponent
  ],
  bootstrap: [AppComponent],
})
export class AppModule {}2個path都還空著,因為還少一個關鍵的東西,就算寫上也會報錯:

Error: Cannot find primary outlet to load 'AppComponent'
在angular裡,router是要搭配標籤router-outlet來使用的,換句話說router決定顯示哪個元件,而由router-outlet決定顯示在哪裡。
在app.component.ts裡的template加上標籤
<router-outlet></router-outlet>
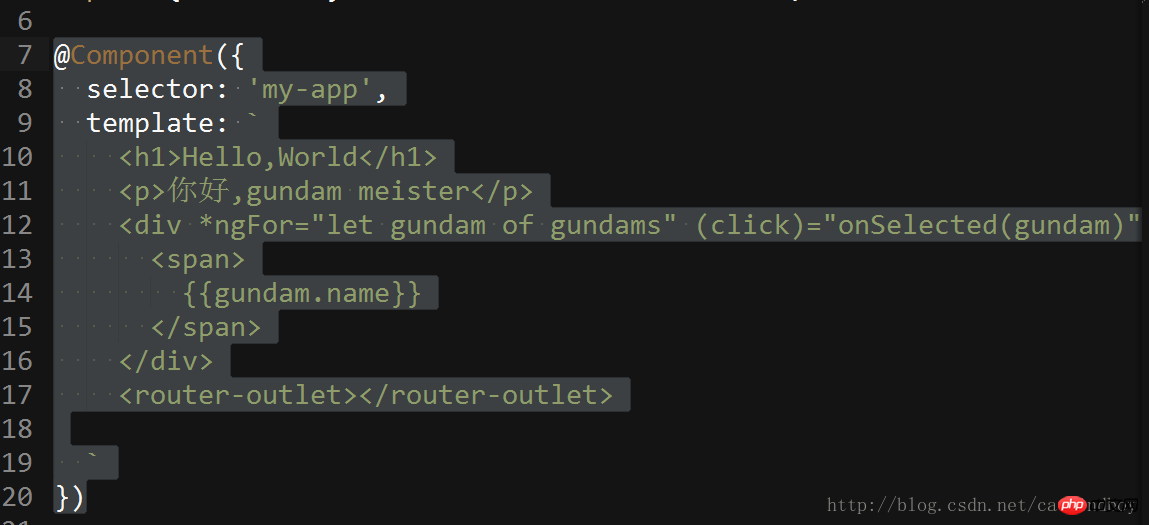
然後不出意外的顯示了2個主頁:

app.component.ts是一個元件也是一個頁面,angular先從bootstrap裡進入了app.component.ts渲染了介面(也就是router-outlet上面的部分)。碰到又去找router,發現對應的router也有元件,於是又載入了一遍。
所以为了正常显示,也要把主页也单独抽出来。所有组件通过app.component.ts里的来进行加载。而app.component.ts作为整个demo的最外层容器可以进行一些公共的操作(典型:后退动作)。
在src下新建host包,新建gundam-host.component.ts文件。
基本上可以把整个app挪过来,删除掉out标签,删掉selector(暂时用不到)。
import {
Component
} from '@angular/core';
import { Gundam } from '../../model/gundam';
import { GUNDAMS } from './../../service/data';
@Component({
  template: `
    <p *ngFor="let gundam of gundams" (click)="onSelected(gundam)">
      <span>
        {{gundam.name}}
      </span>
    </p>
  `
})
export class GundamHostComponent {
  gundam: Gundam = {
    name: '海牛',
    type: 'NewType'
  };
  gundams = GUNDAMS;
  selectedGundam: Gundam; // 定义一个selectedGudam作为展示详情的变量
  onSelected (gundam: Gundam): void {
    this.selectedGundam = gundam; // 通过参数赋值
  }
}app.component.ts只保留标签,其他一概去掉。
修改app.module.ts文件,导入gundam-host.component.ts并把GundamHostComponent 增加到组件声明declarations里。
修改route里的path所指向的component,默认进入后显示主页组件:
before
after
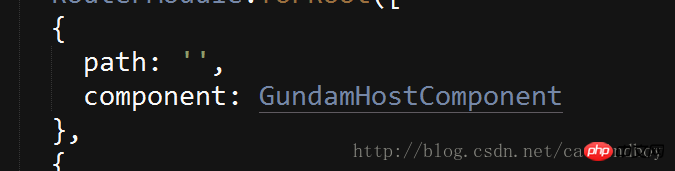
path的值为”(空字符串)的表示不需要增加子路径。
修改详情页的路径:
{
  path: 'detail',
  component: GundamDetailComponent
}在主页里增加跳转连接:
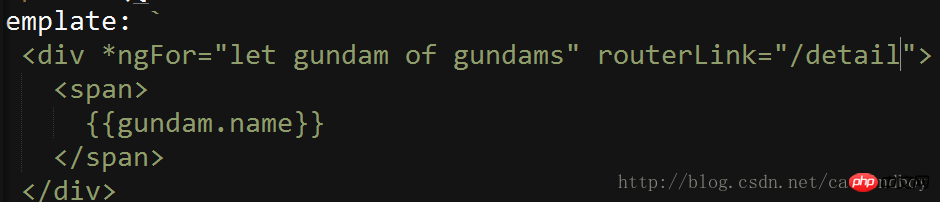
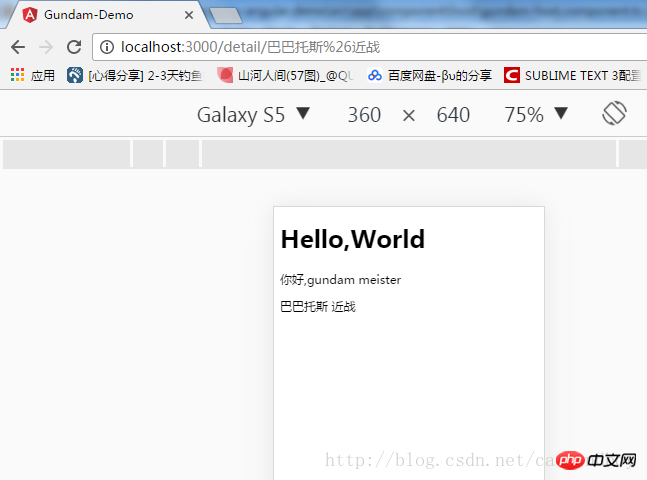
点击跳转(路径已改变)
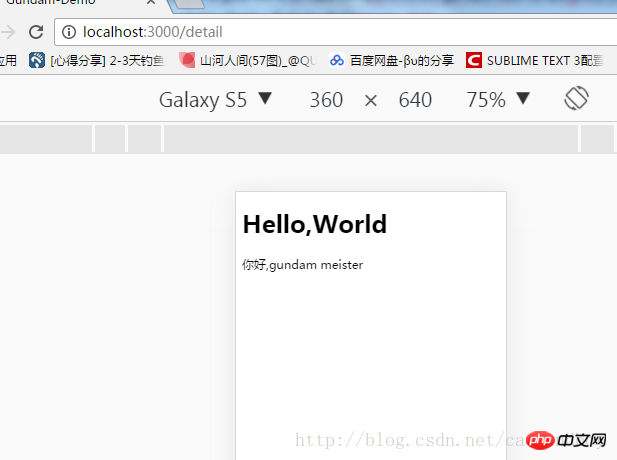
现在点击主页的高达列表的item后,可以跳转到一个空白的详情页。之所以是空白,是因为详情页的值是需要由主页进行传递的。现在主页详情页分家以后,需要通过路由来进行值传递。
传值的方法有很多种,甚至可以传的值也有很多种。
目前我先用最笨的方法:将gundam类转化为一个字符串,将字符串传递到详情页面后再转化为gundam类。
在app.component.ts文件的class里添加函数:
parseGundamToString(gundam: Gundam): string {
  return gundam.name + '&' + gundam.type;
} // 将gundam类转化为固定格式的字符串修改app.component.ts文件的template,访问gundam路径时转化传递转化过的gundam字符串
<p *ngFor="let gundam of gundams" routerLink="/detail/name=parseGundamToString(gundam)">
  <span>
  {{gundam.name}}
  </span>
</p>修改详情页的path
{
  path: 'detail/:gundam',
  component: GundamDetailComponent
}/:gundam 是一个占位符,又是参数说明。表示传递过来的参数属性是gundam。
这样在detail文件中,就可以从url的连接中拿到传递过来的高达字符串。
获得这个字符串的时机,应该是在在detail页面初始化的时候。Angular提供了所谓的的“钩子”(hook),用来标示component的活动周期—其实也就是是类似于Android里onStart或者onCreate一样的方法。
在gundam-detail.component.ts的中添加OnInit钩子,或者说接口:
import { Component, OnInit } from '@angular/core';在class后面加implements关键词和OnInit来实现该接口:
export class GundamDetailComponent implements OnInit {
  selectedGundam: Gundam ;
  ngOnInit(): void {
  }
}剩下的事情,就是读取连接上传来的参数就可以了。
读取连接上传递的参数还是要用到router里的几个类,所以需要在detail里导入。
import { ActivatedRoute, Params } from '@angular/router';导入完成后,通过在构造器里注入的方式进行调用:
(有关注入,现在暂时没有说到)
constructor(
private route: ActivatedRoute){}angular会自动创建ActivatedRoute的实例。
先在ngOnInit里输出看看params是什么
this.route.params.switchMap((params: Params) => console.log(params))
ps:switchMap是angular官方给的拿取url参数的方法,也是需要预先导入才可以使用:
import 'rxjs/add/operator/switchMap';
ps2: 有关箭头函数
(params: Params) => this.gundamStr = params['gundam']
是一个箭头函数,等同于
function(params){
  this.gundamStr = params['gundam']
}其中params是switchMap的返回值,返回的即是通过路由连接传递过来的参数所在的类。
ps3: 箭头函数真的是整个ES6里最恶心的东西,之一。
控制台中 输出:
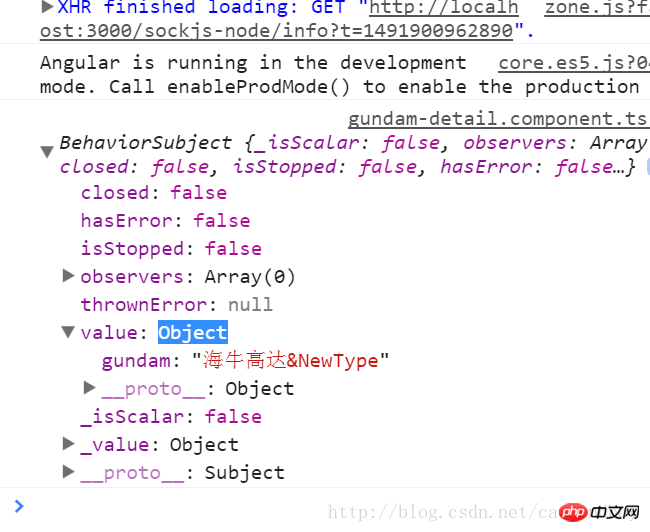
传递过来的参数,是一个gundam类格式化输出的字符串,所以还要在detail里补充一个反格式化字符串到gundam类的函数。
parseStringToGundam(str: string): Gundam {
  const temp = str.split('&');
  const tempGundam: Gundam = {
  name: temp[0],
  type: temp[1]
  };
  return tempGundam;
}最终,获得detail的初始化是这个样子的
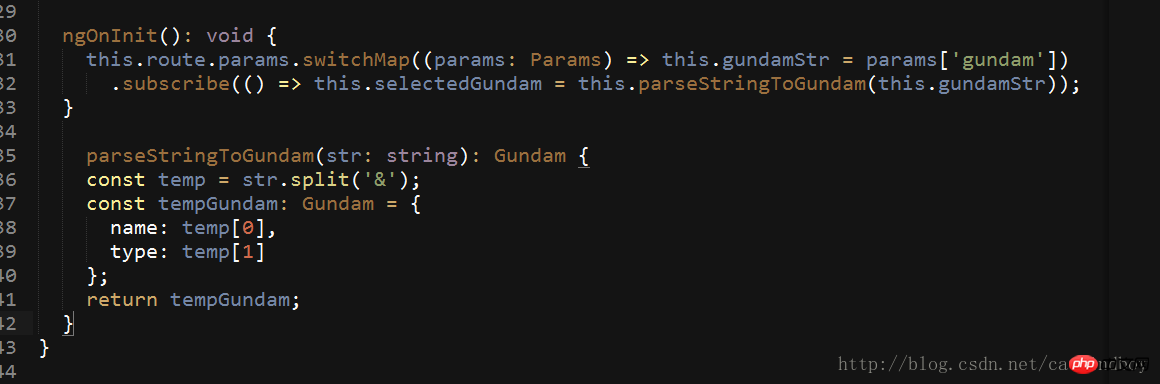
ngOnInit(): void {
  this.route.params // 通过注入的方式拿到route里的参数params
  .switchMap((params: Params) => this.gundamStr = params['gundam']) // 通过参数拿到gundam字符串并付给detail里的一个临时变量
  .subscribe(() => this.selectedGundam = this.parseStringToGundam(this.gundamStr)); // 通过反格式化函数解析临时变量并返回给作为显示的model
}移动web页面间传值确实没有什么太好的方法,angular和react都是如此。以前我们的做法是短的参数直接挂连接传走,长的大的或者object的参数就先保存本地,然后第二个页面再从本地读取。
但是像android那样扔一个intent里直接就过去了的方式,确实没有。
回首页:
点击一个列表:
包结构:
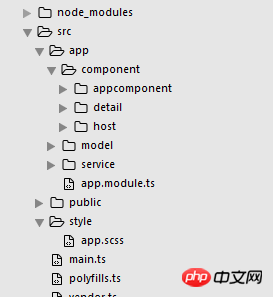
总的来说,业务被分开了,结构干净多了。虽然现在还体现不出来,但是写到后来就觉得心花怒放,磨刀不误砍柴工功啊。
作为router,也可以分离的。
目前我的项目里只有2个页面,如果多起来-比如20来个,那么app.module.ts又会变的乱七八糟。
所以要把router也给扔出去。
新建一个文件app-routing.module.ts,然后把footRoot平移过来(带上引用)。
在app-routing.module.ts文件里,也需要ngModul。个人理解ngModul就相当于一个基类指示器,导出class后以便被其他类引用。
import {
NgModule
} from '@angular/core';
import { RouterModule }  from '@angular/router';
import { GundamDetailComponent } from './component/detail/gundam-detail.component';
import { GundamHostComponent } from './component/host/gundam-host.component';
@NgModule({
  imports: [
    RouterModule.forRoot([
      {
        path: '',
        component: GundamHostComponent
      },
      {
        path: 'detail/:id',
        component: GundamDetailComponent
      }
    ])
  ],
  exports: [RouterModule]
})
export class AppRoutingModule {
}然后既然已经有了这个类,可以导入到app.module.ts里使用使得整个文件看起来清爽一些。
import {
NgModule
} from '@angular/core';
import {
BrowserModule
} from '@angular/platform-browser';
import {
FormsModule
} from '@angular/forms';
import {
AppComponent
} from './component/appcomponent/app.component';
import { GundamDetailComponent } from './component/detail/gundam-detail.component';
import { GundamHostComponent } from './component/host/gundam-host.component';
import { AppRoutingModule } from './app-routing.module';
@NgModule({
  imports: [
    BrowserModule,
    FormsModule,
    AppRoutingModule // 调用路由
  ],
  declarations: [
    AppComponent,
    GundamDetailComponent,
    GundamHostComponent
  ],
  bootstrap: [AppComponent],
})
export class AppModule {}当然,官方文档又进行了进一步简化。
既然forRoot是一个Route数组,那么数组也可以单独抽出来,当然进一步抽取也可以放到另一个文件里。
import {
NgModule
} from '@angular/core';
import { RouterModule, Route }  from '@angular/router';
import { GundamDetailComponent } from './component/detail/gundam-detail.component';
import { GundamHostComponent } from './component/host/gundam-host.component';
const routes: Route[] = [
  {
    path: '',
    component: GundamHostComponent
  },
  {
    path: 'detail/:gundam',
    component: GundamDetailComponent
  }
];
@NgModule({
  imports: [
    RouterModule.forRoot(routes)
  ],
  exports: [RouterModule]
})
export class AppRoutingModule {
}我个人比较偷懒,就先抽取到这一步。
现在连主页面和详情页面都被分开了,项目的耦合度又进一步降低。
相信看了本文案例你已经掌握了方法,更多精彩请关注php中文网其它相关文章!
推荐阅读:
以上是如何對Angular4+router進行使用的詳細內容。更多資訊請關注PHP中文網其他相關文章!

熱AI工具

Undresser.AI Undress
人工智慧驅動的應用程序,用於創建逼真的裸體照片

AI Clothes Remover
用於從照片中去除衣服的線上人工智慧工具。

Undress AI Tool
免費脫衣圖片

Clothoff.io
AI脫衣器

Video Face Swap
使用我們完全免費的人工智慧換臉工具,輕鬆在任何影片中換臉!

熱門文章
熱工具

記事本++7.3.1
好用且免費的程式碼編輯器

SublimeText3漢化版
中文版,非常好用

禪工作室 13.0.1
強大的PHP整合開發環境

Dreamweaver CS6
視覺化網頁開發工具

SublimeText3 Mac版
神級程式碼編輯軟體(SublimeText3)


 React Router使用指南:如何實現前端路由控制
Sep 29, 2023 pm 05:45 PM
React Router使用指南:如何實現前端路由控制
Sep 29, 2023 pm 05:45 PM
ReactRouter使用指南:如何實現前端路由控制隨著單頁應用的流行,前端路由成為了一個不可忽視的重要部分。 ReactRouter作為React生態系統中最受歡迎的路由庫,提供了豐富的功能和易用的API,使得前端路由的實作變得非常簡單和靈活。本文將介紹ReactRouter的使用方法,並提供一些具體的程式碼範例。安裝ReactRouter首先,我們需要
 Vue Router Lazy-Loading路由的獨特優勢,如何優化頁面效能?
Sep 15, 2023 am 10:36 AM
Vue Router Lazy-Loading路由的獨特優勢,如何優化頁面效能?
Sep 15, 2023 am 10:36 AM
VueRouter是Vue.js官方提供的路由管理插件,它可以幫助我們在Vue應用程式中實現頁面導航和路由切換。其中的Lazy-Loading特性是VueRouter的獨特優勢,它可以大幅優化頁面效能。在本文中,我們將介紹VueRouter的Lazy-Loading路由特性,並提供一些最佳化頁面效能的實際程式碼範例。 Lazy-Loading是指在需要
 Vue Router Lazy-Loading路由:協助頁面效能提升的趨勢
Sep 15, 2023 am 08:03 AM
Vue Router Lazy-Loading路由:協助頁面效能提升的趨勢
Sep 15, 2023 am 08:03 AM
VueRouter是Vue.js框架中的官方路由管理器。它允許開發者透過路由映射來切換頁面內容,使得單頁應用程式更加可控和易於維護。但是,在應用程式變得越來越複雜的情況下,路由的載入和解析可能會成為效能瓶頸。為了解決這個問題,VueRouter提供了一個懶加載路由的功能,即將路由的載入推遲到實際需要時。 Lazy-loading(懶加載)是一種加載技術,它
 react router 不顯示怎麼辦
Dec 30, 2022 am 09:30 AM
react router 不顯示怎麼辦
Dec 30, 2022 am 09:30 AM
react router不顯示的解決方法:1、在父路由元件中加入browserRouter把router都包起來;2、使用「this.props.history.go()」進行元件刷新;3、在browserrouter參數裡加上「forcerefresh ={true}」;4、在「<Route>」裡面寫鉤子函數,並在離開或進入此路由時呼叫即可。
 在 Vue 專案中如何使用 Router 實作重定向功能
Sep 15, 2023 am 08:36 AM
在 Vue 專案中如何使用 Router 實作重定向功能
Sep 15, 2023 am 08:36 AM
在Vue專案中如何使用Router實作重新導向功能在一個Vue專案中,我們常常需要實作頁面之間的跳躍與重定向功能。而VueRouter提供了一個簡單而強大的解決方案。本文將介紹如何在Vue專案中使用Router實作重定向功能,並給出具體的程式碼範例。安裝VueRouter首先,我們需要在Vue專案中安裝VueRouter。可
 vue3中如何使用router路由實現跳轉傳參
May 16, 2023 am 10:49 AM
vue3中如何使用router路由實現跳轉傳參
May 16, 2023 am 10:49 AM
一、路由跳轉1.首先在需要跳轉的頁面引入API—useRouterimport{useRouter}from'vue-router'2.在跳轉頁定義router變數//先在setup定義constrouter=useRouter()3.用router.push跳轉頁面//字串router.push('home')//物件router.push({path:'home'})//
 Vue Router中的路由懶載入是如何實現的?
Jul 21, 2023 am 10:40 AM
Vue Router中的路由懶載入是如何實現的?
Jul 21, 2023 am 10:40 AM
VueRouter中的路由懶載入是如何實現的?在Vue開發中,我們通常使用VueRouter來實現頁面之間的跳轉和路由控制。當專案變得龐大時,我們可能會有很多路由頁面需要加載,這會導致整個專案的加載速度變慢。為了提高專案的效能,VueRouter提供了一種路由懶載入的機制。路由懶加載是指在路由頁面被訪問時才會進行加載,而不是在應用初始化時加載所有路
 react router安裝指令是什麼
Dec 20, 2022 am 10:44 AM
react router安裝指令是什麼
Dec 20, 2022 am 10:44 AM
react router安裝指令是“npm install react-router --save”,表示安裝路由,而“npm install react-router-dom --save”指令表示安裝路由dom。
