

使用Angular5實作服務端渲染實戰
本篇文章主要介紹了詳解Angular5 服務端渲染實戰,現在分享給大家,也給大家做個參考。
本文基於上一篇 Angular5 的文章繼續進行開發,上文中講了搭建 Angular5 有道翻譯的過程,以及遇到問題的解決方案。

接著改了 UI,從 bootstrap4 改到 angular material,這裡不詳細講,服務端渲染也與修改 UI 無關。
看過之前文章的人會發現,文章內容都偏向服務端渲染,vue 的 nuxt,react 的 next。
在本次改版前也嘗試去找類似 nuxt.js 與 next.js 的頂級封裝庫,可以大幅節省時間,但未果。
最後決定使用從Angular2 開始就可用的前後端同構解決方案Angular Universal (Universal (isomorphic) JavaScript support for Angular.)
#在這裡不詳細介紹文件內容,本文也盡量使用簡單易懂的語言帶入Angular 的SSR
前提
#前面寫的udao 這個項目是完全遵從於angular-cli 的,從搭建到打包,這也使得本文通用於所有angular-cli 所建構的angular5 專案。
建構過程
首先安裝服務端的依賴
yarn add @angular/platform-server express
yarn add -D ts-loader webpack-node-externals npm-run-all
這裡需要注意的是@angular/platform-server 的版本號碼最好根據當前angular 版本進行安裝,如: @angular/platform-server@5.1.0 ,避免與其它依賴有版本衝突。
建立檔案: src/app/app.server.module.ts
import { NgModule } from '@angular/core'
import { ServerModule } from '@angular/platform-server'

import { AppModule } from './app.module'
import { AppComponent } from './app.component'

@NgModule({
 imports: [
  AppModule,
  ServerModule
 ],
 bootstrap: [AppComponent],
})
export class AppServerModule { }更新檔案: src/app/app.module.ts
import { BrowserModule } from '@angular/platform-browser'
import { NgModule } from '@angular/core'
// ...

import { AppComponent } from './app.component'
// ...

@NgModule({
 declarations: [
  AppComponent
  // ...
 ],
 imports: [
  BrowserModule.withServerTransition({ appId: 'udao' })
  // ...
 ],
 providers: [],
 bootstrap: [AppComponent]
})
export class AppModule { }我們需要一個主檔案來匯出服務端模組
建立檔案: src/main.server.ts
export { AppServerModule } from './app/app.server.module'現在來更新@angular/cli 的設定檔.angular-cli.json
{
 "$schema": "./node_modules/@angular/cli/lib/config/schema.json",
 "project": {
  "name": "udao"
 },
 "apps": [
  {
   "root": "src",
   "outDir": "dist/browser",
   "assets": [
    "assets",
    "favicon.ico"
   ]
   // ...
  },
  {
   "platform": "server",
   "root": "src",
   "outDir": "dist/server",
   "assets": [],
   "index": "index.html",
   "main": "main.server.ts",
   "test": "test.ts",
   "tsconfig": "tsconfig.server.json",
   "testTsconfig": "tsconfig.spec.json",
   "prefix": "app",
   "scripts": [],
   "environmentSource": "environments/environment.ts",
   "environments": {
    "dev": "environments/environment.ts",
    "prod": "environments/environment.prod.ts"
   }
  }
 ]
 // ...
}上面的// ... 代表省略掉,但是json 沒有註解一說,看著怪怪的....
#當然.angular-cli.json 的配置不是固定的,根據需求自行修改
我們需要為服務端建立tsconfig 設定檔: src/tsconfig.server.json
{
 "extends": "../tsconfig.json",
 "compilerOptions": {
  "outDir": "../out-tsc/app",
  "baseUrl": "./",
  "module": "commonjs",
  "types": []
 },
 "exclude": [
  "test.ts",
  "**/*.spec.ts",
  "server.ts"
 ],
 "angularCompilerOptions": {
  "entryModule": "app/app.server.module#AppServerModule"
 }
}然後更新: src/tsconfig.app.json
{
 "extends": "../tsconfig.json",
 "compilerOptions": {
  "outDir": "../out-tsc/app",
  "baseUrl": "./",
  "module": "es2015",
  "types": []
 },
 "exclude": [
  "test.ts",
  "**/*.spec.ts",
  "server.ts"
 ]
}現在可以執行以下指令,看設定是否有效
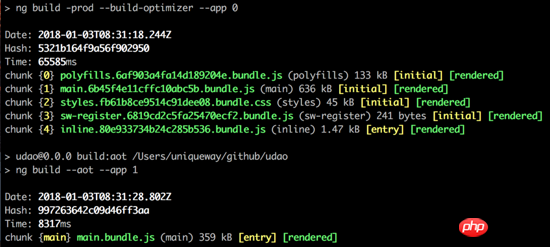
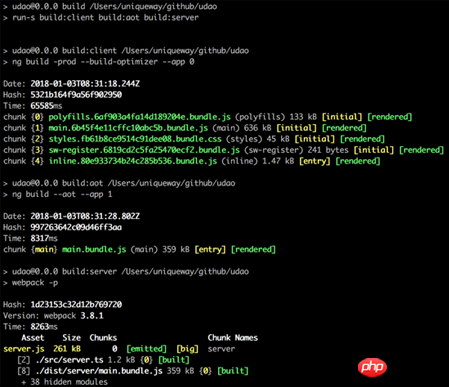
ng build -prod --build-optimizer --app 0
ng build --aot --app 1
運行結果應該如下圖所示
 #
#
然後就是建立Express.js 服務, 建立檔案: src /server.ts
import 'reflect-metadata'
import 'zone.js/dist/zone-node'
import { renderModuleFactory } from '@angular/platform-server'
import { enableProdMode } from '@angular/core'
import * as express from 'express'
import { join } from 'path'
import { readFileSync } from 'fs'

enableProdMode();

const PORT = process.env.PORT || 4200
const DIST_FOLDER = join(process.cwd(), 'dist')

const app = express()

const template = readFileSync(join(DIST_FOLDER, 'browser', 'index.html')).toString()
const { AppServerModuleNgFactory } = require('main.server')

app.engine('html', (_, options, callback) => {
 const opts = { document: template, url: options.req.url }

 renderModuleFactory(AppServerModuleNgFactory, opts)
  .then(html => callback(null, html))
});

app.set('view engine', 'html')
app.set('views', 'src')

app.get('*.*', express.static(join(DIST_FOLDER, 'browser')))

app.get('*', (req, res) => {
 res.render('index', { req })
})

app.listen(PORT, () => {
 console.log(`listening on http://localhost:${PORT}!`)
})理所當然需要一個webpack 設定檔來打包server.ts 檔案: webpack.config.js
const path = require('path');
var nodeExternals = require('webpack-node-externals');

module.exports = {
 entry: {
  server: './src/server.ts'
 },
 resolve: {
  extensions: ['.ts', '.js'],
  alias: {
   'main.server': path.join(__dirname, 'dist', 'server', 'main.bundle.js')
  }
 },
 target: 'node',
 externals: [nodeExternals()],
 output: {
  path: path.join(__dirname, 'dist'),
  filename: '[name].js'
 },
 module: {
  rules: [
   { test: /\.ts$/, loader: 'ts-loader' }
  ]
 }
}為了打包方便最好在package.json 裡面加幾行腳本,如下:
"scripts": {
 "ng": "ng",
 "start": "ng serve",
 "build": "run-s build:client build:aot build:server",
 "build:client": "ng build -prod --build-optimizer --app 0",
 "build:aot": "ng build --aot --app 1",
 "build:server": "webpack -p",
 "test": "ng test",
 "lint": "ng lint",
 "e2e": "ng e2e"
}現在嘗試執行npm run build ,將會看到以下輸出:
node 執行剛剛打包好的node dist/server. js 檔案
開啟http://localhost:4200/ 會正常顯示專案主頁
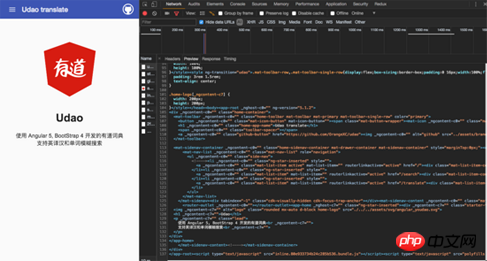
從上面的開發者工具可以看出html 文件是服務端渲染直出的,接下來嘗試請求資料試試看。
注意:本項目明確(選單可點擊)的幾個路由初始化都沒有請求數據,但是單字解釋的詳情頁是會在ngOnInit() 方法裡獲取數據,例如: http:// localhost:4200/detail/add 直接開啟時會發生奇怪的現象,請求在服務端和客戶端分別發送一次,正常的服務端渲染項目首屏初始化資料的請求在服務端執行,在客戶端不會二次請求!
發現問題後,就來踩平這個坑
試想如果採用一個標記來區分服務端是否已經拿到了數據,如果沒拿到數據就在客戶端請求,如果已經拿到資料就不發請求
當然Angular 早有一手準備,那就是Angular Modules for Transfer State
那麼如何真實運用呢?請參閱下文
請求填坑
在服務端入口與用戶端入口分別引入TransferStateModule
import { ServerModule, ServerTransferStateModule } from '@angular/platform-server';
// ...

@NgModule({
 imports: [
  // ...
  ServerModule,
  ServerTransferStateModule
 ]
 // ...
})
export class AppServerModule { }
import { BrowserModule, BrowserTransferStateModule } from '@angular/platform-browser';
// ...

@NgModule({
 declarations: [
  AppComponent
  // ...
 ],
 imports: [
  BrowserModule.withServerTransition({ appId: 'udao' }),
  BrowserTransferStateModule
  // ...
 ]
 // ...
})
export class AppModule { }以本專案為例在detail.component.ts 裡面,修正如下
import { Component, OnInit } from '@angular/core'
import { HttpClient } from '@angular/common/http'
import { Router, ActivatedRoute, NavigationEnd } from '@angular/router'
import { TransferState, makeStateKey } from '@angular/platform-browser'

const DETAIL_KEY = makeStateKey('detail')

// ...

export class DetailComponent implements OnInit {
 details: any

 // some variable

 constructor(
  private http: HttpClient,
  private state: TransferState,
  private route: ActivatedRoute,
  private router: Router
 ) {}

 transData (res) {
  // translate res data
 }

 ngOnInit () {
  this.details = this.state.get(DETAIL_KEY, null as any)

  if (!this.details) {
   this.route.params.subscribe((params) => {
    this.loading = true

    const apiURL = `https://dict.youdao.com/jsonapi?q=${params['word']}`

    this.http.get(`/?url=${encodeURIComponent(apiURL)}`)
    .subscribe(res => {
     this.transData(res)
     this.state.set(DETAIL_KEY, res as any)
     this.loading = false
    })
   })
  } else {
   this.transData(this.details)
  }
 }
}程式碼夠簡單清晰,和上面描述的原理一致
現在我們只需要對main.ts 檔案進行小小的調整,以便在DOMContentLoaded 時運行我們的程式碼,以使TransferState 正常工作:
import { enableProdMode } from '@angular/core'
import { platformBrowserDynamic } from '@angular/platform-browser-dynamic'

import { AppModule } from './app/app.module'
import { environment } from './environments/environment'

if (environment.production) {
 enableProdMode()
}

document.addEventListener('DOMContentLoaded', () => {
 platformBrowserDynamic().bootstrapModule(AppModule)
  .catch(err => console.log(err))
})到這裡運行npm run build && node dist/server.js 然後刷新http://localhost:4200/detail/add 到控制台查看network 如下:
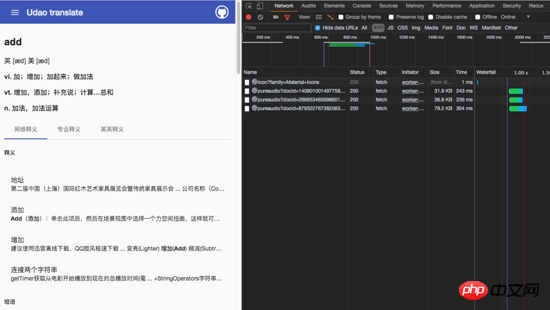
發現XHR 分類裡面沒有發起任何請求,只有service-worker 的cache 命中。
到這裡坑都踩完了,專案運作正常,沒發現其它 bug。
總結
2018 第一篇,目的就是探索所有流行框架服務端渲染的實現,開啟了 angular 這個最後沒嘗試的框架。
當然 Orange 還是前端小學生一枚,只知道實現,原理說的不是很清楚,源碼看的不是很明白,如有紕漏還望指教。
最後 Github 網址跟之前文章一樣:https://github.com/OrangeXC/udao
上面是我整理給大家的,希望今後會對大家有幫助。
相關文章:
#以上是使用Angular5實作服務端渲染實戰的詳細內容。更多資訊請關注PHP中文網其他相關文章!

熱AI工具

Undresser.AI Undress
人工智慧驅動的應用程序,用於創建逼真的裸體照片

AI Clothes Remover
用於從照片中去除衣服的線上人工智慧工具。

Undress AI Tool
免費脫衣圖片

Clothoff.io
AI脫衣器

AI Hentai Generator
免費產生 AI 無盡。

熱門文章
熱工具

記事本++7.3.1
好用且免費的程式碼編輯器

SublimeText3漢化版
中文版,非常好用

禪工作室 13.0.1
強大的PHP整合開發環境

Dreamweaver CS6
視覺化網頁開發工具

SublimeText3 Mac版
神級程式碼編輯軟體(SublimeText3)
熱門話題


 如何在瀏覽器中優化JavaScript代碼以進行性能?
Mar 18, 2025 pm 03:14 PM
如何在瀏覽器中優化JavaScript代碼以進行性能?
Mar 18, 2025 pm 03:14 PM
本文討論了在瀏覽器中優化JavaScript性能的策略,重點是減少執行時間並最大程度地減少對頁面負載速度的影響。

 如何使用瀏覽器開發人員工具有效調試JavaScript代碼?
Mar 18, 2025 pm 03:16 PM
如何使用瀏覽器開發人員工具有效調試JavaScript代碼?
Mar 18, 2025 pm 03:16 PM
本文討論了使用瀏覽器開發人員工具的有效JavaScript調試,專注於設置斷點,使用控制台和分析性能。
 誰得到更多的Python或JavaScript?
Apr 04, 2025 am 12:09 AM
誰得到更多的Python或JavaScript?
Apr 04, 2025 am 12:09 AM
Python和JavaScript開發者的薪資沒有絕對的高低,具體取決於技能和行業需求。 1.Python在數據科學和機器學習領域可能薪資更高。 2.JavaScript在前端和全棧開發中需求大,薪資也可觀。 3.影響因素包括經驗、地理位置、公司規模和特定技能。
 如何使用源地圖調試縮小JavaScript代碼?
Mar 18, 2025 pm 03:17 PM
如何使用源地圖調試縮小JavaScript代碼?
Mar 18, 2025 pm 03:17 PM
本文說明瞭如何使用源地圖通過將其映射回原始代碼來調試JAVASCRIPT。它討論了啟用源地圖,設置斷點以及使用Chrome DevTools和WebPack之類的工具。
 如何使用JavaScript將具有相同ID的數組元素合併到一個對像中?
Apr 04, 2025 pm 05:09 PM
如何使用JavaScript將具有相同ID的數組元素合併到一個對像中?
Apr 04, 2025 pm 05:09 PM
如何在JavaScript中將具有相同ID的數組元素合併到一個對像中?在處理數據時,我們常常會遇到需要將具有相同ID�...
 console.log輸出結果差異:兩次調用為何不同?
Apr 04, 2025 pm 05:12 PM
console.log輸出結果差異:兩次調用為何不同?
Apr 04, 2025 pm 05:12 PM
深入探討console.log輸出差異的根源本文將分析一段代碼中console.log函數輸出結果的差異,並解釋其背後的原因。 �...
