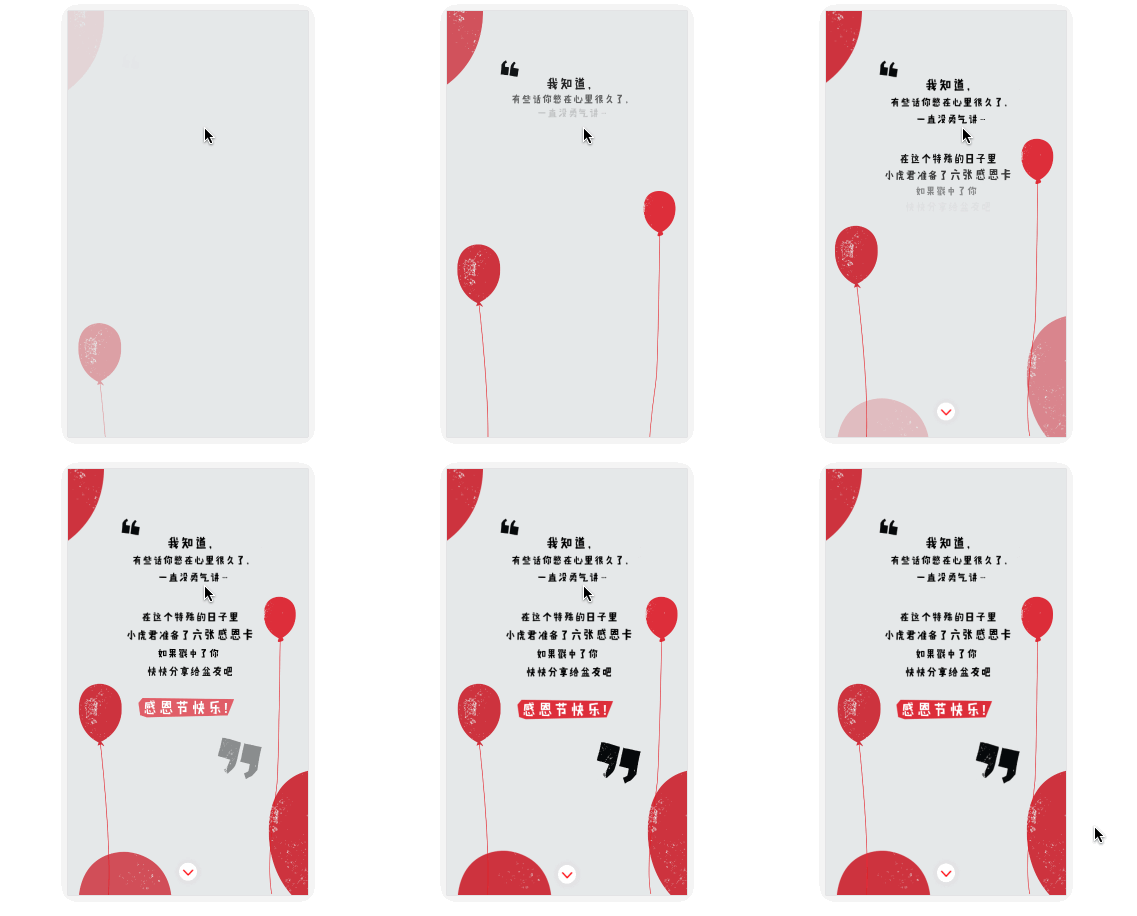
在css3中,我們使用animation與keyframes結合,可以為元素添加各種各樣的動畫效果。這篇文章主要介紹了css3實現多個元素依次顯示效果,需要的朋友可以參考下

#如上圖所示,在許多的活動宣傳html5中會經常需要用到這樣的動畫效果。特別是快到年底了,也許有同學正在為了公司的活動頁面而忙碌,get到這樣一個小技能說不定剛好對你有幫助哦。
在css3中,我們使用animation與keyframes結合,可以為元素添加各種各樣的動畫效果。具體的動畫,在keyframes中定義,在animation中使用。例如可以定義一個從上飛入的動畫效果。
@keyframes topIn {
  from { transform: translateY(-50px) }
  to { transform: translateY(0px) }
}並在目標元素中透過animation來使用動畫。
<p class="target topIn"></p>
.topIn {
  animation: topIn 1s ease;
}這樣,當元素第一次渲染進入DOM時,就會有一個從上到下的位移動畫效果。當然,這種效果並不是我們想要的。往往我們還在在動畫上加上一個透明度從0到1的漸層。
@keyframes topIn {
  from {
    transform: translateY(-50px);
    opacity: 0;
  }
  to {
    transform: translateY(0px);
    opacity: 1;
  }
}我們還要也希望能夠控制元素的顯示時機該怎麼辦?簡單一點的方法就是在需要動畫效果展示時,才會為目標元素加入一個控制動畫的class樣式。
btn.addEventListener('click', function() {
  document.querySelector('.target').classList.add('topIn');
}, !1);但是這樣做有一個問題。我相信實踐過的朋友都已經發現過的。我們期望元素在入場前,是處於看不見的狀態。但是僅僅只是上面的做法,動畫開始前元素是能夠被看見的。那該怎麼辦?
我們可以很簡單的想到,為元素加上 display: none 或 visibility: hidden 。但由於 display: none 之後,元素是不佔位的。因此如果這樣的話,會導致頁面佈局出現混亂。所以我們在開始之前,先為元素新增一個新的class。
.aninode {
  visibility: hidden;
}並且新增一個新的class讓元素顯示出來。
.animated .aninode {
  visibility: visible;
}控制動畫效果的class也在css上做一些調整。
.animated .topIn {
  animation: topIn 1s ease;
}這樣做的好處是,我們只需要在class中加入一個 animated ,就能夠達到我們的效果。實例demo完整程式碼如下:
<p class="container">
<p class="target aninode leftIn"></p>
<button class="btn show">show</button>
<button class="btn hide">hide</button>
</p>
.container {
width: 100px;
margin: 0 auto;
}
.aninode {
visibility: hidden;
}
.animated .aninode {
visibility: visible;
}
.target {
width: 100px;
height: 100px;
background: orange;
border-radius: 4px;
margin: 20px 0;
}
.animated .topIn {
animation: topIn 1s ease;
}
.animated .leftIn {
animation: leftIn 1s ease;
}
.btn {
width: 100px;
height: 30px;
border: 1px solid #ccc;
outline: none;
transition: 0.1s;
}
.btn:active {
border: none;
background: orange;
color: #fff;
}
@keyframes topIn {
from {
transform: translateY(-50px);
opacity: 0;
}
to {
transform: translateY(0px);
opacity: 1;
}
}
@keyframes leftIn {
from {
transform: translateX(-50px);
opacity: 0;
}
to {
transform: translateX(0px);
opacity: 1;
}
}
var show = document.querySelector('.show');
var hide = document.querySelector('.hide');
var container = document.querySelector('.container');
show.addEventListener('click', function() {
container.classList.add('animated');
}, !1);
hide.addEventListener('click', function() {
container.classList.remove('animated');
}, !1);Demo顯示如下:
See the Pen <a href='https://codepen.io/yangbo5207/pen/NXKrPg/'>NXKrPg</a> by Ormie (<a href='https://codepen.io/yangbo5207'>@yangbo5207</a>) on <a href='https://codepen.io'>CodePen</a>.
.delay200 {
    animation-delay: 200ms;
    animation-fill-mode: backwards!important;
}
.delay400 {
    animation-delay: 400ms;
    animation-fill-mode: backwards!important;
}
.delay600 {
    animation-delay: 600ms;
    animation-fill-mode: backwards!important;
}
.delay800 {
    animation-delay: 800ms;
    animation-fill-mode: backwards!important;
}See the Pen <a href='https://codepen.io/yangbo5207/pen/mpbEEE/'>mpbEEE</a> by Ormie (<a href='https://codepen.io/yangbo5207'>@yangbo5207</a>) on <a href='https://codepen.io'>CodePen</a>.
<p class="container">
<p class="targets aninode">
<p class="item leftIn">春晓</p>
<p class="item leftIn delay200">春眠不觉晓</p>
<p class="item leftIn delay400">处处蚊子咬</p>
<p class="item leftIn delay600">夜来风雨声</p>
<p class="item leftIn delay800"><此处请留下你们的才华></p>
</p>
<button class="btn show">show</button>
<button class="btn hide">hide</button>
</p>
.container {
width: 200px;
margin: 0 auto;
}
.aninode {
visibility: hidden;
}
.animated .aninode {
visibility: visible;
}
.targets {
margin: 20px 0;
}
.targets .item {
border: 1px solid #ccc;
margin: 10px 0;
line-height: 2;
padding: 2px 6px;
border-radius: 4px;
}
.animated .topIn {
animation: topIn 1s ease;
}
.animated .leftIn {
animation-name: leftIn;
animation-duration: 1s;
}
.btn {
width: 100px;
height: 30px;
border: 1px solid #ccc;
outline: none;
transition: 0.1s;
}
.btn:active {
border: none;
background: orange;
color: #fff;
}
@keyframes topIn {
from { transform: translateY(-50px) }
to { transform: translateY(0px) }
}
@keyframes leftIn {
from {
transform: translateX(-50px);
opacity: 0;
}
to {
transform: translateX(0px);
opacity: 1;
}
}
.delay200 {
animation-delay: 200ms;
animation-fill-mode: backwards!important;
}
.delay400 {
animation-delay: 400ms;
animation-fill-mode: backwards!important;
}
.delay600 {
animation-delay: 600ms;
animation-fill-mode: backwards!important;
}
.delay800 {
animation-delay: 800ms;
animation-fill-mode: backwards!important;
}
var show = document.querySelector('.show');
var hide = document.querySelector('.hide');
var container = document.querySelector('.container');
show.addEventListener('click', function() {
container.classList.add('animated');
}, !1);
hide.addEventListener('click', function() {
container.classList.remove('animated');
}, !1);# #我們發現js的邏輯並沒有發生任何改變。仍然僅僅只是在合適的位置添加/刪除animated。
在實踐中我們還會遇到一個比較麻煩的事兒。就是延遲class的編寫。我們可能不知道會使用到那些時差,有多少個元素會使用到,如果都用用手寫的話,重複工作確實太過麻煩。因此我們可以使用js動態插入。程式碼如下:
###const styleSheet = getSheet();
var delay = 100;
while (delay < 10000) {
styleSheet.insertRule(`.animated .delay${delay}{ animation-delay: ${delay}ms; animation-fill-mode: backwards; }`, styleSheet.cssRules.length);
delay += delay < 3000 ? 100 : 1000;
}
function getSheet() {
var sheets = document.styleSheets;
var len = sheets.length;
for(var i = 0; i <= len; i++) {
var sheet = sheets.item(i);
try {
if (sheet.cssRules) {
return sheet;
}
} catch(e) {}
}
var style = document.createElement('style');
style.type = "text/css";
document.getElementsByTagName('head')[0].appendChild(style);
return style.sheet;
}以上是如何用css3實作多個元素依序顯示的詳細內容。更多資訊請關注PHP中文網其他相關文章!


