在webpack中詳細解讀入口函數run
Webpack 是一個前端資源載入/打包工具。它將根據模組的依賴關係進行靜態分析,然後將這些模組按照指定的規則產生對應的靜態資源。這篇文章主要介紹了webpack源碼之compile流程-入口函數run,需要的朋友可以參考下
Webpack是目前基於React和Redux開發的應用的主要打包工具。我想使用Angular 2或其他框架開發的應用程式也有很多在使用Webpack。
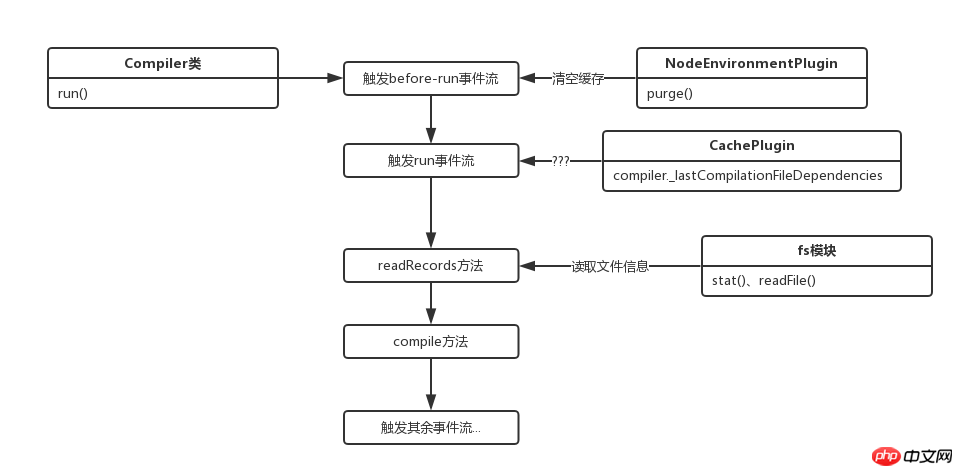
本節流程如圖:

現在正式進入打包流程,起步方法為run:
Compiler.prototype.run = (callback) => {
  const startTime = Date.now();
  const onCompiled = (err, compilation) => { /**/ };
  this.applyPluginsAsync("before-run", this, err => {
    if (err) return callback(err);
    this.applyPluginsAsync("run", this, err => {
      if (err) return callback(err);
      this.readRecords(err => {
        if (err) return callback(err);
        this.compile(onCompiled);
      });
    });
  });
}為什麼不介紹compiler對象?因為建構函式中並沒有一個初始化的方法,只是普通的變數聲明,沒啥好講的。
在run方法中,首先是呼叫了tapable的applyPluginsAsync執行了before-run事件流,該事件流的定義地點如下:
// NodeEnvironmentPlugin
compiler.plugin("before-run", (compiler, callback) => {
  if (compiler.inputFileSystem === inputFileSystem)
    inputFileSystem.purge();
  callback();
});在對compiler物件的檔案系統方法的掛載插件中,注入了before-run這個事件流,這裡首先看一下applyPluginsAsync(做了小幅度的修改以適應webpack源碼):
// tapable
Tapable.prototype.applyPluginsAsync = (name, ...args, callback) => {
  var plugins = this._plugins[name];
  if (!plugins || plugins.length === 0) return callback();
  var i = 0;
  var _this = this;
  // args为[args,next函数]
  args.push(copyProperties(callback, function next(err) {
    // 事件流出错或者全部执行完后调用回调函数
    if (err) return callback(err);
    i++;
    if (i >= plugins.length) {
      return callback();
    }
    // 执行下一个事件
    plugins[i].apply(_this, args);
  }));
  // 执行第一个事件
  plugins[0].apply(this, args);
};當時在第八節沒有講這個系列的事件流觸發方式,這裡簡單說下:
1、copyProperties用於物件屬性的拷貝,類似於Object.assign,然而在這裡傳入的是兩個函數,一點用都沒有! ! ! ! ! (當時沒寫講解就是因為一直卡在這個物件拷貝方法在這裡有什麼毛用)
2、在webpack中,args為一個this,指向compiler的上下文
3、注入該事件流的事件必須要執行callback方法(如上例),此時執行的並不是外部的callback,而是next函數
4、有兩種情況下會執行外部callback,中途出錯或者所有事件流執行完畢
這樣就很明白了,注入before-run中的函數形參的意義如下:
// before-run
// compiler => this
// callback => next
(compiler, callback) => {
  if (compiler.inputFileSystem === inputFileSystem)
    inputFileSystem.purge();
  callback();
}由於before-run中只有一個事件,所以在調用內部callback的next方法後,會因為i大於事件長度而直接呼叫外部callback。
這裡的purge方法之前見過,這裡複習下內容:
// NodeEnvironmentPlugin
compiler.inputFileSystem = new CachedInputFileSystem(new NodeJsInputFileSystem(), 60000);
// CachedInputFileSystem
CachedInputFileSystem.prototype.purge = function(what) {
  this._statStorage.purge(what);
  this._readdirStorage.purge(what);
  this._readFileStorage.purge(what);
  this._readlinkStorage.purge(what);
  this._readJsonStorage.purge(what);
};
// CachedInputFileSystem => Storage
Storage.prototype.purge = function(what) {
  if (!what) {
    this.count = 0;
    clearInterval(this.interval);
    this.nextTick = null;
    this.data.clear();
    this.levels.forEach(function(level) {
      level.clear();
    });
  } else if (typeof what === "string") { /**/ } else { /**/ }
};一句話概括就是:清除所有打包中緩存的資料。
由於假設是第一次,所以這裡並沒有什麼實際操作,接著呼叫外部callback,用同樣的方式觸發了run事件流。
run事件流也只有一個方法,來自CachePlugin插件:
Compiler.plugin("run", (compiler, callback) => {
  // 这个属性我暂时也不知道是啥 反正直接callback了
  if (!compiler._lastCompilationFileDependencies) return callback();
  const fs = compiler.inputFileSystem;
  const fileTs = compiler.fileTimestamps = {};
  asyncLib.forEach(compiler._lastCompilationFileDependencies, (file, callback) => {
    // ...
  }, err => {
    // ...
  });
});在第一次觸發run事件流時,那個屬性是undefined,所以會直接跳過,因為我是邊看原始碼邊解析,所以也不知道是啥,哈哈。
接下來下一個callback是這個:
this.readRecords(err => {
  if (err) return callback(err);
  this.compile(onCompiled);
});這是另一個原型方法,源碼如下:
Compiler.prototype.readRecords = (callback) => {
  // 这个属性也没有
  if (!this.recordsInputPath) {
    this.records = {};
    return callback();
  }
  this.inputFileSystem.stat(this.recordsInputPath, err => {
    // ...
  });
}這裡第一次也會跳過並直接callback,看源碼大概是傳入一個路徑並讀取裡面的檔案資訊快取到records。
這下連跳兩步,直接進入原型方法compile中,預覽一下這個函數:
Compiler.prototype.compile = (callback) => {
  const params = this.newCompilationParams();
  // 依次触发事件流
  this.applyPluginsAsync("before-compile", params, err => {
    if (err) return callback(err);
    this.applyPlugins("compile", params);
    const compilation = this.newCompilation(params);
    this.applyPluginsParallel("make", compilation, err => {
      if (err) return callback(err);
      compilation.finish();
      compilation.seal(err => {
        if (err) return callback(err);
        this.applyPluginsAsync("after-compile", compilation, err => {
          if (err) return callback(err);
          return callback(null, compilation);
        });
      });
    });
  });
}編譯打包的核心流程已經一覽無遺,方法中依次觸發了before-compile、 compile、make、after-compile事件流,最後呼叫了回調函數。
上面是我整理給大家的,希望今後對大家有幫助。
相關文章:
在VueJs中如何監聽window.resize具體該怎麼實現?
React-native橋接Android如何實現,具體步驟又是什麼?
以上是在webpack中詳細解讀入口函數run的詳細內容。更多資訊請關注PHP中文網其他相關文章!

熱AI工具

Undresser.AI Undress
人工智慧驅動的應用程序,用於創建逼真的裸體照片

AI Clothes Remover
用於從照片中去除衣服的線上人工智慧工具。

Undress AI Tool
免費脫衣圖片

Clothoff.io
AI脫衣器

AI Hentai Generator
免費產生 AI 無盡。

熱門文章

熱工具

記事本++7.3.1
好用且免費的程式碼編輯器

SublimeText3漢化版
中文版,非常好用

禪工作室 13.0.1
強大的PHP整合開發環境

Dreamweaver CS6
視覺化網頁開發工具

SublimeText3 Mac版
神級程式碼編輯軟體(SublimeText3)

熱門話題
 VUE3入門教學:使用Webpack進行打包和構建
Jun 15, 2023 pm 06:17 PM
Vue是一款優秀的JavaScript框架,它可以幫助我們快速建立互動性強、高效性好的Web應用程式。 Vue3是Vue的最新版本,它引入了許多新的功能和功能。 Webpack是目前最受歡迎的JavaScript模組打包器和建置工具之一,它可以幫助我們管理專案中的各種資源。本文就為大家介紹如何使用Webpack打包和建構Vue3應用程式。 1.安裝Webpack
 vite和webpack的差別是什麼
Jan 11, 2023 pm 02:55 PM
差異:1、webpack伺服器啟動速度比vite慢;由於vite啟動的時候不需要打包,也就不需要分析模組依賴、編譯,所以啟動速度非常快。 2.vite熱更新比webpack快;vite在HRM方面,當某個模組內容改變時,就讓瀏覽器去重新請求該模組即可。 3.vite用esbuild預先建置依賴,而webpack基於node。 4.vite的生態不如webpack,載入器、插件不夠豐富。
 如何使用PHP和webpack進行模組化開發
May 11, 2023 pm 03:52 PM
隨著Web開發技術的不斷發展,前後端分離、模組化開發已成為了廣泛的趨勢。 PHP作為一種常用的後端語言,在進行模組化開發時,我們需要使用一些工具來實現模組的管理和打包,其中webpack是一個非常好用的模組化打包工具。本文將介紹如何使用PHP和webpack進行模組化開發。一、什麼是模組化開發模組化開發是指將程式分解成不同的獨立模組,每個模組都有自己的作
 webpack怎麼將es6轉成es5的模組
Oct 18, 2022 pm 03:48 PM
設定方法:1.用導入的方法把ES6程式碼放到打包的js程式碼檔案中;2、利用npm工具安裝babel-loader工具,語法「npm install -D babel-loader @babel/core @babel/preset- env」;3、建立babel工具的設定檔「.babelrc」並設定轉碼規則;4、在webpack.config.js檔案中設定打包規則即可。
 使用Spring Boot和Webpack建構前端工程和插件系統
Jun 22, 2023 am 09:13 AM
隨著現代Web應用程式的複雜性不斷增加,建立優秀的前端工程和插件系統變得越來越重要。隨著SpringBoot和Webpack的流行,它們成為了一個建構前端工程和插件系統的完美組合。 SpringBoot是一個Java框架,它以最小的配置需求來建立Java應用程式。它提供了許多有用的功能,例如自動配置,使開發人員可以更快、更輕鬆地建立和部署Web應用程式。 W
 Webpack是什麼?詳解它是如何運作的?
Oct 13, 2022 pm 07:36 PM
Webpack是一款模組打包工具。它為不同的依賴創建模組,將其整體打包成可管理的輸出檔案。這一點對於單頁面應用程式(現今Web應用的事實標準)來說特別有用。
 vue webpack可打包哪些文件
Dec 20, 2022 pm 07:44 PM
在vue中,webpack可以將js、css、圖片、json等檔案打包為適當的格式,以供瀏覽器使用;在webpack中js、css、圖片、json等檔案類型都可以被當作模組來使用。 webpack中各種模組資源可打包合併成一個或多個包,並且在打包的過程中,可以對資源進行處理,如壓縮圖片、將scss轉成css、將ES6語法轉成ES5等可以被html識別的文件類型。
 使用Java中的Pattern.compile方法
Feb 18, 2024 pm 09:04 PM
Java中Pattern.compile函數的用法Java中的Pattern.compile函數是用來編譯正規表示式的方法。正規表示式是一種強大的字串比對和處理工具,可用於尋找、取代、驗證字串等操作。 Pattern.compile函數允許我們將一個字串模式編譯成一個Pattern對象,然後可以使用該物件進行一系列字串操作。 Pattern.compi


