

在Bootstrap4 + Vue2中如何實作分頁查詢
本篇文章主要介紹了使用Bootstrap4 Vue2實作分頁查詢的範例程式碼,現在分享給大家,也給大家做個參考。
寫在前面
工程為前後端分離設計,使用Nginx為前端資源伺服器,同時實作後台服務的反向代理。後台為Java Web工程,使用Tomcat部署服務。
前端框架:Bootstrap4,Vue.js2
#後台框架:spring boot,spring data JPA
#開發工具:IntelliJ IDEA,Maven
實作效果:
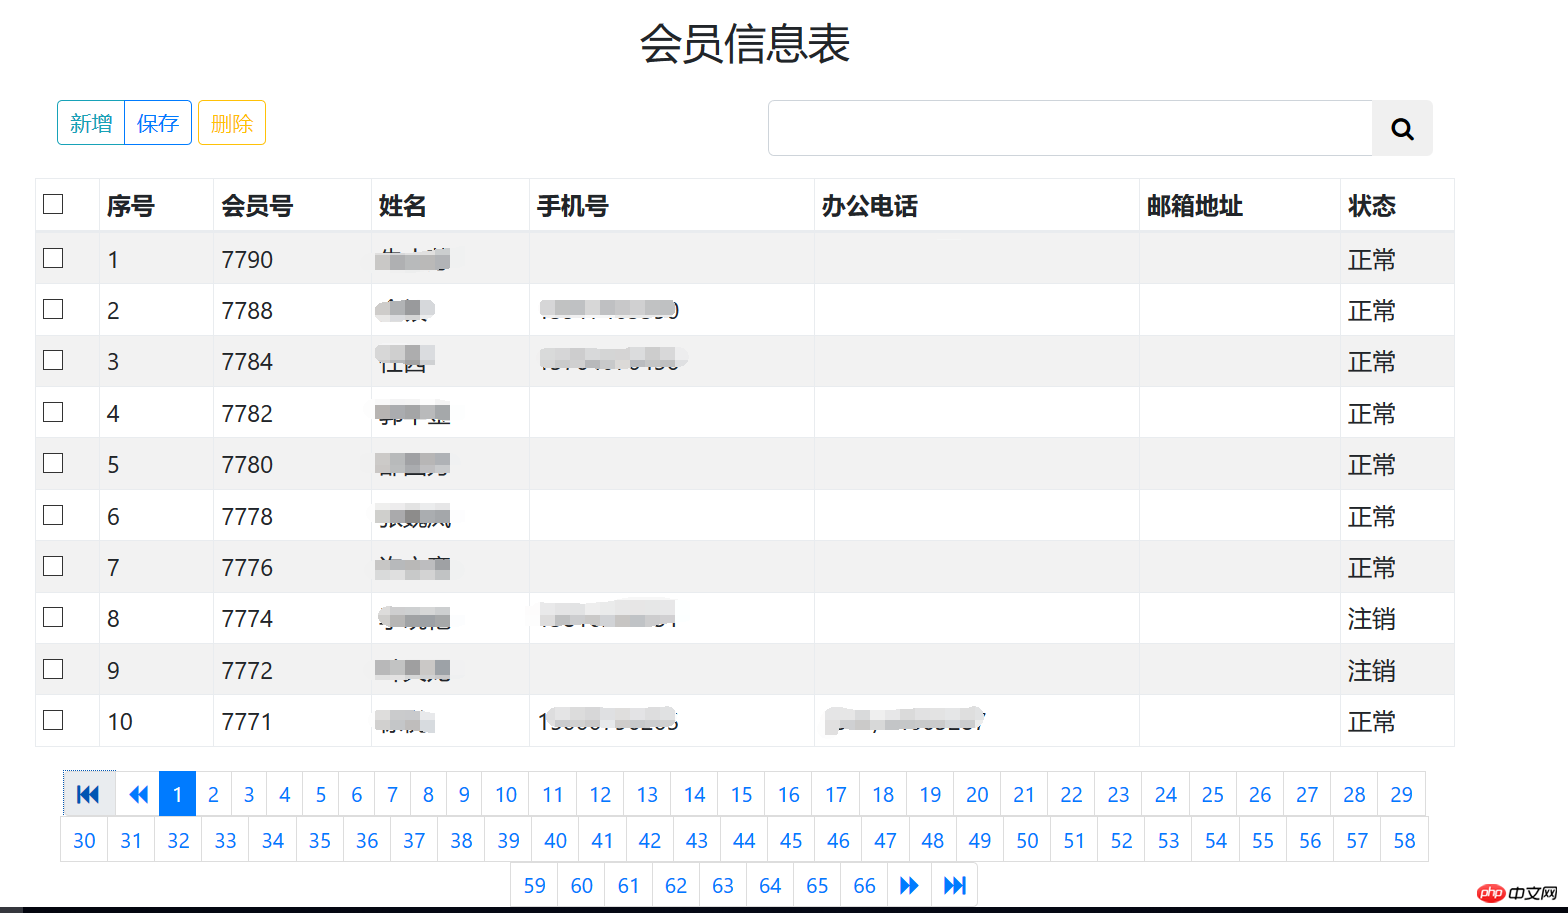
會員資訊
如何使用Bootstrap Vue來實作動態table,資料的新增刪除等操作,請查看使用Bootstrap Vue.js實作表格的動態展示、新增和刪除。交代完畢,本文主題開始。
一、使用Bootstrap建構表格
表格區
<p class="row">
   <table class="table table-hover table-striped table-bordered table-sm">
    <thead class="">
    <tr>
     <th><input type="checkbox"></th>
     <th>序号</th>
     <th>会员号</th>
     <th>姓名</th>
     <th>手机号</th>
     <th>办公电话</th>
     <th>邮箱地址</th>
     <th>状态</th>
    </tr>
    </thead>
    <tbody>
    <tr v-for="(user,index) in userList">
     <td><input type="checkbox" :value="index" v-model="checkedRows"></td>
     <td>{{pageNow*10 + index+1}}</td>
     <td>{{user.id}}</td>
     <td>{{user.username}}</td>
     <td>{{user.mobile}}</td>
     <td>{{user.officetel}}</td>
     <td>{{user.email}}</td>
     <td v-if="user.disenable == 0">正常</td>
     <td v-else>注销</td>
    </tr>
    </tbody>
   </table>
</p>分頁區
<p class="row mx-auto">
   <ul class="nav justify-content-center pagination-sm">
    <li class="page-item">
     <a href="#" rel="external nofollow" rel="external nofollow" rel="external nofollow" rel="external nofollow" rel="external nofollow" class="page-link"><i class="fa fa-fast-backward" @click="switchToPage(0)"> </i></a>
    </li>
    <li class="page-item">
     <a href="#" rel="external nofollow" rel="external nofollow" rel="external nofollow" rel="external nofollow" rel="external nofollow" class="page-link"><i class="fa fa-backward" @click="switchToPage(pageNow-1)"></i></a>
    </li>
    <li class="page-item" v-for="n in totalPages" :class="{active:n==pageNow+1}">
     <a href="#" rel="external nofollow" rel="external nofollow" rel="external nofollow" rel="external nofollow" rel="external nofollow" @click="switchToPage(n-1)" class="page-link">{{n}}</a>
    </li>
    <li class="page-item">
     <a href="#" rel="external nofollow" rel="external nofollow" rel="external nofollow" rel="external nofollow" rel="external nofollow" class="page-link"><i class="fa fa-forward" @click="switchToPage(pageNow+1)"></i></a>
    </li>
    <li class="page-item">
     <a href="#" rel="external nofollow" rel="external nofollow" rel="external nofollow" rel="external nofollow" rel="external nofollow" class="page-link"><i class="fa fa-fast-forward" @click="switchToPage(totalPages-1)"></i></a>
    </li>
   </ul>
</p>二、初始化Vue對象及資料
建立Vue物件
var vueApp = new Vue({
  el:"#vueApp",
  data:{
   userList:[],
   perPage:10,
   pageNow:0,
   totalPages:0,
   checkedRows:[]
  },
  methods:{
   switchToPage:function (pageNo) {
    if (pageNo < 0 || pageNo >= this.totalPages){
     return false;
    }
    getUserByPage(pageNo);
   }
  }
});初始化資料
function getUserByPage(pageNow) {
 $.ajax({
  url:"/user/"+pageNow,
  success:function (datas) {
  vueApp.userList = datas.content;
  vueApp.totalPages = datas.totalPages;
  vueApp.pageNow = pageNow;
  },
  error:function (res) {
  console.log(res);
  }
 });
}完整js程式碼:
<script>
var vueApp = new Vue({
el:"#vueApp",
data:{
userList:[],
perPage:10,
pageNow:0,
totalPages:0,
checkedRows:[]
},
methods:{
switchToPage:function (pageNo) {
if (pageNo < 0 || pageNo >= this.totalPages){
return false;
}
getUserByPage(pageNo);
}
}
});
getUserByPage(0);
function getUserByPage(pageNow) {
$.ajax({
url:"/user/"+pageNow,
success:function (datas) {
vueApp.userList = datas.content;
vueApp.totalPages = datas.totalPages;
vueApp.pageNow = pageNow;
},
error:function (res) {
console.log(res);
}
});
}
</script>三、使用JPA實作分頁查詢
controller接收請求
/**
 * 用户相关请求控制器
 * @author louie
 * @date 2017-12-19
 */
@RestController
@RequestMapping("/user")
public class UserController {

 @Autowired
 private UserService userService;

 /**
 * 分页获取用户
 * @param pageNow 当前页码
 * @return 分页用户数据
 */
 @RequestMapping("/{pageNow}")
 public Page<User> findByPage(@PathVariable Integer pageNow){
 return userService.findUserPaging(pageNow);
 }
}JPA分頁查詢
@Service
public class UserServiceImpl implements UserService {

 @Value("${self.louie.per-page}")
 private Integer perPage;

 @Autowired
 private UserRepository userRepository;

 @Override
 public Page<User> findUserPaging(Integer pageNow) {
 Pageable pageable = new PageRequest(pageNow,perPage,Sort.Direction.DESC,"id");
 return userRepository.findAll(pageable);
 }
}好了,至此功能完成,工程代碼已在GitHub中分享,您可以點擊查看或下載,擁抱開源,分享讓世界更美好。
上面是我整理給大家的,希望今後對大家有幫助。
相關文章:
#以上是在Bootstrap4 + Vue2中如何實作分頁查詢的詳細內容。更多資訊請關注PHP中文網其他相關文章!

熱AI工具

Undresser.AI Undress
人工智慧驅動的應用程序,用於創建逼真的裸體照片

AI Clothes Remover
用於從照片中去除衣服的線上人工智慧工具。

Undress AI Tool
免費脫衣圖片

Clothoff.io
AI脫衣器

Video Face Swap
使用我們完全免費的人工智慧換臉工具,輕鬆在任何影片中換臉!

熱門文章
熱工具

記事本++7.3.1
好用且免費的程式碼編輯器

SublimeText3漢化版
中文版,非常好用

禪工作室 13.0.1
強大的PHP整合開發環境

Dreamweaver CS6
視覺化網頁開發工具

SublimeText3 Mac版
神級程式碼編輯軟體(SublimeText3)


 vue怎麼給按鈕添加函數
Apr 08, 2025 am 08:51 AM
vue怎麼給按鈕添加函數
Apr 08, 2025 am 08:51 AM
可以通過以下步驟為 Vue 按鈕添加函數:將 HTML 模板中的按鈕綁定到一個方法。在 Vue 實例中定義該方法並編寫函數邏輯。
 vue多頁面開發是啥意思
Apr 07, 2025 pm 11:57 PM
vue多頁面開發是啥意思
Apr 07, 2025 pm 11:57 PM
Vue 多頁面開發是一種使用 Vue.js 框架構建應用程序的方法,其中應用程序被劃分為獨立的頁面:代碼維護性:將應用程序拆分為多個頁面可以使代碼更易於管理和維護。模塊化:每個頁面都可以作為獨立的模塊,便於重用和替換。路由簡單:頁面之間的導航可以通過簡單的路由配置來管理。 SEO 優化:每個頁面都有自己的 URL,這有助於搜索引擎優化。
 React與Vue:Netflix使用哪個框架?
Apr 14, 2025 am 12:19 AM
React與Vue:Netflix使用哪個框架?
Apr 14, 2025 am 12:19 AM
NetflixusesAcustomFrameworkcalled“ Gibbon” BuiltonReact,notReactorVuedIrectly.1)TeamSperience:selectBasedonFamiliarity.2)ProjectComplexity:vueforsimplerprojects:reactforforforproproject,reactforforforcompleplexones.3)cocatizationneedneeds:reactoffipicatizationneedneedneedneedneedneeds:reactoffersizationneedneedneedneedneeds:reactoffersizatization needefersmoreflexibleise.4)
 vue的div怎麼跳轉
Apr 08, 2025 am 09:18 AM
vue的div怎麼跳轉
Apr 08, 2025 am 09:18 AM
Vue 中 div 元素跳轉的方法有兩種:使用 Vue Router,添加 router-link 組件。添加 @click 事件監聽器,調用 this.$router.push() 方法跳轉。
 vue怎麼a標籤跳轉
Apr 08, 2025 am 09:24 AM
vue怎麼a標籤跳轉
Apr 08, 2025 am 09:24 AM
實現 Vue 中 a 標籤跳轉的方法包括:HTML 模板中使用 a 標籤指定 href 屬性。使用 Vue 路由的 router-link 組件。使用 JavaScript 的 this.$router.push() 方法。可通過 query 參數傳遞參數,並在 router 選項中配置路由以進行動態跳轉。
 apache怎麼配置zend
Apr 13, 2025 pm 12:57 PM
apache怎麼配置zend
Apr 13, 2025 pm 12:57 PM
如何在 Apache 中配置 Zend?在 Apache Web 服務器中配置 Zend Framework 的步驟如下:安裝 Zend Framework 並解壓到 Web 服務器目錄中。創建 .htaccess 文件。創建 Zend 應用程序目錄並添加 index.php 文件。配置 Zend 應用程序(application.ini)。重新啟動 Apache Web 服務器。
 反應,vue和Netflix前端的未來
Apr 12, 2025 am 12:12 AM
反應,vue和Netflix前端的未來
Apr 12, 2025 am 12:12 AM
Netflix主要使用React作為前端框架,輔以Vue用於特定功能。 1)React的組件化和虛擬DOM提升了Netflix應用的性能和開發效率。 2)Vue在Netflix的內部工具和小型項目中應用,其靈活性和易用性是關鍵。
 vue怎麼實現組件跳轉
Apr 08, 2025 am 09:21 AM
vue怎麼實現組件跳轉
Apr 08, 2025 am 09:21 AM
Vue 中實現組件跳轉有以下方法:使用 router-link 和 <router-view> 組件進行超鏈接跳轉,指定 :to 屬性為目標路徑。直接使用 <router-view> 組件顯示當前路由渲染的組件。使用 router.push() 和 router.replace() 方法進行程序化導航,前者保存歷史記錄,後者替換當前路由不留記錄。
