在angularjs中如何實現長條圖動態加載
本篇文章主要介紹了angularjs實作長條圖動態載入的範例,小編覺得挺不錯的,現在分享給大家,也給大家做個參考。一起跟著小編過來看看吧
一準備工作
#1.引用檔案
下面連結中有一個jquery.js文件,請在index.html中引用。
2.新文件
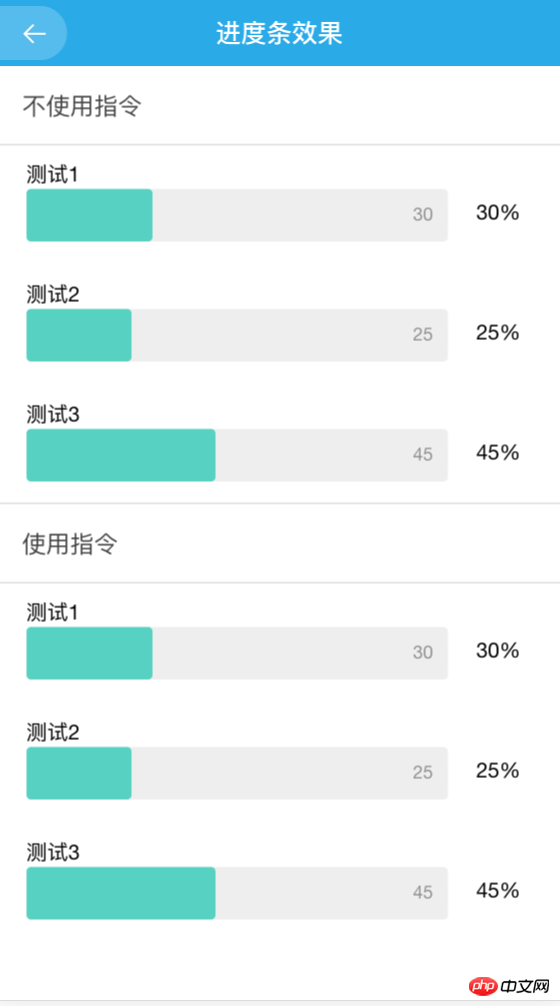
新建一個js文件,寫指令。這也是我第一次寫指令,指令可擴展性強,還很方便,當專案中重複使用的一些效果時可以透過指令來減少冗餘的程式碼。
二碼寫
/**
* Created by xiehan on 2017/12/8.
* 柱状图动态加载指令
*/
angular.module('studyApp.directives')
.directive('progressPer', function ($compile,$timeout) {
return {
restrict: 'AE',
scope: {
progressData: '='
},
template: ' <p class="progress-main" ng-repeat="item in progressData">'+
'<p class="progress-data">'+
'<span>{{item.name}}</span>'+
'<p class="skillbar clearfix " data-percent={{item.width}}>'+
'<p class="skillbar-bar"></p>'+
'<p class="skill-bar-percent">{{item.sum}}</p>'+
'</p>'+
'</p>'+
'<p class="progress-rate">{{item.percent}}</p>'+
'</p>',
replace: true,
transclude: true,
link: function (scope, element, attrs) {
$compile(element.contents())(scope.$new());
$timeout(function() {
jQuery('.skillbar').each(function(){
jQuery(this).find('.skillbar-bar').animate({
width:jQuery(this).attr('data-percent')
},1000);
});
});
}
}
});/**
* Created by xiehan on 2017/11/29.
* controller文件
*/
angular.module('studyApp.controllers')
.controller('ProgressCtrl', function ($scope, $rootScope, $ionicHistory,$timeout,$location) {
$scope.title = '进度条效果';
$scope.goBack = function () {
$ionicHistory.goBack();
};
var dataInfo=[
{
NAME:"测试1",
NUM:30,
RATE:30
},
{
NAME:"测试2",
NUM:25,
RATE:25
},
{
NAME:"测试3",
NUM:45,
RATE:45
}
];
handleTabData(dataInfo);
function handleTabData(data){
var widthData=[];
for(var i = 0;i<data.length;i++){
widthData.push({
width:data[i].RATE+'%', //进度条百分比
name:data[i].NAME, //标题
sum:data[i].NUM, //数量
percent:data[i].RATE+'%'}); //百分比
}
$scope.handleDataInfo = widthData;
//不使用指令加上下面的代码
// $timeout(function() {
// jQuery('.skillbar').each(function(){
// jQuery(this).find('.skillbar-bar').animate({
// width:jQuery(this).attr('data-percent')
// },1000);
// });
// });
}
});<ion-item>不使用指令</ion-item>
<p class="progress-main" ng-repeat="item in handleDataInfo">
<p class="progress-data">
<span>{{item.name}}</span>
<p class="skillbar clearfix " data-percent={{item.width}}>
<p class="skillbar-bar"></p>
<p class="skill-bar-percent">{{item.sum}}</p>
</p>
</p>
<p class="progress-rate">{{item.percent}}</p>
</p>
<ion-item>使用指令</ion-item>
<progress-per progress-data="handleDataInfo"></progress-per>/***************进度条样式css********/
.skillbar {
position: relative;
display: block;
margin-bottom: 15px;
width: 100%;
background: #eee; /**背景颜色**/
height: 35px;
border-radius: 3px;
-moz-border-radius: 3px;
-webkit-border-radius: 3px;
-webkit-transition: 0.4s linear;
-moz-transition: 0.4s linear;
-ms-transition: 0.4s linear;
-o-transition: 0.4s linear;
transition: 0.4s linear;
-webkit-transition-property: width, background-color;
-moz-transition-property: width, background-color;
-ms-transition-property: width, background-color;
-o-transition-property: width, background-color;
transition-property: width, background-color;
}
.skillbar-bar {
height: 35px;
width: 0px;
background: #50d2c2;
border-radius: 3px;
-moz-border-radius: 3px;
-webkit-border-radius: 3px;
}
.skill-bar-percent {
position: absolute;
right: 10px;
top: 0;
font-size: 11px;
height: 35px;
line-height: 35px;
color: #ffffff;
color: rgba(0, 0, 0, 0.4);
}
.progress-main{
display: flex;
display: -webkit-flex;
align-items: center;
-webkit-align-items: center;
justify-content: center;
-webkit-justify-content: center;
margin-top: 10px;
}
.progress-data{
margin-left: 5%;
width: 100%;
float: left;
}
.progress-rate{
float: right;
width: 20%;
line-height: 35px;
margin-left: 5%;
margin-top: 10px;
}#三效果圖

上面是我整理給大家的,希望今後對大家有幫助。
相關文章:
以上是在angularjs中如何實現長條圖動態加載的詳細內容。更多資訊請關注PHP中文網其他相關文章!

熱AI工具

Undresser.AI Undress
人工智慧驅動的應用程序,用於創建逼真的裸體照片

AI Clothes Remover
用於從照片中去除衣服的線上人工智慧工具。

Undress AI Tool
免費脫衣圖片

Clothoff.io
AI脫衣器

Video Face Swap
使用我們完全免費的人工智慧換臉工具,輕鬆在任何影片中換臉!

熱門文章

熱工具

記事本++7.3.1
好用且免費的程式碼編輯器

SublimeText3漢化版
中文版,非常好用

禪工作室 13.0.1
強大的PHP整合開發環境

Dreamweaver CS6
視覺化網頁開發工具

SublimeText3 Mac版
神級程式碼編輯軟體(SublimeText3)
 如何在Ubuntu 24.04上安裝Angular
Mar 23, 2024 pm 12:20 PM
Angular.js是一種可自由存取的JavaScript平台,用於建立動態應用程式。它允許您透過擴展HTML的語法作為模板語言,以快速、清晰地表示應用程式的各個方面。 Angular.js提供了一系列工具,可協助您編寫、更新和測試程式碼。此外,它還提供了許多功能,如路由和表單管理。本指南將討論在Ubuntu24上安裝Angular的方法。首先,您需要安裝Node.js。 Node.js是一個基於ChromeV8引擎的JavaScript運行環境,可讓您在伺服器端執行JavaScript程式碼。要在Ub
 如何使用PHP和Angular進行前端開發
May 11, 2023 pm 04:04 PM
隨著網路的快速發展,前端開發技術也不斷改進與迭代。 PHP和Angular是兩種廣泛應用於前端開發的技術。 PHP是一種伺服器端腳本語言,可以處理表單、產生動態頁面和管理存取權限等任務。而Angular是一種JavaScript的框架,可以用來開發單一頁面應用程式和建構元件化的網頁應用程式。本篇文章將介紹如何使用PHP和Angular進行前端開發,以及如何將它們
 淺析angular中怎麼使用monaco-editor
Oct 17, 2022 pm 08:04 PM
angular中怎麼使用monaco-editor?以下這篇文章記錄下最近的一次業務中用到的 monaco-editor 在 angular 中的使用,希望對大家有幫助!
 WPS文檔長條圖怎麼做
Mar 20, 2024 pm 10:11 PM
WPS作為我們日常工作中常用的軟體,在做統計的時候會用到一些圖表來進行比較與參考,例如對長條圖的應用。那你知道WPS長條圖怎麼做嗎?下面小編就來介紹一下WPS長條圖怎麼做的方法。我們開啟使用的WPS軟體後,介面會因WPS版本不同而有所差異,但不會影響操作。接著,在主選單列中找到「插入」選項,開啟後會看到圖表選項。圖表打開以後,第一個就是所謂的長條圖,其實長條圖也分為3種,分別為簇狀長條圖,與堆積長條圖和百分比堆積長條圖,我們需要那個可以自己來選擇,我先介紹一下這個簇狀長條圖的使用。選擇好了
 淺析Angular中的獨立組件,看看怎麼使用
Jun 23, 2022 pm 03:49 PM
這篇文章帶大家了解Angular中的獨立元件,看看怎麼在Angular中建立一個獨立元件,怎麼在獨立元件中導入已有的模組,希望對大家有幫助!
 使用Angular和Node進行基於令牌的身份驗證
Sep 01, 2023 pm 02:01 PM
身份驗證是任何網路應用程式中最重要的部分之一。本教程討論基於令牌的身份驗證系統以及它們與傳統登入系統的差異。在本教程結束時,您將看到一個用Angular和Node.js編寫的完整工作演示。傳統身份驗證系統在繼續基於令牌的身份驗證系統之前,讓我們先來看看傳統的身份驗證系統。使用者在登入表單中提供使用者名稱和密碼,然後點擊登入。發出請求後,透過查詢資料庫在後端驗證使用者。如果請求有效,則使用從資料庫中獲取的使用者資訊建立會話,然後在回應頭中傳回會話訊息,以便將會話ID儲存在瀏覽器中。提供用於存取應用程式中受


