這篇文章主要介紹了關於PHP – EasyUI DataGrid 資料存的方法介紹,有著一定的參考價值,現在分享給大家,有需要的朋友可以參考一下
繼上篇文章PHP – EasyUI DataGrid 資料取的方式,本篇繼續講述,如何操作DataGrid,把資料存入資料庫,並實現MVC 架構,將資料層分開、獨立運作。
本篇文章主要是改良,原 EasyUI DataGrid 的範例 Build CRUD Application with jQuery EasyUI。
在官方範例中已經示範如何操作資料,但其中有個問題就是,你要操作資料的每個動作都需要一支對應的程序才能動作,像是新增、刪除、修改以及取得資料,總共至少要有四支對應程序才能運作。
讀者可以想想,這還只是一支單檔使用者的基本資料維護而已,一般系統光基本資料都有十幾支甚至幾十支程序在運作,所以這樣的方式,勢必要改良才能運作在實務上。
在來按造多層次架構設計前言的精神,大家可以發現這四支程序其實對每一個基本資料的操作來說,都是大同小異的,所以是可以把他標準化,用成一個固定框架,供後面類似程式來使用。
這部分,會分成幾篇文章來逐漸完成這各過程,藉由這逐漸演進的過程,來了解框架是如何成形的。
首先本篇,先來介紹,如何把分散的四支程序集中成為一支程序來呼叫,在讀者往下閱讀之前,可先在了解PHP – EasyUI DataGrid 資料取的方式以及官方範例 Build CRUD Application with jQuery EasyUI 的運作方式,至少要能把範例Run 起來,run 這個動作是很重要的,不要光看而已,親身去測試才能了解其中的問題點。
要能實現將四支程式改成一支程式來運作,其實關鍵很簡單,就是去改每個操作動作時呼叫的url,改成都會呼叫DAL 端的程式dal_user.php,接下來在呼叫前,都要傳遞一個type 參數告訴dal 你要進行何種動作。
目前type 定義了下面四個動作
add 新增
mod 修改
del 刪除
data 取得資料
了解想要dal 作哪些動作後,就可以開始來撰寫dal 程式了,當然現在這各dal 還是一個非標準化的程序,但是他已經做到MVC 的精神,把資料訪問層跟表現層分離開了,後面的文章, 會再來介紹,如何把本篇介紹的程式來標準化dal 以及UI 表現層。
dal_user.php
<?php
$result = false;
if (!empty($_REQUEST['type']) )
{
require_once(".\..\db\DB_config.php");
require_once(".\..\db\DB_class.php");
$db = new DB();
$db->connect_db($_DB['host'], $_DB['username'], $_DB['password'], $_DB['dbname']);
$tablename = "STUser";
$type = $_REQUEST['type'];
if($type == "del")
{
$id = $_REQUEST['id'];
$sql = "delete from STUser where UNum=$id";
$result = $db->query($sql);
}else if($type == "data"){
$page = isset($_POST['page']) ? intval($_POST['page']) : 1;
$rows = isset($_POST['rows']) ? intval($_POST['rows']) : 10;
$offset = ($page-1)*$rows;
$result = array();
$db->query("select count(*) As Total from $tablename");
$row = $db->fetch_assoc();
$result["total"] = $row["Total"];
$db->query("select * from $tablename limit $offset,$rows");
$items = array();
while($row = $db->fetch_assoc()){
array_push($items, $row);
}
$result["rows"] = $items;
echo json_encode($result);
}else{
$STUID = $_REQUEST['STUID'];
$Password = $_REQUEST['Password'];
$Nickname = $_REQUEST['Nickname'];
$Birthday = $_REQUEST['Birthday'];
if (!empty($_REQUEST['id']) ) {
$id = $_REQUEST['id'];
$sql = "update $tablename set STUID='$STUID',Password='$Password',Nickname='$Nickname' where UNum=$id";
}else{ // is add
$sql = "insert into $tablename (STUID, Password, Nickname, DBSTS) values('$STUID','$Password','$Nickname', 'A')";
}
$result = $db->query($sql);
}
}
if($type != "data")
{
if ($result == "true"){
echo json_encode(array('success'=>true));
} else {
echo json_encode(array('msg'=>'had errors occured. ' . $result));
}
}
?>dal 資料存取層定義完了以後,就可以來實作UI 介面來呼叫dal,因為是使用AJAX 的方式來存取資料,所以MVC 中的控制層有一部分是放在界面層中,這部分,後面可以在用JavaScript 將這部分的控制層標準化,在藉由php 後端來傳遞參數呼叫,如此一來,則還是將所有控制大權集中在在一個程式中,這些後面文章會再來介紹,這邊先暫時打住。
datagrid.php
<!DOCTYPE html PUBLIC "-//W3C//DTD HTML 4.01 Transitional//EN" "http://www.w3.org/TR/html4/loose.dtd">
<html>
<head>
<meta http-equiv="Content-Type" content="text/html; charset=UTF-8">
<title>easyUI datagrid</title>
<link rel="stylesheet" type="text/css" href="./../JS/EasyUI/themes/default/easyui.css">
<link rel="stylesheet" type="text/css" href="./../JS/EasyUI/themes/icon.css">
<script type="text/javascript" src="./../JS/jquery.js"></script>
<script type="text/javascript" src="./../JS/EasyUI/jquery.easyui.min.js"></script>
<script type="text/javascript" src="./../JS/EasyUI/easyui-lang-zh_CN.js"></script>
<style type="text/css">
#fm{
margin:0;
padding:10px 30px;
}
.ftitle{
font-size:14px;
font-weight:bold;
color:#666;
padding:5px 0;
margin-bottom:10px;
border-bottom:1px solid #ccc;
}
.fitem{
margin-bottom:5px;
}
.fitem label{
display:inline-block;
width:80px;
}
</style>
<script type="text/javascript">
var url;
function newUser(){
$('#dlg').dialog('open').dialog('setTitle','New User');
$('#fm').form('clear');
url = 'dal_user.php?type=add';
}
function editUser(){
var row = $('#myDG').datagrid('getSelected');
if (row){
if(typeof(row.UNum) !== 'undefined')
{
$('#dlg').dialog('open').dialog('setTitle','Edit User');
$('#fm').form('load',row);
url = 'dal_user.php?type=mod&id='+row.UNum;
}else{
alert("undefined");
}
}
}
function saveUser(){
$('#fm').form('submit',{
url: url,
onSubmit: function(){
//alert('sub :'+ url);
return $(this).form('validate');
},
success: function(result){
var result = eval('('+result+')');
//alert(result.success);
if (result.success){
$('#dlg').dialog('close'); // close the dialog
$('#myDG').datagrid('reload'); // reload the user data
} else {
$.messager.show({
title: 'Error',
msg: result.msg
});
}
}
});
}
function removeUser(){
var row = $('#myDG').datagrid('getSelected');
if (row){
$.messager.confirm('Confirm','Are you sure you want to remove this user?',function(r){
if (r){
//alert(row.UNum);
$.post('dal_user.php', {type:'del', id:row.UNum}, function(result){
if (result.success){
$('#myDG').datagrid('reload'); // reload the user data
} else {
$.messager.show({ // show error message
title: 'Error',
msg: result.msg
});
}
},'json');
}
});
}
}
</script>
</head>
<body>
<h2>easyUI datagrid url 存取測試</h2>
<table id="myDG" class="easyui-datagrid" style="width:700px;height:450px"
url="dal_user.php?type=data" toolbar="#toolbar"
title="Load Data" iconCls="icon-save" pagination="true"
toolbar="#toolbar" rownumbers="true" fitColumns="true" singleSelect="true">
<thead>
<tr>
<th field="STUID" width="120">User ID</th>
<th field="Password" width="80" align="right">Password</th>
<th field="Birthday" width="80" align="right">Birthday</th>
<th field="Nickname" width="200">Nickname</th>
<th field="DBSTS" width="60" align="center">DBSTS</th>
</tr>
</thead>
</table>
<p id="toolbar">
<a href="#" class="easyui-linkbutton" iconCls="icon-add" plain="true" onclick="newUser()">New User</a>
<a href="#" class="easyui-linkbutton" iconCls="icon-edit" plain="true" onclick="editUser()">Edit User</a>
<a href="#" class="easyui-linkbutton" iconCls="icon-remove" plain="true" onclick="removeUser()">Remove User</a>
</p>
<p id="dlg" class="easyui-dialog" style="width:400px;height:350px;padding:10px 20px"
closed="true" buttons="#dlg-buttons">
<p class="ftitle">User Information</p>
<form id="fm" method="post" novalidate>
<p class="fitem">
<label>User ID:</label>
<input name="STUID" class="easyui-validatebox" required="true">
</p>
<p class="fitem">
<label>Password:</label>
<input name="Password" class="easyui-validatebox" required="true">
</p>
<p class="fitem">
<label>Nickname:</label>
<input name="Nickname">
</p>
<p class="fitem">
<label>Birthday:</label>
<input name="Birthday" class="easyui-validatebox" validType="email">
</p>
</form>
</p>
<p id="dlg-buttons">
<a href="#" class="easyui-linkbutton" iconCls="icon-ok" onclick="saveUser()">Save</a>
<a href="#" class="easyui-linkbutton" iconCls="icon-cancel" onclick="javascript:$('#dlg').dialog('close')">Cancel</a>
</p>
</body>
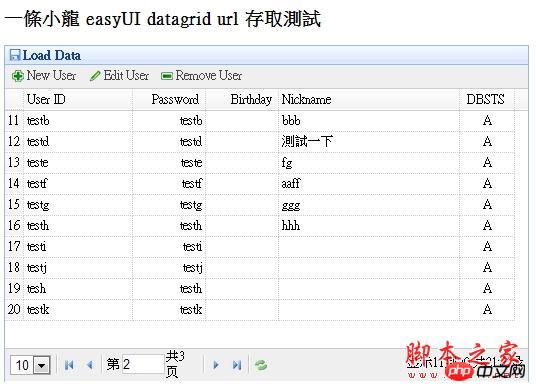
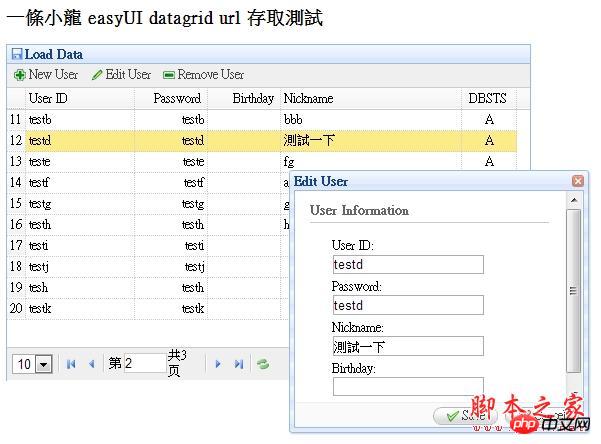
</html>運作結果畫面如下所示:

#以上就是本文的全部內容,希望對大家的學習有幫助,更多相關內容請關注PHP中文網!
相關推薦:
#
以上是關於PHP – EasyUI DataGrid 資料存的方法介紹的詳細內容。更多資訊請關注PHP中文網其他相關文章!


