

微信小程式開發手勢解鎖的介紹

手勢解鎖是app上常見的解鎖方式,比起輸入密碼方式操作起來要方便許多。這篇文章主要介紹了微信小程式開發教學-手勢解鎖實例,有興趣的可以了解一下。
手勢解鎖是app上常見的解鎖方式,相較於輸入密碼方式操作起來要方便許多。以下展示如何基於微信小程式實現手機解鎖。最終實現效果如下圖:
整個功能基於canvas實現,首先新增畫布元件,並設定樣式
<!--index.wxml-->
<view class="container">
 <canvas canvas-id="id-gesture-lock" class="gesture-lock" bindtouchstart="onTouchStart"
  bindtouchmove="onTouchMove" bindtouchend="onTouchEnd"></canvas>
</view>
.gesture-lock {
  margin: 100rpx auto;
  width: 300px;
  height: 300px;
  background-color: #ffffff;
}手勢解鎖實作程式碼在gesture_lock.js中(完整原始碼位址見末尾)。
初始化
  constructor(canvasid, context, cb, opt){
    this.touchPoints = [];
    this.checkPoints = [];
    this.canvasid = canvasid;
    this.ctx = context;
    this.width = opt && opt.width || 300; //画布长度
    this.height = opt && opt.height || 300; //画布宽度
    this.cycleNum = opt && opt.cycleNum || 3;
    this.radius = 0; //触摸点半径
    this.isParamOk = false;
    this.marge = this.margeCircle = 25; //触摸点及触摸点和画布边界间隔
    this.initColor = opt && opt.initColor || '#C5C5C3';
    this.checkColor = opt && opt.checkColor || '#5AA9EC';
    this.errorColor = opt && opt.errorColor || '#e19984';
    this.touchState = "unTouch";
    this.checkParam();
    this.lastCheckPoint = null;
    if (this.isParamOk) {
      // 计算触摸点的半径长度
      this.radius = (this.width - this.marge * 2 - (this.margeCircle * (this.cycleNum - 1))) / (this.cycleNum * 2)
      this.radius = Math.floor(this.radius);
      // 计算每个触摸点的圆心位置
      this.calCircleParams();
    }
    this.onEnd = cb; //滑动手势结束时的回调函数
}#主要設定一些參數,如canvas的長寬,canvas的context,手勢鎖的個數(3乘3, 4乘4),手勢鎖的顏色,手勢滑動結束時的回呼函數等。並計算出手勢鎖的半徑。
計算每個手勢鎖的圓心位置
  calCircleParams() {
    let n = this.cycleNum;
    let count = 0;
    for (let i = 0; i < n; i++) {
      for (let j = 0; j < n; j++){
        count++;
        let touchPoint = {
          x: this.marge + i * (this.radius * 2 + this.margeCircle) + this.radius,
          y: this.marge + j * (this.radius * 2 + this.margeCircle) + this.radius,
          index: count,
          check: "uncheck",
        }
        this.touchPoints.push(touchPoint)
      }
    }
}繪製手勢鎖定
   for (let i = 0; i < this.touchPoints.length; i++){
      this.drawCircle(this.touchPoints[i].x, this.touchPoints[i].y, this.radius, this.initColor)
   }
this.ctx.draw(true);接下來就是辨識使用者的滑動行為,判斷使用者劃過了哪些圓圈,進而辨識出使用者的手勢。
在touchstart和touchmove事件中偵測觸發並更新畫布
#
  onTouchStart(e) {
    // 不识别多点触控
    if (e.touches.length > 1){
      this.touchState = "unTouch";
      return;
    }
    this.touchState = "startTouch";
    this.checkTouch(e);
    let point = {x:e.touches[0].x, y:e.touches[0].y};
    this.drawCanvas(this.checkColor, point);
  }

  onTouchMove(e) {
    if (e.touchState === "unTouch") {
      return;
    }
    if (e.touches.length > 1){
      this.touchState = "unTouch";
      return;
    }
    this.checkTouch(e);
    let point = {x:e.touches[0].x, y:e.touches[0].y};
    this.drawCanvas(this.checkColor, point);
}偵測使用者是否劃過某個圓圈
checkTouch(e) {
for (let i = 0; i < this.touchPoints.length; i++){
let point = this.touchPoints[i];
if (isPointInCycle(e.touches[0].x, e.touches[0].y, point.x, point.y, this.radius)) {
if (point.check === 'uncheck') {
this.checkPoints.push(point);
this.lastCheckPoint = point;
}
point.check = "check"
return;
}
}
}更新畫布
   drawCanvas(color, point) {
    //每次更新之前先清空画布
    this.ctx.clearRect(0, 0, this.width, this.height);
    //使用不同颜色和形式绘制已触发和未触发的锁
    for (let i = 0; i < this.touchPoints.length; i++){
      let point = this.touchPoints[i];
      if (point.check === "check") {
        this.drawCircle(point.x, point.y, this.radius, color);
        this.drawCircleCentre(point.x, point.y, color);
      }
      else {
        this.drawCircle(this.touchPoints[i].x, this.touchPoints[i].y, this.radius, this.initColor)
      }
    }
    //绘制已识别锁之间的线段
    if (this.checkPoints.length > 1) {
       let lastPoint = this.checkPoints[0];
       for (let i = 1; i < this.checkPoints.length; i++) {
         this.drawLine(lastPoint, this.checkPoints[i], color);
         lastPoint = this.checkPoints[i];
       }
    }
    //绘制最后一个识别锁和当前触摸点之间的线段
    if (this.lastCheckPoint && point) {
      this.drawLine(this.lastCheckPoint, point, color);
    }
    this.ctx.draw(true);
}當使用者滑動結束時呼叫回呼函數並傳遞識別出的手勢
#
  onTouchEnd(e) {
    typeof this.onEnd === 'function' && this.onEnd(this.checkPoints, false);
  }

  onTouchCancel(e) {
    typeof this.onEnd === 'function' && this.onEnd(this.checkPoints, true);
}重置和顯示手勢錯誤
gestureError() {
this.drawCanvas(this.errorColor)
}
reset() {
for (let i = 0; i < this.touchPoints.length; i++) {
this.touchPoints[i].check = 'uncheck';
}
this.checkPoints = [];
this.lastCheckPoint = null;
this.drawCanvas(this.initColor);
}如何呼叫
#在onload方法中建立lock物件並在使用者觸摸事件中呼叫對應方法
 onLoad: function () {
  var s = this;
  this.lock = new Lock("id-gesture-lock", wx.createCanvasContext("id-gesture-lock"), function(checkPoints, isCancel) {
   console.log('over');
   s.lock.gestureError();
   setTimeout(function() {
    s.lock.reset();
   }, 1000);
  }, {width:300, height:300})
  this.lock.drawGestureLock();
  console.log('onLoad')
  var that = this
  //调用应用实例的方法获取全局数据
  app.getUserInfo(function(userInfo){
   //更新数据
   that.setData({
    userInfo:userInfo
   })
   that.update()
  })
 },
 onTouchStart: function (e) {
  this.lock.onTouchStart(e);
 },
 onTouchMove: function (e) {
  this.lock.onTouchMove(e);
 },
 onTouchEnd: function (e) {
  this.lock.onTouchEnd(e);
}以上就是本文的全部內容,希望對大家的學習有所幫助,更多相關內容請關注PHP中文網!
相關推薦:
#
以上是微信小程式開發手勢解鎖的介紹的詳細內容。更多資訊請關注PHP中文網其他相關文章!

熱AI工具

Undresser.AI Undress
人工智慧驅動的應用程序,用於創建逼真的裸體照片

AI Clothes Remover
用於從照片中去除衣服的線上人工智慧工具。

Undress AI Tool
免費脫衣圖片

Clothoff.io
AI脫衣器

Video Face Swap
使用我們完全免費的人工智慧換臉工具,輕鬆在任何影片中換臉!

熱門文章
熱工具

記事本++7.3.1
好用且免費的程式碼編輯器

SublimeText3漢化版
中文版,非常好用

禪工作室 13.0.1
強大的PHP整合開發環境

Dreamweaver CS6
視覺化網頁開發工具

SublimeText3 Mac版
神級程式碼編輯軟體(SublimeText3)


 如何在iOS 17上的FaceTime中使用效果
Sep 23, 2023 pm 04:53 PM
如何在iOS 17上的FaceTime中使用效果
Sep 23, 2023 pm 04:53 PM
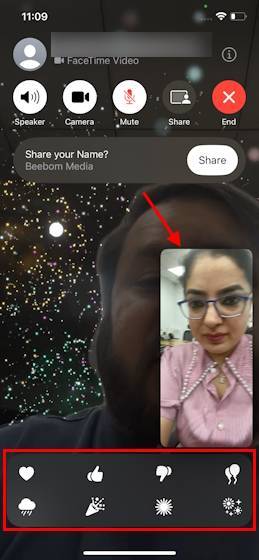
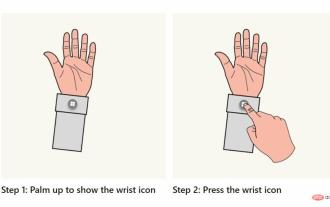
如何在iOS17中使用iPhone上的FaceTime效果【註】FaceTime通話效果僅適用於iPhone12及更高機型。開啟FaceTime通話App,選取聯絡人,然後進行視訊通話。連接後,請確保已啟用前置鏡頭。有兩種方法可以在iOS17上的FaceTime中觸發效果。首先,在FaceTime中長按您的圖片,這應該會顯示螢幕上的FaceTime效果選單,如心形,豎起大拇指,煙火等。點擊效果以查看動畫。在iOS17上的FaceTime中觸發反應效果的第二種也是更令人興奮的方法是解放雙手並使用
 Windows 11的觸控板手勢設定方法是什麼?
May 09, 2023 am 09:22 AM
Windows 11的觸控板手勢設定方法是什麼?
May 09, 2023 am 09:22 AM
Windows11提供了一些新的強大功能,這些功能也很容易自訂。因此,根據您的需求設定它們將創建一個更愉快和原始的數位環境。其中,觸控板和觸控螢幕功能非常流行,兩者都需要特別注意。因為我們希望始終讓您了解最新信息,所以在今天的文章中,我們將探討如何在Windows11中個性化觸控板手勢。但在此之前,讓我們先看看支援哪些手勢以及為什麼要使用它們。 Windows11支援哪些觸控板手勢?點擊手勢點擊和滑動代表兩種常見的手勢,主要用於筆記型電腦或平板電腦等裝置。點擊手勢用於偵測一個或多個手指短暫按下觸
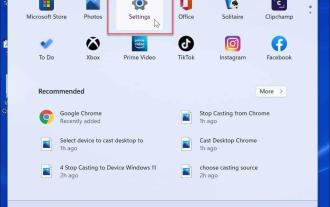 如何在 Windows 11 上自訂觸控板手勢
Apr 15, 2023 pm 04:55 PM
如何在 Windows 11 上自訂觸控板手勢
Apr 15, 2023 pm 04:55 PM
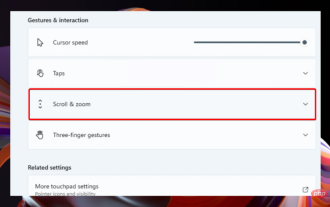
檢查自訂觸控板手勢支援如果您想使用自訂觸控板手勢,則需要確保您有合適的驅動程式來支援它們。以下是您需要做的檢查:檢查觸控板驅動程式。如果您沒有精密觸控板,則「設定」應用程式將不允許您在Windows11上自訂觸控板手勢。如果您有像BrydgeTrackpad之類的,請確保更新其驅動程式。安裝第三方軟體。如果觸控板有第三方軟體,結果將取決於軟體的強度和應用程式個人化的能力。如何在Windows11上自訂觸控板手勢Windows11包含適用於帶有WindowsPrecision
 使用Python開發微信小程式
Jun 17, 2023 pm 06:34 PM
使用Python開發微信小程式
Jun 17, 2023 pm 06:34 PM
隨著行動互聯網技術和智慧型手機的普及,微信成為了人們生活中不可或缺的一個應用。而微信小程式則讓人們可以在不需要下載安裝應用程式的情況下,直接使用小程式來解決一些簡單的需求。本文將介紹如何使用Python來開發微信小程式。一、準備工作在使用Python開發微信小程式之前,需要先安裝相關的Python函式庫。這裡推薦使用wxpy和itchat這兩個函式庫。 wxpy是一個微信機器
 實作微信小程式中的卡片翻轉特效
Nov 21, 2023 am 10:55 AM
實作微信小程式中的卡片翻轉特效
Nov 21, 2023 am 10:55 AM
實作微信小程式中的卡片翻轉特效在微信小程式中,實現卡片翻轉特效是一種常見的動畫效果,可以提升使用者體驗和介面互動的吸引力。以下將具體介紹如何在微信小程式中實現卡片翻轉的特效,並提供相關程式碼範例。首先,需要在小程式的頁面佈局檔案中定義兩個卡片元素,一個用於顯示正面內容,一個用於顯示背面內容,具體範例程式碼如下:<!--index.wxml-->&l
 小程式能用react嗎
Dec 29, 2022 am 11:06 AM
小程式能用react嗎
Dec 29, 2022 am 11:06 AM
小程式能用react,其使用方法:1、基於「react-reconciler」實作一個渲染器,產生一個DSL;2、建立一個小程式元件,去解析和渲染DSL;3、安裝npm,並執行開發者工具中的建構npm;4、在自己的頁面中引入包,再利用api即可完成開發。
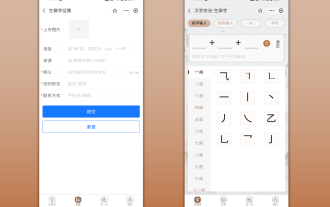 支付寶上線「漢字拾光-生僻字」小程序,用於徵集、補充生僻字庫
Oct 31, 2023 pm 09:25 PM
支付寶上線「漢字拾光-生僻字」小程序,用於徵集、補充生僻字庫
Oct 31, 2023 pm 09:25 PM
本站10月31日消息,今年5月27日,螞蟻集團宣布啟動“漢字拾光計劃”,最近又迎來新進展:支付寶上線“漢字拾光-生僻字”小程序,用於向社會徵集生僻字,補充生僻字庫,同時提供不同的生僻字輸入體驗,以幫助完善支付寶內的生僻字輸入方法。目前,用戶搜尋「漢字拾光」、「生僻字」等關鍵字就可以進入「生僻字」小程式。在小程式裡,使用者可以提交尚未被系統辨識輸入的生僻字圖片,支付寶工程師確認後,將會對字庫進行補錄入。本站注意到,使用者也可以在小程式體驗最新的拆字輸入法,這項輸入法針對讀音不明確的生僻字設計。用戶拆
 微軟為 HoloLens 2 發布 Windows Holographic Build 20348.1442,帶有開始手勢設置
Apr 25, 2023 pm 12:16 PM
微軟為 HoloLens 2 發布 Windows Holographic Build 20348.1442,帶有開始手勢設置
Apr 25, 2023 pm 12:16 PM
<ul><li><strong>點擊進入:</strong>ChatGPT工具外掛程式導覽大全</li></ul><imgsrc="/uploads/20230413/1681369948643702ab5. ="Microsoft-HoloLen
