Vue.js結合Ueditor富文本編輯器的使用方法
本篇文章主要介紹了Vue.js結合Ueditor的專案實例程式碼,這裡整理了詳細的程式碼,具有一定的參考價值,有興趣的可以了解一下
在前端開發的專案中。難免會遇到需要在頁面上整合一個富文本編輯器。
前一段時間公司Vue.js專案需要使用UEditor富文本編輯器,在百度上搜尋一圈沒有發現詳細的說明,決定自己嘗試,忙活了一天終於搞定了。
1. 整體想法
#1.1 模組化
vue的很大的一個優勢在於模組化,我們可以透過模組化實現頁面和邏輯的複用。所以可以把Ueditor重新封裝成一個.vue的模板檔。其他元件透過引入這個模板實現程式碼重複使用。
1.2 資料傳輸
首先父元件需要設定編輯器的長度、寬度、初始文本,這些資料可以透過props來傳遞。編輯器中的文字變更可以透過vue自訂事件向父元件傳遞。
2. 具體實作步驟
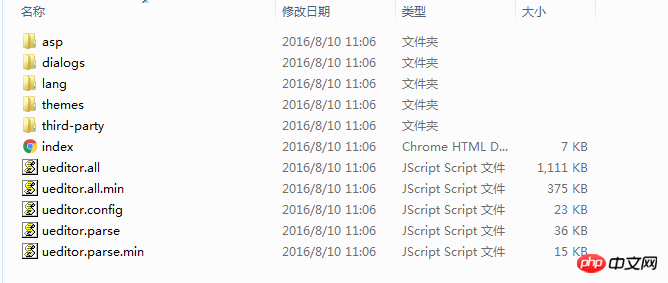
#2.1 引入關鍵的JS以及CSS檔案
將以下檔案全部拷貝到專案中

2.2 設定Ueditor.config.js
先設定URL參數,我們需要將這個路徑指向剛才拷貝的檔案的更目錄,注意這裡最好使用相對路勁。
var URL = window.UEDITOR_HOME_URL || '/static/ueditor/';
然後是預設寬度高度的設定
#,initialFrameWidth:null // null表示宽度自动 ,initialFrameHeight:320
其他功能的設定可以在官方文件查看
2.3 建立編輯器範本
我們需要在編輯器範本中import Ueditor核心JS函式庫,並加入contentChange回呼函數就大功告成了。
之所以使用import語法來引入核心JS庫是因為這樣更符合ES6模組化的規範,我看到網上有人建議在main.js中引入JS,但是過早地引入JS可能導致頁面首次加載緩慢。
<template>
<p ref="editor"></p>
</template>
<script>
/* eslint-disable */
import '../../../assets/js/ueditor/ueditor.config';
import '../../../assets/js/ueditor/ueditor.all';
import '../../../assets/js/ueditor/lang/zh-cn/zh-cn';
import { generateRandonInteger } from '../../../vuex/utils';
export default {
data() {
return {
id: generateRandonInteger(100000) + 'ueditorId',
};
},
props: {
value: {
type: String,
default: null,
},
config: {
type: Object,
default: {},
}
},
watch: {
value: function value(val, oldVal) {
this.editor = UE.getEditor(this.id, this.config);
if (val !== null) {
this.editor.setContent(val);
}
},
},
mounted() {
this.$nextTick(function f1() {
// 保证 this.$el 已经插入文档
this.$refs.editor.id = this.id;
this.editor = UE.getEditor(this.id, this.config);
this.editor.ready(function f2() {
this.editor.setContent(this.value);
this.editor.addListener("contentChange", function () {
const wordCount = this.editor.getContentLength(true);
const content = this.editor.getContent();
const plainTxt = this.editor.getPlainTxt();
this.$emit('input', { wordCount: wordCount, content: content, plainTxt: plainTxt });
}.bind(this));
this.$emit('ready', this.editor);
}.bind(this));
});
},
};
</script>
<style>
body{
background-color:#ff0000;
}
</style>#3. 編輯器的使用
使用編輯器模板的時候我需要透過props傳入config以及初始文字value。
<template xmlns:v-on="http://www.w3.org/1999/xhtml">
<p class="edit-area">
<ueditor v-bind:value=defaultMsg v-bind:config=config v-on:input="input" v-on:ready="ready"></ueditor>
</p>
</template>
<script>
import ueditor from './ueditor.vue';
export default {
components: {
ueditor,
},
data() {
return {
defaultMsg: '初始文本',
config: {
initialFrameWidth: null,
initialFrameHeight: 320,
},
};
},
};
</script>如果需要讓Ueditor上傳圖片的話,還需要在背景設定一個介面。這部分還沒時間研究,等過幾天補上
以上就是本文的全部內容,希望對大家的學習有所幫助,更多相關內容請關注PHP中文網!
相關推薦:
以上是Vue.js結合Ueditor富文本編輯器的使用方法的詳細內容。更多資訊請關注PHP中文網其他相關文章!

熱AI工具

Undresser.AI Undress
人工智慧驅動的應用程序,用於創建逼真的裸體照片

AI Clothes Remover
用於從照片中去除衣服的線上人工智慧工具。

Undress AI Tool
免費脫衣圖片

Clothoff.io
AI脫衣器

Video Face Swap
使用我們完全免費的人工智慧換臉工具,輕鬆在任何影片中換臉!

熱門文章

熱工具

記事本++7.3.1
好用且免費的程式碼編輯器

SublimeText3漢化版
中文版,非常好用

禪工作室 13.0.1
強大的PHP整合開發環境

Dreamweaver CS6
視覺化網頁開發工具

SublimeText3 Mac版
神級程式碼編輯軟體(SublimeText3)
 深入探討vite是怎麼解析.env檔的
Jan 24, 2023 am 05:30 AM
使用vue框架開發前端專案時,我們部署的時候都會部署多套環境,往往開發、測試以及線上環境呼叫的介面網域都是不一樣的。如何能做到區分呢?那就是使用環境變數和模式。
 圖文詳解如何在Vue專案中整合Ace程式碼編輯器
Apr 24, 2023 am 10:52 AM
Ace 是一個用 JavaScript 寫的可嵌入程式碼編輯器。它與 Sublime、Vim 和 TextMate 等原生編輯器的功能和效能相符。它可以很容易地嵌入到任何網頁和 JavaScript 應用程式中。 Ace 被維護為Cloud9 IDE的主要編輯器 ,並且是 Mozilla Skywriter (Bespin) 專案的繼承者。
 vue中組件化和模組化有什麼區別
Dec 15, 2022 pm 12:54 PM
組件化和模組化的區別:模組化是從程式碼邏輯的角度進行劃分的;方便程式碼分層開發,確保每個每個功能模組的職能一致。元件化是從UI介面的角度進行規劃;前端的元件化,方便UI元件的重複使用。
 探討如何在Vue3中撰寫單元測試
Apr 25, 2023 pm 07:41 PM
在當今前端開發中,Vue.js 已經成為了一個非常流行的框架。隨著 Vue.js 的不斷發展,單元測試變得越來越重要。今天,我們將探討如何在 Vue.js 3 中編寫單元測試,並提供一些最佳實踐和常見的問題及解決方案。
 Vue中JSX語法和模板語法的簡單比較(優劣勢分析)
Mar 23, 2023 pm 07:53 PM
在Vue.js中,開發人員可以使用兩種不同的語法來建立使用者介面:JSX語法和範本語法。這兩種文法各有優劣,以下就來探討它們的差異和優劣勢。
 怎麼查詢目前vue的版本
Dec 19, 2022 pm 04:55 PM
查詢目前vue版本的兩種方法:1、在cmd控制台內,執行「npm list vue」指令查詢版本,輸出結果就是vue的版本號資訊;2、在專案中找到並開啟package.json文件,查找「dependencies」項目即可看到vue的版本資訊。
 深入聊聊vue3中的reactive()
Jan 06, 2023 pm 09:21 PM
前言:在vue3的開發中,reactive是提供實現響應式資料的方法。日常開發這個是使用頻率很高的api。這篇文章筆者就來探索其內部運作機制。
 淺析vue怎麼實現檔案切片上傳
Mar 24, 2023 pm 07:40 PM
在實際開發專案過程中有時候需要上傳比較大的文件,然後呢,上傳的時候相對來說就會慢一些,so,後台可能會要求前端進行文件切片上傳,很簡單哈,就是把比如說1個G的檔案流切割成若干個小的檔案流,然後分別請求介面傳遞這個小的檔案流。


