這篇文章主要介紹了vue 實現剪裁圖片並上傳伺服器功能,非常不錯,具有參考借鑒價值,需要的朋友可以參考下
預覽鏈接點擊預覽
效果圖如下圖所示,大家感覺不錯,請參考實現程式碼。

需求
#[x] 預覽:根據選擇影像大小自適應填滿左側裁切區域
[x] 裁切:移動裁切框右側預覽區域可即時預覽
[x ] 上傳&清空:點選確認上傳裁切圖片,點選取消按鈕清空影像
[ ] 裁切框可調整大小
實作步驟
methods:funName() - 對應原始碼中methods中的funName方法
data:dataName - 對應原始碼中data中的dataName資料
1. 圖片選擇與讀取
#選擇圖片:(methods:selectPic) 使用input[ type="file"] 彈出選擇圖片框,js 主動觸發點擊事件;
讀取圖片: (methods:readImage) 建立圖片對象,使用createObjectURL顯示圖片。 objectURL = URL.createObjectURL(blob) ;
#2. 在canvas中展示圖片
需要掌握的canvas相關知識:
清空畫布ctx.clearRect(x,y,width,height) ;
填滿矩形ctx.fillRect(x, y,width,height) ;
繪製圓弧ctx.arc(x,y,r,startAngle,endAngle,counterclockwise) ; 繪製矩形ctx.rect(x,y,width ,height);
繪製圖像drawImage

# 语法
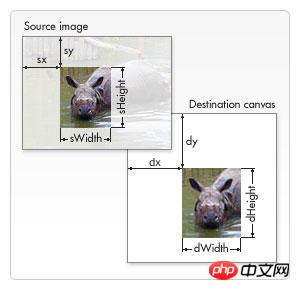
 ctx.drawImage(image, dx, dy);
 ctx.drawImage(image, dx, dy, dWidth, dHeight);
 ctx.drawImage(image, sx, sy, sWidth, sHeight, dx, dy, dWidth, dHeight);
 # 参数
 image    # 绘制的元素(可以为HTMLImageElement,HTMLVideoElement,或者 HTMLCanvasElement。)
 dx,dy    # 目标画布(destination canvas)左上角的坐标
 dWidth,dHeight  # 目标画布(destination canvas)上绘制图像宽高
 sx,sy    # 源画布(source canvase)左上角的坐标
 sWidth,sHeight  # 源画布(source canvase)选择的图像宽高

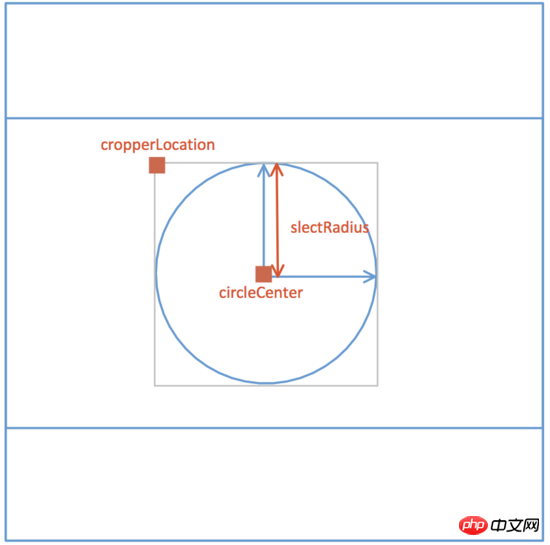
##計算canvas寬高:(methods:calcCropperSize) 根據圖片大小,計算canvas寬高(data:cropperCanvasSize),以致圖片能夠在裁剪區域自適應展示,並確定裁剪的左上角位置(data:cropperLocation)。
繪製左側裁切區域影像:(methods:renderCropperImg)
裁切區域vue data示意圖:
3. 移動裁切框
知識點: onmousedown、onmousemove、onmouseup
#具體實作:methods:drag()
canvas.onmousedown = e => {
  let [lastX, lastY] = [e.offsetX, e.offsetY];
  self.movement = true;
  canvas.onmousemove = e => {
   self.circleCenter = {
   X:
    self.cropperCanvasSize.width > 2 * self.slectRadius
    ? self.circleCenter.X + (e.offsetX - lastX)
    : self.cropperCanvasSize.width / 2,
   Y:
    self.cropperCanvasSize.height > 2 * self.slectRadius
    ? self.circleCenter.Y + (e.offsetY - lastY)
    : self.cropperCanvasSize.height / 2
   };
   self.renderCropperImg();
   [lastX, lastY] = [e.offsetX, e.offsetY];
  };
  canvas.onmouseup = e => {
   self.movement = false;
   canvas.onmousemove = null;
   canvas.onmouseup = null;
  };
};知識點:
FormData 物件的使用Convert Data URI to File then append to FormData
methods:upload()
this.$refs.preview.toBlob((blob)=> {
  const url = URL.createObjectURL(blob);
  const formData = new FormData();
  formData.append(this.uploadProps.name, blob, `${Date.now()}.png`);
  if(this.data){
   Object.keys(this.uploadProps.data).forEach(key => {
    formData.append(key, this.uploadProps.data[key]);
   });
  }
  const request = new XMLHttpRequest();
  request.open("POST", this.uploadProps.action, true);
  request.send(formData);
  request.onreadystatechange = () => {
   if (request.readyState === 4 && request.status === 200) {
    // ...
   }
  };
});以上是vue 實作剪裁圖片並上傳伺服器的功能介紹的詳細內容。更多資訊請關注PHP中文網其他相關文章!


