

React-Reflux的基礎介紹

這篇文章主要介紹了React-Reflux的基礎介紹,有著一定的參考價值,現在分享給大家,有需要的朋友可以參考一下
因為工作需要使用React Reflux 開發,最近幾天都在努力學習著,特別是Reflux,在網上查找的許多資料和github 上的文檔年代都有點久遠,JavaScript 按照目前的節奏,更新得太快,舊文檔的一些文法跟不上更新,對廣大初學者來說,確實存在著許多困惑。本文是僅適於初學者或對 React 有興趣的朋友,大神請繞道! ! !
廢話不多說,進入正題~
引用俗話:“學語言用hello world,學框架用todolist”,今天咱們就用todolist 來做說明。
作為一個對比todolist-raw 是沒有用Reflux 實現todolist 的增加和刪除的,react-reflux 使用Reflux 實現todolist 的增加和刪除,react- reflux 再分基本關聯和簡單法關聯Component。
先看下元件的效果圖:

電腦需要準備好環境,我用的是create-react-app
和yarn ,請自行百度安裝好這兩個工具,專案目錄精簡如下圖:
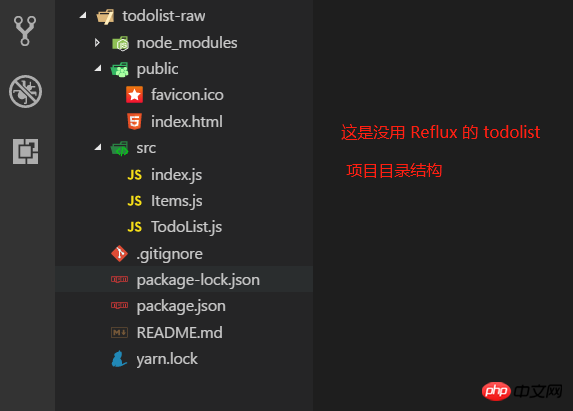
# 1. todolist-raw 就幾個文件,裡面的程式碼都比較簡單,相信各道友一看就懂了。 package.json 的設定如下:
{
  "name": "todolist-raw",
  "version": "0.1.0",
  "private": true,
  "dependencies": {
    "react": "^16.4.1",
    "react-dom": "^16.4.1",
    "react-scripts": "1.1.4"
  },
  "scripts": {
    "start": "react-scripts start",
    "build": "react-scripts build",
    "test": "react-scripts test --env=jsdom",
    "eject": "react-scripts eject"
  }
}
yarn 安裝了Rflux 之後,提示 "react-scripts"
不是內部指令,yarn start 啟動不了,反覆試驗都不行,後來打扣了 yarn -h
然後接著yarn -autoclean 就好了。講了那麼多,其實我遇到的這個問題也不算版本不對稱的問題吧,建議出現一些莫名其妙的 bug 就整理下 yarn。癢?癢就撓嗆! ! !
index.html 如下:與自動產生的沒什麼改變,就是刪了一些註解! <!DOCTYPE html>
<html>
<head>
<meta charset="utf-8">
<meta name="viewport" content="width=device-width, initial-scale=1, shrink-to-fit=no">
<link rel="shortcut icon" href="%PUBLIC_URL%/favicon.ico">
<title>TodoList-raw</title>
</head>
<body>
<noscript>
You need to enable JavaScript to run this app.
</noscript>
<div id="root"></div>
</body>
</html>1 import React from 'react';
2 import ReactDOM from 'react-dom';
3 import TodoList from './TodoList';
4
5 ReactDOM.render(<TodoList />, document.getElementById('root'));
import React, { Component, Fragment } from 'react';
import Items from './Items';

class TodoList extends Component {

  constructor(props) {
    super(props);
    this.state = {
      items: [1, 2, 3],
      isC: false
    };

    this.handlerClick = this.handlerClick.bind(this);
  }
  // 添加一个 item 项
  handlerClick() {
    const val = this.refs.inputEl.value;
    this.refs.inputEl.value = '';
    const items = [...this.state.items, val]; // 最好不要直接操作 state
    this.setState({items}); // es6 语法,等价于 {items: items}
    }

  // 删除某一个 item 项,点击就删除
  handlerDelete(index) {
    const items = [...this.state.items];
    items.splice(index, 1);
    this.setState({items});
  }

  render() {
    return (
      <Fragment>
        <h3>Hello React!</h3>
        <input
          ref="inputEl"
          style={{marginRight: "10px"}}
        />
        <button onClick={this.handlerClick}>添加</button>
        <Items
          msg={this.state.items}
          func={this.handlerDelete.bind(this)} />
      </Fragment>
    );
  }
}

export default TodoList;
b. 代码很少阅读起来应该没难度,而且上面也有一些注释了。不过还是要啰嗦一下。React 是用数据(data)基于状态(state)来驱动视图(view),也就是搞来搞去都是在搞数据,用数据改变状态来达到渲染视图的目的,大多是在虚拟内存处理,通过什么 diff 比较算法,层层计较然后达到提高性能,加快视图渲染的目的。额,我只能用“非常快”来形容 React 的性能,当然,性能的事还是跟实际代码复杂度相关,我只想说 React 确实出众!扯远了...,既然是基于状态(state),所以要有 state,在 constructor 中定义了,而且处理业务时改变 state,比如 handlerClick,deleteClick 中都是先用变量保存下来,通过 this.setState() 方法在设置回去!
c. 父子关系的组件,父组件可通过属性来给子组件传参,就像这样:<Items msg={this.state.items} />,子组件可通过 this.props.msg 拿到 items。
Items.js 代码如下:
import React, { Component } from 'react';

class Items extends Component {

  constructor(props) {
    super(props);
    this.func = this.props.func;
  }

  render() {
    return (
      <ul>
        {this.props.msg.map((item, index) => <li
            key={index}
            onClick={this.func.bind(this, index)}
          >{item}</li>
        )}
      </ul>
    );
  }
}

export default Items;注意,父组件传递方法给子组件时,this 指向的是子组件,所以通过属性传递时,需要用函数绑定 bind() 绑定父组件的 this。
最后,通过 cmd 命令行,yarn start 运行任务即可实现一个简单的 TodoList 功能。
2. react-reflux: 通过 Reflux 来实现简单的 TodoList (基本法关联 Component)。
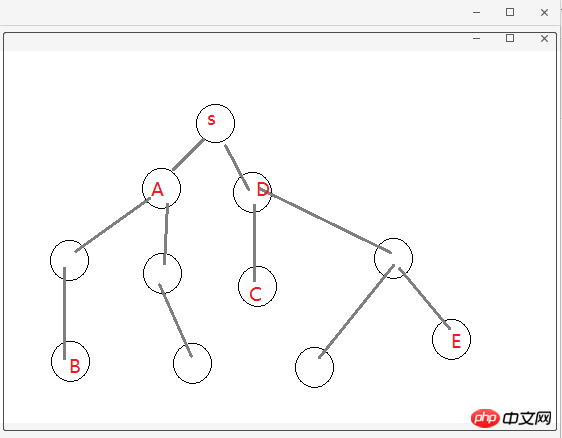
2.1 简单地说明下为什么要 Reflux 架构,如图(自己画的组件树结构!),不存在父子关系的组件(如 B 和 E)通讯势必会很困难而且麻烦,需要一个中间件(Store)来存储数据,类似于订阅者和发布者(中间人模式)一样,大家都往 Store 中存取数据就好,不需要层层走关系了,避免了层层传递数据的灾难!
2.2 关于 Actions、Store 和 Component 的关系,可以这么理解:Store 作为一个中间人有订阅和发布的功能,Actions 就是 Component 触发的动作,Actions 被 Store 监听着,组件有新动作了, Store 就会做出相应的处理(回调函数)更改 Store 中的数据通过 this.trigger(this.items) 发布消息[就相当于更新 items], Component 监听着 Store,用一些手段(mixin 或回调函数)关联起 Component 中的状态信息(state.items)和 Store 中的信息(items),这就是所谓的单向数据流,单向表示一个方向流动,不能反向。
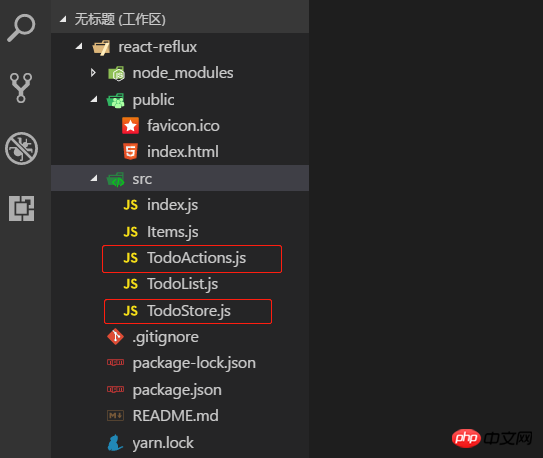
2.3 目录结构和前面的 todolist-raw 没多大区别,就是多了 TodoActions.js 和 TodoStore.js 两个文件。如图:
2.4 一言不合就贴代码。首先 index.js 代码没变化,就不贴了,TodoActions.js 代码如下:
import Reflux from 'reflux';

const TodoActions = Reflux.createActions([
    'getAll',
    'addItem',
    'deleteItem'
]);
export default TodoActions;TodoStore.js 代码如下:
import Reflux from 'reflux';
import Actions from './TodoActions';
const TodoStore = Reflux.createStore({
    // items: [1, 2, 3],
    // listenables: Actions,
    init() {
        console.log('TodoStore init method~');
        this.items = [1, 2, 3]; // 给个初始值
        this.listenables = Actions; // 监听 TodoActions.js
        // this.listenTo(addItem, 'addItem');
    },
    onGetAll() {
        console.log('onGetAll');
        this.trigger(this.items);
    },
    onAddItem(model) {
        console.log('onAddItem---', model);
        this.items.unshift(model);
        this.trigger(this.items);
    },
    onDeleteItem(index) {
        console.log('onDeleteItem---', index);
        this.items.splice(index, 1);
        this.trigger(this.items);
    }
})
export default TodoStore;说明:多个监听用 listenables,单个监听 this.listenTo(addItem, 'addItem'); 多个监听的时候定义处理函数是 on + ActionName 驼峰式命名。定义初始值和监听可以写在 init 方法外面,就像上面那样(已注释)。
2.5 Actions 和 Store 都写好了,就差最后一步,整合到组件 Component 中,才算有点意义了!TodoList.js 代码如下:
import React, { Component, Fragment } from 'react';
import Actions from './TodoActions';
import TodoStore from './TodoStore';
import Items from './Items';

class TodoList extends Component {

    constructor(props) {
        super(props);
        this.state = {
            items: [],
            isC: false
        };

        this.handlerClick = this.handlerClick.bind(this);
    }
    // 组件挂载
    componentDidMount() {
        this.unsubscribe = TodoStore.listen(this.onStatusChange, this);
        Actions.getAll();
    }
    // 组件移除
    componentWillUnmount() {
        console.log('componentWillUnmount');
        this.unsubscribe(); // 解除监听
    }
    // callback
    onStatusChange(items) {
        this.setState({items});
    }
    // 添加一个 item 项
    handlerClick() {
        const val = this.refs.inputEl.value;
        this.refs.inputEl.value = '';
        Actions.addItem(val);
    }

    render() {
        return (
            <Fragment>
                <h3>Hello React-Reflux!</h3>
                <input
                    ref="inputEl"
                    style={{marginRight: "10px"}}
                />
                <button onClick={this.handlerClick}>添加</button>
                <Items msg={this.state.items} />
            </Fragment>
        );
    }
}

export default TodoList;说明:这是基本的添加关联,需要在组件挂载时监听 Store,需要定义一个回调函数 onStatusChange(),组件卸载时解除监听 this.unsubscribe(),Store 源码如下:
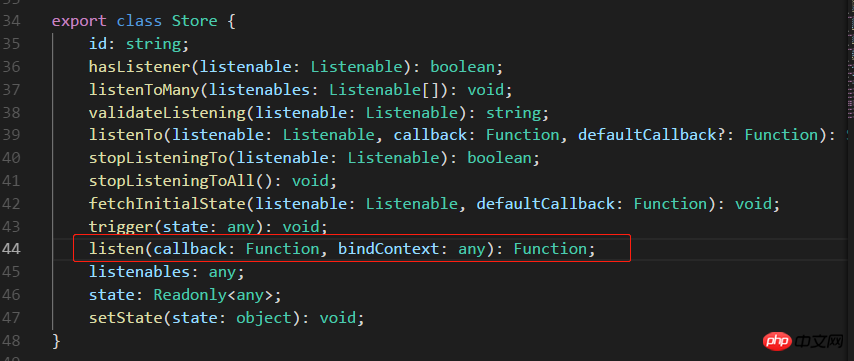
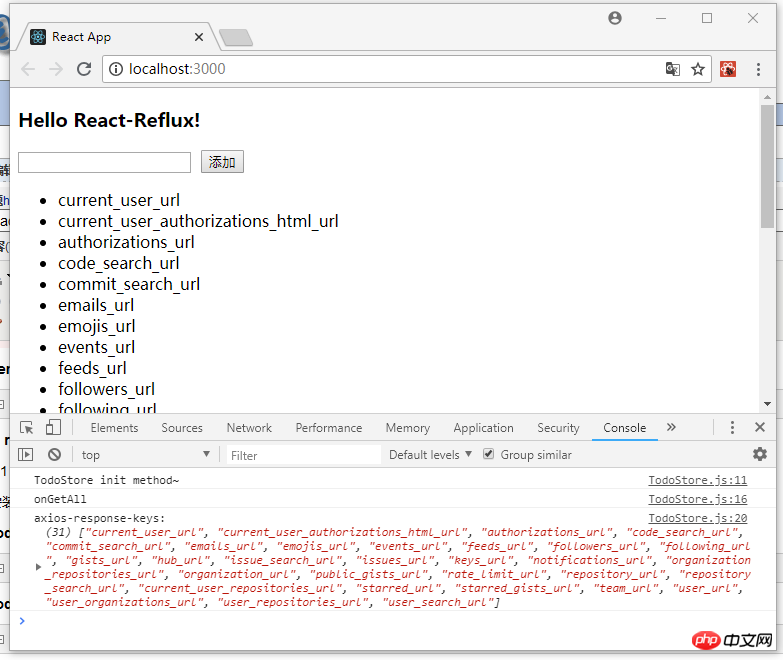
不传 bindContext 更新不了状态,回调函数 onStatusChange 中报异常,传入 this 就好了。如图:

Items.js 代码如下:
import React, { Component } from 'react';
import Actions from './TodoActions';

class Items extends Component {
    render() {
        return (
            <ul>
                {this.props.msg.map((item, index) => <li
                        key={index}
                        onClick={this.handlerDelete.bind(this, index)}
                    >{item}</li>
                )}
            </ul>
        );
    }
    handlerDelete(index) {
        Actions.deleteItem(index);
    }
}

export default Items;3. react-reflux: 通过 Reflux 来实现简单的 TodoList (简便法关联 Component)。
3.1 先安装 react-mixin 和 axios: npm install react-mixin,npm install axios。结合异步操作实现简便 Store 关联 Component。
安装两个依赖之后,修改 TodoStore.js 和 TodoList.js 代码如下:
我贴:TodoStore.js:
import Reflux from 'reflux';
import Actions from './TodoActions';
import Axios from 'axios';

const TodoStore = Reflux.createStore({

    // items: [3, 2, 1],
    // listenables: Actions,

    init() {
        console.log('TodoStore init method~');
        this.items = [3, 2, 1]; // 初始值,此处不是 state, mark-1 -2 -3 都可以直接操作
        this.listenables = Actions;
    },
    onGetAll() {
        console.log('onGetAll');
        Axios.get('https://api.github.com/')
        .then(res => {
            const keys = Object.keys(res.data);
            console.log('axios-response-keys: ', keys);
            this.items = keys; // mark-1
            this.trigger(this.items);
        })
        .catch(err => console.log('axios-error: ', err));
    },
    onAddItem(model) {
        console.log('onAddItem---', model);
        this.items.unshift(model); // mark-2
        console.log('TodoStore-items: ', this.items);
        this.trigger(this.items);
    },
    onDeleteItem(index) {
        console.log('onDeleteItem---', index);
        this.items.splice(index, 1); // mark-3
        this.trigger(this.items);
    }
})

export default TodoStore;我再贴:TodoList.js:
import React, { Component, Fragment } from 'react';
import ReactMixin from 'react-mixin';
import Reflux from 'reflux';
import Actions from './TodoActions';
import TodoStore from './TodoStore';
import Items from './Items';
class TodoList extends Component {
constructor(props) {
super(props);
this.state = {
items: [],
isC: false
};
this.handlerClick = this.handlerClick.bind(this);
}
// 组件挂载
componentDidMount() {
Actions.getAll();
}
// 添加一个 item 项
handlerClick() {
const val = this.refs.inputEl.value;
this.refs.inputEl.value = '';
if (!val) {
alert('Please enter the data which type of number or string');
return false;
}
Actions.addItem(val);
}
render() {
return (
<Fragment>
<h3>Hello React-Reflux!</h3>
<input
ref="inputEl"
style={{marginRight: "10px"}}
/>
<button onClick={this.handlerClick}>添加</button>
<Items msg={this.state.items} />
</Fragment>
);
}
}
// 用 Reflux.connect 将 Store 和 Component 组合在一起
ReactMixin.onClass(TodoList, Reflux.connect(TodoStore, 'items'));
export default TodoList;修改之后 yarn start 启动项目,截图如下:
4. 说在后面的话:本篇文章只是关于 React-Reflux 基础入门的一些知识,没有涉及实战应用,读者自酌。对于 React 我也是初学者,难免有许多不准确的地方,有待提高,欢迎各位道友留言指正。
4.1 好了,简单地分享就到此结束了,谢谢阅读~~~
以上就是本文的全部内容,希望对大家的学习有所帮助,更多相关内容请关注PHP中文网!
相关推荐:
以上是React-Reflux的基礎介紹的詳細內容。更多資訊請關注PHP中文網其他相關文章!

熱AI工具

Undresser.AI Undress
人工智慧驅動的應用程序,用於創建逼真的裸體照片

AI Clothes Remover
用於從照片中去除衣服的線上人工智慧工具。

Undress AI Tool
免費脫衣圖片

Clothoff.io
AI脫衣器

Video Face Swap
使用我們完全免費的人工智慧換臉工具,輕鬆在任何影片中換臉!

熱門文章
熱工具

記事本++7.3.1
好用且免費的程式碼編輯器

SublimeText3漢化版
中文版,非常好用

禪工作室 13.0.1
強大的PHP整合開發環境

Dreamweaver CS6
視覺化網頁開發工具

SublimeText3 Mac版
神級程式碼編輯軟體(SublimeText3)


 神秘的JavaScript:它的作用以及為什麼重要
Apr 09, 2025 am 12:07 AM
神秘的JavaScript:它的作用以及為什麼重要
Apr 09, 2025 am 12:07 AM
JavaScript是現代Web開發的基石,它的主要功能包括事件驅動編程、動態內容生成和異步編程。 1)事件驅動編程允許網頁根據用戶操作動態變化。 2)動態內容生成使得頁面內容可以根據條件調整。 3)異步編程確保用戶界面不被阻塞。 JavaScript廣泛應用於網頁交互、單頁面應用和服務器端開發,極大地提升了用戶體驗和跨平台開發的靈活性。
 誰得到更多的Python或JavaScript?
Apr 04, 2025 am 12:09 AM
誰得到更多的Python或JavaScript?
Apr 04, 2025 am 12:09 AM
Python和JavaScript開發者的薪資沒有絕對的高低,具體取決於技能和行業需求。 1.Python在數據科學和機器學習領域可能薪資更高。 2.JavaScript在前端和全棧開發中需求大,薪資也可觀。 3.影響因素包括經驗、地理位置、公司規模和特定技能。
 如何使用JavaScript將具有相同ID的數組元素合併到一個對像中?
Apr 04, 2025 pm 05:09 PM
如何使用JavaScript將具有相同ID的數組元素合併到一個對像中?
Apr 04, 2025 pm 05:09 PM
如何在JavaScript中將具有相同ID的數組元素合併到一個對像中?在處理數據時,我們常常會遇到需要將具有相同ID�...
 JavaScript難以學習嗎?
Apr 03, 2025 am 12:20 AM
JavaScript難以學習嗎?
Apr 03, 2025 am 12:20 AM
學習JavaScript不難,但有挑戰。 1)理解基礎概念如變量、數據類型、函數等。 2)掌握異步編程,通過事件循環實現。 3)使用DOM操作和Promise處理異步請求。 4)避免常見錯誤,使用調試技巧。 5)優化性能,遵循最佳實踐。
 如何實現視差滾動和元素動畫效果,像資生堂官網那樣?
或者:
怎樣才能像資生堂官網一樣,實現頁面滾動伴隨的動畫效果?
Apr 04, 2025 pm 05:36 PM
如何實現視差滾動和元素動畫效果,像資生堂官網那樣?
或者:
怎樣才能像資生堂官網一樣,實現頁面滾動伴隨的動畫效果?
Apr 04, 2025 pm 05:36 PM
實現視差滾動和元素動畫效果的探討本文將探討如何實現類似資生堂官網(https://www.shiseido.co.jp/sb/wonderland/)中�...
 console.log輸出結果差異:兩次調用為何不同?
Apr 04, 2025 pm 05:12 PM
console.log輸出結果差異:兩次調用為何不同?
Apr 04, 2025 pm 05:12 PM
深入探討console.log輸出差異的根源本文將分析一段代碼中console.log函數輸出結果的差異,並解釋其背後的原因。 �...
 前端開發中如何實現類似 VSCode 的面板拖拽調整功能?
Apr 04, 2025 pm 02:06 PM
前端開發中如何實現類似 VSCode 的面板拖拽調整功能?
Apr 04, 2025 pm 02:06 PM
探索前端中類似VSCode的面板拖拽調整功能的實現在前端開發中,如何實現類似於VSCode...
