這篇文章主要介紹了關於PHP管道外掛League\Pipeline的解析,有著一定的參考價值,現在分享給大家,有需要的朋友可以參考一下
水管太長,只要有一處破了,就會漏水了,而且不利於複雜環境彎曲轉折使用。所以我們都會把水管分成很短的一節一節管道,然後最大化的讓管道大小作用不同,因地制宜,組裝在一起,滿足各種各樣的不同需求。
由此得出 Pipeline 的設計模式,就是將複雜冗長的流程 (processes) 截成各個小流程,小任務。每個最小量化的任務就可以重複使用,透過組裝不同的小任務,構成複雜多元的流程 (processes)。
最後將「輸入」引入管道,根據每個小任務對輸入進行操作 (加工、過濾),最後輸出滿足需要的結果。
今天主要學習學習「Pipeline」,順便推薦一個 PHP 外掛:league/pipeline。
第一次知道「pipe」的概念,來自 gulp 的使用。

gulp 是基於NodeJS 的自動任務執行器,她能自動化地完成Javascript、 sass、less 等檔案的測試、檢查、合併、壓縮、格式化、瀏覽器自動刷新、部署檔案生成,並監聽檔案在變更後重複指定的這些步驟。在實現上,她借鑒了 Unix 作業系統的管道 (pipe) 思想,前一級的輸出,直接變成後一級的輸入,使得在操作上非常簡單。
var gulp = require('gulp');
var less = require('gulp-less');
var minifyCSS = require('gulp-csso');
var concat = require('gulp-concat');
var sourcemaps = require('gulp-sourcemaps');

gulp.task('css', function(){
  return gulp.src('client/templates/*.less')
    .pipe(less())
    .pipe(minifyCSS())
    .pipe(gulp.dest('build/css'))
});

gulp.task('js', function(){
  return gulp.src('client/javascript/*.js')
    .pipe(sourcemaps.init())
    .pipe(concat('app.min.js'))
    .pipe(sourcemaps.write())
    .pipe(gulp.dest('build/js'))
});

gulp.task('default', [ 'html', 'css', 'js' ]);上面的兩個task 主要是將less、所有js 檔案進行解析、壓縮、輸出等流程操作,然後儲存到對應的資料夾下;每一步操作的輸出就是下一步操作的輸入,猶如管道的流水一般。
Laravel 框架中的中介軟體,就是利用 Illuminate\Pipeline 來實現的,原本想寫寫我對「Laravel 中間件」原始碼的解讀,但發現網路上已經有很多貼文都有表述了,所以本文簡單說說如何使用Illuminate\Pipeline。
寫個demo
public function demo(Request $request)
{
    $pipe1 = function ($payload, Closure $next) {
        $payload = $payload + 1;
        return $next($payload);
    };

    $pipe2 = function ($payload, Closure $next) {
        $payload = $payload * 3;
        return $next($payload);
    };

    $data = $request->input('data', 0);

    $pipeline = new Pipeline();

    return $pipeline
        ->send($data)
        ->through([$pipe1, $pipe2])
        ->then(function ($data) {
            return $data;
        });
}

對於該原始碼的分析,可以推薦看這篇文章,分析的挺透徹了:
Laravel Pipeline 元件的實作https://www.insp.top/article/realization-of-pipeline-component-for -laravel
上面對gulp 和Illuminate\Pipeline 的簡單使用,只是告訴我們「Pipeline」應用比較廣泛。如果讓我們自己也寫一個類似的插件出來呢,我想應該也不會很難。
下面我拿 League\Pipeline 外掛來扒一扒它的原始碼,看如何實現的。
簡述
This package provides a plug and play implementation of the Pipeline Pattern. It's an architectural pattern which encapsulates sequential processes. When used, it allows you to mixit and match operation, and pipelines, to create new execution chains. The pipeline pattern is often compared to a production line, where each stage performs a certain operation on a given payload/subject. Stages can reject. Stagesd on a given payment/subject. Stages can reject. Stagesman or. the payload.If you find yourself passing results from one function to another to complete a series of tasks on a given subject, you might want to convert it into a pipeline.
. thephpleague.com/
安裝外掛
composer require league/pipeline
寫個demo
use League\Pipeline\Pipeline;

// 创建两个闭包函数
$pipe1 = function ($payload) {
    return $payload + 1;
};

$pipe2 = function ($payload) {
    return $payload * 3;
};

$route->map(
    'GET',
    '/demo',
    function (ServerRequestInterface $request, ResponseInterface $response
    ) use ($service, $pipe1, $pipe2) {
        $params = $request->getQueryParams();

        // 正常使用
        $pipeline1 = (new Pipeline)
            ->pipe($pipe1)
            ->pipe($pipe2);

        $callback1 = $pipeline1->process($params['data']);

        $response->getBody()->write("<h1>正常使用</h1>");
        $response->getBody()->write("<p>结果:$callback1</p>");

        // 使用魔术方法
        $pipeline2 = (new Pipeline())
            ->pipe($pipe1)
            ->pipe($pipe2);

        $callback2 = $pipeline2($params['data']);

        $response->getBody()->write("<h1>使用魔术方法</h1>");
        $response->getBody()->write("<p>结果:$callback2</p>");

        // 使用 Builder
        $builder = new PipelineBuilder();
        $pipeline3 = $builder
            ->add($pipe1)
            ->add($pipe2)
            ->build();

        $callback3 = $pipeline3($params['data']);

        $response->getBody()->write("<h1>使用 Builder</h1>");
        $response->getBody()->write("<p>结果:$callback3</p>");
        return $response;
    }
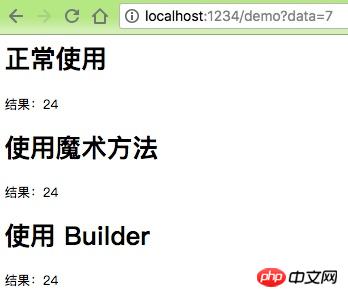
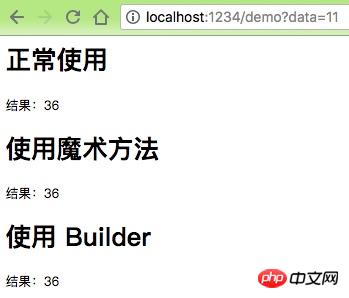
);執行結果


解讀原始程式碼
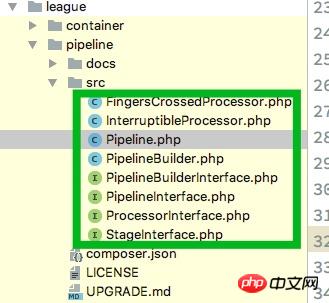
就這幾個檔案這個外掛程式:

PipelineInterface
<?php declare(strict_types=1);

namespace League\Pipeline;

interface PipelineInterface extends StageInterface
{
    /**
     * Create a new pipeline with an appended stage.
     *
     * @return static
     */
    public function pipe(callable $operation): PipelineInterface;
}

interface StageInterface
{
    /**
     * Process the payload.
     *
     * @param mixed $payload
     *
     * @return mixed
     */
    public function __invoke($payload);
}該介面主要利用鍊式程式設計的思想,不斷添加管道“pipe”,然後增加一個魔術方法,來讓傳入的參數運作起來。
先看看這個魔術方法的作用:
mixed __invoke ([ $... ] )
当尝试以调用函数的方式调用一个对象时,__invoke() 方法会被自动调用。如:
<?php class CallableClass
{
    function __invoke($x) {
        var_dump($x);
    }
}
$obj = new CallableClass;
$obj(5);
var_dump(is_callable($obj));
?>返回结果:
int(5)
bool(true)
Pipeline
<?php declare(strict_types=1);

namespace League\Pipeline;

class Pipeline implements PipelineInterface
{
    /**
     * @var callable[]
     */
    private $stages = [];

    /**
     * @var ProcessorInterface
     */
    private $processor;

    public function __construct(ProcessorInterface $processor = null, callable ...$stages)
    {
        $this->processor = $processor ?? new FingersCrossedProcessor;
        $this->stages = $stages;
    }

    public function pipe(callable $stage): PipelineInterface
    {
        $pipeline = clone $this;
        $pipeline->stages[] = $stage;

        return $pipeline;
    }

    public function process($payload)
    {
        return $this->processor->process($payload, ...$this->stages);
    }

    public function __invoke($payload)
    {
        return $this->process($payload);
    }
}其中核心类 Pipeline 的作用主要就是两个:
添加组装各个管道「pipe」;
组装后,引水流动,执行 process($payload),输出结果。
Processor
接好各种管道后,那就要「引水入渠」了。该插件提供了两个基础执行类,比较简单,直接看代码就能懂。
// 按照 $stages 数组顺利,遍历执行管道方法,再将结果传入下一个管道,让「水」一层层「流动」起来
class FingersCrossedProcessor implements ProcessorInterface
{
    public function process($payload, callable ...$stages)
    {
        foreach ($stages as $stage) {
            $payload = $stage($payload);
        }

        return $payload;
    }
}

// 增加一个额外的「过滤网」,经过每个管道后的结果,都需要 check,一旦满足则终止,直接输出结果。
class InterruptibleProcessor implements ProcessorInterface
{
    /**
     * @var callable
     */
    private $check;

    public function __construct(callable $check)
    {
        $this->check = $check;
    }

    public function process($payload, callable ...$stages)
    {
        $check = $this->check;

        foreach ($stages as $stage) {
            $payload = $stage($payload);

            if (true !== $check($payload)) {
                return $payload;
            }
        }

        return $payload;
    }
}

interface ProcessorInterface
{
    /**
     * Process the payload using multiple stages.
     *
     * @param mixed $payload
     *
     * @return mixed
     */
    public function process($payload, callable ...$stages);
}我们完全也可以利用该接口,实现我们的方法来组装管道和「过滤网」。
PipelineBuilder
最后提供了一个 Builder,这个也很好理解:
class PipelineBuilder implements PipelineBuilderInterface
{
    /**
     * @var callable[]
     */
    private $stages = [];

    /**
     * @return self
     */
    public function add(callable $stage): PipelineBuilderInterface
    {
        $this->stages[] = $stage;

        return $this;
    }

    public function build(ProcessorInterface $processor = null): PipelineInterface
    {
        return new Pipeline($processor, ...$this->stages);
    }
}

interface PipelineBuilderInterface
{
    /**
     * Add an stage.
     *
     * @return self
     */
    public function add(callable $stage): PipelineBuilderInterface;

    /**
     * Build a new Pipeline object.
     */
    public function build(ProcessorInterface $processor = null): PipelineInterface;
}无论是对不同技术的横向理解,还是基于 Laravel 或者某些开源插件,我们都能学习到技术之上的通用原理和方法。再将这些原理和方法反作用于我们的实际代码开发中。
最近闲来没事,自己参考 Laravel 去写个简易框架,也将League\Pipeline 引入到框架中使用。
以上就是本文的全部内容,希望对大家的学习有所帮助,更多相关内容请关注PHP中文网!
相关推荐:
关于利用Vue-laravel前端和后端分离写一个博客的方法
以上是關於PHP管道插件 League\Pipeline的解析的詳細內容。更多資訊請關注PHP中文網其他相關文章!


