對angular的元件通訊的解析
這篇文章主要介紹了關於對angular的元件通訊的解析,有著一定的參考價值,現在分享給大家,有需要的朋友可以參考一下
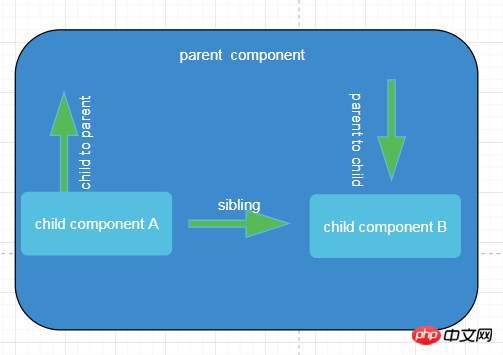
單頁應用元件通訊有以下幾種,這篇文章主要講Angular 通訊

#父元件=> 子元件
子元件=> 父元件
元件A = > 元件B
| 父元件=>子元件 | 子元件=> 父元件 | sibling => sibling |
|---|---|---|
| @output | ||
| 注入父元件 | ||
| service | service | |
| #Rxjs的Observalbe | Rxjs的Observalbe | |
| localStorage,sessionStorage | localStorage, | localStorage,sessionStorage |
上面圖表總結了能用到通訊方案,期中最後3種,是通用的,angular的組件之間都可以使用這3種,其中Rxjs是最最牛逼的用法,甩redux, promise,這些同樣基於函數式的狀態管理幾條街,下面一一說來
父元件=> 子元件
@input,最常用的一種方式
@Component({
  selector: 'app-parent',
template: '<p>childText:<app-child></app-child></p>',
  styleUrls: ['./parent.component.css']
})
export class ParentComponent implements OnInit {
  varString: string;
  constructor() { }
  ngOnInit() {
    this.varString = '从父组件传过来的' ;
  }
}import { Component, OnInit, Input } from '@angular/core';
@Component({
selector: 'app-child',
template: '<h1 id="textContent">{{textContent}}</h1>',
styleUrls: ['./child.component.css']
})
export class ChildComponent implements OnInit {
@Input() public textContent: string ;
constructor() { }
ngOnInit() {
}
}setter
setter 是攔截@input 屬性,因為我們在元件通訊的時候,常常需要對輸入的屬性處理下,就需要setter了,setter和getter常配套使用,稍微修改下上面的child.component.ts
child.component.ts
import { Component, OnInit, Input } from '@angular/core';
@Component({
  selector: 'app-child',
  template: '<h1 id="textContent">{{textContent}}</h1>',
  styleUrls: ['./child.component.css']
})
export class ChildComponent implements OnInit {
_textContent:string;
  @Input()
  set textContent(text: string){
   this._textContent = !text: "啥都没有给我" ? text ;
  } ;
  get textContent(){
  return this._textContent;
  }
  constructor() { }
  ngOnInit() {
  }
}onChange
這個是透過angular生命週期鉤子來偵測,不建議使用,要使用的話可以參angular文檔
@ViewChild()
@ViewChild() 一般用在呼叫子元件非私有的方法
           import {Component, OnInit, ViewChild} from '@angular/core';
       import {ViewChildChildComponent} from "../view-child-child/view-child-child.component";
    @Component({
      selector: 'app-parent',
      templateUrl: './parent.component.html',
      styleUrls: ['./parent.component.css']
    })
    export class ParentComponent implements OnInit {
      varString: string;
      @ViewChild(ViewChildChildComponent)
      viewChildChildComponent: ViewChildChildComponent;
      constructor() { }
      ngOnInit() {
        this.varString = '从父组件传过来的' ;
      }
      clickEvent(clickEvent: any) {
        console.log(clickEvent);
        this.viewChildChildComponent.myName(clickEvent.value);
      }
} import { Component, OnInit } from '@angular/core';
@Component({
selector: 'app-view-child-child',
templateUrl: './view-child-child.component.html',
styleUrls: ['./view-child-child.component.css']
})
export class ViewChildChildComponent implements OnInit {
constructor() { }
name: string;
myName(name: string) {
console.log(name);
this.name = name ;
}
ngOnInit() {
}
}局部變數
#局部變量和viewChild類似,只能用在html模板裡,修改parent.component.html,透過#viewChild這個變數來表示子元件,就能呼叫子元件的方法了.
<p>
    <input>
    <button>局部变量传值</button>
    <app-view-child-child></app-view-child-child>
            </p>
child 元件如下
@Component({
  selector: 'app-view-child-child',
  templateUrl: './view-child-child.component.html',
  styleUrls: ['./view-child-child.component.css']
})
export class ViewChildChildComponent implements OnInit {

  constructor() { }
  name: string;
  myName(name: string) {
      console.log(name);
      this.name = name ;
  }
  ngOnInit() {
  }

}子元件=> 父元件
@output()
output這個常見的通訊,本質是給子元件傳入一個function,在子元件裡執行完某些方法後,再執行傳入的這個回呼function,將值傳給父元件
parent.component.ts
@Component({
  selector: 'app-child-to-parent',
  templateUrl: './parent.component.html',
  styleUrls: ['./parent.component.css']
})
export class ChildToParentComponent implements OnInit {

  childName: string;
  childNameForInject: string;
  constructor( ) { }
  ngOnInit() {
  }
  showChildName(name: string) {
    this.childName = name;
  }
}parent.component. html
<p>
  </p><p>output方式 childText:{{childName}}</p>
  <br>
  <app-output-child></app-output-child>
  child.component.ts
  export class OutputChildComponent implements OnInit {
  // 传入的回调事件
  @Output() public childNameEventEmitter: EventEmitter<any> = new EventEmitter();
  constructor() { }
  ngOnInit() {
  }
  showMyName(value) {
    //这里就执行,父组件传入的函数
    this.childNameEventEmitter.emit(value);
  }
}</any>注入父元件
這個原理的原因是父,子元件本質生命週期是一樣的
export class OutputChildComponent implements OnInit {
  // 注入父组件
  constructor(private childToParentComponent: ChildToParentComponent) { }
  ngOnInit() {
  }
  showMyName(value) {
    this.childToParentComponent.childNameForInject = value;
  }
}sibling元件=> sibling元件
service
Rxjs
透過service通訊
angular中service是單例的,所以三種通訊類型都可以透過service,很多前端對單例理解的不是很清楚,本質就是
,你在某個module中註入service,所有這個modul的component都可以拿到這個service的屬性,方法,是共享的,所以常在app.moudule.ts注入日誌service ,http攔截service,在子module注入的service,只能這個子module能共享,在component注入的service,就只能子的component的能拿到service,下面以注入到app.module.ts,的service來示範
user.service.ts
@Injectable()
export class UserService {
  age: number;
  userName: string;
  constructor() { }
}
app.module.ts
@NgModule({
  declarations: [
    AppComponent,
    SiblingAComponent,
    SiblingBComponent
  ],
  imports: [
    BrowserModule
  ],
  providers: [UserService],
  bootstrap: [AppComponent]
})
export class AppModule { }
SiblingBComponent.ts
@Component({
  selector: 'app-sibling-b',
  templateUrl: './sibling-b.component.html',
  styleUrls: ['./sibling-b.component.css']
})
export class SiblingBComponent implements OnInit {
  constructor(private userService: UserService) {
    this.userService.userName = "王二";
  }
  ngOnInit() {
  }
}
SiblingAComponent.ts
@Component({
  selector: 'app-sibling-a',
  templateUrl: './sibling-a.component.html',
  styleUrls: ['./sibling-a.component.css']
})
export class SiblingAComponent implements OnInit {
  userName: string;
  constructor(private userService: UserService) {
  }
  ngOnInit() {
    this.userName = this.userService.userName;
  }
}透過Rx.js通訊
這個是最屌的,基於訂閱發布的這種流文件處理,一旦訂閱,發布的源頭發生改變,訂閱者就能拿到這個變化;這樣說不是很好理解,簡單解釋就是,b.js,c.js,d.js訂閱了a.js裡某個值變化,b.js,c.js,d.js立刻取得到這個變化的,但是a.js並沒有主動調用b.js,c.js,d.js這些裡面的方法,舉個簡單的例子,每個頁面在處理ajax請求的時候,都有一彈出的提示訊息,一般我會在
元件的template中放一個提示框的元件,這樣很繁瑣每個元件都要來一次,如果基於Rx.js,就可以在app.component.ts中放這個提示元件,然後app.component.ts訂閱公共的service,就比較省事了,代碼如下
先搞一個alset.service.ts
import {Injectable} from "@angular/core";
import {Subject} from "rxjs/Subject";
@Injectable()
export class AlertService {
  private messageSu = new Subject<string>();  //
  messageObserve = this.messageSu.asObservable();
  private  setMessage(message: string) {
    this.messageSu.next(message);
  }
  public success(message: string, callback?: Function) {
    this.setMessage(message);
    callback();
  }
}</string>sibling-a.component.ts
@Component({
  selector: 'app-sibling-a',
  templateUrl: './sibling-a.component.html',
  styleUrls: ['./sibling-a.component.css']
})
export class SiblingAComponent implements OnInit {
  userName: string;
  constructor(private userService: UserService, private alertService: AlertService) {
  }
  ngOnInit() {
    this.userName = this.userService.userName;
    // 改变alertService的信息源
    this.alertService.success("初始化成功");
  }
}app.component.ts
@Component({
  selector: 'app-root',
  templateUrl: './app.component.html',
  styleUrls: ['./app.component.css']
})
export class AppComponent {
  title = 'app';
  message: string;
  constructor(private alertService: AlertService) {
    //订阅alertServcie的message服务
     this.alertService.messageObserve.subscribe((res: any) => {
      this.message = res;
    });
  }
}這樣訂閱者就能動態的跟著發布源變化
總結: 以上就是常用的通信方式,各種場景可以採取不同的方法
以上就是本文的全部內容,希望對大家的學習有所幫助,更多相關內容請關注PHP中文網!
相關推薦:
#以上是對angular的元件通訊的解析的詳細內容。更多資訊請關注PHP中文網其他相關文章!

熱AI工具

Undresser.AI Undress
人工智慧驅動的應用程序,用於創建逼真的裸體照片

AI Clothes Remover
用於從照片中去除衣服的線上人工智慧工具。

Undress AI Tool
免費脫衣圖片

Clothoff.io
AI脫衣器

Video Face Swap
使用我們完全免費的人工智慧換臉工具,輕鬆在任何影片中換臉!

熱門文章

熱工具

記事本++7.3.1
好用且免費的程式碼編輯器

SublimeText3漢化版
中文版,非常好用

禪工作室 13.0.1
強大的PHP整合開發環境

Dreamweaver CS6
視覺化網頁開發工具

SublimeText3 Mac版
神級程式碼編輯軟體(SublimeText3)
 vue中怎麼用bootstrap
Apr 07, 2025 pm 11:33 PM
在 Vue.js 中使用 Bootstrap 分為五個步驟:安裝 Bootstrap。在 main.js 中導入 Bootstrap。直接在模板中使用 Bootstrap 組件。可選:自定義樣式。可選:使用插件。
 HTML,CSS和JavaScript的角色:核心職責
Apr 08, 2025 pm 07:05 PM
HTML定義網頁結構,CSS負責樣式和佈局,JavaScript賦予動態交互。三者在網頁開發中各司其職,共同構建豐富多彩的網站。
 React在HTML中的作用:增強用戶體驗
Apr 09, 2025 am 12:11 AM
React通過JSX與HTML結合,提升用戶體驗。 1)JSX嵌入HTML,使開發更直觀。 2)虛擬DOM機制優化性能,減少DOM操作。 3)組件化管理UI,提高可維護性。 4)狀態管理和事件處理增強交互性。
 了解HTML,CSS和JavaScript:初學者指南
Apr 12, 2025 am 12:02 AM
WebDevelovermentReliesonHtml,CSS和JavaScript:1)HTMLStructuresContent,2)CSSStyleSIT和3)JavaScriptAddSstractivity,形成thebasisofmodernWebemodernWebExexperiences。
 bootstrap怎麼設置框架
Apr 07, 2025 pm 03:27 PM
要設置 Bootstrap 框架,需要按照以下步驟:1. 通過 CDN 引用 Bootstrap 文件;2. 下載文件並將其託管在自己的服務器上;3. 在 HTML 中包含 Bootstrap 文件;4. 根據需要編譯 Sass/Less;5. 導入定製文件(可選)。設置完成後,即可使用 Bootstrap 的網格系統、組件和样式創建響應式網站和應用程序。
 bootstrap怎麼寫分割線
Apr 07, 2025 pm 03:12 PM
創建 Bootstrap 分割線有兩種方法:使用 標籤,可創建水平分割線。使用 CSS border 屬性,可創建自定義樣式的分割線。
 bootstrap怎麼插入圖片
Apr 07, 2025 pm 03:30 PM
在 Bootstrap 中插入圖片有以下幾種方法:直接插入圖片,使用 HTML 的 img 標籤。使用 Bootstrap 圖像組件,可以提供響應式圖片和更多樣式。設置圖片大小,使用 img-fluid 類可以使圖片自適應。設置邊框,使用 img-bordered 類。設置圓角,使用 img-rounded 類。設置陰影,使用 shadow 類。調整圖片大小和位置,使用 CSS 樣式。使用背景圖片,使用 background-image CSS 屬性。
 H5指的是什麼?探索上下文
Apr 12, 2025 am 12:03 AM
H5referstoHTML5,apivotaltechnologyinwebdevelopment.1)HTML5introducesnewelementsandAPIsforrich,dynamicwebapplications.2)Itsupportsmultimediawithoutplugins,enhancinguserexperienceacrossdevices.3)SemanticelementsimprovecontentstructureandSEO.4)H5'srespo


