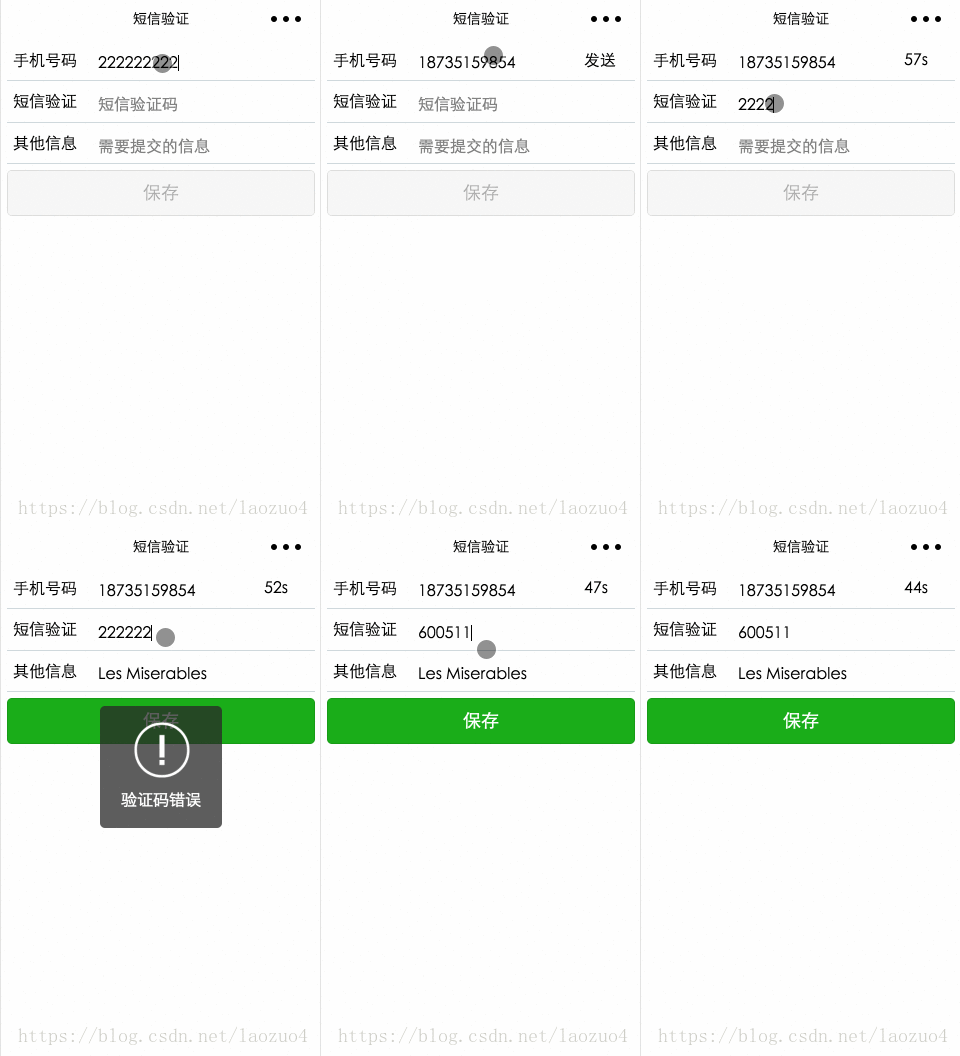
微信小程式中如何取得簡訊驗證碼登入的?以下程式碼詳細解說了,分享給大家參考,看看下圖的效果,後面將系統介紹簡訊驗證碼實現流程。

我是java開發者,後端使用了springMvc
1、建構手機驗證碼,產生6位元的隨機數字字串;
2、使用介面向簡訊平台發送手機號碼和驗證碼,然後簡訊平台再把驗證碼發送到製定手機號碼上
3、將手機號碼驗證碼、操作時間存入Session中,作為後面驗證使用;
4、接收用戶填寫的驗證碼、手機號碼及其他註冊資料;
5、比較提交的驗證碼與Session中的驗證碼是否一致,同時判斷提交動作是否在有效期限內;
6、驗證碼正確且在有效期限內,請求通過,處理對應的業務。
小程式碼
info.wxml
<!--info.wxml-->
<view class="container">

<view class="section">
<text>手机号码</text>
<input placeholder="请输入手机号码" type="number" maxlength="11" bindinput="inputPhoneNum" auto-focus />
<text wx:if="{{send}}" class="sendMsg" bindtap="sendMsg">发送</text>
<text wx:if="{{alreadySend}}" class="sendMsg" bindtap="sendMsg">{{second+"s"}}</text>
</view>

<view class="section">
<text>短信验证</text>
<input placeholder="短信验证码" type="number" bindinput="addCode" />
</view>

<view class="section">
<text>其他信息</text>
<input placeholder="需要提交的信息" bindinput="addOtherInfo" />
</view>

<button type="{{buttonType}}" disabled="{{disabled}}" bindtap="onSubmit">保存</button>

</view>info.js
// info.js
const config = require('../../config/config.default.js')
Page({
data: {
send: false,
alreadySend: false,
second: 60,
disabled: true,
buttonType: 'default',
phoneNum: '',
code: '',
otherInfo: ''
},
onReady: function () {
wx.request({
url: `${config.api + '/getSessionId.html'}`,
header: {
"Content-Type": "application/x-www-form-urlencoded"
},
method: 'POST',
success: function (res) {
wx.setStorageSync('sessionId', 'JSESSIONID=' + res.data)
}
})
},
// 手机号部分
inputPhoneNum: function (e) {
let phoneNum = e.detail.value
if (phoneNum.length === 11) {
let checkedNum = this.checkPhoneNum(phoneNum)
if (checkedNum) {
this.setData({
phoneNum: phoneNum
})
console.log('phoneNum' + this.data.phoneNum)
this.showSendMsg()
this.activeButton()
}
} else {
this.setData({
phoneNum: ''
})
this.hideSendMsg()
}
},
checkPhoneNum: function (phoneNum) {
let str = /^1\d{10}$/
if (str.test(phoneNum)) {
return true
} else {
wx.showToast({
title: '手机号不正确',
image: '../../images/fail.png'
})
return false
}
},
showSendMsg: function () {
if (!this.data.alreadySend) {
this.setData({
send: true
})
}
},
hideSendMsg: function () {
this.setData({
send: false,
disabled: true,
buttonType: 'default'
})
},
sendMsg: function () {
var phoneNum = this.data.phoneNum;
var sessionId = wx.getStorageSync('sessionId');
wx.request({
url: `${config.api + '/sendSms.html'}`,
data: {
phoneNum: phoneNum
},
header: {
"Content-Type": "application/x-www-form-urlencoded",
"Cookie": sessionId
},
method: 'POST',
success: function (res) {
console.log(res)
}
})
this.setData({
alreadySend: true,
send: false
})
this.timer()
},
timer: function () {
let promise = new Promise((resolve, reject) => {
let setTimer = setInterval(
() => {
this.setData({
second: this.data.second - 1
})
if (this.data.second <= 0) {
this.setData({
second: 60,
alreadySend: false,
send: true
})
resolve(setTimer)
}
}
, 1000)
})
promise.then((setTimer) => {
clearInterval(setTimer)
})
},
// 其他信息部分
addOtherInfo: function (e) {
this.setData({
otherInfo: e.detail.value
})
this.activeButton()
console.log('otherInfo: ' + this.data.otherInfo)
},
// 验证码
addCode: function (e) {
this.setData({
code: e.detail.value
})
this.activeButton()
console.log('code' + this.data.code)
},
// 按钮
activeButton: function () {
let {phoneNum, code, otherInfo} = this.data
console.log(code)
if (phoneNum && code && otherInfo) {
this.setData({
disabled: false,
buttonType: 'primary'
})
} else {
this.setData({
disabled: true,
buttonType: 'default'
})
}
},
onSubmit: function () {
var phoneNum = this.data.phoneNum;
var code = this.data.code;
var otherInfo = this.data.otherInfo;
var sessionId = wx.getStorageSync('sessionId');
wx.request({
url: `${config.api + '/addinfo.html'}`,
data: {
phoneNum: phoneNum,
code: code,
otherInfo: otherInfo
},
header: {
"Content-Type": "application/x-www-form-urlencoded",
"Cookie": sessionId
},
method: 'POST',
success: function (res) {
console.log(res)
if ((parseInt(res.statusCode) === 200) && res.data.message === 'pass') {
wx.showToast({
title: '验证成功',
icon: 'success'
})
} else {
wx.showToast({
title: res.data.message,
image: '../../images/fail.png'
})
}
},
fail: function (res) {
console.log(res)
}
})
}
})要注意的是小程式沒有session的概念,所以我們需要虛擬出http的session:
1) 在onReady取得伺服器端的sessionId, 並儲存到本機快取中
2) 每次發起http請求時在header中建構: "Cookie": sessionId
伺服器端程式碼
1. 取得sessionId
/**
	 * 获得sessionId
	 */
	@RequestMapping("/getSessionId")
	@ResponseBody
	public Object getSessionId(HttpServletRequest request) {
		try {
			HttpSession session = request.getSession();
			return session.getId();
		} catch (Exception e) {
			e.printStackTrace();
		}
		return null;
}2. 傳送簡訊驗證碼
/**
	 * 发送短信验证码
	 * @param number接收手机号码
	 */
	@RequestMapping("/sendSms")
	@ResponseBody
	public Object sendSms(HttpServletRequest request, String phoneNum) {
		try {
			JSONObject json = null;
			//生成6位验证码
			String verifyCode = String.valueOf(new Random().nextInt(899999) + 100000);
			//发送短信
			ZhenziSmsClient client = new ZhenziSmsClient("你的appId", "你的appSecret");
			String result = client.send(phoneNum, "您的验证码为:" + verifyCode + ",该码有效期为5分钟,该码只能使用一次!【短信签名】");
			json = JSONObject.parseObject(result);
			if(json.getIntValue("code") != 0)//发送短信失败
				return "fail";
			//将验证码存到session中,同时存入创建时间
			//以json存放,这里使用的是阿里的fastjson
			HttpSession session = request.getSession();
			json = new JSONObject();
			json.put("verifyCode", verifyCode);
			json.put("createTime", System.currentTimeMillis());
			// 将认证码存入SESSION
			request.getSession().setAttribute("verifyCode", json);
			return "success";
		} catch (Exception e) {
			e.printStackTrace();
		}
		return null;
}3. 提交資訊並驗證簡訊驗證碼apache php mysql
/**
	 * 注册
	 */
	@RequestMapping("/addinfo")
	@ResponseBody
	public Object addinfo(
			HttpServletRequest request,
			String phoneNum,
			String code,
			String otherInfo) {
		JSONObject json = (JSONObject)request.getSession().getAttribute("verifyCode");
		if(!json.getString("verifyCode").equals(code)){
			return "验证码错误";
		}
		if((System.currentTimeMillis() - json.getLong("createTime")) > 1000 * 60 * 5){
			return "验证码过期";
		}
		//将用户信息存入数据库
		//这里省略
		return "success";
}相關文章:
相關影片:
#以上是系統—微信小程式中利用簡訊驗證碼login實作流程及程式碼詳解的詳細內容。更多資訊請關注PHP中文網其他相關文章!


