LAMP環境如何搭建? LAMP環境搭建的詳細流程
這篇文章要跟大家介紹的內容是關於LAMP環境搭建的詳細過程,有一定的參考價值,有需要的朋友可以參考一下,希望對你有幫助。
最開始最小化安裝好CentOS 7之後,直接輸入 ifconfig 指令,提示 "ifconfig command not found"
,說明最小化安裝沒有安裝相關軟體,我們可以用 ip addr 代替 ifconfig 來查看網卡詳情,或者我們可以透過 yum install
net-tools 來安裝回 ifconfig 指令,在安裝過程中輸入兩次y,即可完成安裝。
一、Apache
yum install httpd //安裝Apache
Total download size: 3.0 M
Installed size: 10 M
Is this ok [y/d/N]:  //输入y,确认安装
Retrieving key from file:///etc/pki/rpm-gpg/RPM-GPG-KEY-CentOS-7
Importing GPG key 0xF4A80EB5:
 Userid     : "CentOS-7 Key (CentOS 7 Official Signing Key) <security>"
 Fingerprint: 6341 ab27 53d7 8a78 a7c2 7bb1 24c6 a8a7 f4a8 0eb5
 Package    : centos-release-7-5.1804.el7.centos.x86_64 (@anaconda)
 From       : /etc/pki/rpm-gpg/RPM-GPG-KEY-CentOS-7
Is this ok [y/N]:  //验证GPG密钥是否正确,输入y</security>
Running transaction check
Running transaction test
Transaction test succeeded
Running transaction
  Installing : apr-1.4.8-3.el7_4.1.x86_64                                                            1/5
  Installing : apr-util-1.5.2-6.el7.x86_64                                                           2/5
  Installing : httpd-tools-2.4.6-80.el7.centos.1.x86_64                                              3/5
  Installing : mailcap-2.1.41-2.el7.noarch                                                           4/5
  Installing : httpd-2.4.6-80.el7.centos.1.x86_64                                                    5/5
  Verifying  : mailcap-2.1.41-2.el7.noarch                                                           1/5
  Verifying  : httpd-tools-2.4.6-80.el7.centos.1.x86_64                                              2/5
  Verifying  : apr-util-1.5.2-6.el7.x86_64                                                           3/5
  Verifying  : apr-1.4.8-3.el7_4.1.x86_64                                                            4/5
  Verifying  : httpd-2.4.6-80.el7.centos.1.x86_64                                                    5/5

Installed:
  httpd.x86_64 0:2.4.6-80.el7.centos.1

Dependency Installed:
  apr.x86_64 0:1.4.8-3.el7_4.1  apr-util.x86_64 0:1.5.2-6.el7 httpd-tools.x86_64 0:2.4.6-80.el7.centos.1
  mailcap.noarch 0:2.1.41-2.el7

Complete!
#開啟Apache服務,並設定系統啟動時服務自動啟動:systemctl start httpd.servicesystemctl enable httpd.service
為了能夠從外部存取Web伺服器,必須在防火牆中開啟HTTP(80)和HTTPS(443)連接埠。 CentOS上的預設防火牆是firewalld,可以使用firewalld-cmd指令進行設定。 firewall-cmd --permanent --zone = public --add-service = http firewall-cmd --permanent --zone = public --add-service = https firewall-cmd --reload //重新啟動firewalld
偵測Apache服務是否開啟:systemctl status httpd.service
● httpd.service - The Apache HTTP Server
   Loaded: loaded (/usr/lib/systemd/system/httpd.service; disabled; vendor preset: disabled)
   Active: active (running) since Mon 2018-08-06 20:14:21 CST; 9s ago
     Docs: man:httpd(8)
           man:apachectl(8)
 Main PID: 1498 (httpd)
   Status: "Total requests: 0; Current requests/sec: 0; Current traffic:   0 B/sec"
   CGroup: /system.slice/httpd.service
           ├─1498 /usr/sbin/httpd -DFOREGROUND
           ├─1499 /usr/sbin/httpd -DFOREGROUND
           ├─1500 /usr/sbin/httpd -DFOREGROUND
           ├─1501 /usr/sbin/httpd -DFOREGROUND
           ├─1502 /usr/sbin/httpd -DFOREGROUND
           └─1503 /usr/sbin/httpd -DFOREGROUND

Aug 06 20:14:21 localhost systemd[1]: Starting The Apache HTTP Server...
Aug 06 20:14:21 localhost httpd[1498]: AH00558: httpd: Could not reliably determine the server's f...sage
Aug 06 20:14:21 localhost systemd[1]: Started The Apache HTTP Server.
Hint: Some lines were ellipsized, use -l to show in full.
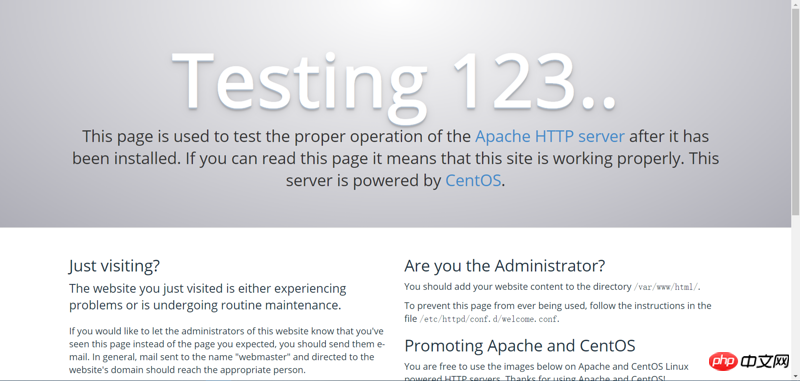
再用瀏覽器輸入伺服器的IP位址:

#看到如圖所示介面表示安裝成功。
二、MySQL/MariaDB
MariaDB資料庫管理系統是MySQL的一個分支,主要由開源社群在維護,採用GPL授權授權。
開發這個分支的原因之一是:甲骨文公司收購了MySQL後,有將MySQL閉源的潛在風險,因此社群採用分支的方式來避免這個風險。
MariaDB的目的是完全相容於MySQL,包括API和命令列,是目前最受關注的MySQL資料庫衍生版,也被視為開源資料庫MySQL的替代品。
這裡我們用MariaDB取代MySQL,MySQL安裝及操作方法大致類似。
安裝時,把mariadb換成mysql;
啟動、停止服務、檢視狀態,把mariadb.service換成mysql.service。
yum -y install mariadb-server mariadb //安裝MariaDB
Installed:
  mariadb.x86_64 1:5.5.56-2.el7                   mariadb-server.x86_64 1:5.5.56-2.el7

Dependency Installed:
  perl.x86_64 4:5.16.3-292.el7                        perl-Carp.noarch 0:1.26-244.el7
  perl-Compress-Raw-Bzip2.x86_64 0:2.061-3.el7        perl-Compress-Raw-Zlib.x86_64 1:2.061-4.el7
  perl-DBD-MySQL.x86_64 0:4.023-6.el7                 perl-DBI.x86_64 0:1.627-4.el7
  perl-Data-Dumper.x86_64 0:2.145-3.el7               perl-Encode.x86_64 0:2.51-7.el7
  perl-Exporter.noarch 0:5.68-3.el7                   perl-File-Path.noarch 0:2.09-2.el7
  perl-File-Temp.noarch 0:0.23.01-3.el7               perl-Filter.x86_64 0:1.49-3.el7
  perl-Getopt-Long.noarch 0:2.40-3.el7                perl-HTTP-Tiny.noarch 0:0.033-3.el7
  perl-IO-Compress.noarch 0:2.061-2.el7               perl-Net-Daemon.noarch 0:0.48-5.el7
  perl-PathTools.x86_64 0:3.40-5.el7                  perl-PlRPC.noarch 0:0.2020-14.el7
  perl-Pod-Escapes.noarch 1:1.04-292.el7              perl-Pod-Perldoc.noarch 0:3.20-4.el7
  perl-Pod-Simple.noarch 1:3.28-4.el7                 perl-Pod-Usage.noarch 0:1.63-3.el7
  perl-Scalar-List-Utils.x86_64 0:1.27-248.el7        perl-Socket.x86_64 0:2.010-4.el7
  perl-Storable.x86_64 0:2.45-3.el7                   perl-Text-ParseWords.noarch 0:3.29-4.el7
  perl-Time-HiRes.x86_64 4:1.9725-3.el7               perl-Time-Local.noarch 0:1.2300-2.el7
  perl-constant.noarch 0:1.27-2.el7                   perl-libs.x86_64 4:5.16.3-292.el7
  perl-macros.x86_64 4:5.16.3-292.el7                 perl-parent.noarch 1:0.225-244.el7
  perl-podlators.noarch 0:2.5.1-3.el7                 perl-threads.x86_64 0:1.87-4.el7
  perl-threads-shared.x86_64 0:1.43-6.el7

Complete!
開啟MariaDB服務,並設定係統啟動時服務自動啟動: systemctl start mariadb.servicesystemctl enable mariadb.service
設定MySQL root帳號的密碼:mysql_secure_installation
NOTE: RUNNING ALL PARTS OF THIS SCRIPT IS RECOMMENDED FOR ALL MariaDB
      SERVERS IN PRODUCTION USE!  PLEASE READ EACH STEP CAREFULLY!

In order to log into MariaDB to secure it, we'll need the current
password for the root user.  If you've just installed MariaDB, and
you haven't set the root password yet, the password will be blank,
so you should just press enter here.

Enter current password for root (enter for none):  //输入当前root用户密码,直接回车

OK, successfully used password, moving on...

Setting the root password ensures that nobody can log into the MariaDB
root user without the proper authorisation.

Set root password? [Y/n]
New password:   //输入密码
Re-enter new password:   //确认密码
Password updated successfully!
Reloading privilege tables..
 ... Success!

By default, a MariaDB installation has an anonymous user, allowing anyone
to log into MariaDB without having to have a user account created for
them.  This is intended only for testing, and to make the installation
go a bit smoother.  You should remove them before moving into a
production environment.

Remove anonymous users? [Y/n]   //删除匿名用户,回车
 ... Success!

Normally, root should only be allowed to connect from 'localhost'.  This
ensures that someone cannot guess at the root password from the network.

Disallow root login remotely? [Y/n]   //不允许root用户远程登录,回车
 ... Success!

By default, MariaDB comes with a database named 'test' that anyone can
access.  This is also intended only for testing, and should be removed
before moving into a production environment.

Remove test database and access to it? [Y/n]   //删除测试数据库并访问它,回车
 - Dropping test database...
 ... Success!
 - Removing privileges on test database...
 ... Success!

Reloading the privilege tables will ensure that all changes made so far
will take effect immediately.

Reload privilege tables now? [Y/n]   //重新加载权限表,回车
 ... Success!

Cleaning up...

All done!  If you've completed all of the above steps, your MariaDB
installation should now be secure.

Thanks for using MariaDB!
三、PHP
yum install php //安裝php
Total download size: 4.7 M
Installed size: 17 M
Is this ok [y/d/N]:   //允许安装,输入y
Downloading packages:
(1/4): libzip-0.10.1-8.el7.x86_64.rpm                                             |  48 kB  00:00:00
(2/4): php-5.4.16-45.el7.x86_64.rpm                                               | 1.4 MB  00:00:01
(3/4): php-common-5.4.16-45.el7.x86_64.rpm                                        | 565 kB  00:00:01
(4/4): php-cli-5.4.16-45.el7.x86_64.rpm                                           | 2.7 MB  00:00:02
---------------------------------------------------------------------------------------------------------
Total                                                                    2.1 MB/s | 4.7 MB  00:00:02
Running transaction check
Running transaction test
Transaction test succeeded
Running transaction
  Installing : libzip-0.10.1-8.el7.x86_64                                                            1/4
  Installing : php-common-5.4.16-45.el7.x86_64                                                       2/4
  Installing : php-cli-5.4.16-45.el7.x86_64                                                          3/4
  Installing : php-5.4.16-45.el7.x86_64                                                              4/4
  Verifying  : php-5.4.16-45.el7.x86_64                                                              1/4
  Verifying  : php-cli-5.4.16-45.el7.x86_64                                                          2/4
  Verifying  : libzip-0.10.1-8.el7.x86_64                                                            3/4
  Verifying  : php-common-5.4.16-45.el7.x86_64                                                       4/4

Installed:
  php.x86_64 0:5.4.16-45.el7

Dependency Installed:
  libzip.x86_64 0:0.10.1-8.el7    php-cli.x86_64 0:5.4.16-45.el7    php-common.x86_64 0:5.4.16-45.el7

Complete!
為了讓資料庫和php關聯,我們還需要安裝php- mysql:yum install php-mysql //安裝程序輸入y,即可安裝完成
systemctl restart httpd.service //安裝好php後,要重新啟動Apache服務
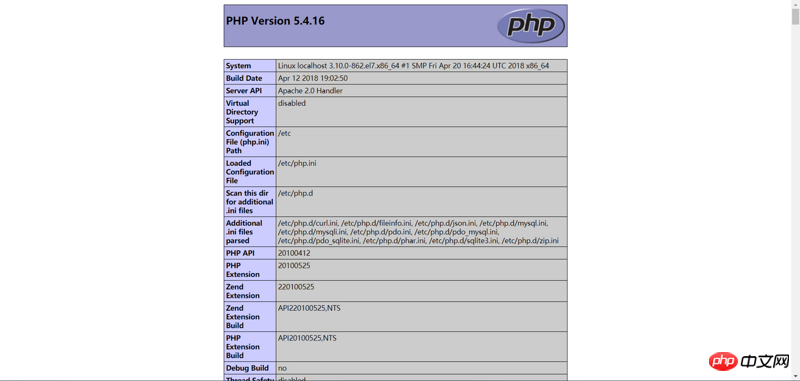
測試php有沒有安裝好:vi /var/www/html/index.php //新建一個php文件,填入下面的內容
<?php phpinfo();
?>
在之前URL後面加上/info.php,看到以下介面,就表示安裝成功了。

相關文章推薦:
Linux系統下修改phpstudy整合環境中的MySQL連接埠號碼的步驟
#以上是LAMP環境如何搭建? LAMP環境搭建的詳細流程的詳細內容。更多資訊請關注PHP中文網其他相關文章!

熱AI工具

Undresser.AI Undress
人工智慧驅動的應用程序,用於創建逼真的裸體照片

AI Clothes Remover
用於從照片中去除衣服的線上人工智慧工具。

Undress AI Tool
免費脫衣圖片

Clothoff.io
AI脫衣器

Video Face Swap
使用我們完全免費的人工智慧換臉工具,輕鬆在任何影片中換臉!

熱門文章

熱工具

記事本++7.3.1
好用且免費的程式碼編輯器

SublimeText3漢化版
中文版,非常好用

禪工作室 13.0.1
強大的PHP整合開發環境

Dreamweaver CS6
視覺化網頁開發工具

SublimeText3 Mac版
神級程式碼編輯軟體(SublimeText3)
 怎樣卸載MySQL並清理殘留文件
Apr 29, 2025 pm 04:03 PM
要安全、徹底地卸載MySQL並清理所有殘留文件,需遵循以下步驟:1.停止MySQL服務;2.卸載MySQL軟件包;3.清理配置文件和數據目錄;4.驗證卸載是否徹底。
 session_start()函數的意義是什麼?
May 03, 2025 am 12:18 AM
session_start()iscucialinphpformanagingusersessions.1)ItInitiateSanewsessionifnoneexists,2)resumesanexistingsessions,and3)setsasesessionCookieforContinuityActinuityAccontinuityAcconActInityAcconActInityAcconAccRequests,EnablingApplicationsApplicationsLikeUseAppericationLikeUseAthenticationalticationaltication and PersersonalizedContentent。
 給MySQL表添加和刪除字段的操作步驟
Apr 29, 2025 pm 04:15 PM
在MySQL中,添加字段使用ALTERTABLEtable_nameADDCOLUMNnew_columnVARCHAR(255)AFTERexisting_column,刪除字段使用ALTERTABLEtable_nameDROPCOLUMNcolumn_to_drop。添加字段時,需指定位置以優化查詢性能和數據結構;刪除字段前需確認操作不可逆;使用在線DDL、備份數據、測試環境和低負載時間段修改表結構是性能優化和最佳實踐。
 MacOS和Linux:兼容性和用戶體驗
Apr 30, 2025 am 12:05 AM
macOS和Linux在兼容性和用戶體驗上各有優勢。 macOS在蘋果生態系統內兼容性極佳,用戶體驗簡潔直觀;Linux則在硬件兼容性和軟件靈活性上表現突出,用戶體驗因發行版而異,強調個性化和控制。
 MySQL批量插入數據的高效方法
Apr 29, 2025 pm 04:18 PM
MySQL批量插入数据的高效方法包括:1.使用INSERTINTO...VALUES语法,2.利用LOADDATAINFILE命令,3.使用事务处理,4.调整批量大小,5.禁用索引,6.使用INSERTIGNORE或INSERT...ONDUPLICATEKEYUPDATE,这些方法能显著提升数据库操作效率。
 如何使用MySQL的函數進行數據處理和計算
Apr 29, 2025 pm 04:21 PM
MySQL函數可用於數據處理和計算。 1.基本用法包括字符串處理、日期計算和數學運算。 2.高級用法涉及結合多個函數實現複雜操作。 3.性能優化需避免在WHERE子句中使用函數,並使用GROUPBY和臨時表。
 MySQL的字符集和排序規則如何配置
Apr 29, 2025 pm 04:06 PM
在MySQL中配置字符集和排序規則的方法包括:1.設置服務器級別的字符集和排序規則:SETNAMES'utf8';SETCHARACTERSETutf8;SETCOLLATION_CONNECTION='utf8_general_ci';2.創建使用特定字符集和排序規則的數據庫:CREATEDATABASEexample_dbCHARACTERSETutf8COLLATEutf8_general_ci;3.創建表時指定字符集和排序規則:CREATETABLEexample_table(idINT
 作曲家:PHP開發人員的軟件包經理
May 02, 2025 am 12:23 AM
Composer是PHP的依賴管理工具,通過composer.json文件管理項目依賴。 1)解析composer.json獲取依賴信息;2)解析依賴關係形成依賴樹;3)從Packagist下載並安裝依賴到vendor目錄;4)生成composer.lock文件鎖定依賴版本,確保團隊一致性和項目可維護性。


