這篇文章帶給大家的內容是關於python發送郵件SMTP的詳細介紹(附程式碼),有一定的參考價值,有需要的朋友可以參考一下,希望對你有幫助。
如何使用Python將產生的測試報告以郵件附件的形式進行傳送呢?
python的smtplib提供了一種很方便的途徑發送電子郵件,它對smtp協定進行了簡單的封裝。
Python對SMTP支援有smtplib和email兩個模組。其中email負責建構郵件,smtplib則負責發送郵件。
來理Python發送一個未知MIME類型的文件附件基本思路:
0、前提:导入邮件发送模块
        from email.mime.text import MIMEText
        from email.mime.multipart import MIMEMultipart
        import smtplib
1、构造MIMEMultipart对象作为根容器
2、构造MIMEText对象作为邮件显示内容并附加到根容器
    a、读入文件内容并格式化
    b、设置附件头
3、设置根容器属性
4、得到格式化后的完整文本
5、用smtp发送邮件
6、封装成sendEmail类。
同時想想我們要發送郵件的幾個要素:
1、服务器。以QQ邮箱举例,则为smtp.qq.com
2、端口号。有465和587,请使用587
3、发送者。
4、密码。密码总不能直接写在文件里吧?哈哈,这里需要使用qq邮箱获取授权码。
5、收件人。(可能还不止一个)
6、发送邮件的主题subject。
7、邮件文本内容。
8、附件。
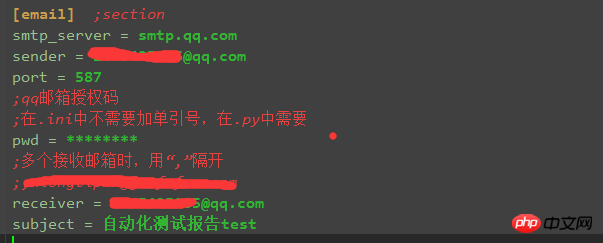
因為之前寫過如何讀取.ini配置文件,所以此部分,將發送郵件的一些要素放在了配置文件中,配置文件如下:

對應讀取設定檔腳本為:(readConfig.py部分)
import os
import configparser

# config
cur_path = os.path.dirname(os.path.relpath(__file__))
configPath = os.path.join(cur_path,'config.ini')
conf = configparser.ConfigParser()
conf.read(configPath)

def get_smtpServer(smtpServer):
    smtp_server = conf.get('email',smtpServer)
    return smtp_server
#
......建構MIMEMultipart()郵件根容器物件後,需要藉助根容器來定義郵件的各個要素,例如郵件主旨subject、發送人from、接收人to、郵件主體、郵件附件等。
# 构建根容器
msg = MIMEMultipart()

# 邮件主题、发送人、收件人、内容,此部分可以来自配置文件,也可以直接填入
msg['Subject'] = self.mail_subject  # u'自动化测试报告'
msg['from'] = self.mail_sender
msg['to'] = self.mail_pwd
# 邮件正文部分body,1、可以用HTML自己自定义body内容;2、读取其他文件的内容为body
# body = "您好,<p>这里是使用Python登录邮箱,并发送附件的测试"
with open(reportFile,'r',encoding='UTF-8') as f:
     body = f.read()
msg.attach(MIMEText(_text=body, _subtype='html', _charset='utf-8'))  # _charset 是指Content_type的类型</p>
# 添加附件
attachment = MIMEText(_text=open(reportFile, 'rb').read(), _subtype='base64',_charset= 'utf-8')
attachment['Content-Type'] = 'application/octet-stream'
attachment['Content-Disposition'] = 'attachment;filename = "result.html"'
msg.attach(attachment)
發送四部曲:取得伺服器連線、再登入郵件信箱、傳送郵件、登出。
大致如下:
try:
      smtp = smtplib.SMTP_SSL(host=self.mail_smtpserver, port=self.mail_port)  # 继承自SMTP
except:
      smtp = smtplib.SMTP()
      smtp.connect(self.mail_smtpserver, self.mail_port)

# smtp.set_debuglevel(1)
# 创建安全连接,加密SMTP
smtp.starttls()     # Puts the connection to the SMTP server into TLS mode.
# 用户名和密码
smtp.login(user=self.mail_sender, password=self.mail_pwd)

# 函数:sendmail(self, from_addr, to_addrs, msg, mail_options=[],rcpt_options=[]):
smtp.sendmail(self.mail_sender, self.mail_receiverList, msg.as_string())
smtp.quit()
在裡面加了一句smtp.starttls()。這一句是用來加密SMTP會話,確保郵件安全地傳送不被竊聽的。
在建立完SMTP物件後,立刻呼叫starttls()方法即可。
其實整個下來郵件發送模組也就完成了。
在這個過程中有遇見幾個問題,也貼上來跟大家一起分享一下。
拋錯535
拋錯:smtplib.SMTPAuthenticationError: (535, b'Error:
xc7xebxcaxb9xd3xc3xcaxdaxc8xa8xc2xebxb5xc7xc2xbcxa1xa3xcfxeaxc7xe9xc7xebxbfxb4:
http://service.mail.qq.com/cg...')
解決方法:點擊最後的鏈接,其實是因為授權碼問題
替換授權碼後繼續報錯,535
解決辦法:替換連接埠。因為qq郵箱ssl協定連接埠有兩個:465/587。
錯誤:smtplib.SMTPAuthenticationError: (530, b'Must issue a STARTTLS command first.')
解決方法:在login()之前,新增一句:smtp.starttls()
下面貼上整個文件,這個文件是依賴其他文件的的,所以僅供參考,但是方法是一樣的。
import smtplib
from email.mime.text import MIMEText
from email.mime.multipart import MIMEMultipart
from email.mime.base import MIMEBase

class SendEmail(object):
    '''
    发送邮件模块封装,属性均从config.ini文件获得
    '''
    def __init__(self, smtpServer, mailPort, mailSender, mailPwd, mailtoList, mailSubject):
        self.mail_smtpserver = smtpServer
        self.mail_port = mailPort
        self.mail_sender = mailSender
        self.mail_pwd = mailPwd
        # 接收邮件列表
        self.mail_receiverList = mailtoList
        self.mail_subject = mailSubject
        # self.mail_content = mailContent

    def sendFile(self, reportFile):
        '''
        发送各种类型的附件
        '''
        # 构建根容器
        msg = MIMEMultipart()

        # 邮件正文部分body,1、可以用HTML自己自定义body内容;2、读取其他文件的内容为body
        # body = "您好,<p>这里是使用Python登录邮箱,并发送附件的测试"
        with open(reportFile,'r',encoding='UTF-8') as f:
            body = f.read()

        # _charset 是指Content_type的类型
        msg.attach(MIMEText(_text=body, _subtype='html', _charset='utf-8'))

        # 邮件主题、发送人、收件人、内容
        msg['Subject'] = self.mail_subject  # u'自动化测试报告'
        msg['from'] = self.mail_sender
        msg['to'] = self.mail_pwd

        # 添加附件
        attachment = MIMEText(_text=open(reportFile, 'rb').read(), _subtype='base64',_charset= 'utf-8')
        attachment['Content-Type'] = 'application/octet-stream'
        attachment['Content-Disposition'] = 'attachment;filename = "result.html"'
        msg.attach(attachment)

        try:
            smtp = smtplib.SMTP_SSL(host=self.mail_smtpserver, port=self.mail_port)  # 继承自SMTP
        except:
            smtp = smtplib.SMTP()
            smtp.connect(self.mail_smtpserver, self.mail_port)

        # smtp.set_debuglevel(1)
        # 创建安全连接,加密SMTP
        smtp.starttls()     # Puts the connection to the SMTP server into TLS mode.
        # 用户名和密码
        smtp.login(user=self.mail_sender, password=self.mail_pwd)

        # 函数:sendmail(self, from_addr, to_addrs, msg, mail_options=[],rcpt_options=[]):
        smtp.sendmail(self.mail_sender, self.mail_receiverList, msg.as_string())
        smtp.quit()

# 调试代码
if __name__ == "__main__":
    mail_smtpserver = 'smtp.qq.com'
    mail_port = 587
    mail_sender = '@qq.com'
    mail_pwd = ''
    mail_receiverList = ['@qq.com', '@163.com']
    mail_subject = u'自动化测试报告'
    s = SendEmail(mail_smtpserver, mail_port, mail_sender, mail_pwd, mail_receiverList, mail_subject)
    s.sendFile('F:\Python_project\PythonLearnning_2018\send_email\sendEmail_Test.html.tar.gz')
print('--- test end --- ')</p>以上是python SMTP發送郵件的詳細介紹(附代碼)的詳細內容。更多資訊請關注PHP中文網其他相關文章!


