本文為大家介紹css如何實現酷炫的右側懸浮選單列效果,有一定的參考價值,有需要的朋友可以參考一下,希望對你們有所幫助。
預設顯示效果:

滑鼠懸浮效果:
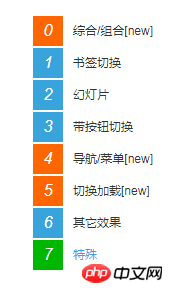
HTML、JS程式碼如下:
<!DOCTYPE html>
<html>
    <head>
        <meta charset="UTF-8">
        <title></title>
        <script src="jquery-1.11.1.min.js"></script>
        <style type="text/css">
            *{margin:0;padding:0;}
            body{ color:#333;font:12px/20px Arial,"Microsoft YaHei","宋体",sans-serif; text-align:center; background:#fff;  }
            a{text-decoration:none;color:#333;}
            .rightNav{ position:fixed; width:140px;  right:0; top:100px; _position:absolute; text-align:left; cursor:pointer; background-image:url(about:blank);  }
            .rightNav a{ display:block; position:relative; height:30px; line-height:30px; margin-bottom:2px; background:#fff; padding-right:10px; width:130px; overflow:hidden;  cursor:pointer; right:-110px; }
            .rightNav a:hover{ text-decoration:none; color:#39A4DC;  }
            .rightNav a:hover em{ background:#00b700}
            .rightNav a em{ display:block; float:left; width:30px; background:#39A4DC; color:#fff; font-size:16px; text-align:center; margin-right:10px;}
            .rightNav a.new em{ background:#f60;}
        </style>
    </head>
    <body>
        <div class="rightNav">
            <a class="new" href="#effect0" style="right: -110px;"><em>0</em>综合/组合[new]</a>
            <a href="#effect1" style="right: -110px;"><em>1</em>书签切换</a>
            <a href="#effect2" style="right: -110px;"><em>2</em>幻灯片</a>
            <a href="#effect3" style="right: -110px;"><em>3</em>带按钮切换</a>
            <a class="new" href="#effect4" style="right: -110px;"><em>4</em>导航/菜单[new]</a>
            <a class="new" href="#effect5" style="right: -110px;"><em>5</em>切换加载[new]</a>
            <a href="#effectT1" style="right: -110px;"><em>6</em>其它效果</a>
            <a href="#effectT1" style="right: -110px;"><em>7</em>特殊</a>
        </div>
        <script type="text/javascript">

            //右侧导航
            var btb=$(".rightNav");
            var tempS;
            $(".rightNav").hover(function(){
                    var thisObj = $(this);
                    tempS = setTimeout(function(){
                    thisObj.find("a").each(function(i){
                        var tA=$(this);
                        console.log(i);
                        setTimeout(function(){ tA.animate({right:"0"},200);},50*i);
                    });
                },200);

            },function(){
                if(tempS){ clearTimeout(tempS); }
                $(this).find("a").each(function(i){
                    var tA=$(this);
                    setTimeout(function(){ tA.animate({right:"-110"},200,function(){
                    });},50*i);
                });

            });


        </script>
    </body>
</html>總結:以上就是這篇文章的全部內容,希望能對大家的學習有所幫助。更多相關教學請訪問 CSS影片教學!
相關推薦:
以上是css實現酷炫的右側懸浮選單列效果(程式碼實例)的詳細內容。更多資訊請關注PHP中文網其他相關文章!
