

springboot專案創建教學(IntelliJIDEA,springboot 2.0 +mybatis)

這篇文章帶給大家的內容是關於springboot專案創作教學(IntelliJIDEA,springboot 2.0 mybatis),有一定的參考價值,有需要的朋友可以參考一下,希望對你有幫助。
環境:
JDK8 windows10
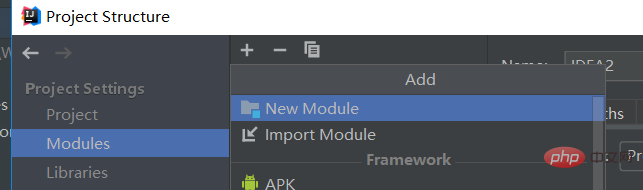
步驟New Module —>Spring Initializr—>next
#1
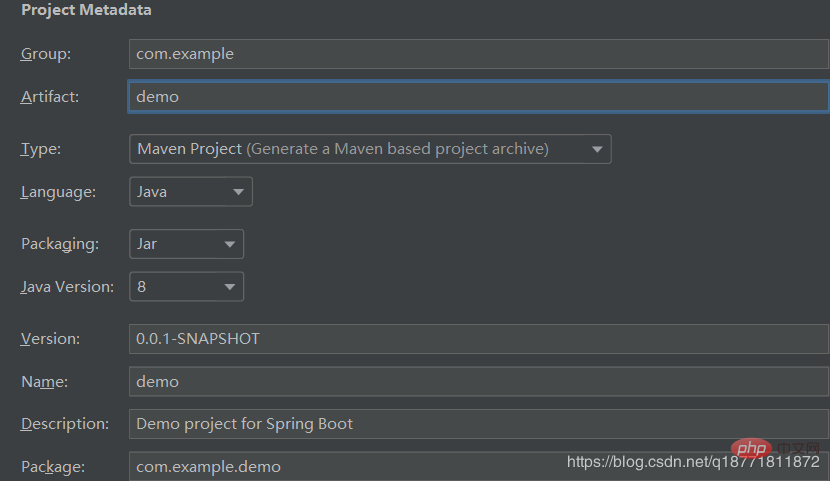
2.
3。 web勾選web,sql裡面可以不勾,後續添加,另外,勾選了MyBatis會報錯Property 'sqlSessionFactory' or 'sqlSessionTemplate' are required 這樣的錯誤。這裡我勾選了是為了待會解決這個錯誤
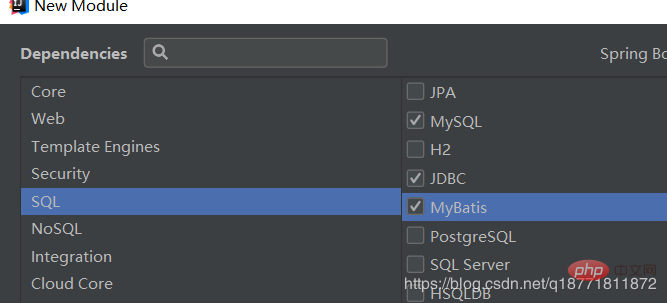
選完直接下一步到最後就行了
自動產生的pom檔如下
<?xml version="1.0" encoding="UTF-8"?>
<project xmlns="http://maven.apache.org/POM/4.0.0" xmlns:xsi="http://www.w3.org/2001/XMLSchema-instance"
         xsi:schemaLocation="http://maven.apache.org/POM/4.0.0 http://maven.apache.org/xsd/maven-4.0.0.xsd">
    <modelVersion>4.0.0</modelVersion>
    <parent>
        <groupId>org.springframework.boot</groupId>
        <artifactId>spring-boot-starter-parent</artifactId>
        <version>2.0.8.RELEASE</version>
        <relativePath/> <!-- lookup parent from repository -->
    </parent>
    <groupId>com.example</groupId>
    <artifactId>demo</artifactId>
    <version>0.0.1-SNAPSHOT</version>
    <name>demo</name>
    <description>Demo project for Spring Boot</description>

    <properties>
        <java.version>1.8</java.version>
    </properties>

    <dependencies>
        <dependency>
            <groupId>org.springframework.boot</groupId>
            <artifactId>spring-boot-starter-jdbc</artifactId>
        </dependency>
        <dependency>
            <groupId>org.springframework.boot</groupId>
            <artifactId>spring-boot-starter-web</artifactId>
        </dependency>
        <dependency>
            <groupId>org.mybatis.spring.boot</groupId>
            <artifactId>mybatis-spring-boot-starter</artifactId>
            <version>2.0.0</version>
        </dependency>

        <dependency>
            <groupId>mysql</groupId>
            <artifactId>mysql-connector-java</artifactId>
            <scope>runtime</scope>
        </dependency>
        <dependency>
            <groupId>org.springframework.boot</groupId>
            <artifactId>spring-boot-starter-test</artifactId>
            <scope>test</scope>
        </dependency>
    </dependencies>

    <build>
        <plugins>
            <plugin>
                <groupId>org.springframework.boot</groupId>
                <artifactId>spring-boot-maven-plugin</artifactId>
            </plugin>
        </plugins>
    </build>

</project>## 目錄結構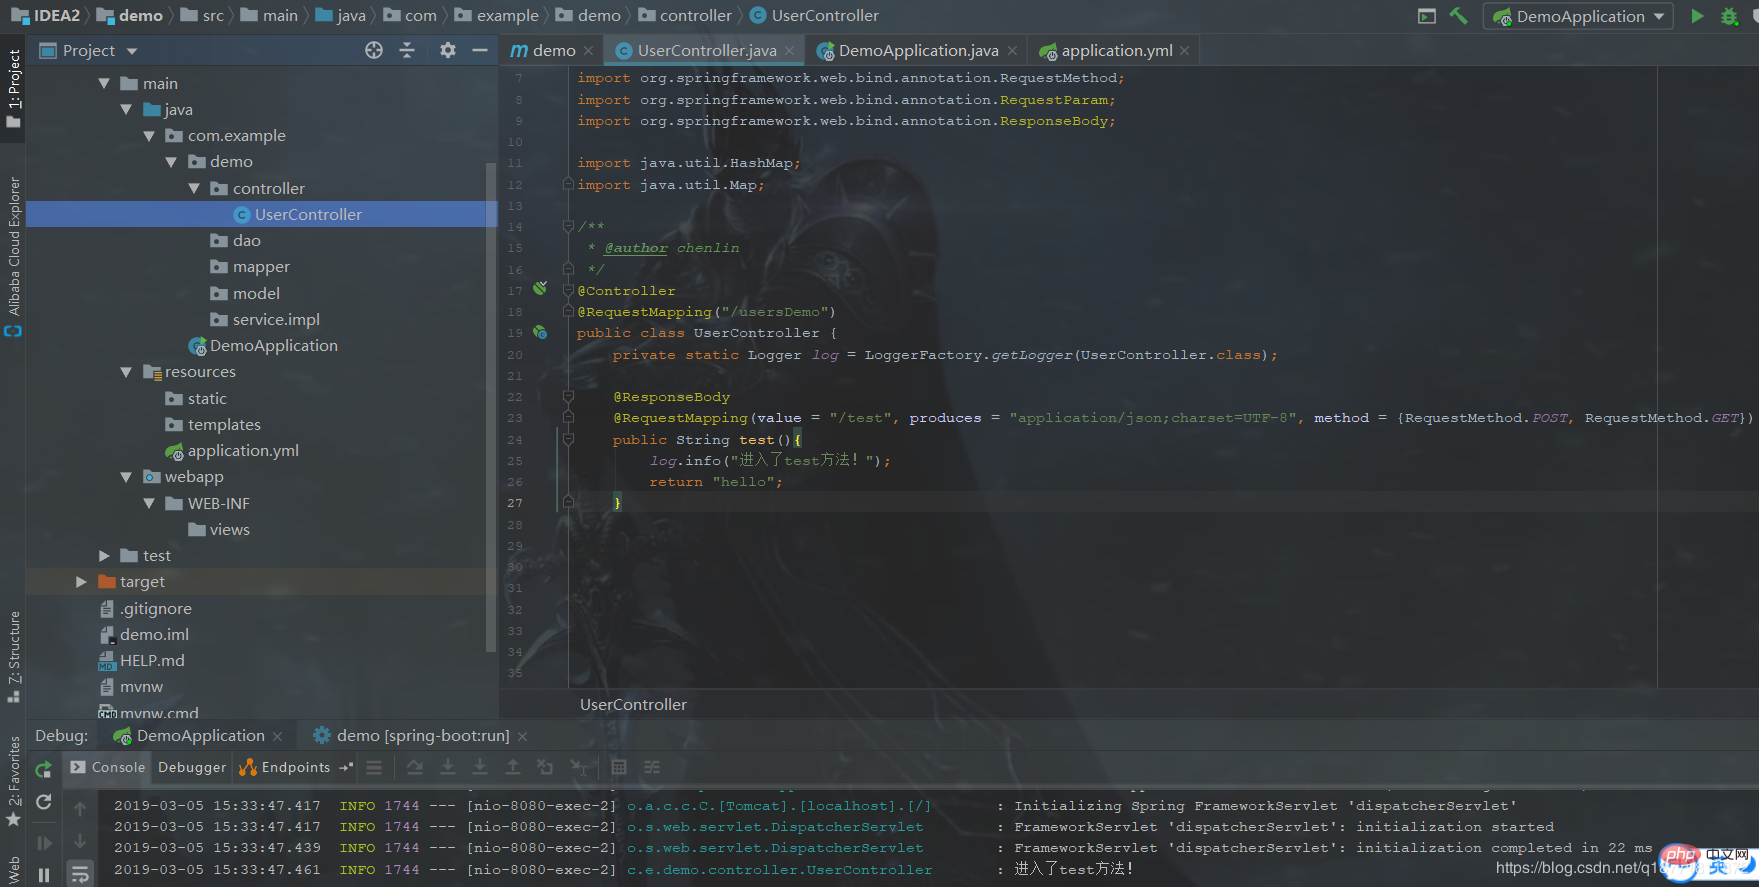
因為沒有配置資料庫和任何文件,application是空的,預設連接埠是8080
我們需要在啟動累忽略資料庫配置
@SpringBootApplication(exclude = {DataSourceAutoConfiguration.class})
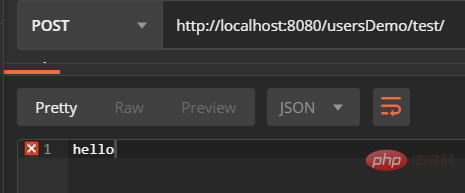
然後用postman存取 說明項目是正常的
4.設定資料庫 application.yml 檔案
server:
  port: 8080
  tomcat:
    uri-encoding: UTF-8
  servlet:
    context-path: /
spring:
  dataSource:
    url: jdbc:mysql://localhost:3306/db-test?useUnicode=true&characterEncoding=utf8&tinyInt1isBit=false
    username: root
    password: 123456
    driverClassName: com.mysql.jdbc.Driver
mybatis:
  mapper-locations: classpath:com/example/demo/mapper/*Mapper.xml #注意:一定要对应mapper映射xml文件的所在路径
  type-aliases-package: com.example.demo.model # 注意:对应实体类的路径
  configuration:
call-setters-on-nulls: true # 解决使用map类型接收查询结果的时候为null的字段会没有的情况这时候 com.mysql.jdbc.Driver 标红 说明mysql架包找不到

#把
<dependency>
    <groupId>mysql</groupId>
    <artifactId>mysql-connector-java</artifactId>
    <scope>runtime</scope>
</dependency>改成 版本預設就行
<dependency>
    <groupId>mysql</groupId>
    <artifactId>mysql-connector-java</artifactId>
</dependency>然後driverClassName 恢復正常
导入 service dao xml (这里没有使用实体类返回,使用的是map返回,所以表我们可以随意自建)

UserController
@Controller
@RequestMapping("/usersDemo")
public class UserController {
    private static Logger log = LoggerFactory.getLogger(UserController.class);
    @Resource
    UserService userService;

    @ResponseBody
    @RequestMapping(value = "/test", produces = "application/json;charset=UTF-8", method = {RequestMethod.POST, RequestMethod.GET})
    public List<Map<String, Object>> test(){
        log.info("进入了test方法!");
        List<Map<String,Object>> list=userService.userQueryAll();
        return list;
    }
}UserService
public interface UserService {
    List<Map<String, Object>> userQueryAll();
}UserserviceImpl
@Service
public class UserserviceImpl  implements UserService {
    @Resource
    UserMapper userDao;
    @Override
    public List<Map<String, Object>> userQueryAll() {
        return userDao.userQueryAll();
    }
}UserMapper
@Mapper
public interface UserMapper {
    List<Map<String, Object>> userQueryAll();
}UserMappererr. ##好了,
接下來就是啟動了
5啟動
注意:依賴注入後如果沒有去掉exclude = {DataSourceAutoConfiguration.class}
#啟動會報如下錯誤:
Caused by: java.lang.IllegalArgumentException: Property 'sqlSessionFactory' or 'sqlSessionTemplate' are required
錯誤原因1:##
<?xml version="1.0" encoding="UTF-8" ?>
<!DOCTYPE mapper PUBLIC "-//mybatis.org//DTD Mapper 3.0//EN" "http://mybatis.org/dtd/mybatis-3-mapper.dtd" >
<mapper namespace="com.example.demo.dao.UserMapper">
    <select id="userQueryAll" parameterType="Map" resultType="Map">
        SELECT * FROM `users`
    </select>
</mapper>DemoApplication
@SpringBootApplication(exclude = {DataSourceAutoConfiguration.class})
@MapperScan("com.example.demo.dao")
@ComponentScan(basePackages = {"com.example.demo.*"})
public class DemoApplication {

    public static void main(String[] args) {
        SpringApplication.run(DemoApplication.class, args);
    }

}6 繼續啟動,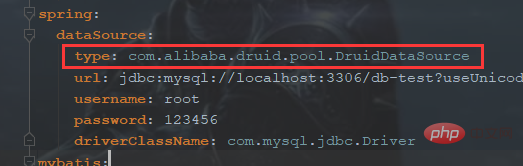
#錯誤可能原因1
. mapper.xml select 的id寫錯了解決方案:檢查程式碼
錯誤可能原因2
.程式沒有編譯xml檔解決方案:pom.xml 檔案build裡面增加程式碼
很多人说 创建项目的时候勾选了mybatis导致
  实际上是这个架包的原因
如果不要的话也不能使用mybatis了
<dependency>
    <groupId>org.mybatis.spring.boot</groupId>
    <artifactId>mybatis-spring-boot-starter</artifactId>
    <version>2.0.0</version>
</dependency>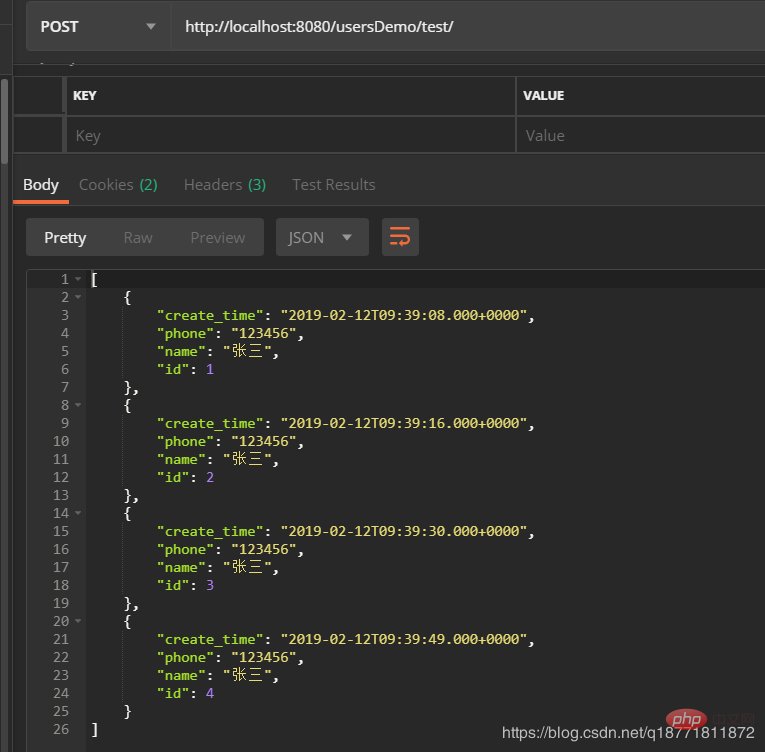
dataSource.type 使用默认的连接池导致的
以上是springboot專案創建教學(IntelliJIDEA,springboot 2.0 +mybatis)的詳細內容。更多資訊請關注PHP中文網其他相關文章!

熱AI工具

Undresser.AI Undress
人工智慧驅動的應用程序,用於創建逼真的裸體照片

AI Clothes Remover
用於從照片中去除衣服的線上人工智慧工具。

Undress AI Tool
免費脫衣圖片

Clothoff.io
AI脫衣器

AI Hentai Generator
免費產生 AI 無盡。

熱門文章
熱工具

記事本++7.3.1
好用且免費的程式碼編輯器

SublimeText3漢化版
中文版,非常好用

禪工作室 13.0.1
強大的PHP整合開發環境

Dreamweaver CS6
視覺化網頁開發工具

SublimeText3 Mac版
神級程式碼編輯軟體(SublimeText3)
熱門話題


 Springboot怎麼整合Jasypt實現設定檔加密
Jun 01, 2023 am 08:55 AM
Springboot怎麼整合Jasypt實現設定檔加密
Jun 01, 2023 am 08:55 AM
Jasypt介紹Jasypt是一個java庫,它允許開發員以最少的努力為他/她的專案添加基本的加密功能,並且不需要對加密工作原理有深入的了解用於單向和雙向加密的高安全性、基於標準的加密技術。加密密碼,文本,數字,二進位檔案...適合整合到基於Spring的應用程式中,開放API,用於任何JCE提供者...添加如下依賴:com.github.ulisesbocchiojasypt-spring-boot-starter2. 1.1Jasypt好處保護我們的系統安全,即使程式碼洩露,也可以保證資料來源的
 SpringBoot怎麼整合Redisson實現延遲隊列
May 30, 2023 pm 02:40 PM
SpringBoot怎麼整合Redisson實現延遲隊列
May 30, 2023 pm 02:40 PM
使用場景1、下單成功,30分鐘未支付。支付超時,自動取消訂單2、訂單簽收,簽收後7天未進行評估。訂單超時未評價,系統預設好評3、下單成功,商家5分鐘未接單,訂單取消4、配送超時,推播簡訊提醒…對於延時比較長的場景、即時性不高的場景,我們可以採用任務調度的方式定時輪詢處理。如:xxl-job今天我們採
 怎麼在SpringBoot中使用Redis實現分散式鎖
Jun 03, 2023 am 08:16 AM
怎麼在SpringBoot中使用Redis實現分散式鎖
Jun 03, 2023 am 08:16 AM
一、Redis實現分散式鎖原理為什麼需要分散式鎖在聊分散式鎖之前,有必要先解釋一下,為什麼需要分散式鎖。與分散式鎖相對就的是單機鎖,我們在寫多執行緒程式時,避免同時操作一個共享變數產生資料問題,通常會使用一把鎖來互斥以保證共享變數的正確性,其使用範圍是在同一個進程中。如果換做是多個進程,需要同時操作一個共享資源,如何互斥?現在的業務應用通常是微服務架構,這也意味著一個應用會部署多個進程,多個進程如果需要修改MySQL中的同一行記錄,為了避免操作亂序導致髒數據,此時就需要引入分佈式鎖了。想要實現分
 springboot讀取檔案打成jar包後存取不到怎麼解決
Jun 03, 2023 pm 04:38 PM
springboot讀取檔案打成jar包後存取不到怎麼解決
Jun 03, 2023 pm 04:38 PM
springboot讀取文件,打成jar包後訪問不到最新開發出現一種情況,springboot打成jar包後讀取不到文件,原因是打包之後,文件的虛擬路徑是無效的,只能通過流去讀取。文件在resources下publicvoidtest(){Listnames=newArrayList();InputStreamReaderread=null;try{ClassPathResourceresource=newClassPathResource("name.txt");Input
 SpringBoot與SpringMVC的比較及差別分析
Dec 29, 2023 am 11:02 AM
SpringBoot與SpringMVC的比較及差別分析
Dec 29, 2023 am 11:02 AM
SpringBoot和SpringMVC都是Java開發中常用的框架,但它們之間有一些明顯的差異。本文將探究這兩個框架的特點和用途,並對它們的差異進行比較。首先,我們來了解一下SpringBoot。 SpringBoot是由Pivotal團隊開發的,它旨在簡化基於Spring框架的應用程式的建立和部署。它提供了一種快速、輕量級的方式來建立獨立的、可執行
 SpringBoot怎麼自訂Redis實作快取序列化
Jun 03, 2023 am 11:32 AM
SpringBoot怎麼自訂Redis實作快取序列化
Jun 03, 2023 am 11:32 AM
1.自訂RedisTemplate1.1、RedisAPI預設序列化機制基於API的Redis快取實作是使用RedisTemplate範本進行資料快取操作的,這裡開啟RedisTemplate類,查看該類別的源碼資訊publicclassRedisTemplateextendsRedisAccessorimplementsRedisOperations,BeanClassLoaderAware{//聲明了value的各種序列化方式,初始值為空@NullableprivateRedisSe
 Springboot+Mybatis-plus不使用SQL語句進行多表新增怎麼實現
Jun 02, 2023 am 11:07 AM
Springboot+Mybatis-plus不使用SQL語句進行多表新增怎麼實現
Jun 02, 2023 am 11:07 AM
在Springboot+Mybatis-plus不使用SQL語句進行多表添加操作我所遇到的問題準備工作在測試環境下模擬思維分解一下:創建出一個帶有參數的BrandDTO對像模擬對後台傳遞參數我所遇到的問題我們都知道,在我們使用Mybatis-plus中進行多表操作是極其困難的,如果你不使用Mybatis-plus-join這一類的工具,你只能去配置對應的Mapper.xml文件,配置又臭又長的ResultMap,然後再寫對應的sql語句,這種方法雖然看上去很麻煩,但具有很高的靈活性,可以讓我們
 springboot怎麼取得application.yml裡值
Jun 03, 2023 pm 06:43 PM
springboot怎麼取得application.yml裡值
Jun 03, 2023 pm 06:43 PM
在專案中,很多時候需要用到一些配置信息,這些信息在測試環境和生產環境下可能會有不同的配置,後面根據實際業務情況有可能還需要再做修改。我們不能將這些設定在程式碼中寫死,最好是寫到設定檔中,例如可以把這些資訊寫到application.yml檔案中。那麼,怎麼在程式碼裡取得或使用這個位址呢?有2個方法。方法一:我們可以透過@Value註解的${key}即可取得設定檔(application.yml)中和key對應的value值,這個方法適用於微服務比較少的情形方法二:在實際專案中,遇到業務繁瑣,邏
