最詳細的Android面試題分享
#推薦:《2020年Android面試題大匯總【收藏】》
Android基本知識點
1、常規知識點
1、 Android類別載入器
在Android開發中,不管是插件化還是組件化,都是基於Android系統的類別載入器ClassLoader來設計的。只不過Android平台上虛擬機器運行的是Dex字節碼,一種對class文件優化的產物,傳統Class文件是一個Java源碼文件會產生一個.class文件,而Android是把所有Class文件合併、優化,然後再產生一個最終的class.dex,目的是把不同class檔案重複的東西只需保留一份,在早期的Android應用開發中,如果不對Android應用程式進行分dex處理,那麼最後一個應用的apk只會有一個dex檔。
Android中常用的類別載入器有兩種,DexClassLoader和PathClassLoader,它們都繼承於BaseDexClassLoader。差別在於呼叫父類別建構器時,DexClassLoader多傳了一個optimizedDirectory參數,這個目錄必須是內部儲存路徑,用來快取系統所建立的Dex檔。而PathClassLoader此參數為null,只能載入內部儲存目錄的Dex檔。所以我們可以用DexClassLoader去載入外部的apk文件,這也是很多插件化技術的基礎。 
2、Service
理解Android的Service,可以從以下幾個面向來理解:
- Service是在main Thread中執行,Service中不能執行耗時操作(網路請求,拷貝資料庫,大檔案)。
- 可以在xml中設定Service所在的進程,讓Service在另外的進程中執行。
- Service執行的操作最多是20s,BroadcastReceiver是10s,Activity是5s。
- Activity透過bindService(Intent,ServiceConnection,flag)與Service綁定。
- Activity可以透過startService和bindService啟動Service。
IntentService
IntentService是一個抽象類,繼承自Service,內部存在一個ServiceHandler(Handler)和HandlerThread(Thread)。 IntentService是處理非同步請求的一個類,在IntentService中有一個工作執行緒(HandlerThread)來處理耗時操作,啟動IntentService的方式和普通的一樣,不過當執行完任務之後,IntentService會自動停止。另外可以多次啟動IntentService,每個耗時操作都會以工作佇列的形式在IntentService的onHandleIntent回呼中執行,並且每次執行一個工作執行緒。 IntentService的本質是:封裝了一個HandlerThread和Handler的非同步框架。
2.1、生命週期示意圖
Service 作為 Android四大元件之一,應用非常廣泛。和Activity一樣,Service 也有一系列的生命週期回檔函數,具體如下圖。 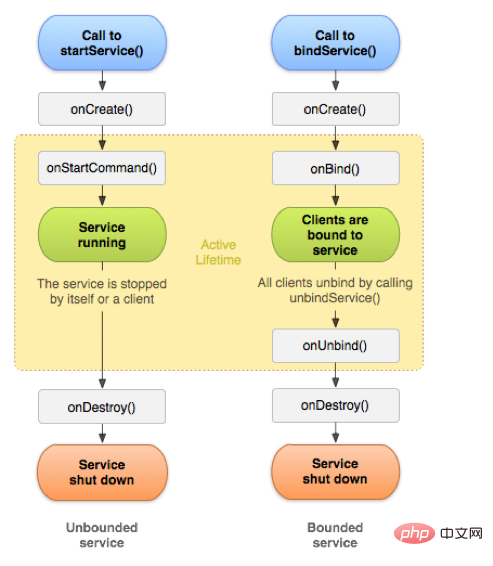
通常,啟動Service有兩種方式,startService和bindService方式。
2.2、startService生命週期
當我們透過呼叫了Context的startService方法後,我們便啟動了Service,透過startService方法啟動的Service會一直無限期地運行下去,只有在當外部呼叫Context的stopService或Service內部呼叫Service的stopSelf方法時,該Service才會停止運作並銷毀。
onCreate
onCreate: 執行startService方法時,如果Service沒有執行的時候會建立該Service並執行Service的onCreate回呼方法;如果Service已經處於執行中,那麼執行startService方法不會執行Service的onCreate方法。也就是說如果多次執行了Context的startService方法啟動Service,Service方法的onCreate方法只會在第一次建立Service的時候呼叫一次,以後都不會再呼叫。我們可以在onCreate方法中完成一些Service初始化相關的操作。
onStartCommand
onStartCommand: 在執行了startService方法之後,有可能會呼叫Service的onCreate方法,在這之後一定會執行Service的onStartCommand回呼方法。也就是說,如果多次執行了Context的startService方法,那麼Service的onStartCommand方法也會對應的多次呼叫。 onStartCommand方法很重要,我們在該方法中根據傳入的Intent參數進行實際的操作,例如會在此處建立一個執行緒用於下載資料或播放音樂等。
public @StartResult int onStartCommand(Intent intent, @StartArgFlags int flags, int startId) {
}當Android面臨記憶體匱乏的時候,可能會銷毀你目前執行的Service,然後待記憶體充足的時候可以重新建立Service,Service被Android系統強制銷毀並再次重建的行為依賴於Service中onStartCommand方法的回傳值。我們常用的回傳值有三種值,START_NOT_STICKY#、START_STICKY和START_REDELIVER_INTENT,這三個值都是Service中的靜態常數。
START_NOT_STICKY
如果返回START_NOT_STICKY,表示當Service運行的進程被Android系統強制殺死之後,不會重新建立該Service,當然如果在其被殺掉之後一段時間又呼叫了startService,那麼Service又會被實例化。那什麼情境下回傳該值比較恰當呢?如果我們某個Service執行的工作被中斷幾次無關緊要或者對Android內存緊張的情況下需要被殺掉且不會立即重新創建這種行為也可接受,那麼我們便可將onStartCommand的返回值設置為START_NOT_STICKY。舉個例子,某個Service需要定時從伺服器取得最新資料:透過一個計時器每隔指定的N分鐘讓定時器啟動Service去取得服務端的最新資料。當執行到Service的onStartCommand時,在該方法內再規劃一個N分鐘後的定時器用於再次啟動該Service並開闢一個新的執行緒去執行網路操作。假設Service在從伺服器取得最新資料的過程中被Android系統強制殺掉,Service不會再重新創建,這也沒關係,因為再過N分鐘定時器就會再次啟動該Service並重新取得資料。
START_STICKY
如果返回START_STICKY,表示Service運行的進程被Android系統強制殺死之後,Android系統會將該Service依然設定為started狀態(即運行狀態),但是不再儲存onStartCommand方法傳入的intent對象,然後Android系統會嘗試再次重新建立該Service,並執行onStartCommand回呼方法,但是onStartCommand回呼方法的Intent參數為null,也就是onStartCommand方法雖然會執行但是取得不到intent資訊。如果你的Service可以在任意時刻運行或結束都沒什麼問題,而且不需要intent訊息,那麼就可以在onStartCommand方法中返回START_STICKY,例如一個用來播放背景音樂功能的Service就適合返回該值。
START_REDELIVER_INTENT
如果傳回START_REDELIVER_INTENT,表示Service執行的程序被Android系統強制殺掉之後,與回傳START_STICKY的情況類似,Android系統會再次重新建立該Service,並執行onStartCommand回呼方法,但不同的是,Android系統會再次將Service在被殺之前最後一次傳入onStartCommand方法中的Intent再次保留下來並再次傳入到重新建立後的Service的onStartCommand方法中,這樣我們就能讀取到intent參數。只要回傳START_REDELIVER_INTENT,那麼onStartCommand重的intent一定不是null。如果我們的Service需要依賴特定的Intent才能運行(需要從Intent中讀取相關資料資訊等),並且在強制銷毀後有必要重新建立運行,那麼這樣的Service就適合傳回START_REDELIVER_INTENT。
onBind
Service中的onBind方法是抽象方法,所以Service類別本身就是抽象類,也就是onBind方法是必須重寫的,即使我們用不到。透過startService使用Service時,我們在重寫onBind方法時,只需要將其傳回null即可。 onBind方法主要用於給bindService方法呼叫Service時才會使用到。
onDestroy
onDestroy: 透過startService方法啟動的Service會無限期運行,只有當呼叫了Context的stopService或在Service內部呼叫stopSelf方法時,Service才會停止運行並銷毀,在銷毀的時候會執行Service回呼函數。
2.3、bindService生命週期
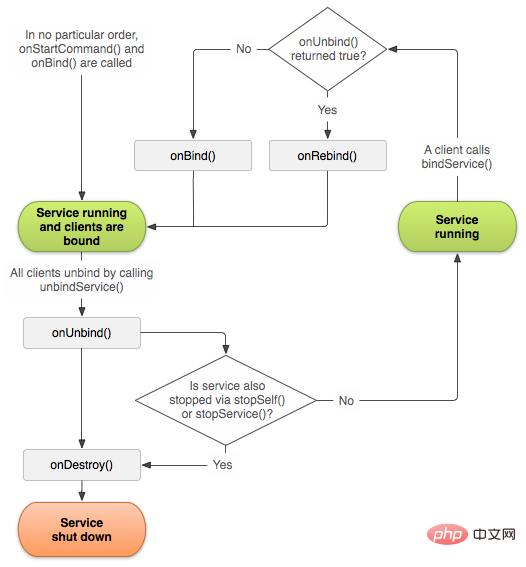
bindService方式啟動Service主要有以下生命週期函數:
onCreate():
首次建立服務時,系統將呼叫此方法。如果服務已在運行,則不會呼叫此方法,該方法只會呼叫一次。
onStartCommand():
當另一個元件透過呼叫startService()請求啟動服務時,系統將呼叫此方法。
onDestroy():
當服務不再使用且將被銷毀時,系統將呼叫此方法。
onBind():
當另一個元件透過呼叫bindService()與服務綁定時,系統將呼叫此方法。
onUnbind():
當另一個元件透過呼叫unbindService()與服務解綁時,系統將呼叫此方法。
onRebind():
當舊的元件與服務解綁後,另一個新的元件與服務綁定,onUnbind()傳回true時,系統會呼叫此方法。
3、fragemnt
3.1、创建方式
(1)静态创建
首先我们需要创建一个xml文件,然后创建与之对应的java文件,通过onCreatView()的返回方法进行关联,最后我们需要在Activity中进行配置相关参数即在Activity的xml文件中放上fragment的位置。
 <fragment
        android:name="xxx.BlankFragment"
        android:layout_width="match_parent"
        android:layout_height="match_parent">
</fragment>(2)动态创建
动态创建Fragment主要有以下几个步骤:
- 创建待添加的fragment实例。
- 获取FragmentManager,在Activity中可以直接通过调用 getSupportFragmentManager()方法得到。
- 开启一个事务,通过调用beginTransaction()方法开启。
- 向容器内添加或替换fragment,一般使用repalce()方法实现,需要传入容器的id和待添加的fragment实例。
- 提交事务,调用commit()方法来完成。
3.2、Adapter对比
FragmnetPageAdapter在每次切换页面时,只是将Fragment进行分离,适合页面较少的Fragment使用以保存一些内存,对系统内存不会多大影响。
FragmentPageStateAdapter在每次切换页面的时候,是将Fragment进行回收,适合页面较多的Fragment使用,这样就不会消耗更多的内存
3.3、Activity生命周期
Activity的生命周期如下图: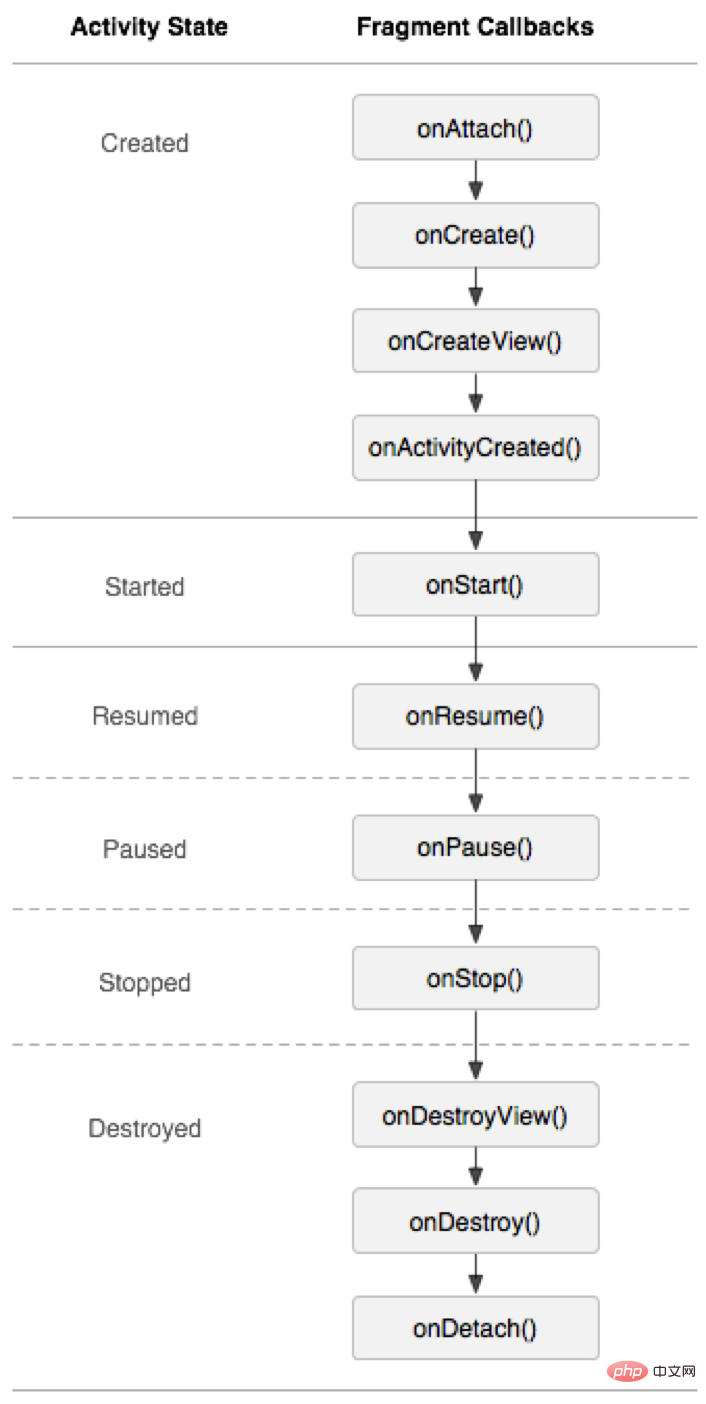
(1)动态加载:
动态加载时,Activity的onCreate()调用完,才开始加载fragment并调用其生命周期方法,所以在第一个生命周期方法onAttach()中便能获取Activity以及Activity的布局的组件;
(2)静态加载:
1.静态加载时,Activity的onCreate()调用过程中,fragment也在加载,所以fragment无法获取到Activity的布局中的组件,但为什么能获取到Activity呢?
2.原来在fragment调用onAttach()之前其实还调用了一个方法onInflate(),该方法被调用时fragment已经是和Activity相互结合了,所以可以获取到对方,但是Activity的onCreate()调用还未完成,故无法获取Activity的组件;
3.Activity的onCreate()调用完成是,fragment会调用onActivityCreated()生命周期方法,因此在这儿开始便能获取到Activity的布局的组件;
3.4、与Activity通信
fragment不通过构造函数进行传值的原因是因为横屏切换的时候获取不到值。
Activity向Fragment传值:
Activity向Fragment传值,要传的值放到bundle对象里;
在Activity中创建该Fragment的对象fragment,通过调用setArguments()传递到fragment中;
在该Fragment中通过调用getArguments()得到bundle对象,就能得到里面的值。
Fragment向Activity传值:
第一种:
在Activity中调用getFragmentManager()得到fragmentManager,,调用findFragmentByTag(tag)或者通过findFragmentById(id),例如:
FragmentManager fragmentManager = getFragmentManager();

Fragment fragment = fragmentManager.findFragmentByTag(tag);
第二种:
通过回调的方式,定义一个接口(可以在Fragment类中定义),接口中有一个空的方法,在fragment中需要的时候调用接口的方法,值可以作为参数放在这个方法中,然后让Activity实现这个接口,必然会重写这个方法,这样值就传到了Activity中
Fragment与Fragment之间是如何传值的:
第一种:
通过findFragmentByTag得到另一个的Fragment的对象,这样就可以调用另一个的方法了。
第二种:
通过接口回调的方式。
第三种:
通过setArguments,getArguments的方式。
3.5、api区别
add
一种是add方式来进行show和add,这种方式你切换fragment不会让fragment重新刷新,只会调用onHiddenChanged(boolean isHidden)。
replace
而用replace方式会使fragment重新刷新,因为add方式是将fragment隐藏了而不是销毁再创建,replace方式每次都是重新创建。
commit/commitAllowingStateLoss
两者都可以提交fragment的操作,唯一的不同是第二种方法,允许丢失一些界面的状态和信息,几乎所有的开发者都遇到过这样的错误:无法在activity调用了onSaveInstanceState之后再执行commit(),这种异常时可以理解的,界面被系统回收(界面已经不存在),为了在下次打开的时候恢复原来的样子,系统为我们保存界面的所有状态,这个时候我们再去修改界面理论上肯定是不允许的,所以为了避免这种异常,要使用第二种方法。
3.懶載入
我們常在使用fragment時,常常會結合viewpager使用,那麼我們就會遇到一個問題,就是初始化fragment的時候,會連同我們寫的網路請求一起執行,這樣非常消耗效能,最理想的方式是,只有當用戶點開或滑動到目前fragment時,才進行請求網路的操作。因此,我們就產生了懶加載這樣一個說法。
Viewpager配合fragment使用,預設載入前兩個fragment。容易造成網路丟包、阻斷等問題。
在Fragment中有一個setUserVisibleHint這個方法,而且這個方法是優於onCreate()方法的,它會透過isVisibleToUser告訴我們目前Fragment我們是否可見,我們可以在可見的時候再進行網頁載入。
從log上看setUserVisibleHint()的呼叫早於onCreateView,所以如果在setUserVisibleHint()要實現懶加載的話,就必須確保View以及其他變數都已經初始化結束,避免空指標。
使用步驟:
申明一個變數isPrepare=false,isVisible=false,標示目前頁面是否被建立了
在onViewCreated週期內設定isPrepare=true
在setUserVisibleHint( boolean isVisible)判斷是否顯示,設定isVisible=true
判斷isPrepare和isVisible,都為true開始載入數據,然後恢復isPrepare和isVisible為false,防止重複載入。
關於Android Fragment的懶加載,可以參考下面的連結:Fragment的懶加載
4、Activity
4.1、 Activity啟動流程
用戶從Launcher程式點擊應用程式圖示可啟動應用程式的入口Activity,Activity啟動時需要多個進程之間的交互,Android系統中有一個zygote進程專用於孵化Android框架層和應用程式層程式的進程。還有一個system_server進程,該進程裡運行了很多binder service。例如ActivityManagerService,PackageManagerService,WindowManagerService,這些binder service分別運行在不同的執行緒中,其中ActivityManagerService負責管理Activity堆疊,應用程式,task。
點擊Launcher圖示來啟動Activity
使用者在Launcher程式裡點擊應用程式圖示時,會通知ActivityManagerService啟動應用程式的入口Activity,ActivityManagerService發現這個應用程式還未啟動,則會通知Zygote進程孵化出應用程式,然後在這個dalvik應用程式裡執行ActivityThread的main方法。應用程式接下來通知ActivityManagerService應用程式已啟動,ActivityManagerService保存應用程式的一個代理對象,這樣ActivityManagerService可以透過這個代理程式對象控制應用程式,然後ActivityManagerService通知應用程式建立入口Activity的實例,並執行它的生命週期方法。
Android繪製流程視窗啟動流程分析
4.2、Activity生命週期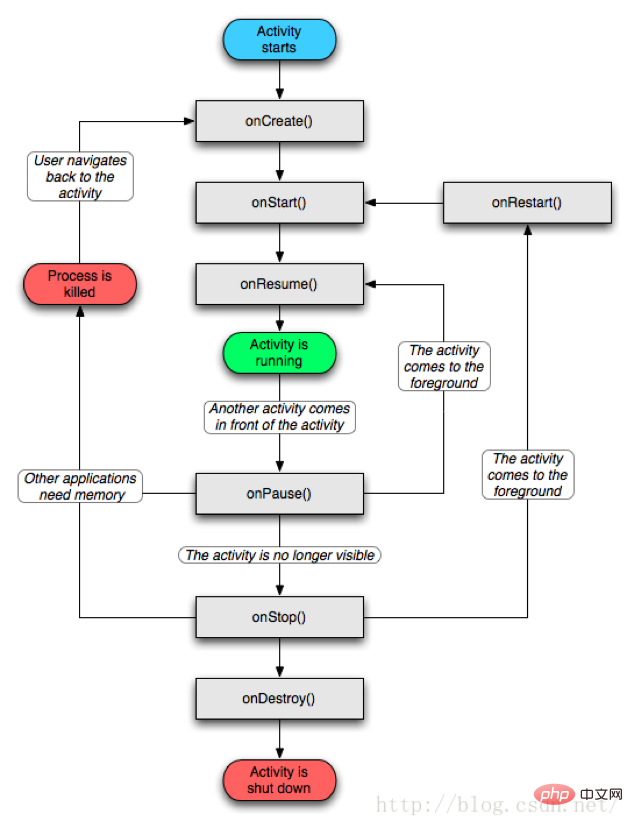
(1)Activity的形態
##Active/ Running:Activity處於活動狀態,此時Activity處於堆疊頂,是可見狀態,可與使用者互動。 Paused:當Activity失去焦點時,或被一個新的非全螢幕的Activity,或被一個透明的Activity放置在堆疊頂部時,Activity就轉化為Paused狀態。但我們需要明白,此時Activity只是失去了與使用者互動的能力,其所有的狀態資訊及其成員變數都還存在,只有在系統記憶體緊張的情況下,才有可能被系統回收。 Stopped:當一個Activity被另一個Activity完全覆蓋時,被覆蓋的Activity就會進入Stopped狀態,此時它不再可見,但是跟Paused狀態一樣保持著其所有狀態資訊及其成員變數。 Killed:當Activity被系統回收時,Activity就處於Killed狀態。 Activity會在以上四種形態中相互切換,至於如何切換,這會因使用者的操作不同而異。了解了Activity的4種形態後,我們就來聊聊Activity的生命週期。 Activity的生命週期所謂的典型的生命週期就是在有用戶參與的情況下,Activity經歷從創建,運行,停止,銷毀等正常的生命週期過程。 onCreate該方法是在Activity被建立時回調,它是生命週期第一個呼叫的方法,我們在創建Activity時一般都需要重寫該方法,然後在該方法中做一些初始化的操作,如透過setContentView設定介面佈局的資源,初始化所需的元件資訊等。 onStart此方法回呼時表示Activity正在啟動,此時Activity已處於可見狀態,但尚未在前台顯示,因此無法與使用者互動。可以簡單理解為Activity已顯示而我們無法看見擺了。onResume
When this method calls back, it means that the Activity is visible in the foreground and can interact with the user (in the Active/Running state mentioned earlier). The onResume method has two similarities with onStart. Everyone said that the Activity is visible, but when onStart is called back, the Activity is still in the background and cannot interact with the user, while onResume is already displayed in the foreground and can interact with the user. Of course, from the flow chart, we can also see that when the Activity stops (onPause method and onStop method are called), the onResume method will also be called when returning to the foreground, so we can also initialize some resources in the onResume method, such as re-initialization Resources released in the onPause or onStop method.
onPause
When this method is called back, it means that the Activity is stopping (Paused state). Under normal circumstances, the onStop method will be called back immediately. But through the flow chart, we can also see a situation where the onResume method is directly executed after the onPause method is executed. This is a relatively extreme phenomenon. This may be due to the user operation that caused the current Activity to retreat to the background and then quickly return to it. For the current Activity, the onResume method will be called back at this time. Of course, in the onPause method we can do some data storage or animation stopping or resource recycling operations, but it should not be too time-consuming, because this may affect the display of the new Activity - after the onPause method is executed, the onResume of the new Activity method will be executed.
onStop
Generally, it is executed directly after the onPause method is completed, indicating that the Activity is about to stop or is completely covered (Stopped state). At this time, the Activity is invisible and only runs in the background. Similarly, some resource release operations can be done in the onStop method (not too time-consuming).
onRestart
Indicates that the Activity is being restarted. When the Activity changes from invisible to visible, this method is called back. This situation is generally when the user opens a new Activity, the current Activity will be suspended (onPause and onStop are executed), and then when the user returns to the current Activity page, the onRestart method will be called back.
onDestroy
At this time, the Activity is being destroyed, and it is also the last method to be executed in the life cycle. Generally, we can do some recycling work and final resource release in this method.
Summary
Here we come to a summary. When Activity starts, onCreate(), onStart(), onResume() will be called in sequence, and when Activity retreats to the background (invisible , click Home or be completely covered by a new Activity), onPause() and onStop() will be called in sequence. When the Activity returns to the foreground (returns to the original Activity from the desktop or returns to the original Activity after being overwritten), onRestart(), onStart(), and onResume() will be called in sequence. When the Activity exits and is destroyed (click the back button), onPause(), onStop(), and onDestroy() will be called in sequence. At this point, the entire life cycle method callback of the Activity is completed. Now let's look back at the previous flow chart, it should be quite clear. Well, this is the entire typical life cycle process of Activity.
2. View knowledge points
The relationship between Android’s Activity, PhoneWindow and DecorView can be represented by the following diagram: 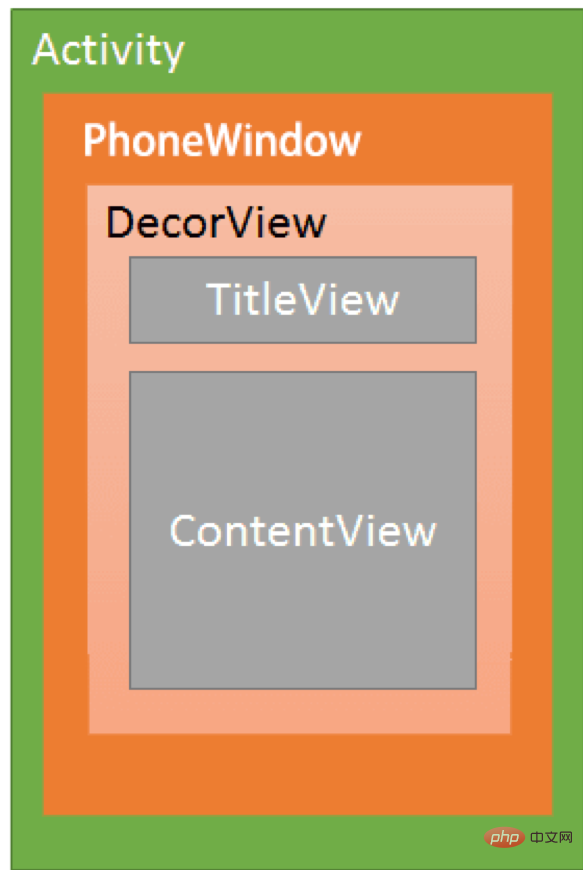
2.1, DecorView in brief Analysis
For example, there is the following view. DecorView is the top-level View of the entire Window interface. It has only one child element, LinearLayout. Represents the entire Window interface, including the notification bar, title bar, and content display bar. There are two FrameLayout child elements in LinearLayout. 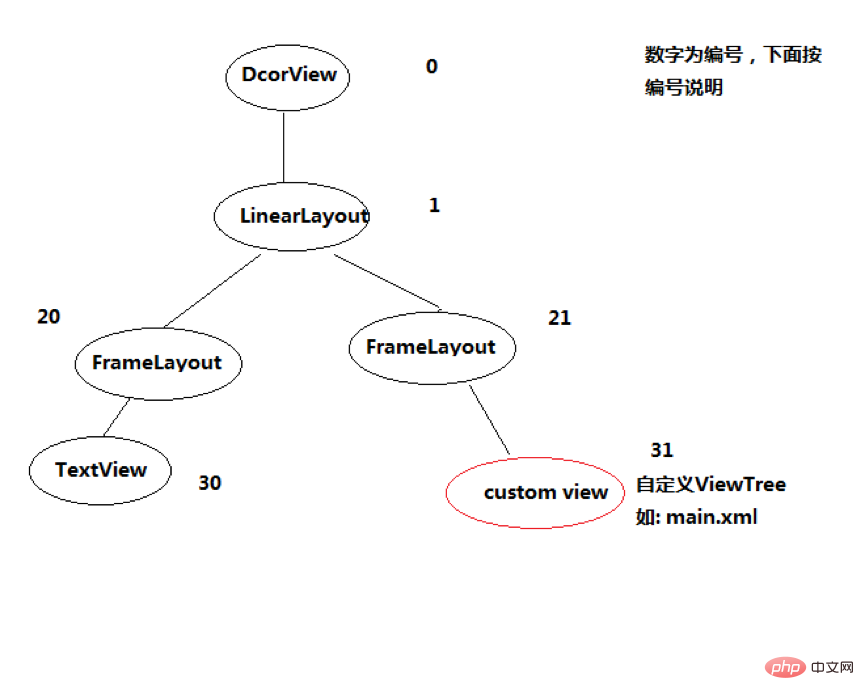
The role of DecorView
DecorView is a top-level View, which is essentially a FrameLayout. It contains two parts, the title bar and the content bar, both of which are FrameLayout. The content column id is content, which is the part of the activity where setContentView is set. Finally, the layout is added to the FrameLayout with the id of content.
Get content: ViewGroup content=findViewById(android.id.content)
Get the set View: getChildAt(0).
Usage summary
Each Activity contains a Window object, the Window object is usually implemented by PhoneWindow.
PhoneWindow: Set DecorView as the root View of the entire application window, which is the implementation class of Window. It is the most basic window system in Android. Each Activity creates a PhoneWindow object, which is the interface for interaction between Activity and the entire View system.
DecorView: It is the top-level view that presents the specific content to be displayed on PhoneWindow. DecorView is the ancestor of all Views in the current Activity. It does not present anything to the user.
2.2. View’s event distribution
View’s event distribution mechanism can be represented by the following figure: 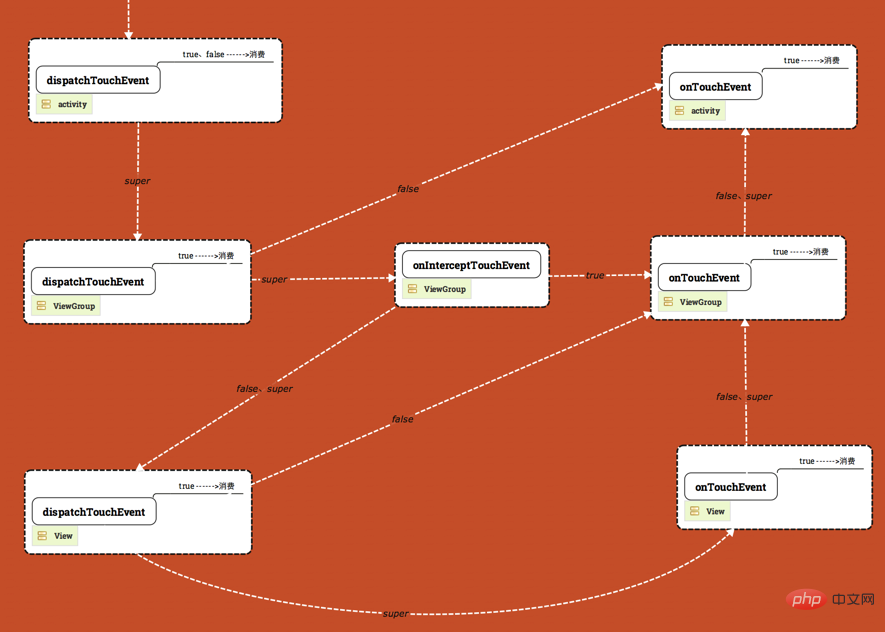
As shown in the figure above, the figure is divided into 3 layers, from top to top Next are Activity, ViewGroup, and View.
- The event starts from the white arrow in the upper left corner and is distributed by Activity's dispatchTouchEvent
- The words above the arrow represent the method return value, (return true, return false, return super.xxxxx(), super
means calling the parent class implementation. - There is a word [true---->Consumption] in the boxes of dispatchTouchEvent and onTouchEvent, which means that if the method returns true, then it means The event is consumed here and will not be transmitted to other places. The event is terminated.
- Currently all the events of the graph are for ACTION_DOWN. We will do the final analysis for ACTION_MOVE and ACTION_UP.
- Before The dispatchTouchEvent of the Activity in the picture is wrong (the picture has been fixed). Only return
super.dispatchTouchEvent(ev) goes down. If true or false is returned, the event will be consumed (termination of delivery).
ViewGroup event distribution
When a click event is generated, its delivery process will follow the following sequence:
Activity -> Window -> View
The event is always passed to the Activity, and then the Activity is passed to the Window, and finally the Window is passed to the top-level View. After receiving the event, the top-level View will distribute the event according to the event distribution mechanism. If a View's onTouchEvent returns FALSE , then the onTouchEvent of its parent container will be called, and so on. If none of them handle this event, then Activity will handle this event.
For the event distribution process of ViewGroup, it is probably like this : If the top-level ViewGroup interception event, that is, onInterceptTouchEvent, returns true, the event will be handed over to the ViewGroup for processing. If the ViewGroup's onTouchListener is set, then onTouch will be called, otherwise onTouchEvent will be called, that is to say: both If both are set, onTouch will block onTouchEvent. In onTouchEvent, if onClickerListener is set, then onClick will be called. If the top-level ViewGroup does not intercept it, the event will be passed to the child view of the click event where it is located. , at this time, the dispatchTouchEvent of the subview will be called
View's event distribution
dispatchTouchEvent -> onTouch(setOnTouchListener) -> onTouchEvent -> onClick
onTouch The difference between onTouchEvent
Both are called in dispatchTouchEvent. onTouch takes precedence over onTouchEvent. If onTouch returns true, then onTouchEvent will not be executed, and onClick will not be executed.
2.3. View drawing
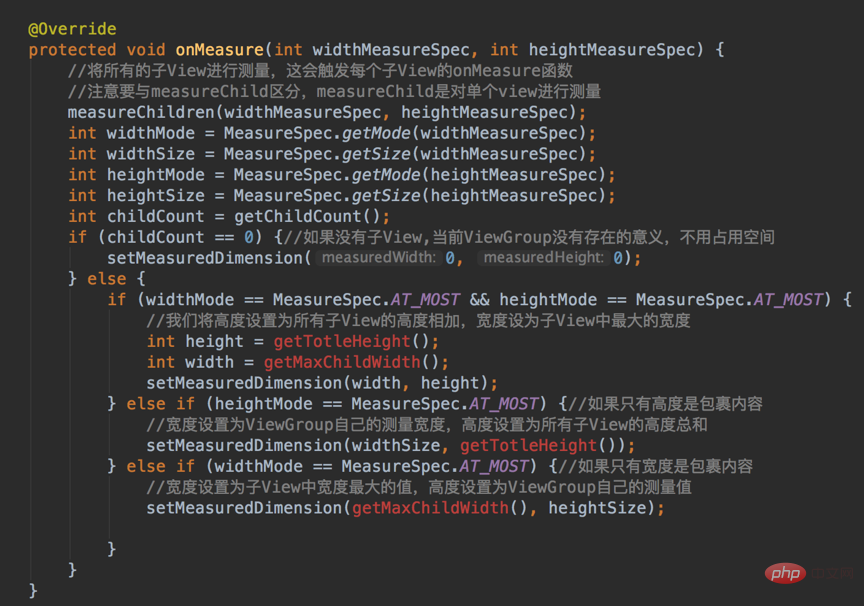
In the xml layout file, our layout_width and layout_height parameters do not need to write specific sizes, but wrap_content or match_parent. These two settings do not specify the actual size, but the View we draw on the screen must have a specific width and height. It is for this reason that we must handle and set the size ourselves. Of course, the View class provides default processing, but if the default processing of the View class does not meet our requirements, we have to rewrite the onMeasure function~.
The onMeasure function is an int integer, which contains the measurement mode and size. Int type data occupies 32 bits, and what Google implements is that the first 2 bits of the int data are used to distinguish different layout modes, and the next 30 bits store size data.
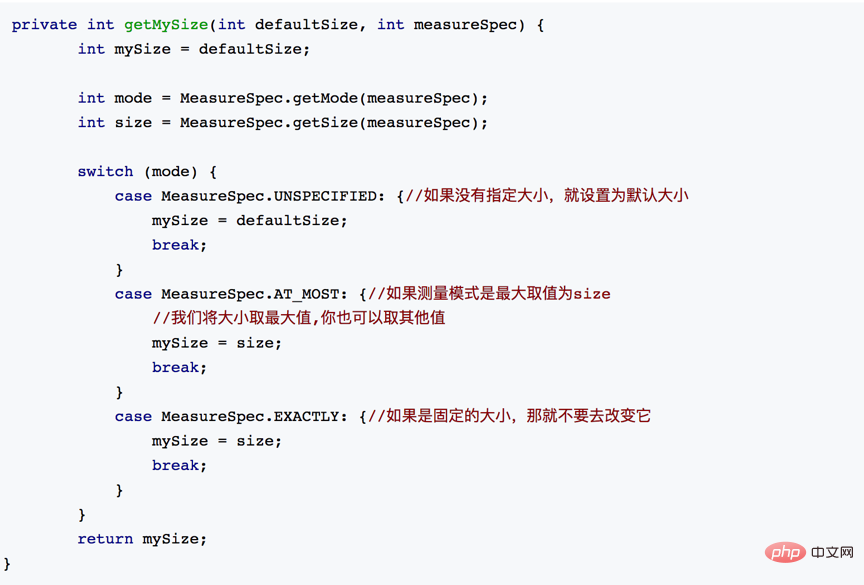
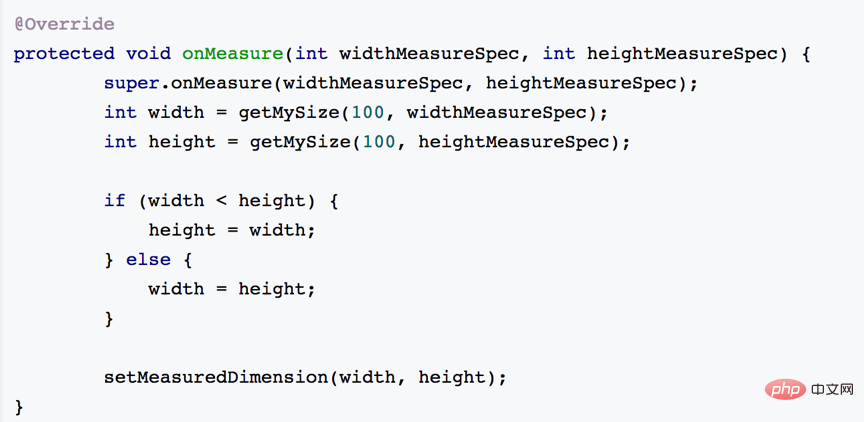
The use of the onMeasure function is as shown below: 
MeasureSpec has three measurement modes: 
match_parent—>EXACTLY. How to understand it? match_parent is to use all the remaining space provided by the parent View, and the remaining space of the parent View is determined, which is the size stored in the integer of this measurement mode.
wrap_content—>AT_MOST. How to understand: We want to set the size to wrap our view content, then the size is the size given to us by the parent View as a reference. As long as it does not exceed this size, the specific size will be set according to our needs.
Fixed size (such as 100dp)—>EXACTLY. If the user specifies the size, we don't need to interfere anymore. Of course, the specified size will be the main one.
2.4. Drawing of ViewGroup
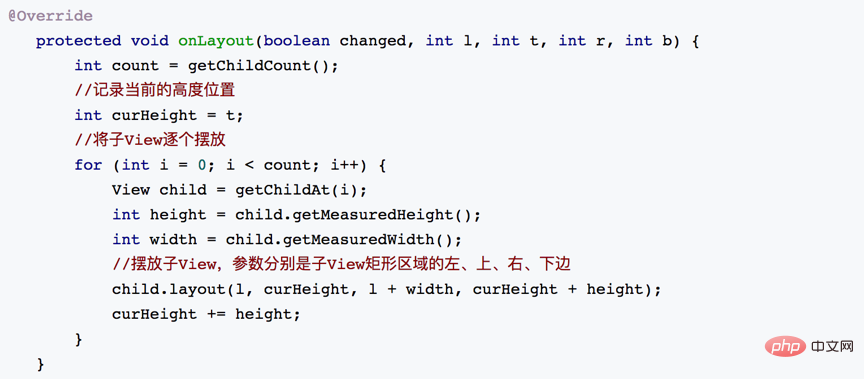
Customizing ViewGroup is not that simple~, because it not only needs to take care of itself , and its sub-Views must also be taken into consideration. We all know that ViewGroup is a View container, which holds the child View and is responsible for placing the child View in the specified location.
First of all, we have to know the size of each sub-View. Only by knowing the size of the sub-View first can we know how big the current ViewGroup should be to accommodate them.
Determine the size of the ViewGroup based on the size of the sub-View and the functions our ViewGroup wants to implement
ViewGroup和子View的大小算出来了之后,接下来就是去摆放了吧,具体怎么去摆放呢?这得根据你定制的需求去摆放了,比如,你想让子View按照垂直顺序一个挨着一个放,或者是按照先后顺序一个叠一个去放,这是你自己决定的。
已经知道怎么去摆放还不行啊,决定了怎么摆放就是相当于把已有的空间”分割”成大大小小的空间,每个空间对应一个子View,我们接下来就是把子View对号入座了,把它们放进它们该放的地方去。


自定义ViewGroup可以参考:Android自定义ViewGroup
3、系统原理
3.1、打包原理
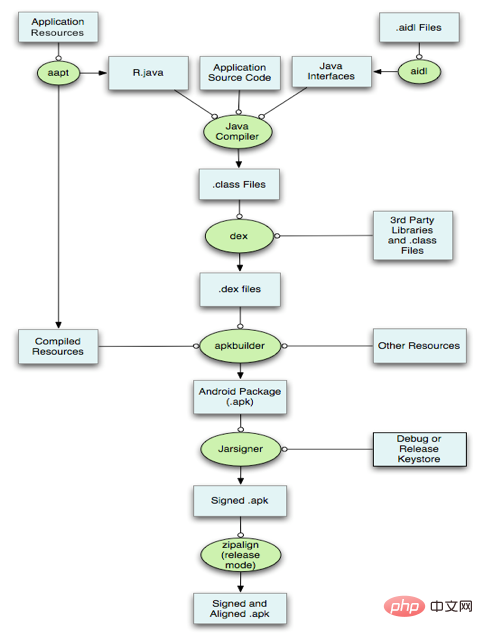
Android的包文件APK分为两个部分:代码和资源,所以打包方面也分为资源打包和代码打包两个方面,这篇文章就来分析资源和代码的编译打包原理。
具体说来:
- 通过AAPT工具进行资源文件(包括AndroidManifest.xml、布局文件、各种xml资源等)的打包,生成R.java文件。
- 通过AIDL工具处理AIDL文件,生成相应的Java文件。
- 通过Javac工具编译项目源码,生成Class文件。
- 通过DX工具将所有的Class文件转换成DEX文件,该过程主要完成Java字节码转换成Dalvik字节码,压缩常量池以及清除冗余信息等工作。
- 通过ApkBuilder工具将资源文件、DEX文件打包生成APK文件。
- 利用KeyStore对生成的APK文件进行签名。
- 如果是正式版的APK,还会利用ZipAlign工具进行对齐处理,对齐的过程就是将APK文件中所有的资源文件举例文件的起始距离都偏移4字节的整数倍,这样通过内存映射访问APK文件的速度会更快。
3.2、安装流程
Android apk的安装过程主要氛围以下几步:
- 复制APK到/data/app目录下,解压并扫描安装包。
- 资源管理器解析APK里的资源文件。
- 解析AndroidManifest文件,并在/data/data/目录下创建对应的应用数据目录。
- 然后对dex文件进行优化,并保存在dalvik-cache目录下。
- 将AndroidManifest文件解析出的四大组件信息注册到PackageManagerService中。
- 安装完成后,发送广播。
可以使用下面的图表示: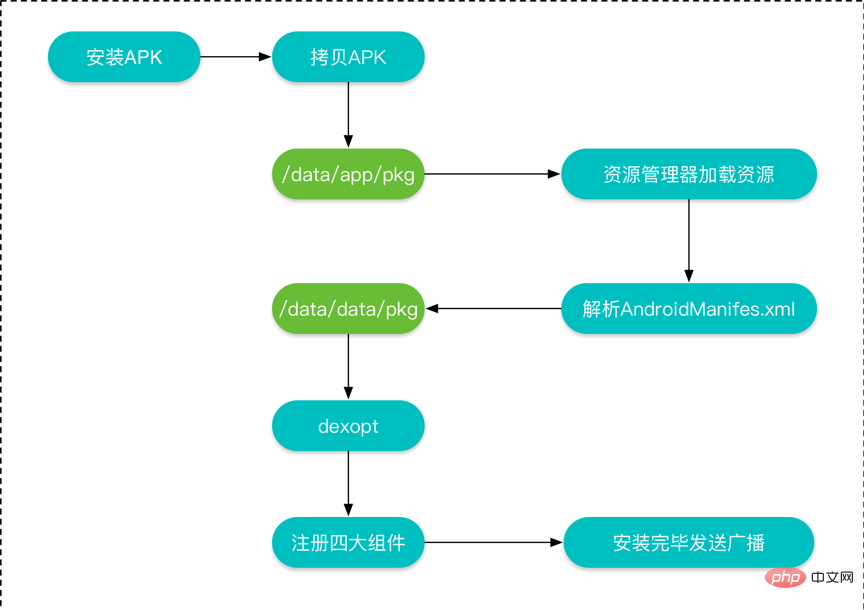
4、 第三方库解析
4.1、Retrofit网络请求框架
概念:Retrofit是一个基于RESTful的HTTP网络请求框架的封装,其中网络请求的本质是由OKHttp完成的,而Retrofit仅仅负责网络请求接口的封装。
原理:App应用程序通过Retrofit请求网络,实际上是使用Retrofit接口层封装请求参数,Header、URL等信息,之后由OKHttp完成后续的请求,在服务器返回数据之后,OKHttp将原始的结果交给Retrofit,最后根据用户的需求对结果进行解析。
retrofit使用
1.在retrofit中通过一个接口作为http请求的api接口
public interface NetApi {
    @GET("repos/{owner}/{repo}/contributors")
    Call<ResponseBody> contributorsBySimpleGetCall(@Path("owner") String owner, @Path("repo") String repo);
}2.创建一个Retrofit实例
Retrofit retrofit = new Retrofit.Builder()
        .baseUrl("https://api.github.com/")
.build();3.调用api接口
NetApi repo = retrofit.create(NetApi.class);

//第三步:调用网络请求的接口获取网络请求
retrofit2.Call<ResponseBody> call = repo.contributorsBySimpleGetCall("username", "path");
call.enqueue(new Callback<ResponseBody>() { //进行异步请求
    @Override
    public void onResponse(Call<ResponseBody> call, Response<ResponseBody> response) {
        //进行异步操作
    }

    @Override
    public void onFailure(Call<ResponseBody> call, Throwable t) {
        //执行错误回调方法
    }
});retrofit动态代理
retrofit执行的原理如下:
1.首先,通过method把它转换成ServiceMethod。
2.然后,通过serviceMethod,args获取到okHttpCall对象。
3.最后,再把okHttpCall进一步封装并返回Call对象。
首先,创建retrofit对象的方法如下:
Retrofit retrofit = new Retrofit.Builder()
        .baseUrl("https://api.github.com/")
.build();在创建retrofit对象的时候用到了build()方法,该方法的实现如下:
public Retrofit build() {
  if (baseUrl == null) {
    throw new IllegalStateException("Base URL required.");
  }

  okhttp3.Call.Factory callFactory = this.callFactory;
  if (callFactory == null) {
    callFactory = new OkHttpClient(); //设置kHttpClient
  }

  Executor callbackExecutor = this.callbackExecutor;
  if (callbackExecutor == null) {
    callbackExecutor = platform.defaultCallbackExecutor(); //设置默认回调执行器
  }

  // Make a defensive copy of the adapters and add the default Call adapter.
  List<CallAdapter.Factory> adapterFactories = new ArrayList<>(this.adapterFactories);
  adapterFactories.add(platform.defaultCallAdapterFactory(callbackExecutor));

  // Make a defensive copy of the converters.
  List<Converter.Factory> converterFactories = new ArrayList<>(this.converterFactories);

  return new Retrofit(callFactory, baseUrl, converterFactories, adapterFactories,
      callbackExecutor, validateEagerly); //返回新建的Retrofit对象
}该方法返回了一个Retrofit对象,通过retrofit对象创建网络请求的接口的方式如下:
NetApi repo = retrofit.create(NetApi.class);
retrofit对象的create()方法的实现如下:‘
public <T> T create(final Class<T> service) {
  Utils.validateServiceInterface(service);
  if (validateEagerly) {
    eagerlyValidateMethods(service);
  }
  return (T) Proxy.newProxyInstance(service.getClassLoader(), new Class<?>[] { service },
      new InvocationHandler() {
        private final Platform platform = Platform.get();

        @Override public Object invoke(Object proxy, Method method, Object... args)
            throws Throwable {
          // If the method is a method from Object then defer to normal invocation.
          if (method.getDeclaringClass() == Object.class) {
            return method.invoke(this, args); //直接调用该方法
          }
          if (platform.isDefaultMethod(method)) {
            return platform.invokeDefaultMethod(method, service, proxy, args); //通过平台对象调用该方法
          }
          ServiceMethod serviceMethod = loadServiceMethod(method); //获取ServiceMethod对象
          OkHttpCall okHttpCall = new OkHttpCall<>(serviceMethod, args); //传入参数生成okHttpCall对象
          return serviceMethod.callAdapter.adapt(okHttpCall); //执行okHttpCall
        }
      });
}4.2、图片加载库对比
Picasso:120K
Glide:475K
Fresco:3.4M
Android-Universal-Image-Loader:162K
图片函数库的选择需要根据APP的具体情况而定,对于严重依赖图片缓存的APP,例如壁纸类,图片社交类APP来说,可以选择最专业的Fresco。对于一般的APP,选择Fresco会显得比较重,毕竟Fresco3.4M的体量摆在这。根据APP对图片的显示和缓存的需求从低到高,我们可以对以上函数库做一个排序。
Picasso < Android-Universal-Image-Loader < Glide < Fresco
2. Introduction:
Picasso: It can work best together with Square's network library, because Picasso can choose to hand over the caching part of the network request to okhttp implementation.
Glide: It imitates Picasso's API and adds a lot of extensions (such as gif and other support). Glide's default Bitmap format is RGB_565, which has higher memory overhead than Picasso's default ARGB_8888 format. Half smaller; Picasso caches the full size (only caches one type), while Glide caches the same size as the ImageView (that is, 5656 and 128128 are two caches).
FB's image loading framework Fresco: The biggest advantage lies in bitmap loading below 5.0 (minimum 2.3). In systems below 5.0, Fresco places images in a special memory area (Ashmem area). Of course, when the picture is not displayed, the occupied memory will be automatically released. This will make the APP smoother and reduce OOM caused by image memory usage. Why is it said to be below 5.0? Because after 5.0, the system defaults to storing it in the Ashmem area.
3. Summary:
Glide can do all the functions that Picasso can achieve, but the required settings are different. However, the size of Picasso is much smaller than that of Glide. If the network request in the project itself uses okhttp or retrofit (the essence is still okhttp), then it is recommended to use Picasso, which will be much smaller (the work of Square family bucket). The advantage of Glide is large picture streams, such as GIF and Video. If you are making video applications such as Meipai and Aipai, it is recommended to use it.
Fresco's memory optimization below 5.0 is very good, but the price is that the volume is also very large. Fresco>Glide>Picasso
However, it is also somewhat inconvenient to use (small suggestion: he These functions can only be realized with a built-in ImageView, which is troublesome to use. We usually modify it according to Fresco and directly use his Bitmap layer)
4.3. Use of various json parsing libraries
Reference link: https://www.cnblogs.com/kunpengit/p/4001680.html
(1) Google’s Gson
Gson is currently the most comprehensive Json parser An artifact, Gson was originally developed by Google in response to Google's internal needs. However, since the first version was publicly released in May 2008, it has been used by many companies or users. The application of Gson mainly consists of two conversion functions: toJson and fromJson. It has no dependencies and does not require additional jars. It can run directly on the JDK. Before using this kind of object conversion, you need to create the object type and its members before you can successfully convert the JSON string into the corresponding object. As long as there are get and set methods in the class, Gson can completely convert complex types of json to beans or beans to json. It is an artifact of JSON parsing. Gson is impeccable in terms of functionality, but its performance is lagging behind FastJson.
(2) Alibaba’s FastJson
Fastjson is a high-performance JSON processor written in Java language, developed by Alibaba.
No dependencies, no need for extra jars, and can run directly on the JDK. FastJson will have some problems when converting complex types of beans to Json. Reference types may appear, causing Json conversion errors, and references need to be specified. FastJson uses an original algorithm to increase the speed of parse to the extreme, surpassing all json libraries.
To sum up the comparison of Json technology, Google's Gson and Alibaba's FastJson can be used in parallel when selecting projects. If it is just a functional requirement and no performance requirements, you can use Google's Gson. If you have performance requirements, you can use Gson to convert beans to json to ensure the accuracy of the data. Use FastJson to convert Json to beans
5. Hotspot technology
Reference link - Android componentization solution
5.1. Componentization
(1) Concept:
Componentization: It is to divide an APP into multiple modules. Each module is a component or a basic library. Component dependencies, some components can be debugged separately during development. The components do not need to depend on each other but can call each other. When finally released, all components are packaged into an apk in the form of lib by the main APP project dependency.
(2) Origin:
- APP version iteration, new functions are constantly added, the business becomes complex, and maintenance costs are high
- The business coupling is high, the code is bloated, and the team internal Difficulty in multi-person collaborative development
- Android compilation code is stuck, and the code coupling in a single project is serious. Modifying one part requires recompiling and packaging, which is time-consuming and labor-intensive.
- Convenient for unit testing, you can change one business module alone without focusing on other modules.
(3) Advantages:
- Componentization separates common modules and manages them uniformly to improve reuse and split the page into components with smaller granularity. The component contains UI implementation, and can also include data layer and logic layer
- Each component can be compiled independently, speeding up compilation, and packaged independently.
- Modifications within each project will not affect other projects.
- Business library projects can be quickly separated and integrated into other apps.
- Business modules with frequent iterations adopt a component approach. Business line research and development can not interfere with each other, improve collaboration efficiency, control product quality, and enhance stability.
- Parallel development, team members only focus on small modules developed by themselves, reducing coupling and facilitating later maintenance.
(4) Consideration issues:
Mode switching: How to make the APP freely switch between individual debugging and overall debugging
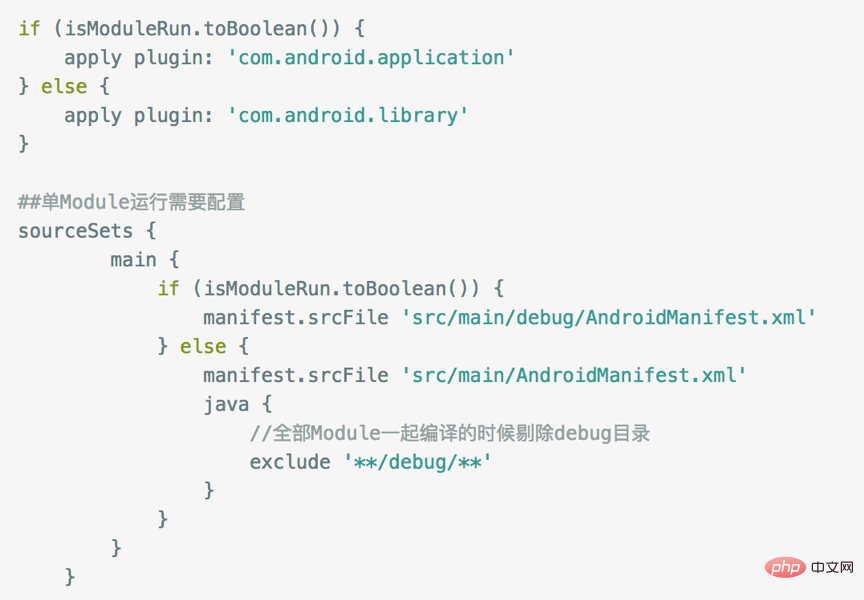
Each business module after componentization It can be a separate APP (isModuleRun=false). When releasing the package, each business module is used as a lib dependency. This is completely controlled by a variable. In the root project gradle.properties, isModuleRun=true. The isModuleRun status is different, and the loading application and AndroidManifest are different to distinguish whether it is an independent APK or a lib.
Configure in build.grade:
Resource conflict
How to resolve the same resources when we create multiple Modules Conflicts in file name merging. Duplicate names of business Module and BaseModule resource files will cause conflicts. The solution is:
Each module has app_name. In order to prevent duplicate resource names, in the build of each component. Add resourcePrefix "xxx_ to forcibly check the resource name prefix in gradle. Fix the resource prefix of each component. However, the resourcePrefix value can only limit the resources in xml, and cannot limit image resources.
Dependencies
How to reference some common libraries and tool classes between multiple Modules
Component communication
After componentization, Modules are isolated from each other, how to perform UI jumps and methods To call, you can use routing frameworks such as Alibaba ARouter or Meituan's WMRouter.
Each business module does not need any dependencies before and can be jumped through routing, perfectly solving the coupling between businesses.
Entry parameters
We know that components are related, so how to get the parameters passed by other Modules when debugging alone
Application
When the component is alone When running, each Module forms its own APK, which means there will be multiple Applications. Obviously we don't want to write so much code repeatedly, so we only need to define one BaseApplication, and other Applications directly inherit this BaseApplication. That's OK. Public parameters can also be defined in BaseApplication.
Regarding how to implement componentization, you can refer to: Anjuke Android Project Architecture Evolution
5.2, Plug-inization
Reference link - Introduction to plug-in
(1) Overview
When it comes to plug-in, we have to mention the problem that the number of methods exceeds 65535. We can solve it through Dex subcontracting, and we can also Solved by using plug-in development. The concept of plug-in is for the host APP to load and run the plug-in APP.
(2 advantages)
In a large project, in order to have a clear division of labor , often different teams are responsible for different plug-in APPs, so the division of labor is clearer. Each module is encapsulated into different plug-in APKs, and different modules can be compiled separately, which improves development efficiency.
Solve the above problem of the number of methods exceeding the limit. Online bugs can be solved by launching new plug-ins to achieve a "hot fix" effect.
Reduced the size of the host APK.
(3 Disadvantages)
Apps developed as plug-ins cannot be launched on Google Play, which means there is no overseas market.
6. Screen adaptation
6.1. Basic concepts
Screen size
Meaning: The physical size unit of the diagonal of the mobile phone: inches (inch) , 1 inch = 2.54cm
The common sizes of Android phones are 5 inches, 5.5 inches, 6 inches, 6.5 inches, etc.
Screen resolution
Meaning: The phone is in The sum of the number of pixels in the horizontal and vertical directions
is generally described as the "width x height" =AxB of the screen. Meaning: The screen has A pixels in the horizontal direction (width), and in the vertical direction
(Height) has B pixels Example: 1080x1920, that is, there are 1080 pixels in the width direction and 1920 pixels in the height direction
Unit: px (pixel), 1px=1 pixel
UI designer’s design drawings will use px as a unified unit of measurement
Common resolutions for Android phones: 320x480, 480x800, 720x1280, 1080x1920
Screen pixel density
Meaning: Number of pixels per inch Unit: dpi (dots per ich)
Assuming there are 160 pixels per inch in the device, then the screen pixel density of the device =160dpi
6.2. Adaptation method
1. Support various screen sizes: Use wrap_content, match_parent, weight. To ensure the flexibility of the layout and adapt to various screen sizes, you should use "wrap_content", "match_parent" control the width and height of certain view components.
2. Use relative layout and disable absolute layout.
3. Use the weight attribute of LinearLayout
What if our width is not 0dp (wrap_content and 0dp have the same effect), but match_parent?
The true meaning of android:layout_weight is: If the View sets this attribute and it is valid, then the width of the View is equal to the original width (android:layout_width) plus the proportion of the remaining space.
From this perspective, let’s explain the above phenomenon. In the above code, we set the width of each Button to match_parent. Assuming the screen width is L, then the width of each Button should also be L, and the remaining width is equal to L-(L L) = -L.
Button1’s weight=1, and the remaining width ratio is 1/(1 2)= 1/3, so the final width is L 1/3*(-L)=2/3L. The calculation of Button2 is similar , the final width is L 2/3(-L)=1/3L.
4. Use .9 pictures
6.3. Today’s Toutiao screen adaptation
Reference link: Today’s Toutiao screen adaptation solution ultimate version
7. Performance Optimization
Reference link: Android performance monitoring tool, methods to optimize memory, lag, power consumption, and APK size
Performance optimization of Android is mainly optimized from the following aspects:
Stable (memory overflow, crash)
Smooth (stuck)
Consumption (power consumption, traffic)
Installation package (APK slimming)
There are many reasons that affect stability, such as unreasonable memory usage , Inadequate consideration of code exception scenarios, unreasonable code logic, etc. will all affect the stability of the application. The two most common scenarios are: Crash and ANR. These two errors will make the program unusable. Therefore, do a good job in global monitoring of Crash, handle crashes, and collect and record crash information and exception information for subsequent analysis; rationally use the main thread to process business, and do not perform time-consuming operations in the main thread to prevent ANR programs from becoming unresponsive.
(1) Stability - Memory Optimization
(1) Memory Monitor tool:
It is a memory monitoring tool that comes with Android Studio. It can be used very well. Help us perform real-time analysis of memory. By clicking the Memory Monitor tab in the lower right corner of Android Studio and opening the tool, you can see that the lighter blue represents free memory, while the darker part represents the used memory. From the memory transformation trend chart, you can determine the memory usage status, for example When the memory continues to increase, memory leaks may occur; when the memory suddenly decreases, GC, etc. may occur, as shown in the figure below.
LeakCanary tool:
LeakCanary is an open source framework developed by Square based on MAT to monitor Android memory leaks. The working principle is:
The monitoring mechanism uses Java's WeakReference and ReferenceQueue. By packaging the Activity into WeakReference, if the Activity object wrapped by WeakReference is recycled, the WeakReference reference will be placed in the ReferenceQueue. Through monitoring The content in the ReferenceQueue can be used to check whether the Activity can be recycled (it is stated in the ReferenceQueue that it can be recycled, and there is no leak; otherwise, there may be a leak. LeakCanary executes GC once. If it is not in the ReferenceQueue, it will be considered a leak. ).
If the Activity is determined to be leaked, grab the memory dump file (Debug.dumpHprofData); then analyze the memory file through HeapAnalyzerService.runAnalysis; then analyze the memory through HeapAnalyzer (checkForLeak—findLeakingReference—findLeakTrace) Leak analysis. Finally, the memory leak is displayed through DisplayLeakService.
(3) Android Lint Tool:
Android Lint Tool is an Android code prompt tool integrated with Android Sutido. It can provide very powerful help for your layout and code. Hard coding will prompt a level warning. For example: writing three redundant LinearLayout layouts in the layout file, writing the text to be displayed directly in TextView, and using dp instead of sp as the unit for the font size will appear on the right side of the editor. See the prompt.
(2) Smoothness - Stuttering Optimization
Stuttering scenarios usually occur in the most direct aspects of user interaction experience. The two major factors that affect lag are interface drawing and data processing.
Interface drawing: The main reason is that the drawing level is deep, the page is complex, and the refresh is unreasonable. Due to these reasons, stuck scenes more often appear in the UI, the initial interface after startup, and the drawing that jumps to the page. superior.
Data processing: The reason for this lagging scenario is that the amount of data processing is too large, which is generally divided into three situations. One is that the data is processed in the UI thread, and the other is that the data processing takes up a lot of CPU, causing the main thread to The time slice cannot be obtained. Third, the increase in memory leads to frequent GC, which causes lags.
(1) Layout optimization
When the Android system measures, layouts and draws Views, it operates by traversing the number of Views. If the height of a View number is too high, it will seriously affect the speed of measurement, layout and drawing. Google also recommends in its API documentation that the View height should not exceed 10 layers. In the current version, Google uses RelativeLayout instead of LineraLayout as the default root layout. The purpose is to reduce the height of the layout tree generated by LineraLayout nesting, thereby improving the efficiency of UI rendering.
Layout reuse, use labels to reuse layout;
Increase display speed, use delayed View loading;
Reduce levels, use labels to replace parent layout;
Note that using wrap_content will increase measure Calculate cost;
Delete useless attributes in controls;
(2)Drawing optimization
Overdrawing means that a certain pixel on the screen is drawn too many times in the same frame. Second-rate. In a multi-level overlapping UI structure, if the invisible UI is also performing drawing operations, it will cause certain pixel areas to be drawn multiple times, thus wasting redundant CPU and GPU resources. How to avoid overdrawing?
Layout optimization. Remove unnecessary backgrounds in XML, remove Window's default background, and display placeholder background images on demand
Customized View optimization. Use canvas.clipRect() to help the system identify those visible areas, and only within this area will be drawn.
(3) Startup optimization
Apps generally have a splash screen page SplashActivity, which optimizes the UI layout of the splash screen page and can detect frame loss through Profile GPU Rendering.
(3) Savings - Power Consumption Optimization
Before Android 5.0, the test of application power consumption was troublesome and inaccurate. After 5.0, Google specially introduced a device to obtain API for power consumption information——Battery Historian. Battery Historian is an Android system power analysis tool provided by Google. It visually displays the power consumption process of the mobile phone and displays the consumption situation by inputting the power analysis file.
Finally, some methods for power consumption optimization are provided for reference:
(1) Calculation optimization. Algorithm, for loop optimization, Switch...case instead of if...else, avoiding floating point operations.
Floating point arithmetic: In computers, integers and decimals are stored in normal formats, such as 1024, 3.1415926, etc. This has no characteristics, but the accuracy of such numbers is not high, and the expression is not comprehensive enough. In order to be able to have A universal representation of numbers, floating point numbers were invented. The representation of floating point numbers is a bit like scientific notation (.×10***), its representation is 0.*****×10, the form in the computer is .*** e ±**), where the first asterisk represents a fixed-point decimal, that is, a pure decimal with the integer part being 0, and the following The exponent part of is a fixed-point integer. Any integer or decimal can be expressed using this form. For example, 1024 can be expressed as 0.1024×10^4, which is .1024e 004, and 3.1415926 can be expressed as 0.31415926×10^1, which is .31415926e 001. This It's a floating point number. The operations performed on floating point numbers are floating point operations. Floating-point operations are more complex than regular operations, so computers perform floating-point operations much slower than regular operations.
(2) Avoid improper use of Wake Lock.
Wake Lock is a lock mechanism, mainly relative to the sleep of the system. As long as someone holds this lock, the system cannot enter sleep. This means that my program has added this lock to the CPU. The system will not sleep. The purpose of this is to fully cooperate with the operation of our program. In some cases, if you do not do this, some problems will occur. For example, heartbeat packets for instant messaging such as WeChat will stop network access shortly after the screen is turned off. Therefore, Wake_Lock is used extensively in WeChat. In order to save power, the system automatically goes to sleep when the CPU is not busy with tasks. When there is a task that needs to wake up the CPU for efficient execution, a Wake_Lock will be added to the CPU. A common mistake everyone makes is that it is easy to wake up the CPU to work, but it is easy to forget to release Wake_Lock.
(3) Use Job Scheduler to manage background tasks.
In Android 5.0 API 21, Google provides a component called JobScheduler API to handle the scenario of executing a task at a certain point in time or when a specific condition is met, such as when the user performs a task at night When resting or when the device is connected to the power adapter and connected to WiFi, it starts the task of downloading updates. This can improve application efficiency while reducing resource consumption.
(4) Installation package - APK slimming
(1) Structure of the installation package
assets folder. To store some configuration files and resource files, assets will not automatically generate corresponding IDs, but will obtain them through the interface of the AssetManager class.
res. res is the abbreviation of resource. This directory stores resource files. The corresponding ID will be automatically generated and mapped to the .R file. Use the resource ID directly for access.
META-INF. Save the application's signature information, which can verify the integrity of the APK file.
AndroidManifest.xml. This file is used to describe the configuration information of the Android application, the registration information of some components, usable permissions, etc.
classes.dex. Dalvik bytecode program makes the Dalvik virtual machine executable. Generally, Android applications use the dx tool in the Android SDK to convert Java bytecode into Dalvik bytecode when packaging.
resources.arsc. It records the mapping relationship between resource files and resource IDs, and is used to find resources based on resource IDs.
(2) Reduce the installation package size
Code obfuscation. Use the proGuard code obfuscator tool that comes with the IDE, which includes compression, optimization, obfuscation and other functions.
Resource optimization. For example, use Android Lint to delete redundant resources, minimize resource files, etc.
Image optimization. For example, use PNG optimization tools to compress images. Recommend the most advanced compression tool Googlek open source library zopfli. If the application is version 0 or above, it is recommended to use the WebP image format.
Avoid third-party libraries with duplicate or useless functionality. For example, Baidu Maps can be connected to the basic map, iFlytek Voice does not need to be connected offline, the picture library Glide\Picasso, etc.
Plug-in development. For example, functional modules are placed on the server and downloaded on demand, which can reduce the size of the installation package.
You can use the WeChat open source resource file obfuscation tool-AndResGuard. Generally, the apk size can be compressed to about 1M.
7.1. Cold start and warm start
Reference link: https://www.jianshu.com/p/03c0fd3fc245
Cold start
When starting the application, there is no process for the application in the system. At this time, the system will create a new process and assign it to the application;
Hot start
When starting the application , there is already a process of the application in the system (for example: press the back key or home key, although the application will exit, the process of the application will still remain in the background);
Difference
Cold start: The system does not have a process for the application, and a new process needs to be created and assigned to the application, so the Application class will be created and initialized first, then the MainActivity class (including a series of measurements, layout, and drawing) will be created and initialized, and finally displayed on the interface. Hot start: Start from an existing process. The Application class will not be created and initialized. The MainActivity class will be created and initialized directly (including a series of measurements, layout, and drawing), and finally displayed on the interface.
Cold start process
Fork creates a new process in the Zygote process; creates and initializes the Application class, creates MainActivity; inflate layout, when onCreate/onStart/onResume methods are all gone Finished; contentView's measure/layout/draw is displayed on the interface.
Cold start optimization
Reduce the workload in the onCreate() method of Application and the first Activity; Do not let Application participate in business operations; Do not perform time-consuming operations in Application ; Do not save data in Application in the form of static variables; Reduce the complexity and depth of the layout;
8. MVP pattern architecture
8.1. MVP pattern
MVP architecture Developed from MVC. In MVP, M stands for Model, V stands for View, and P stands for Presenter.
Model layer (Model): Mainly used to obtain data functions, business logic and entity models.
View layer (View): corresponds to Activity or Fragment, responsible for partial display of the view and business logic user interaction
Control layer (Presenter): responsible for completing the interaction between the View layer and the Model layer , obtain the data in the M layer through the P layer and return it to the V layer, so that there is no coupling between the V layer and the M layer.
In MVP, the Presenter layer completely separates the View layer and the Model layer, and implements the main program logic in the Presenter layer. The Presenter is not directly related to the specific View layer (Activity), but is implemented through Define an interface for interaction, so that when the View layer (Activity) changes, the Presenter can still remain unchanged. The View layer interface class should only have set/get methods, and some interface display content and user input. In addition, there should be no redundant content. The View layer is never allowed to directly access the Model layer. This is the biggest difference from MVC and the core advantage of MVP.
9. Virtual machine
9.1. Comparison between Android Dalvik virtual machine and ART virtual machine
Dalvik
Android4.4 and earlier use Dalvik Virtual machine, we know that during the packaging process, Apk will first compile java and other source codes into .class files through javac, but our Dalvik virtual machine will only execute .dex files. At this time, dx will convert the .class files into Dalvik virtual machines. .dex file for machine execution. When the Dalvik virtual machine starts, it will first convert the .dex file into a fast-running machine code. Because of the problem of 65535, we have a co-packaging process when the application is cold-started. The final result is our The app starts slowly. This is the JIT feature (Just In Time) of the Dalvik virtual machine.
ART
The ART virtual machine is an Android virtual machine that was only started to be used in Android 5.0. The ART virtual machine must be compatible with the characteristics of the Dalvik virtual machine, but ART has a very good feature AOT (ahead of time), this feature is that when we install the APK, we directly process dex into machine code that can be directly used by the ART virtual machine. The ART virtual machine converts the .dex file into an .oat file that can be directly run. ART The virtual machine inherently supports multiple dexes, so there is no synchronization process, so the ART virtual machine greatly improves the APP cold start speed.
ART advantages:
Speed up APP cold start speed
Improve GC speed
提供功能全面的Debug特性
ART缺点:
APP安装速度慢,因为在APK安装的时候要生成可运行.oat文件
APK占用空间大,因为在APK安装的时候要生成可运行.oat文件
arm处理器
关于ART更详细的介绍,可以参考Android ART详解
总结
熟悉Android性能分析工具、UI卡顿、APP启动、包瘦身和内存性能优化
熟悉Android APP架构设计,模块化、组件化、插件化开发
熟练掌握Java、设计模式、网络、多线程技术
Java基本知识点
1、Java的类加载过程
jvm将.class类文件信息加载到内存并解析成对应的class对象的过程,注意:jvm并不是一开始就把所有的类加载进内存中,只是在第一次遇到某个需要运行的类才会加载,并且只加载一次
主要分为三部分:1、加载,2、链接(1.验证,2.准备,3.解析),3、初始化
1:加载
类加载器包括 BootClassLoader、ExtClassLoader、APPClassLoader
2:链接
验证:(验证class文件的字节流是否符合jvm规范)
准备:为类变量分配内存,并且进行赋初值
解析:将常量池里面的符号引用(变量名)替换成直接引用(内存地址)过程,在解析阶段,jvm会把所有的类名、方法名、字段名、这些符号引用替换成具体的内存地址或者偏移量。
3:初始化
主要对类变量进行初始化,执行类构造器的过程,换句话说,只对static修试的变量或者语句进行初始化。
范例:Person person = new Person();为例进行说明。
Java编程思想中的类的初始化过程主要有以下几点:
- 找到class文件,将它加载到内存
- 在堆内存中分配内存地址
- 初始化
- 将堆内存地址指给栈内存中的p变量
2、String、StringBuilder、StringBuffer
StringBuffer里面的很多方法添加了synchronized关键字,是可以表征线程安全的,所以多线程情况下使用它。
执行速度:
StringBuilder > StringBuffer > String
StringBuilder牺牲了性能来换取速度的,这两个是可以直接在原对象上面进行修改,省去了创建新对象和回收老对象的过程,而String是字符串常量(final)修试,另外两个是字符串变量,常量对象一旦创建就不可以修改,变量是可以进行修改的,所以对于String字符串的操作包含下面三个步骤:
- 创建一个新对象,名字和原来的一样
- 在新对象上面进行修改
- 原对象被垃圾回收掉
3、JVM内存结构
Java对象实例化过程中,主要使用到虚拟机栈、Java堆和方法区。Java文件经过编译之后首先会被加载到jvm方法区中,jvm方法区中很重的一个部分是运行时常量池,用以存储class文件类的版本、字段、方法、接口等描述信息和编译期间的常量和静态常量。
3.1、JVM基本结构
类加载器classLoader,在JVM启动时或者类运行时将需要的.class文件加载到内存中。
执行引擎,负责执行class文件中包含的字节码指令。
本地方法接口,主要是调用C/C++实现的本地方法及返回结果。
内存区域(运行时数据区),是在JVM运行的时候操作所分配的内存区,
主要分为以下五个部分,如下图: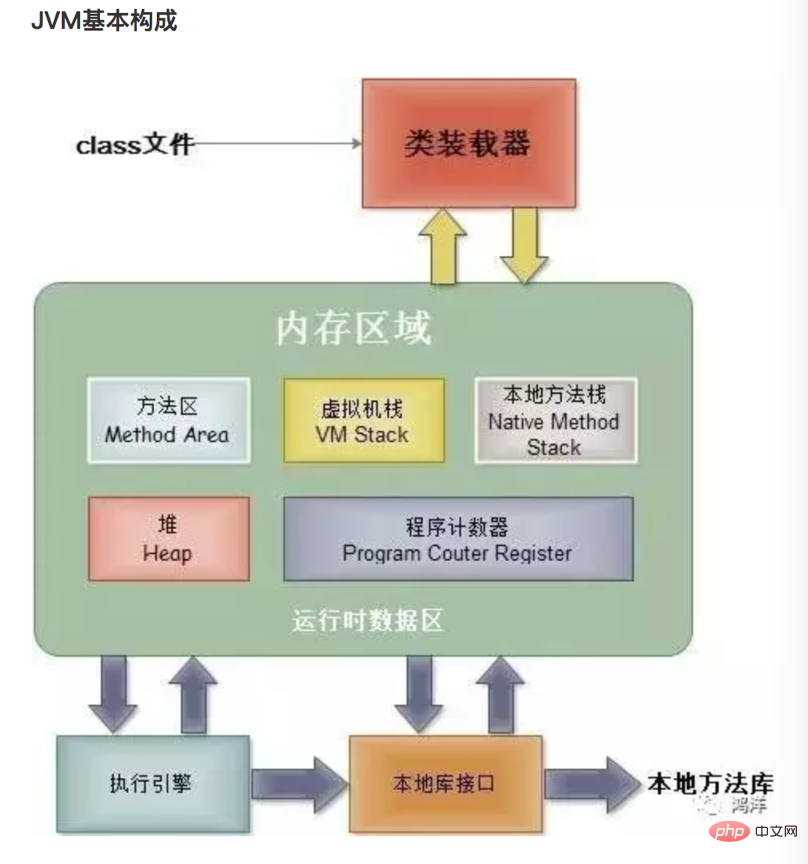
- 方法区:用于存储类结构信息的地方,包括常量池、静态变量、构造函数等。
- Java堆(heap):存储Java实例或者对象的地方。这块是gc的主要区域。
- Java栈(stack):Java栈总是和线程关联的,每当创建一个线程时,JVM就会为这个线程创建一个对应的Java栈。在这个java栈中又会包含多个栈帧,每运行一个方法就创建一个栈帧,用于存储局部变量表、操作栈、方法返回值等。每一个方法从调用直至执行完成的过程,就对应一个栈帧在java栈中入栈到出栈的过程。所以java栈是线程私有的。
- 程序计数器:用于保存当前线程执行的内存地址,由于JVM是多线程执行的,所以为了保证线程切换回来后还能恢复到原先状态,就需要一个独立的计数器,记录之前中断的地方,可见程序计数器也是线程私有的。
- 本地方法栈:和Java栈的作用差不多,只不过是为JVM使用到的native方法服务的。
3.2、JVM源码分析
https://www.jianshu.com/nb/12554212
4、GC机制
垃圾收集器一般完成两件事
- 检测出垃圾;
- 回收垃圾;
4.1 Java对象引用
通常,Java对象的引用可以分为4类:强引用、软引用、弱引用和虚引用。
强引用:通常可以认为是通过new出来的对象,即使内存不足,GC进行垃圾收集的时候也不会主动回收。
Object obj = new Object();
软引用:在内存不足的时候,GC进行垃圾收集的时候会被GC回收。
Object obj = new Object();
SoftReference<Object> softReference = new SoftReference<>(obj);
弱引用:无论内存是否充足,GC进行垃圾收集的时候都会回收。
Object obj = new Object();
WeakReference<Object> weakReference = new WeakReference<>(obj);
虚引用:和弱引用类似,主要区别在于虚引用必须和引用队列一起使用。
Object obj = new Object();
ReferenceQueue<Object> referenceQueue = new ReferenceQueue<>();
PhantomReference<Object> phantomReference = new PhantomReference<>(obj, referenceQueue);
引用队列:如果软引用和弱引用被GC回收,JVM就会把这个引用加到引用队列里,如果是虚引用,在回收前就会被加到引用队列里。
垃圾检测方法:
引用计数法:给每个对象添加引用计数器,每个地方引用它,计数器就+1,失效时-1。如果两个对象互相引用时,就导致无法回收。
可达性分析算法:以根集对象为起始点进行搜索,如果对象不可达的话就是垃圾对象。根集(Java栈中引用的对象、方法区中常量池中引用的对象、本地方法中引用的对象等。JVM在垃圾回收的时候,会检查堆中所有对象是否被这些根集对象引用,不能够被引用的对象就会被垃圾回收器回收。)
垃圾回收算法:
常见的垃圾回收算法有:
标记-清除
标记:首先标记所有需要回收的对象,在标记完成之后统计回收所有被标记的对象,它的标记过程即为上面的可达性分析算法。
清除:清除所有被标记的对象
缺点:
效率不足,标记和清除效率都不高
空间问题,标记清除之后会产生大量不连续的内存碎片,导致大对象分配无法找到足够的空间,提前进行垃圾回收。
复制回收算法
将可用的内存按容量划分为大小相等的2块,每次只用一块,当这一块的内存用完了,就将存活的对象复制到另外一块上面,然后把已使用过的内存空间一次清理掉。
缺点:
将内存缩小了原本的一般,代价比较高
大部分对象是“朝生夕灭”的,所以不必按照1:1的比例划分。
现在商业虚拟机采用这种算法回收新生代,但不是按1:1的比例,而是将内存区域划分为eden 空间、from 空间、to 空间 3 个部分。
其中 from 空间和 to 空间可以视为用于复制的两块大小相同、地位相等,且可进行角色互换的空间块。from 和 to 空间也称为 survivor 空间,即幸存者空间,用于存放未被回收的对象。
在垃圾回收时,eden 空间中的存活对象会被复制到未使用的 survivor 空间中 (假设是 to),正在使用的 survivor 空间 (假设是 from) 中的年轻对象也会被复制到 to 空间中 (大对象,或者老年对象会直接进入老年带,如果 to 空间已满,则对象也会直接进入老年代)。此时,eden 空间和 from 空间中的剩余对象就是垃圾对象,可以直接清空,to 空间则存放此次回收后的存活对象。这种改进的复制算法既保证了空间的连续性,又避免了大量的内存空间浪费。
标记-整理
在老年代的对象大都是存活对象,复制算法在对象存活率教高的时候,效率就会变得比较低。根据老年代的特点,有人提出了“标记-压缩算法(Mark-Compact)”
标记过程与标记-清除的标记一样,但后续不是对可回收对象进行清理,而是让所有的对象都向一端移动,然后直接清理掉端边界以外的内存。
这种方法既避免了碎片的产生,又不需要两块相同的内存空间,因此,其性价比比较高。
分带收集算法
根据对象存活的周期不同将内存划分为几块,一般是把Java堆分为老年代和新生代,这样根据各个年代的特点采用适当的收集算法。
新生代每次收集都有大量对象死去,只有少量存活,那就选用复制算法,复制的对象数较少就可完成收集。
老年代对象存活率高,使用标记-压缩算法,以提高垃圾回收效率。
5、类加载器
程序在启动的时候,并不会一次性加载程序所要用的所有class文件,而是根据程序的需要,通过Java的类加载机制(ClassLoader)来动态加载某个class文件到内存当中的,从而只有class文件被载入到了内存之后,才能被其它class所引用。所以ClassLoader就是用来动态加载class文件到内存当中用的。
5.1、双亲委派原理
每个ClassLoader实例都有一个父类加载器的引用(不是继承关系,是一个包含的关系),虚拟机内置的类加载器(Bootstrap ClassLoader)本身没有父类加载器,但是可以用做其他ClassLoader实例的父类加载器。
当一个ClassLoader 实例需要加载某个类时,它会试图在亲自搜索这个类之前先把这个任务委托给它的父类加载器,这个过程是由上而下依次检查的,首先由顶层的类加载器Bootstrap CLassLoader进行加载,如果没有加载到,则把任务转交给Extension CLassLoader视图加载,如果也没有找到,则转交给AppCLassLoader进行加载,还是没有的话,则交给委托的发起者,由它到指定的文件系统或者网络等URL中进行加载类。还没有找到的话,则会抛出CLassNotFoundException异常。否则将这个类生成一个类的定义,并将它加载到内存中,最后返回这个类在内存中的Class实例对象。
5.2、 为什么使用双亲委托模型
JVM在判断两个class是否相同时,不仅要判断两个类名是否相同,还要判断是否是同一个类加载器加载的。
避免重复加载,父类已经加载了,则子CLassLoader没有必要再次加载。
考虑安全因素,假设自定义一个String类,除非改变JDK中CLassLoader的搜索类的默认算法,否则用户自定义的CLassLoader如法加载一个自己写的String类,因为String类在启动时就被引导类加载器Bootstrap CLassLoader加载了。
关于Android的双亲委托机制,可以参考android classloader双亲委托模式
6、集合
Java集合类主要由两个接口派生出:Collection和Map,这两个接口是Java集合的根接口。
Collection接口是集合类的根接口,Java中没有提供这个接口的直接的实现类。但是却让其被继承产生了两个接口,就是 Set和List。Set中不能包含重复的元素。List是一个有序的集合,可以包含重复的元素,提供了按索引访问的方式。
Map是Java.util包中的另一个接口,它和Collection接口没有关系,是相互独立的,但是都属于集合类的一部分。Map包含了key-value对。Map不能包含重复的key,但是可以包含相同的value。
6.1、区别
List,Set都是继承自Collection接口,Map则不是;
List特点:元素有放入顺序,元素可重复; Set特点:元素无放入顺序,元素不可重复,重复元素会覆盖掉,(注意:元素虽然无放入顺序,但是元素在set中的位置是有该元素的HashCode决定的,其位置其实是固定的,加入Set 的Object必须定义equals()方法;
LinkedList、ArrayList、HashSet是非线程安全的,Vector是线程安全的;
HashMap是非线程安全的,HashTable是线程安全的;
6.2、List和Vector比较
Vector是多线程安全的,线程安全就是说多线程访问同一代码,不会产生不确定的结果。而ArrayList不是,这个可以从源码中看出,Vector类中的方法很多有synchronized进行修饰,这样就导致了Vector在效率上无法与ArrayList相比;
两个都是采用的线性连续空间存储元素,但是当空间不足的时候,两个类的增加方式是不同。
Vector可以设置增长因子,而ArrayList不可以。
Vector是一种老的动态数组,是线程同步的,效率很低,一般不赞成使用。
6.3、HashSet如何保证不重复
HashSet底层通过HashMap来实现的,在往HashSet中添加元素是
public boolean add(E e) {
return map.put(e, PRESENT)==null;
}


// Dummy value to associate with an Object in the backing Map
private static final Object PRESENT = new Object();在HashMap中进行查找是否存在这个key,value始终是一样的,主要有以下几种情况:
- 如果hash码值不相同,说明是一个新元素,存;
- 如果hash码值相同,且equles判断相等,说明元素已经存在,不存;
- 如果hash码值相同,且equles判断不相等,说明元素不存在,存;
- 如果有元素和传入对象的hash值相等,那么,继续进行equles()判断,如果仍然相等,那么就认为传入元素已经存在,不再添加,结束,否则仍然添加;
6.4、HashSet与Treeset的适用场景
- HashSet是基于Hash算法实现的,其性能通常都优于TreeSet。为快速查找而设计的Set,我们通常都应该使用HashSet,在我们需要排序的功能时,我们才使用TreeSet。
- TreeSet 是二叉树(红黑树的树据结构)实现的,Treeset中的数据是自动排好序的,不允许放入null值
- HashSet是哈希表实现的,HashSet中的数据是无序的,可以放入null,但只能放入一个null,两者中的值都不能重复,就如数据库中唯一约束。
- HashSet是基于Hash算法实现的,其性能通常都优于TreeSet。为快速查找而设计的Set,我们通常都应该使用HashSet,在我们需要排序的功能时,我们才使用TreeSet。
6.5、HashMap与TreeMap、HashTable的区别及适用场景
HashMap 非线程安全,基于哈希表(散列表)实现。使用HashMap要求添加的键类明确定义了hashCode()和equals()[可以重写hashCode()和equals()],为了优化HashMap空间的使用,您可以调优初始容量和负载因子。其中散列表的冲突处理主要分两种,一种是开放定址法,另一种是链表法。HashMap的实现中采用的是链表法。
TreeMap:非线程安全基于红黑树实现,TreeMap没有调优选项,因为该树总处于平衡状态
7、 常量池
7.1、Interger中的128(-128~127)
当数值范围为-128~127时:如果两个new出来Integer对象,即使值相同,通过“”比较结果为false,但两个对象直接赋值,则通过“”比较结果为“true,这一点与String非常相似。
当数值不在-128~127时,无论通过哪种方式,即使两个对象的值相等,通过“”比较,其结果为false;
当一个Integer对象直接与一个int基本数据类型通过“”比较,其结果与第一点相同;
Integer对象的hash值为数值本身;
@Override
public int hashCode() {
return Integer.hashCode(value);
}7.2、为什么是-128-127?
在Integer类中有一个静态内部类IntegerCache,在IntegerCache类中有一个Integer数组,用以缓存当数值范围为-128~127时的Integer对象。
8、泛型
泛型是Java SE 1.5的新特性,泛型的本质是参数化类型,也就是说所操作的数据类型被指定为一个参数。这种参数类型可以用在类、接口和方法的创建中,分别称为泛型类、泛型接口、泛型方法。 Java语言引入泛型的好处是安全简单。
泛型的好处是在编译的时候检查类型安全,并且所有的强制转换都是自动和隐式的,提高代码的重用率。
它提供了编译期的类型安全,确保你只能把正确类型的对象放入 集合中,避免了在运行时出现ClassCastException。
使用Java的泛型时应注意以下几点:
- 泛型的类型参数只能是类类型(包括自定义类),不能是简单类型。
- 同一种泛型可以对应多个版本(因为参数类型是不确定的),不同版本的泛型类实例是不兼容的。
- 泛型的类型参数可以有多个。
- 泛型的参数类型可以使用extends语句,例如。习惯上称为“有界类型”。
- 泛型的参数类型还可以是通配符类型。例如Class> classType =
Class.forName(“java.lang.String”);
8.1 T泛型和通配符泛型
- ? 表示不确定的java类型。
- T 表示java类型。
- K V 分别代表java键值中的Key Value。
- E 代表Element。
8.2 泛型擦除
Java中的泛型基本上都是在编译器这个层次来实现的。在生成的Java字节码中是不包含泛型中的类型信息的。使用泛型的时候加上的类型参数,会在编译器在编译的时候去掉。这个过程就称为类型擦除。
泛型是通过类型擦除来实现的,编译器在编译时擦除了所有类型相关的信息,所以在运行时不存在任何类型相关的信息。例如 List在运行时仅用一个List来表示。这样做的目的,是确保能和Java 5之前的版本开发二进制类库进行兼容。你无法在运行时访问到类型参数,因为编译器已经把泛型类型转换成了原始类型。
8.3 限定通配符
限定通配符对类型进行了限制。
One is extends T> which sets the upper bound of the type by ensuring that the type must be a subclass of T.
The other is super T> which sets the upper bound of the type by ensuring that the type must be a subclass of T. parent class to set the lower bound of the type.
On the other hand, > represents an unqualified wildcard character, because > can be replaced by any type.
For example, List extends Number> can accept List or List.
8.4 Generics Interview Questions
Can you pass a List to a method that accepts a List parameter?
For anyone who is not familiar with generics, this Java generics question may seem confusing, because at first glance String is a kind of Object, so List should be used wherever List is needed. ,But that is not the case. Doing so will cause compilation errors. If you think about it further, you will find that it makes sense for Java to do this, because List can store any type of object including String, Integer, etc., but List can only be used to store Strings.
Can generics be used in Array?
Array actually does not support generics, which is why Joshua Bloch suggested using List instead of Array in the book Effective Java, because List can Provides compile-time type safety guarantees, while Array does not.
What is the difference between List and primitive type List in Java?
The main difference between primitive types and parameterized types is that the compiler does not perform type safety on primitive types at compile time Check, but the type with parameters will be checked. By using Object as the type, you can tell the compiler that the method can accept any type of object, such as String or Integer. The test point of this question lies in the correct understanding of primitive types in generics. The second difference between them is that you can pass any type with parameters to the primitive type List, but you cannot pass a List to a method that accepts a List, because a compilation error will occur.
List> is a List of unknown type, and List is actually a List of any type. You can assign List, List to List>, but you cannot assign List to List.
9. Reflection
9.1. Concept
The JAVA reflection mechanism is that in the running state, for any class, all properties and methods of the class can be known; for Any object can call any of its methods; this dynamic acquisition of information and the function of dynamically calling the object's methods are called the reflection mechanism of the Java language.
9.2. Function
The Java reflection mechanism mainly provides the following functions: Determine the class to which any object belongs at runtime; Construct an object of any class at runtime; Determine any class at runtime; Member variables and methods owned by a class; calling methods of any object at runtime; generating dynamic proxies.
10. Agent
You must be very familiar with the word agent, because you have come into contact with it a lot in reality. In fact, things in reality can reflect the abstract process of the pattern very vividly and intuitively. Nature. Isn't the house very noisy now? Let’s take a house as an example to remove the veil of agency.
Suppose you have a house to sell. One way is to post the sale information directly online, and then directly take the people who want to buy the house to see the house, transfer the ownership, etc. until the house is sold, but it may be difficult for you to do so. If you are busy, you don't have time to deal with these things, so you can go to an intermediary and let the intermediary help you handle these trivial things. The intermediary is actually your agent. It was originally something you had to do, but now the intermediary helps you handle it one by one. For the buyer, there is no difference between direct transactions with you and direct transactions with the intermediary. The buyer may not even be aware of your existence. This is actually a part of the agency. Maximum benefit.
Next let’s consider in depth why you don’t buy a house directly but need an agent? In fact, one question exactly answers the question of when to use the proxy mode.
Reason 1: You may work out of town, and house buyers cannot find you for direct transactions.
Corresponds to our program design: the client cannot directly operate the actual object. So why can't it be done directly? One situation is that the object you need to call is on another machine, and you need to access it across the network. If you call it directly by coding, you need to process the network connection, package, unpack and other very complicated steps, so In order to simplify the processing of the client, we use the proxy mode to establish a proxy for the remote object on the client. The client calls the proxy just like calling the local object, and then the proxy contacts the actual object. For the client, there may be no It feels like the thing being called is on the other end of the network. This is actually how Web Service works. In another case, although the object you want to call is local, because the call is very time-consuming, you are afraid of affecting your normal operations, so you specially find an agent to handle this time-consuming situation. One of the easiest to understand is in Word There is a large picture installed. When word is opened, we must load the content inside and open it together. However, if the user waits until the large picture is loaded before opening Word, the user may have already jumped in the waiting, so we can Set up a proxy and let the proxy slowly open the image without affecting the original opening function of Word. Let me clarify that I just guessed that Word might do this. I don’t know exactly how it is done.
Reason 2: You don’t know how to go through the transfer procedures, or in addition to what you can do now, you need to do other things to achieve your goal.
Corresponds to our program design: in addition to the functions that the current class can provide, we also need to add some other functions. The easiest situation to think of is permission filtering. I have a class that does a certain business, but due to security reasons only certain users can call this class. At this time, we can make a proxy class of this class, requiring all requests to pass through This proxy class will make permission judgment. If it is safe, the business of the actual class will be called to start processing. Some people may ask why I need to add an additional proxy class? I just need to add permission filtering to the method of the original class, right? In programming, there is a problem of the unity principle of classes. This principle is very simple, that is, the function of each class is as single as possible. Why should it be single? Because only a class with a single function will be least likely to be changed. Take the example just now, if you put the permission judgment in the current class, the current class must be responsible for its own business logic, Also responsible for permission judgment, there are two reasons for the change of this class. Now if the permission rules change, this class must be changed. Obviously this is not a good design.
Okay, I’ve pretty much talked about the principles. If I continue to talk about it endlessly, everyone may throw bricks. Haha, let’s see how to implement agency next.
Data structure and algorithm
https://zhuanlan.zhihu.com/p/27005757?utm_source=weibo&utm_medium=social
http://crazyandcoder.tech/2016 /09/14/android algorithm and data structure - sorting/
1. Sorting
Sorting has internal sorting and external sorting. Internal sorting is to sort data records in memory, while external sorting This is because the sorted data is very large and cannot accommodate all the sorted records at one time. During the sorting process, external memory needs to be accessed.
1.1. Direct insertion sort
Idea:
Sort the first number and the second number, and then form an ordered sequence
Sort the third number The numbers are inserted into it to form a new ordered sequence.
Repeat the second step for the fourth number, the fifth number... until the last number.
Code:
First set the number of insertions, that is, the number of loops, for (int i=1;i
2. Design patterns
Reference: Some design patterns in Android development
2.1. Singleton design pattern
Single cases are mainly divided into: lazy people Type singleton, Hungry style singleton, registered singleton.
Features:
- The singleton class has only one instance
- The singleton class must create its own unique instance
- The singleton class must give All other objects provide this instance.
In computer systems, thread pools, caches, log objects, dialog boxes, printers, etc. are often designed as singletons.
Lazy singleton:
Singleton avoids the class from being instantiated externally by limiting the construction method to private. Within the scope of the same virtual machine, the only instance of Singleton can only pass the getInstance() method. access. (In fact, it is possible to instantiate classes with private constructors through the Java reflection mechanism, which will basically invalidate all Java singleton implementations. 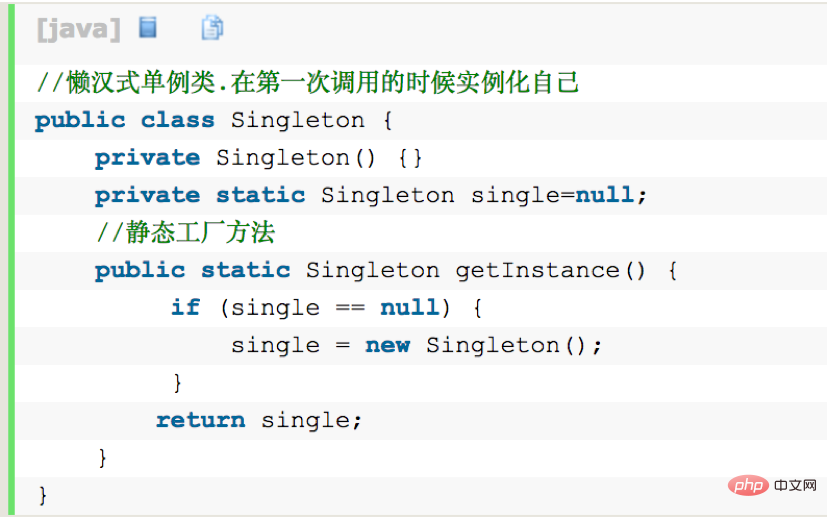
It is thread-unsafe and concurrent It is very likely that there will be multiple Singleton instances. To achieve thread safety, there are the following three ways:
1. Add synchronization to the getInstance method 
2. Double check locking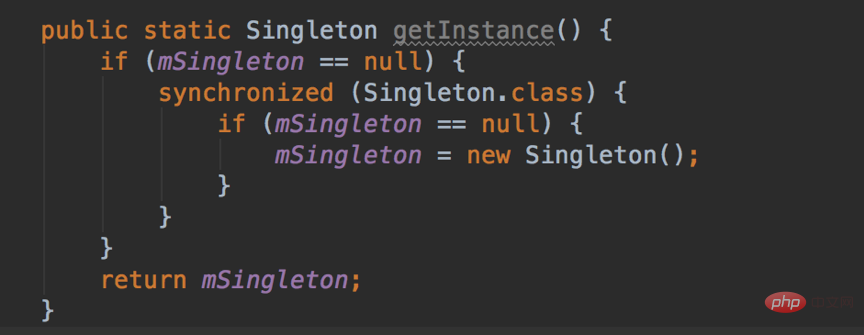
3. Static inner class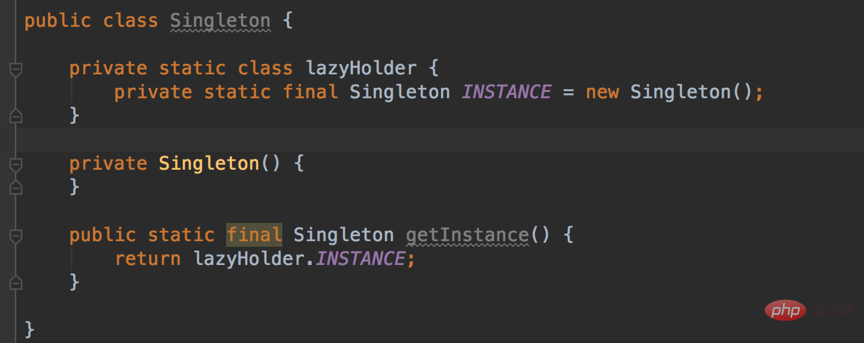
Compared with the first two methods, this method not only achieves thread safety, but also avoids the performance impact caused by synchronization.
Hungry Han style singleton:
Hungry Han style has already created a static object for system use when creating the class, and it will not change in the future, so it is inherently system safe. 
以上是最詳細的Android面試題分享的詳細內容。更多資訊請關注PHP中文網其他相關文章!

熱AI工具

Undresser.AI Undress
人工智慧驅動的應用程序,用於創建逼真的裸體照片

AI Clothes Remover
用於從照片中去除衣服的線上人工智慧工具。

Undress AI Tool
免費脫衣圖片

Clothoff.io
AI脫衣器

AI Hentai Generator
免費產生 AI 無盡。

熱門文章

熱工具

記事本++7.3.1
好用且免費的程式碼編輯器

SublimeText3漢化版
中文版,非常好用

禪工作室 13.0.1
強大的PHP整合開發環境

Dreamweaver CS6
視覺化網頁開發工具

SublimeText3 Mac版
神級程式碼編輯軟體(SublimeText3)

熱門話題
 什麼是使用效果?您如何使用它執行副作用?
Mar 19, 2025 pm 03:58 PM
本文討論了React中的使用效應,這是一種用於管理副作用的鉤子,例如數據獲取和功能組件中的DOM操縱。它解釋了用法,常見的副作用和清理,以防止記憶洩漏等問題。
 反應和解算法如何起作用?
Mar 18, 2025 pm 01:58 PM
本文解釋了React的對帳算法,該算法通過比較虛擬DOM樹有效地更新DOM。它討論了性能優勢,優化技術以及對用戶體驗的影響。
 JavaScript中的高階功能是什麼?如何使用它們來編寫更簡潔和可重複使用的代碼?
Mar 18, 2025 pm 01:44 PM
JavaScript中的高階功能通過抽象,常見模式和優化技術增強代碼簡潔性,可重複性,模塊化和性能。
 咖哩如何在JavaScript中起作用,其好處是什麼?
Mar 18, 2025 pm 01:45 PM
本文討論了JavaScript中的咖哩,這是一種將多重題材函數轉換為單詞彙函數序列的技術。它探討了咖哩的實施,諸如部分應用和實際用途之類的好處,增強代碼閱讀
 什麼是Usecontext?您如何使用它在組件之間共享狀態?
Mar 19, 2025 pm 03:59 PM
本文解釋了React中的UseContext,該文章通過避免道具鑽探簡化了狀態管理。它討論了通過減少的重新租賃者進行集中國家和績效改善之類的好處。
 如何使用Connect()將React組件連接到Redux Store?
Mar 21, 2025 pm 06:23 PM
文章討論了使用Connect()將React組件連接到Redux Store,解釋了MapStateToprops,MapDispatchToprops和性能影響。
 您如何防止事件處理程序中的默認行為?
Mar 19, 2025 pm 04:10 PM
文章討論了使用DestrestDefault()方法在事件處理程序中預防默認行為,其好處(例如增強的用戶體驗)以及諸如可訪問性問題之類的潛在問題。
 受控和不受控制的組件的優點和缺點是什麼?
Mar 19, 2025 pm 04:16 PM
本文討論了React中受控和不受控制的組件的優勢和缺點,重點是可預測性,性能和用例等方面。它建議在選擇之間選擇因素。


