

介紹小程式依賴分析實踐

微信小程式開發教學介紹小程式依賴分析實作。

用過 webpack 的同學肯定知道 介紹小程式依賴分析實踐 ,可以用來分析目前專案 js 檔案的依賴關係。

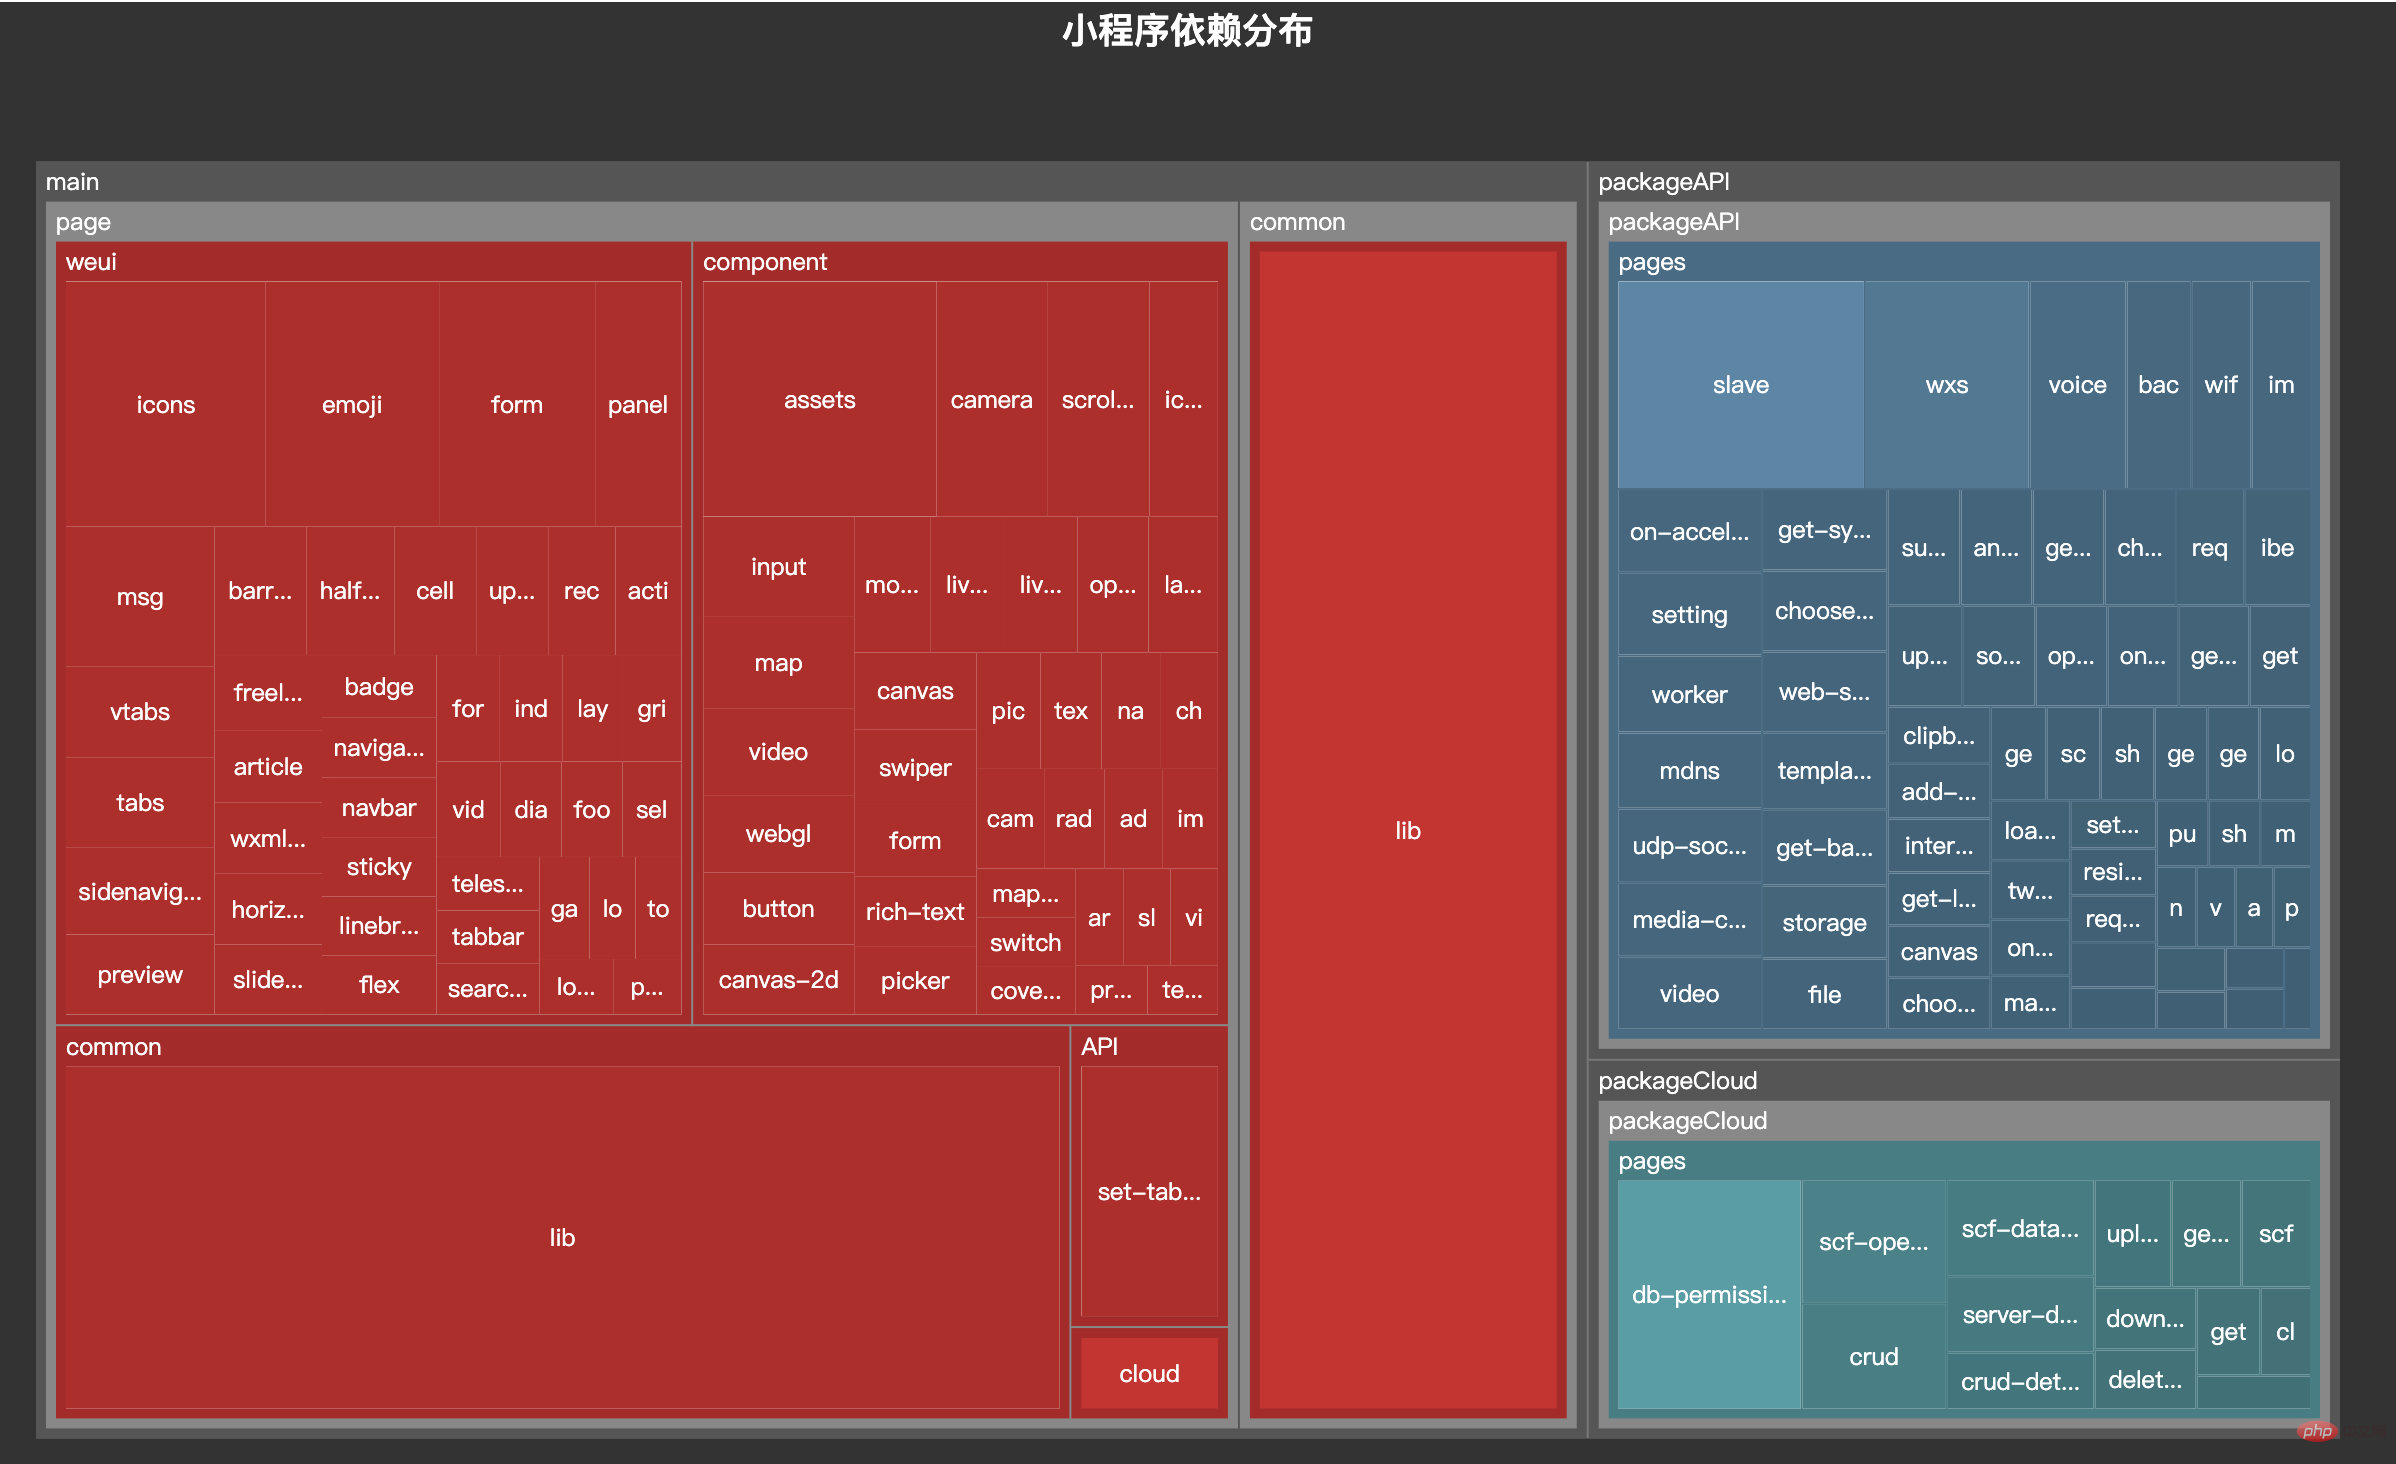
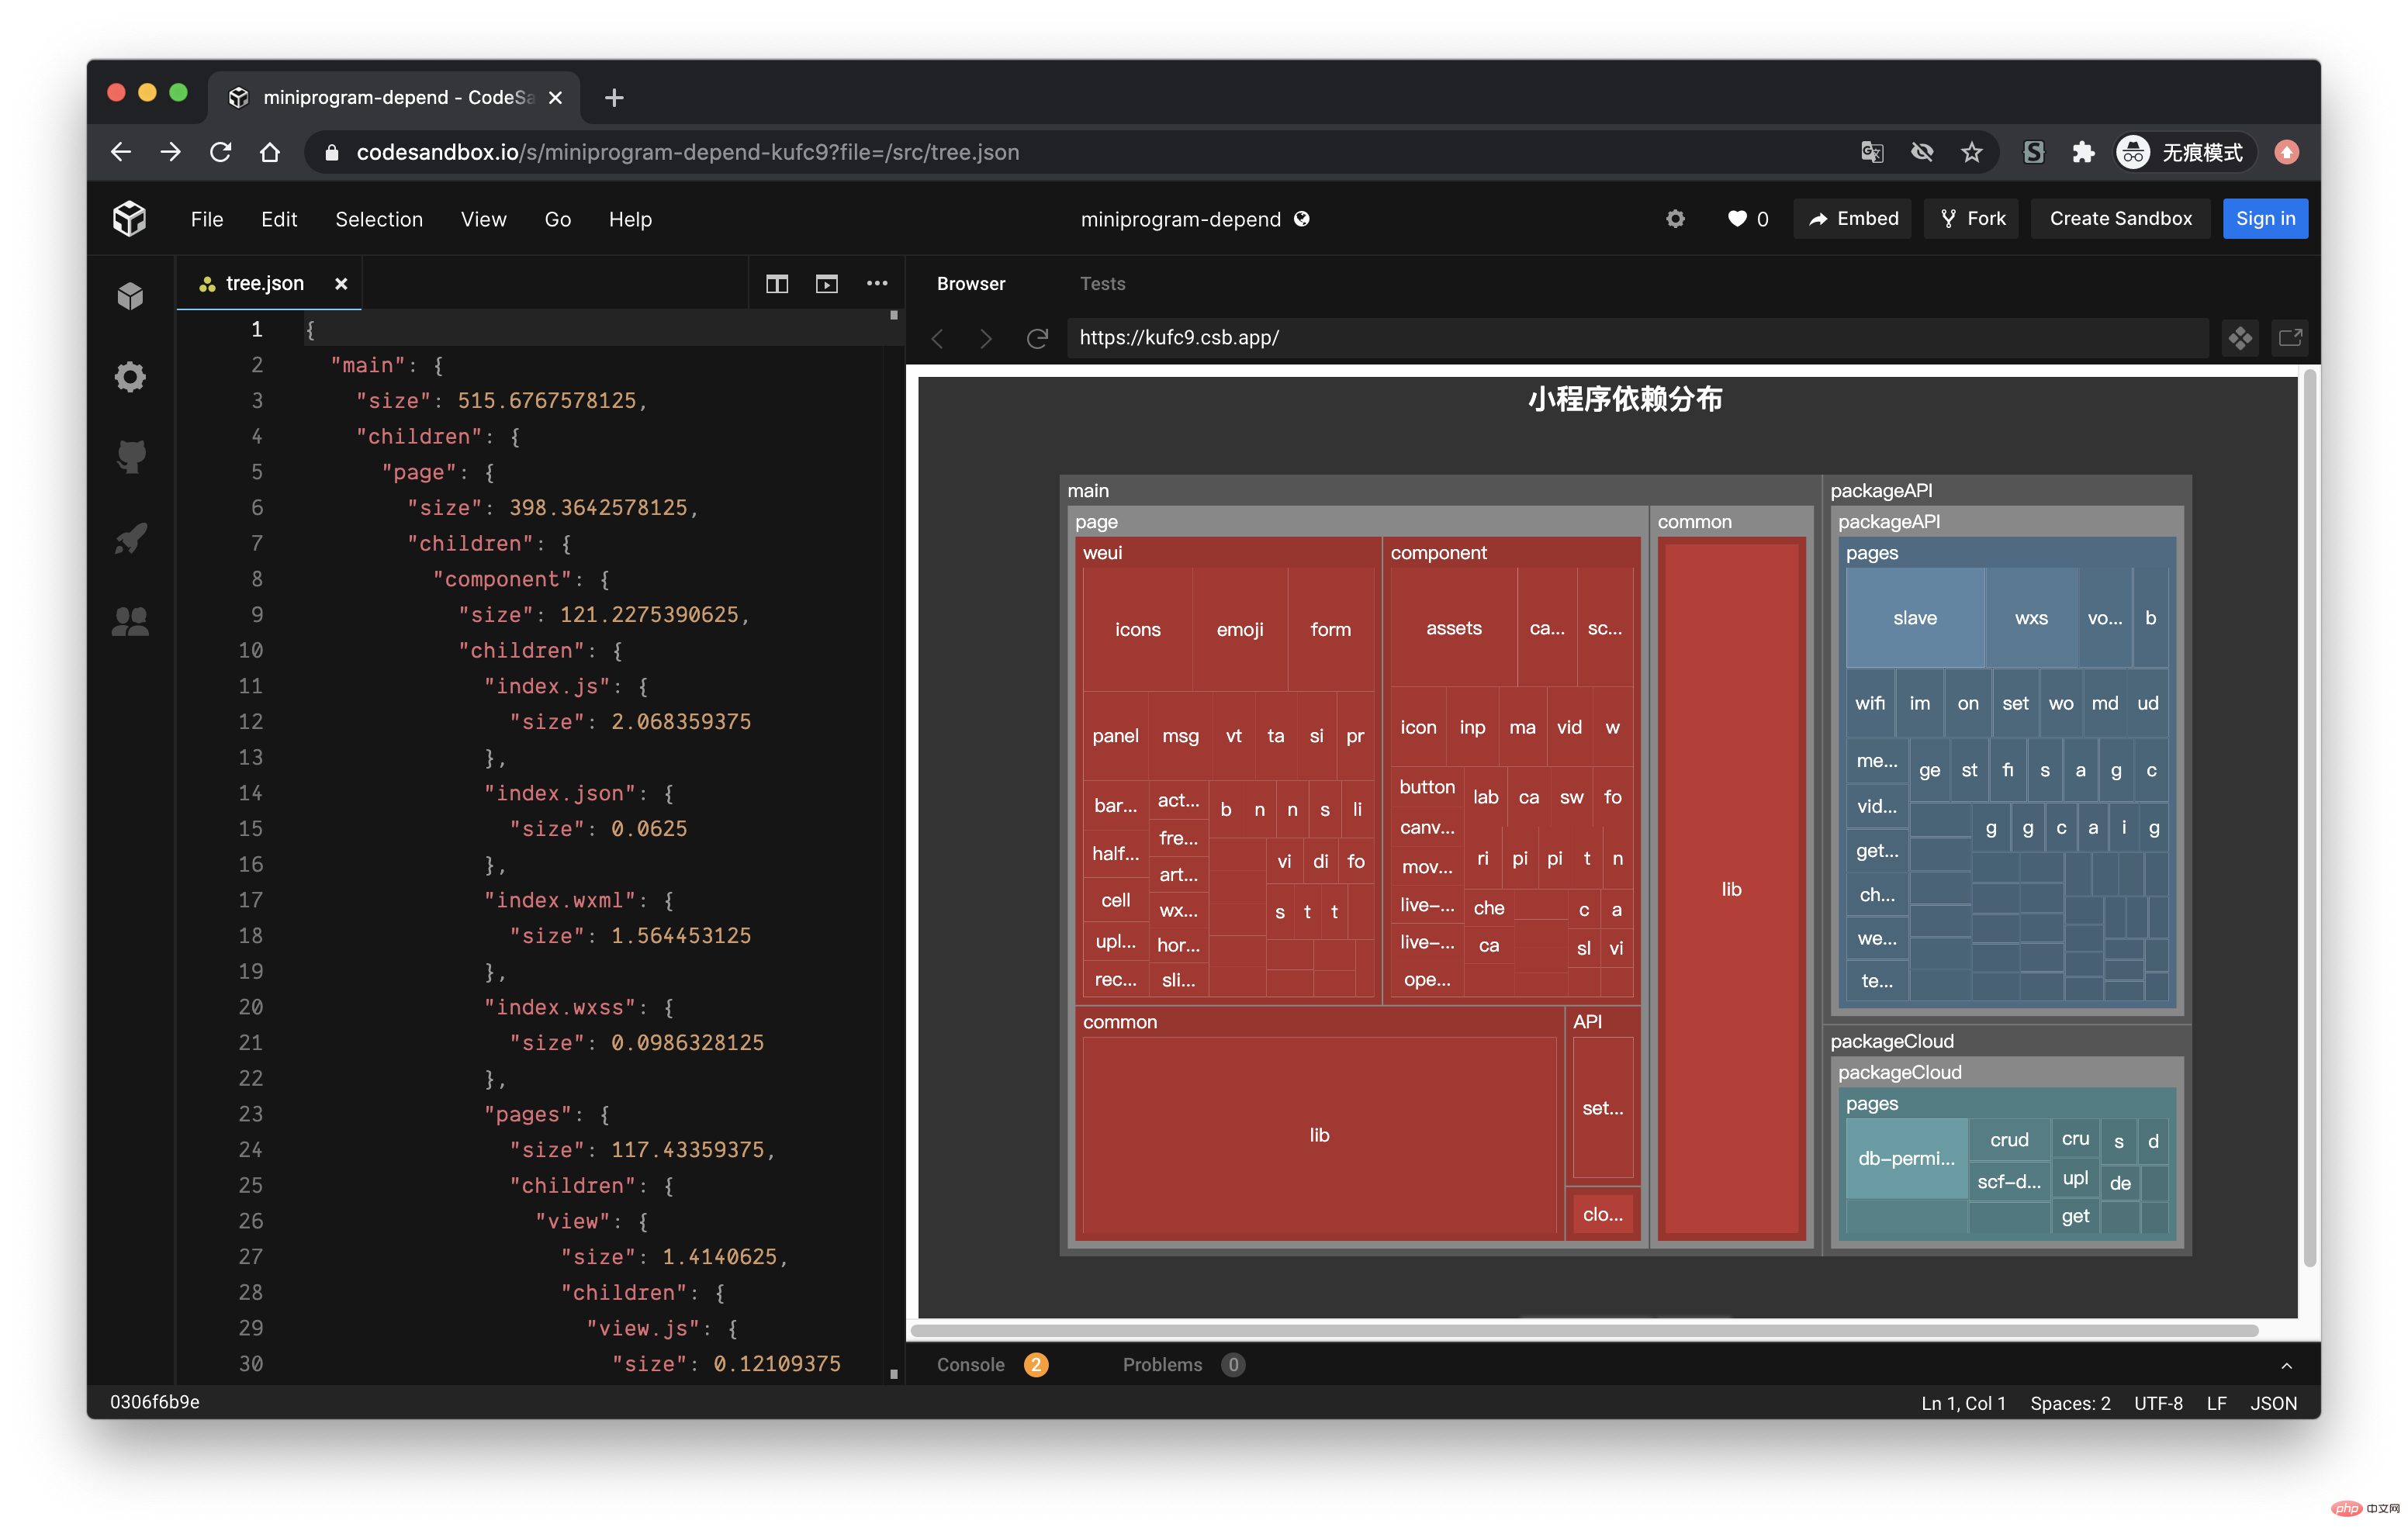
因為最近一直在做小程式業務,而且小程式對包體大小特別敏感,所以就想著能不能做一個類似的工具,用來查看當前小程式各個主包與分包之間的依賴關係。經過幾天的折騰終於做出來了,效果如下:
今天的文章就帶大家來實現這個工具。
小程式入口
小程式的頁面透過app.json 的pages 參數定義,用於指定小程式由哪些頁面組成,每一項都對應一個頁面的路徑(含檔案名稱) 資訊。 pages 內的每個頁面,小程式都會去尋找對應的json, js, wxml, wxss 四個文件進行處理。
如開發目錄為:
├── app.js
├── app.json
├── app.wxss
├── pages
│   │── index
│   │   ├── index.wxml
│   │   ├── index.js
│   │   ├── index.json
│   │   └── index.wxss
│   └── logs
│       ├── logs.wxml
│       └── logs.js
└── utils复制代码
則需要在app.json 中寫:
{  "pages": ["pages/index/index", "pages/logs/logs"]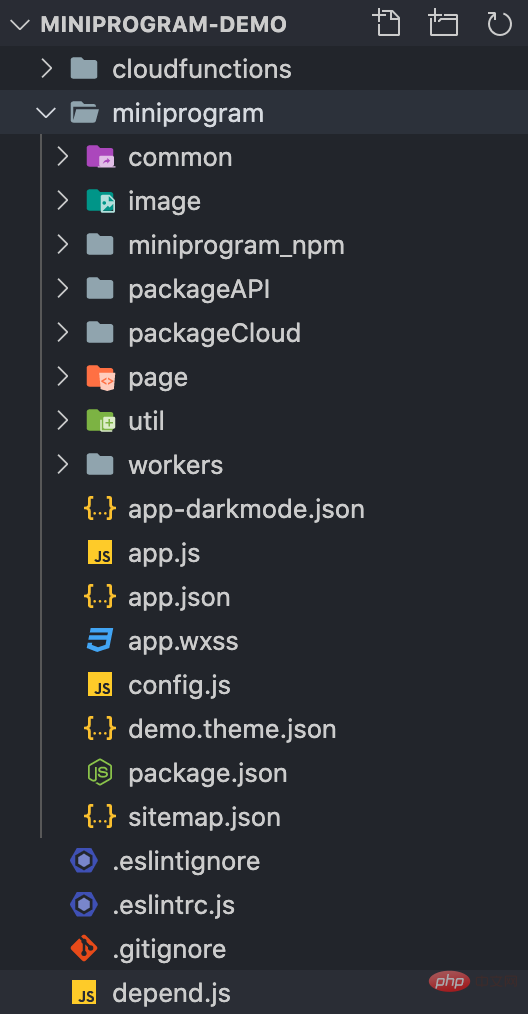
}复制代码為了方便演示,我們先fork 一份小程式的官方demo,然後新建一個檔案depend.js,依賴分析相關的工作就在這個檔案裡面實作。
$ git clone git@github.com:wechat-miniprogram/miniprogram-demo.git
$ cd miniprogram-demo
$ touch depend.js复制代码
其大致的目錄結構如下:
#以app.json 為入口,我們可以取得所有主套件下的頁面。
const fs = require('fs-extra')const path = require('path')const root = process.cwd()class Depend {  constructor() {    this.context = path.join(root, 'miniprogram')
  }  // 获取绝对地址
  getAbsolute(file) {    return path.join(this.context, file)
  }  run() {    const appPath = this.getAbsolute('app.json')    const appJson = fs.readJsonSync(appPath)    const { pages } = appJson // 主包的所有页面
  }
}复制代码每個頁面會對應json, js, wxml, wxss 四個檔案:
const Extends = ['.js', '.json', '.wxml', '.wxss']class Depend {  constructor() {    // 存储文件
    this.files = new Set()    this.context = path.join(root, 'miniprogram')
  }  // 修改文件后缀
  replaceExt(filePath, ext = '') {    const dirName = path.dirname(filePath)    const extName = path.extname(filePath)    const fileName = path.basename(filePath, extName)    return path.join(dirName, fileName + ext)
  }  run() {    // 省略获取 pages 过程
    pages.forEach(page => {      // 获取绝对地址
      const absPath = this.getAbsolute(page)
      Extends.forEach(ext => {        // 每个页面都需要判断 js、json、wxml、wxss 是否存在
        const filePath = this.replaceExt(absPath, ext)        if (fs.existsSync(filePath)) {          this.files.add(filePath)
        }
      })
    })
  }
}复制代码現在pages 內頁面相關的檔案都放到files 欄位存起來了。
建構樹狀結構
拿到檔案後,我們需要依據個別檔案建構一個樹狀結構的檔案樹,用於後續展示依賴關係。
假設我們有一個pages 目錄,pages 目錄下有兩個頁面:detail、index ,這兩個頁面資料夾下有四個對應的檔案。
pages
├── detail
│   ├── detail.js
│   ├── detail.json
│   ├── detail.wxml
│   └── detail.wxss
└── index
    ├── index.js
    ├── index.json
    ├── index.wxml
    └── index.wxss复制代码
依據上面的目錄結構,我們建構一個如下的檔案樹結構,size 用來表示目前檔案或資料夾的大小,children 存放資料夾下的文件,如果是文件則沒有children 屬性。
pages = {  "size": 8,  "children": {    "detail": {      "size": 4,      "children": {        "detail.js": { "size": 1 },        "detail.json": { "size": 1 },        "detail.wxml": { "size": 1 },        "detail.wxss": { "size": 1 }
      }
    },    "index": {      "size": 4,      "children": {        "index.js": { "size": 1 },        "index.json": { "size": 1 },        "index.wxml": { "size": 1 },        "index.wxss": { "size": 1 }
      }
    }
  }
}复制代码我們先在建構子建構一個tree 欄位用來儲存檔案樹的數據,然後我們將每個檔案傳入addToTree 方法,將文件添加到樹中。
class Depend {  constructor() {    this.tree = {      size: 0,      children: {}
    }    this.files = new Set()    this.context = path.join(root, 'miniprogram')
  }
  run() {    // 省略获取 pages 过程
    pages.forEach(page => {      const absPath = this.getAbsolute(page)
      Extends.forEach(ext => {        const filePath = this.replaceExt(absPath, ext)        if (fs.existsSync(filePath)) {          // 调用 addToTree
          this.addToTree(filePath)
        }
      })
    })
  }
}复制代码接下來實作 addToTree 方法:
class Depend {  // 省略之前的部分代码

  // 获取相对地址
  getRelative(file) {    return path.relative(this.context, file)
  }  // 获取文件大小,单位 KB
  getSize(file) {    const stats = fs.statSync(file)    return stats.size / 1024
  }  // 将文件添加到树中
  addToTree(filePath) {    if (this.files.has(filePath)) {      // 如果该文件已经添加过,则不再添加到文件树中
      return
    }    const size = this.getSize(filePath)    const relPath = this.getRelative(filePath)    // 将文件路径转化成数组
    // 'pages/index/index.js' =>
    // ['pages', 'index', 'index.js']
    const names = relPath.split(path.sep)    const lastIdx = names.length - 1

    this.tree.size += size    let point = this.tree.children
    names.forEach((name, idx) => {      if (idx === lastIdx) {
        point[name] = { size }        return
      }      if (!point[name]) {
        point[name] = {
          size, children: {}
        }
      } else {
        point[name].size += size
      }
      point = point[name].children
    })    // 将文件添加的 files
    this.files.add(filePath)
  }
}复制代码我們可以在運行之後,將檔案輸出到 介紹小程式依賴分析實踐 看看。
 run() {   // ...
   pages.forEach(page => {     //...
   })
   fs.writeJSONSync('介紹小程式依賴分析實踐', this.tree, { spaces: 2 })
 }复制代码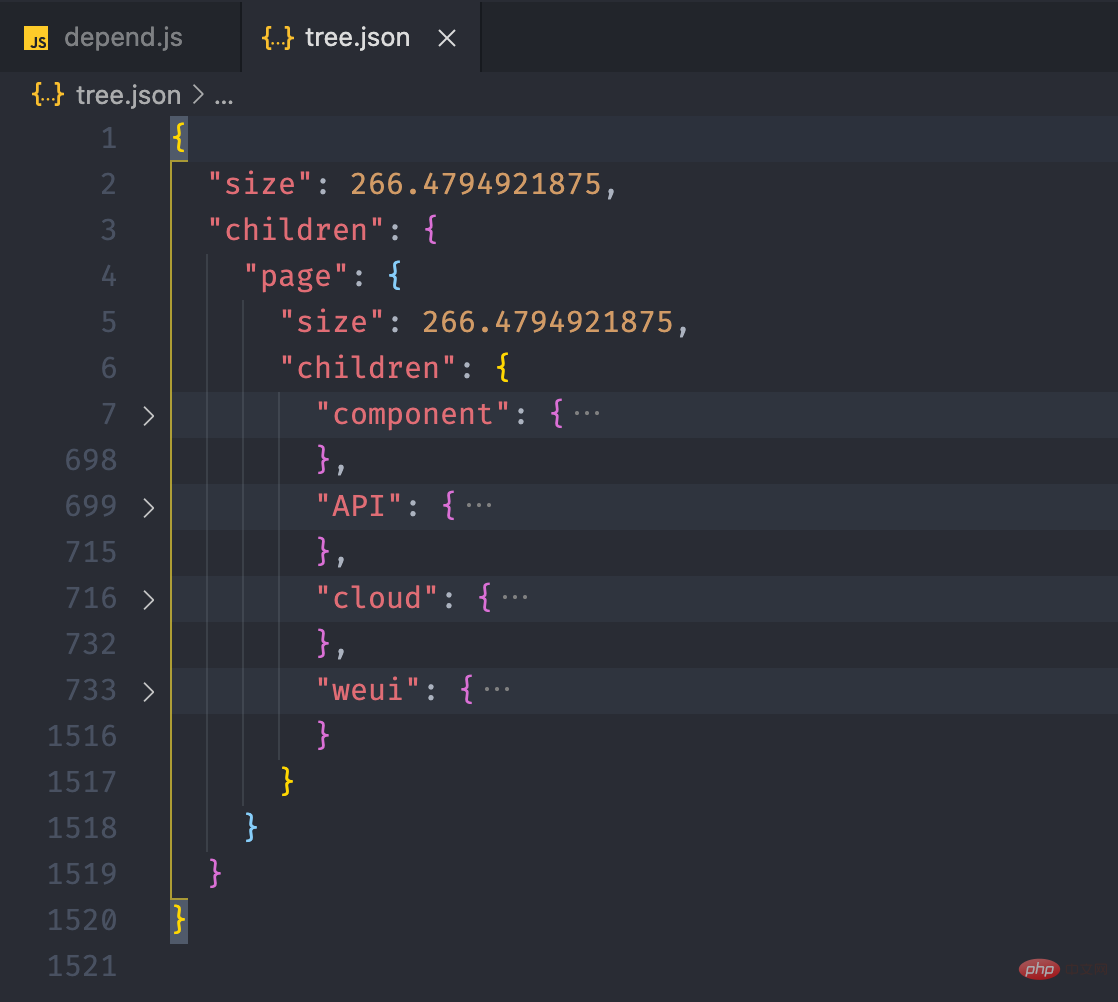
取得依賴關係
上面的步驟看起來沒什麼問題,但是我們缺少了重要的一環,那就是我們在建構檔樹之前,還需要得到每個檔案的依賴項,這樣輸出的才是小程式完整的檔案樹。檔案的依賴關係需要分成四個部分來講,分別是 js, json, wxml, wxss 這四種類型檔案擷取依賴的方式。
取得 .js 檔案依賴
小程式支援 CommonJS 的方式進行模組化,如果開啟了 es6,也能支援 ESM 進行模組化。我們如果要獲得一個 js 檔案的依賴,首先要明確,js 檔案匯入模組的三種寫法,針對下面三種語法,我們可以引入 Babel 來取得依賴。
import a from './a.js'export b from './b.js'const c = require('./c.js')复制代码透過@babel/parser 將程式碼轉換為AST,然後透過@babel/traverse 遍歷AST 節點,取得上面三種導入方式的值,放到數組。
const { parse } = require('@babel/parser')const { default: traverse } = require('@babel/traverse')class Depend {  // ...
	jsDeps(file) {    const deps = []    const dirName = path.dirname(file)    // 读取 js 文件内容
    const content = fs.readFileSync(file, 'utf-8')    // 将代码转化为 AST
    const ast = parse(content, {      sourceType: 'module',      plugins: ['exportDefaultFrom']
    })    // 遍历 AST
    traverse(ast, {      ImportDeclaration: ({ node }) => {        // 获取 import from 地址
        const { value } = node.source        const jsFile = this.transformScript(dirName, value)        if (jsFile) {
          deps.push(jsFile)
        }
      },      ExportNamedDeclaration: ({ node }) => {        // 获取 export from 地址
        const { value } = node.source        const jsFile = this.transformScript(dirName, value)        if (jsFile) {
          deps.push(jsFile)
        }
      },      CallExpression: ({ node }) => {        if (
          (node.callee.name && node.callee.name === 'require') &&
          node.arguments.length >= 1
        ) {          // 获取 require 地址
          const [{ value }] = node.arguments          const jsFile = this.transformScript(dirName, value)          if (jsFile) {
            deps.push(jsFile)
          }
        }
      }
    })    return deps
  }
}复制代码在獲取依賴模組的路徑後,還不能立即將路徑添加到依賴數組內,因為根據模組語法js 後綴是可以省略的,另外require 的路徑是一個文件夾的時候,預設會導入該資料夾下的index.js 。
class Depend {  // 获取某个路径的脚本文件
  transformScript(url) {    const ext = path.extname(url)    // 如果存在后缀,表示当前已经是一个文件
    if (ext === '.js' && fs.existsSync(url)) {      return url
    }    // a/b/c => a/b/c.js
    const jsFile = url + '.js'
    if (fs.existsSync(jsFile)) {      return jsFile
    }    // a/b/c => a/b/c/index.js
    const jsIndexFile = path.join(url, 'index.js')    if (fs.existsSync(jsIndexFile)) {      return jsIndexFile
    }    return null
  }	jsDeps(file) {...}
}复制代码我們可以建立一個 js,看看輸出的 deps 是否正確:
// 文件路径:/Users/shenfq/Code/fork/miniprogram-demo/import a from './a.js'export b from '../b.js'const c = require('../../c.js')复制代码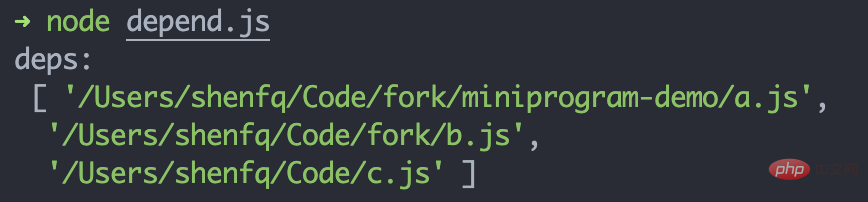
获取 .json 文件依赖
json 文件本身是不支持模块化的,但是小程序可以通过 json 文件导入自定义组件,只需要在页面的 json 文件通过 usingComponents 进行引用声明。usingComponents 为一个对象,键为自定义组件的标签名,值为自定义组件文件路径:
{  "usingComponents": {    "component-tag-name": "path/to/the/custom/component"
  }
}复制代码自定义组件与小程序页面一样,也会对应四个文件,所以我们需要获取 json 中 usingComponents 内的所有依赖项,并判断每个组件对应的那四个文件是否存在,然后添加到依赖项内。
class Depend {  // ...
  jsonDeps(file) {    const deps = []    const dirName = path.dirname(file)    const { usingComponents } = fs.readJsonSync(file)    if (usingComponents && typeof usingComponents === 'object') {      Object.values(usingComponents).forEach((component) => {
        component = path.resolve(dirName, component)        // 每个组件都需要判断 js/json/wxml/wxss 文件是否存在
        Extends.forEach((ext) => {          const file = this.replaceExt(component, ext)          if (fs.existsSync(file)) {
            deps.push(file)
          }
        })
      })
    }    return deps
  }
}复制代码获取 .wxml 文件依赖
wxml 提供两种文件引用方式 import 和 include。
<import></import><include></include>复制代码
wxml 文件本质上还是一个 html 文件,所以可以通过 html parser 对 wxml 文件进行解析,关于 html parser 相关的原理可以看我之前写过的文章 《Vue 模板编译原理》。
const htmlparser2 = require('htmlparser2')class Depend {  // ...
	wxmlDeps(file) {    const deps = []    const dirName = path.dirname(file)    const content = fs.readFileSync(file, 'utf-8')    const htmlParser = new htmlparser2.Parser({      onopentag(name, attribs = {}) {        if (name !== 'import' && name !== 'require') {          return
        }        const { src } = attribs        if (src) {          return
        }      	const wxmlFile = path.resolve(dirName, src)        if (fs.existsSync(wxmlFile)) {
        	deps.push(wxmlFile)
        }
      }
    })
    htmlParser.write(content)
    htmlParser.end()    return deps
  }
}复制代码获取 .wxss 文件依赖
最后 wxss 文件导入样式和 css 语法一致,使用 @import 语句可以导入外联样式表。
@import "common.wxss";复制代码
可以通过 postcss 解析 wxss 文件,然后获取导入文件的地址,但是这里我们偷个懒,直接通过简单的正则匹配来做。
class Depend {  // ...
  wxssDeps(file) {    const deps = []    const dirName = path.dirname(file)    const content = fs.readFileSync(file, 'utf-8')    const importRegExp = /@import\\s*['"](.+)['"];*/g
    let matched    while ((matched = importRegExp.exec(content)) !== null) {      if (!matched[1]) {        continue
      }      const wxssFile = path.resolve(dirName, matched[1])      if (fs.existsSync(wxmlFile)) {
        deps.push(wxssFile)
      }
    }    return deps
  }
}复制代码将依赖添加到树结构中
现在我们需要修改 addToTree 方法。
class Depend {  addToTree(filePath) {    // 如果该文件已经添加过,则不再添加到文件树中
    if (this.files.has(filePath)) {      return
    }    const relPath = this.getRelative(filePath)    const names = relPath.split(path.sep)
    names.forEach((name, idx) => {      // ... 添加到树中
    })    this.files.add(filePath)    // ===== 获取文件依赖,并添加到树中 =====
    const deps = this.getDeps(filePath)
    deps.forEach(dep => {      this.addToTree(dep)
    })
  }
}复制代码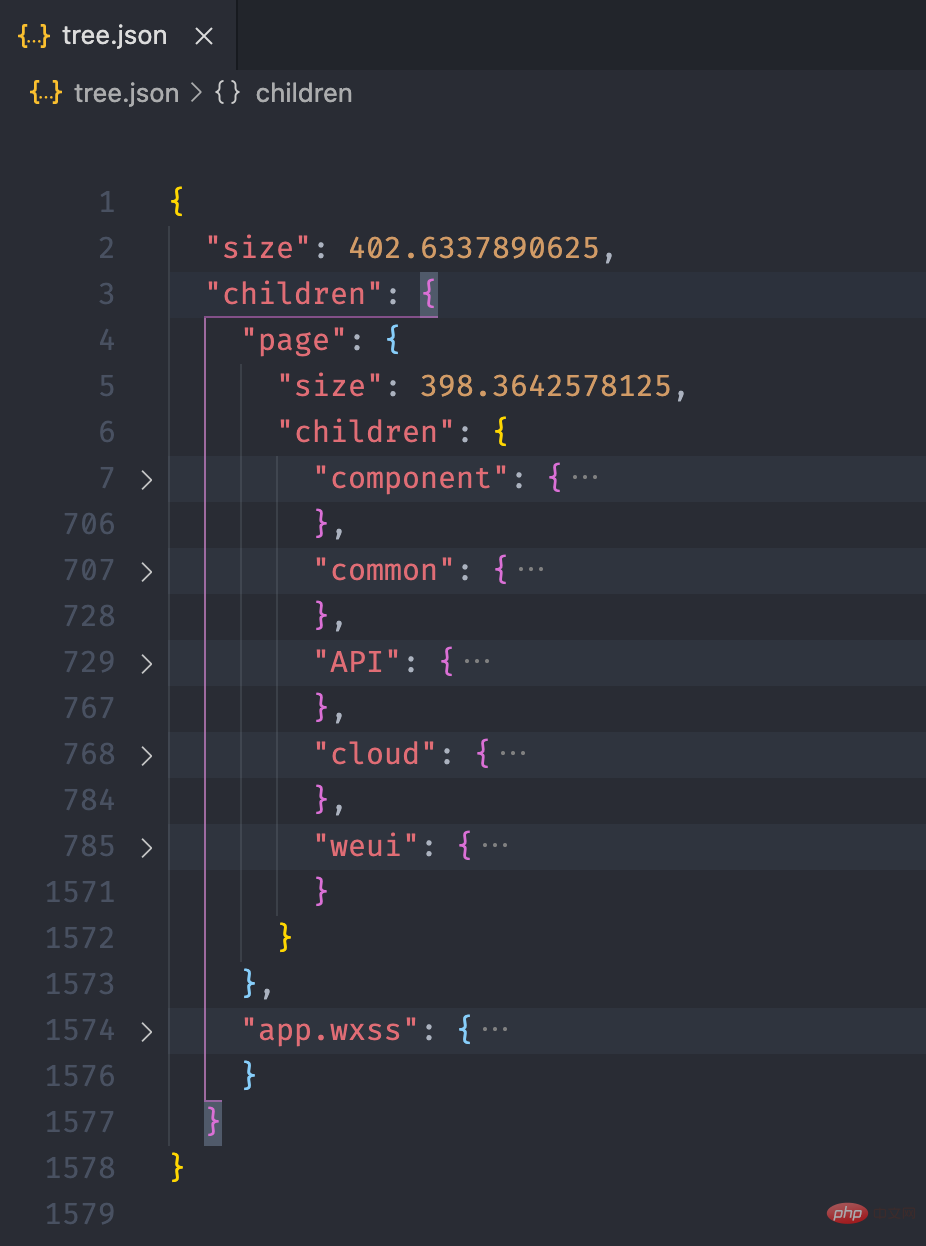
获取分包依赖
熟悉小程序的同学肯定知道,小程序提供了分包机制。使用分包后,分包内的文件会被打包成一个单独的包,在用到的时候才会加载,而其他的文件则会放在主包,小程序打开的时候就会加载。subpackages 中,每个分包的配置有以下几项:
| 字段 | 类型 | 说明 |
|---|---|---|
| root | String | 分包根目录 |
| name | String | 分包别名,分包预下载时可以使用 |
| pages | StringArray | 分包页面路径,相对与分包根目录 |
| independent | Boolean | 分包是否是独立分包 |
所以我们在运行的时候,除了要拿到 pages 下的所有页面,还需拿到 subpackages 中所有的页面。由于之前只关心主包的内容,this.tree 下面只有一颗文件树,现在我们需要在 this.tree 下挂载多颗文件树,我们需要先为主包创建一个单独的文件树,然后为每个分包创建一个文件树。
class Depend {  constructor() {    this.tree = {}    this.files = new Set()    this.context = path.join(root, 'miniprogram')
  }  createTree(pkg) {    this.tree[pkg] = {      size: 0,      children: {}
    }
  }  addPage(page, pkg) {    const absPath = this.getAbsolute(page)
    Extends.forEach(ext => {      const filePath = this.replaceExt(absPath, ext)      if (fs.existsSync(filePath)) {        this.addToTree(filePath, pkg)
      }
    })
  }  run() {    const appPath = this.getAbsolute('app.json')    const appJson = fs.readJsonSync(appPath)    const { pages, subPackages, subpackages } = appJson
    this.createTree('main') // 为主包创建文件树
    pages.forEach(page => {      this.addPage(page, 'main')
    })    // 由于 app.json 中 subPackages、subpackages 都能生效
    // 所以我们两个属性都获取,哪个存在就用哪个
    const subPkgs = subPackages || subpackages    // 分包存在的时候才进行遍历
    subPkgs && subPkgs.forEach(({ root, pages }) => {
      root = root.split('/').join(path.sep)      this.createTree(root) // 为分包创建文件树
      pages.forEach(page => {        this.addPage(`${root}${path.sep}${page}`, pkg)
      })
    })    // 输出文件树
    fs.writeJSONSync('介紹小程式依賴分析實踐', this.tree, { spaces: 2 })
  }
}复制代码addToTree 方法也需要进行修改,根据传入的 pkg 来判断将当前文件添加到哪个树。
class Depend {  addToTree(filePath, pkg = 'main') {    if (this.files.has(filePath)) {      // 如果该文件已经添加过,则不再添加到文件树中
      return
    }    let relPath = this.getRelative(filePath)    if (pkg !== 'main' && relPath.indexOf(pkg) !== 0) {      // 如果该文件不是以分包名开头,证明该文件不在分包内,
      // 需要将文件添加到主包的文件树内
      pkg = 'main'
    }    const tree = this.tree[pkg] // 依据 pkg 取到对应的树
    const size = this.getSize(filePath)    const names = relPath.split(path.sep)    const lastIdx = names.length - 1

    tree.size += size    let point = tree.children
    names.forEach((name, idx) => {      // ... 添加到树中
    })    this.files.add(filePath)    // ===== 获取文件依赖,并添加到树中 =====
    const deps = this.getDeps(filePath)
    deps.forEach(dep => {      this.addToTree(dep)
    })
  }
}复制代码这里有一点需要注意,如果 package/a 分包下的文件依赖的文件不在 package/a 文件夹下,则该文件需要放入主包的文件树内。
通过 EChart 画图
经过上面的流程后,最终我们可以得到如下的一个 json 文件:
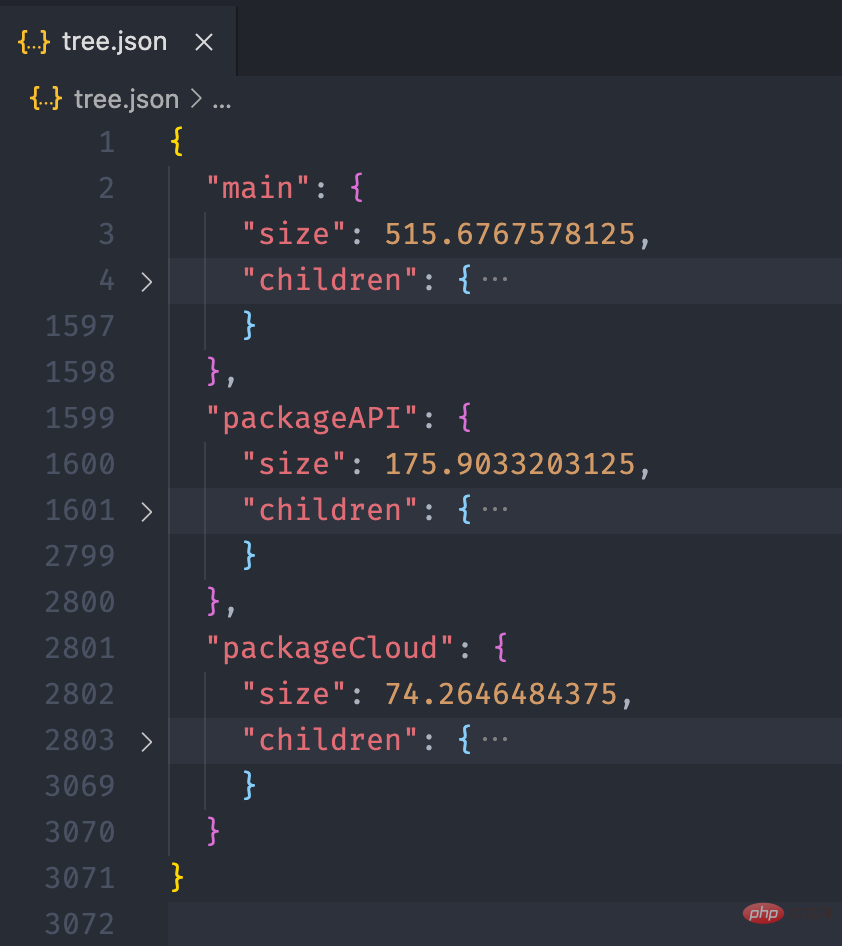
接下来,我们利用 介紹小程式依賴分析實踐 的画图能力,将这个 json 数据以图表的形式展现出来。我们可以在 介紹小程式依賴分析實踐 提供的实例中看到一个 Disk Usage 的案例,很符合我们的预期。

介紹小程式依賴分析實踐 的配置这里就不再赘述,按照官网的 demo 即可,我们需要把 tree. json 的数据转化为 介紹小程式依賴分析實踐 需要的格式就行了,完整的代码放到 codesandbod 了,去下面的线上地址就能看到效果了。
线上地址:https://codesandbox.io/s/cold-dawn-kufc9
总结
这篇文章比较偏实践,所以贴了很多的代码,另外本文对各个文件的依赖获取提供了一个思路,虽然这里只是用文件树构造了一个这样的依赖图。
在业务开发中,小程序 IDE 每次启动都需要进行全量的编译,开发版预览的时候会等待较长的时间,我们现在有文件依赖关系后,就可以只选取目前正在开发的页面进行打包,这样就能大大提高我们的开发效率。如果有对这部分内容感兴趣的,可以另外写一篇文章介绍下如何实现。
相关免费学习推荐:微信小程序开发教程
以上是介紹小程式依賴分析實踐的詳細內容。更多資訊請關注PHP中文網其他相關文章!

熱AI工具

Undresser.AI Undress
人工智慧驅動的應用程序,用於創建逼真的裸體照片

AI Clothes Remover
用於從照片中去除衣服的線上人工智慧工具。

Undress AI Tool
免費脫衣圖片

Clothoff.io
AI脫衣器

Video Face Swap
使用我們完全免費的人工智慧換臉工具,輕鬆在任何影片中換臉!

熱門文章
熱工具

記事本++7.3.1
好用且免費的程式碼編輯器

SublimeText3漢化版
中文版,非常好用

禪工作室 13.0.1
強大的PHP整合開發環境

Dreamweaver CS6
視覺化網頁開發工具

SublimeText3 Mac版
神級程式碼編輯軟體(SublimeText3)


 使用Python開發微信小程式
Jun 17, 2023 pm 06:34 PM
使用Python開發微信小程式
Jun 17, 2023 pm 06:34 PM
隨著行動互聯網技術和智慧型手機的普及,微信成為了人們生活中不可或缺的一個應用。而微信小程式則讓人們可以在不需要下載安裝應用程式的情況下,直接使用小程式來解決一些簡單的需求。本文將介紹如何使用Python來開發微信小程式。一、準備工作在使用Python開發微信小程式之前,需要先安裝相關的Python函式庫。這裡推薦使用wxpy和itchat這兩個函式庫。 wxpy是一個微信機器
 小程式能用react嗎
Dec 29, 2022 am 11:06 AM
小程式能用react嗎
Dec 29, 2022 am 11:06 AM
小程式能用react,其使用方法:1、基於「react-reconciler」實作一個渲染器,產生一個DSL;2、建立一個小程式元件,去解析和渲染DSL;3、安裝npm,並執行開發者工具中的建構npm;4、在自己的頁面中引入包,再利用api即可完成開發。
 實作微信小程式中的卡片翻轉特效
Nov 21, 2023 am 10:55 AM
實作微信小程式中的卡片翻轉特效
Nov 21, 2023 am 10:55 AM
實作微信小程式中的卡片翻轉特效在微信小程式中,實現卡片翻轉特效是一種常見的動畫效果,可以提升使用者體驗和介面互動的吸引力。以下將具體介紹如何在微信小程式中實現卡片翻轉的特效,並提供相關程式碼範例。首先,需要在小程式的頁面佈局檔案中定義兩個卡片元素,一個用於顯示正面內容,一個用於顯示背面內容,具體範例程式碼如下:<!--index.wxml-->&l
 支付寶上線「漢字拾光-生僻字」小程序,用於徵集、補充生僻字庫
Oct 31, 2023 pm 09:25 PM
支付寶上線「漢字拾光-生僻字」小程序,用於徵集、補充生僻字庫
Oct 31, 2023 pm 09:25 PM
本站10月31日消息,今年5月27日,螞蟻集團宣布啟動“漢字拾光計劃”,最近又迎來新進展:支付寶上線“漢字拾光-生僻字”小程序,用於向社會徵集生僻字,補充生僻字庫,同時提供不同的生僻字輸入體驗,以幫助完善支付寶內的生僻字輸入方法。目前,用戶搜尋「漢字拾光」、「生僻字」等關鍵字就可以進入「生僻字」小程式。在小程式裡,使用者可以提交尚未被系統辨識輸入的生僻字圖片,支付寶工程師確認後,將會對字庫進行補錄入。本站注意到,使用者也可以在小程式體驗最新的拆字輸入法,這項輸入法針對讀音不明確的生僻字設計。用戶拆
 uniapp如何實現小程式和H5的快速轉換
Oct 20, 2023 pm 02:12 PM
uniapp如何實現小程式和H5的快速轉換
Oct 20, 2023 pm 02:12 PM
uniapp如何實現小程式和H5的快速轉換,需要具體程式碼範例近年來,隨著行動網路的發展和智慧型手機的普及,小程式和H5成為了不可或缺的應用形式。而uniapp作為一個跨平台的開發框架,可以在一套程式碼的基礎上,快速實現小程式和H5的轉換,大大提高了開發效率。本文將介紹uniapp如何實現小程式和H5的快速轉換,並給出具體的程式碼範例。一、uniapp簡介unia
 用Python編寫簡單的聊天程式教程
May 08, 2023 pm 06:37 PM
用Python編寫簡單的聊天程式教程
May 08, 2023 pm 06:37 PM
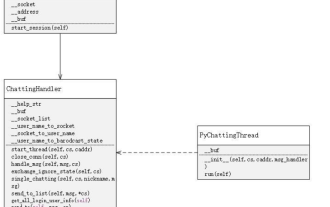
實現思路x01服務端的建立首先,在服務端,使用socket進行訊息的接受,每接受一個socket的請求,就開啟一個新的線程來管理訊息的分發與接受,同時,又存在一個handler來管理所有的線程,從而實現對聊天室的各種功能的處理x02客戶端的建立客戶端的建立就要比服務端簡單多了,客戶端的作用只是對消息的發送以及接受,以及按照特定的規則去輸入特定的字符從而實現不同的功能的使用,因此,在客戶端這裡,只需要去使用兩個線程,一個是專門用於接受消息,一個是專門用於發送消息的至於為什麼不用一個呢,那是因為,只
 教你如何在小程式中用公眾號範本訊息(附詳細想法)
Nov 04, 2022 pm 04:53 PM
教你如何在小程式中用公眾號範本訊息(附詳細想法)
Nov 04, 2022 pm 04:53 PM
這篇文章給大家帶來了關於微信小程式的相關問題,其中主要介紹瞭如何在小程式中用公眾號範本訊息,下面一起來看一下,希望對大家有幫助。
 微信小程式怎麼弄會員
May 07, 2024 am 10:24 AM
微信小程式怎麼弄會員
May 07, 2024 am 10:24 AM
1.開啟微信小程序,進入對應的小程式頁面。 2.在小程式頁面中尋找會員相關入口,通常會員入口在底部導覽列或個人中心等位置。 3.點選會員入口,進入會員申請頁。 4、在會員申請頁面,填寫相關信息,如手機號碼、姓名等,完成資料填寫後,提交申請。 5.小程式方會對會員申請審核,審核通過後,用戶即可成為微信小程式會員。 6.作為會員,用戶將享有更多的會員權益,如積分、優惠券、會員專屬活動等
