vue amap怎麼用
vue amap的使用方法:先透過「vue init webpack vueamap」下載vue webpack的範本;然後使用「cnpm install vue-amap --save」安裝vue-amap;最後運用此元件庫即可。

本教學操作環境:windows7系統、vue2.0版本、thinkpad t480電腦。
推薦:《vue教學》
一、 down一個vue webpack的範本
vue init webpack vueamap
根據提示完成範本下載,這裡我的項目中選擇router為yes 其他測試插件全為no? vueamap為資料夾名稱
模板下載後安裝依賴
cnpm install
依賴安裝完成後執行開發環境
npm run dev
若提示在"localhost:8080"上查看效果,在瀏覽器上查看效果,若出現VUE效果則範本下載成功
二、安裝vue-amap
安裝vue-amap
cnpm install vue-amap --save
安裝完成後,main.js檔案中引入
import VueAMap from "vue-amap";
Vue.use(VueAMap);
初始化高德地圖,這裡需要有一個KEY,可以到高德地圖平台上去申請.
##初始化高德地圖的key與外掛程式VueAMap.initAMapApiLoader({
key: "e1dedc6bdd765d46693986ff7ff969f4",
plugin: [
"AMap.Autocomplete", //输入提示插件
"AMap.PlaceSearch", //POI搜索插件
"AMap.Scale", //右下角缩略图插件 比例尺
"AMap.OverView", //地图鹰眼插件
"AMap.ToolBar", //地图工具条
"AMap.MapType", //类别切换控件,实现默认图层与卫星图、实施交通图层之间切换的控制
"AMap.PolyEditor", //编辑 折线多,边形
"AMap.CircleEditor", //圆形编辑器插件
"AMap.Geolocation" //定位控件,用来获取和展示用户主机所在的经纬度位置
],
uiVersion: "1.0"
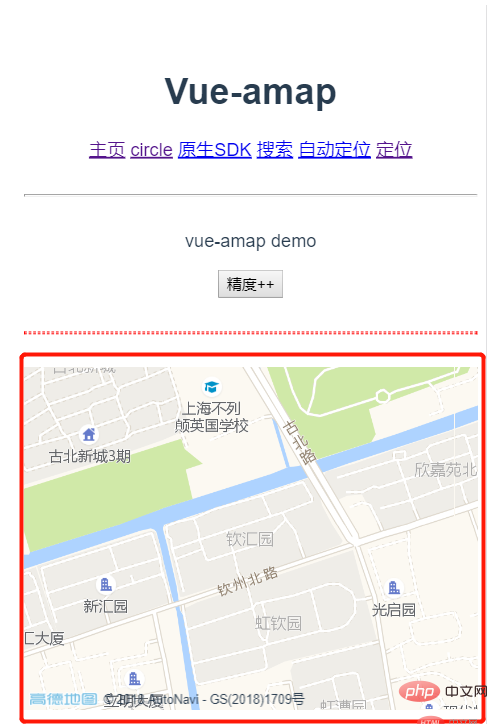
}); <div class="amap-wrapper">
<el-amap class="amap-box" vid="map"
:zoom="zoom"
:center="center">
</el-amap>
</div>zoom:16, center:[121.406051,31.179695],

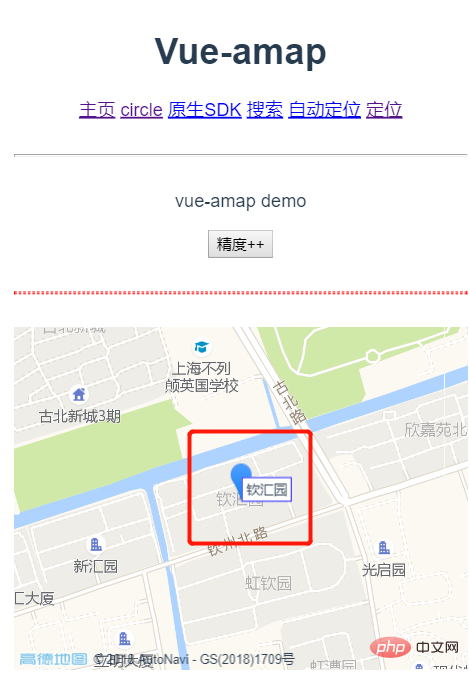
<div class="amap-wrapper">
      <el-amap vid="amapDemo"
        :center="center"
        :zoom="zoom"
        class="amap-demo">
        <el-amap-marker vid="marker"
          :position="center"
          :label="label"
           >
        </el-amap-marker>
      </el-amap>
</div> label:{
content:'钦汇园',
offset:[10,12]
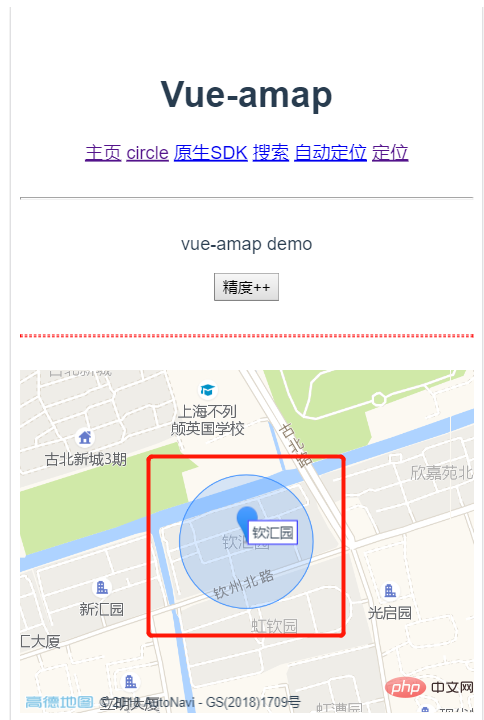
}, ##3、新增圓形區域?(此處依舊以中心點為圓心半徑為100)
注意:新增圓形區域時,要在初始化插件內初始化"AMap.CircleEditor",否則會報錯
#範本:
<div class="amap-wrapper">
      <el-amap vid="amapDemo"
        :center="center"
        :zoom="zoom"
        class="amap-demo">
        <el-amap-marker vid="marker"
          :position="center"
          :label="label"
           >
        </el-amap-marker>
        <el-amap-circle  vid="circle"
          :center="center"
          :radius="radius"
          fill-opacity="0.2"
          strokeColor="#38f"
          strokeOpacity="0.8"
          strokeWeight="1"
          fillColor="#38f"
          >
        </el-amap-circle>
      </el-amap>
</div>拓展:動態變更圓形區域的半徑,可用來設定範圍
這裡我以「精確度」按鈕為例,每點一次半徑加10
data資料:
radius:100
增加事件:
addRadius(){
      this.radius+=10;
}PS:新增其他覆蓋物,如折線,圖片,多邊形等,用法與此類似,參考官方文件進行使用即可
效果圖如下:
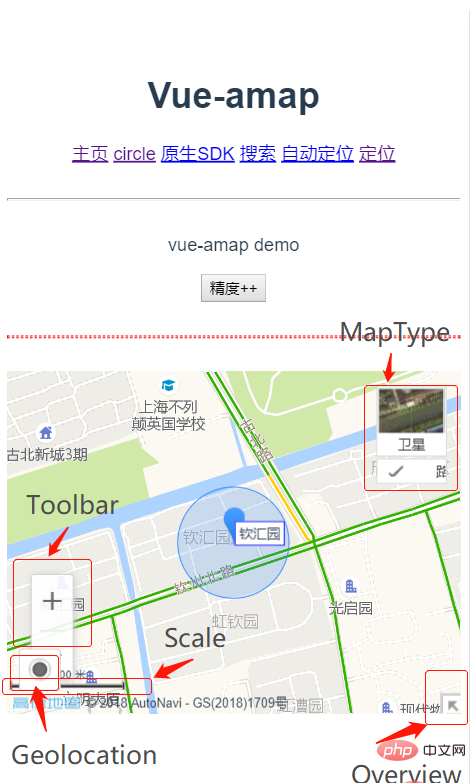
 3、使用外掛
只用外掛程式時,一定要在前面initAMapApiLoader裡面進行初始化,否則會報錯
模板:
  <div class="amap-wrapper">
      <el-amap class="amap-box" vid="map"
        :zoom="zoom"
        :center="center"
        :plugin="plugin">
        <el-amap-marker vid="marker"
          :position="center"
          :label="label"
           >
        </el-amap-marker>
        <el-amap-circle  vid="circle"
          :center="center"
          :radius="radius"
          fill-opacity="0.2"
          strokeColor="#38f"
          strokeOpacity="0.8"
          strokeWeight="1"
          fillColor="#38f"
          >
        </el-amap-circle>
      </el-amap>
</div>data裡新增外掛程式資料:
plugin: [
        {
          pName: 'ToolBar',//工具条插件
          position:'LB',
        },
        {
          pName: 'MapType',//卫星与地图切换
          defaultType: 0,
          showTraffic:true,//实时交通图层
        },
        {
          pName:'OverView',
          //isOpen:true//鹰眼是否打开
        },
        {
          pName:'Scale'
        },
        {
          pName:'Geolocation',//定位插件
          showMarker:false,
          events:{
            init(o){
              //定位成功 自动将marker和circle移到定位点
              o.getCurrentPosition((status, result) => {
                console.log(result);
                vm.center=[result.position.lng,result.position.lat]
              });
            }
          }
        }
]效果圖如下:
 全部程式碼如下:
<script> export default { name:'home', data(){ let vm=this; return{ msg:'vue-amap demo', zoom:16, center:[121.406051,31.179695], label:{ content:&#39;钦汇园&#39;, offset:[10,12] }, radius:100, plugin: [ { pName: &#39;ToolBar&#39;,//工具条插件 position:&#39;LB&#39;, }, { pName: &#39;MapType&#39;,//卫星与地图切换 defaultType: 0, showTraffic:true,//实时交通图层 }, { pName:&#39;OverView&#39;, //isOpen:true//鹰眼是否打开 }, { pName:&#39;Scale&#39; }, { pName:&#39;Geolocation&#39;,//定位插件 showMarker:false, events:{ init(o){ //定位成功 自动将marker和circle移到定位点 o.getCurrentPosition((status, result) => { console.log(result); vm.center=[result.position.lng,result.position.lat] }); } } } ] } }, methods:{ addRadius(){ this.radius+=10; } } } </script>{{msg}}
<div class="amap-wrapper"> <el-amap class="amap-box" vid="map" :zoom="zoom" :center="center" :plugin="plugin"> <el-amap-marker vid="marker" :position="center" :label="label" > </el-amap-marker> <el-amap-circle vid="circle" :center="center" :radius="radius" fill-opacity="0.2" strokeColor="#38f" strokeOpacity="0.8" strokeWeight="1" fillColor="#38f" > </el-amap-circle> </el-amap> </div>
以上是vue amap怎麼用的詳細內容。更多資訊請關注PHP中文網其他相關文章!

熱AI工具

Undresser.AI Undress
人工智慧驅動的應用程序,用於創建逼真的裸體照片

AI Clothes Remover
用於從照片中去除衣服的線上人工智慧工具。

Undress AI Tool
免費脫衣圖片

Clothoff.io
AI脫衣器

Video Face Swap
使用我們完全免費的人工智慧換臉工具,輕鬆在任何影片中換臉!

熱門文章

熱工具

記事本++7.3.1
好用且免費的程式碼編輯器

SublimeText3漢化版
中文版,非常好用

禪工作室 13.0.1
強大的PHP整合開發環境

Dreamweaver CS6
視覺化網頁開發工具

SublimeText3 Mac版
神級程式碼編輯軟體(SublimeText3)
 vue中怎麼用bootstrap
Apr 07, 2025 pm 11:33 PM
在 Vue.js 中使用 Bootstrap 分為五個步驟:安裝 Bootstrap。在 main.js 中導入 Bootstrap。直接在模板中使用 Bootstrap 組件。可選:自定義樣式。可選:使用插件。
 vue怎麼給按鈕添加函數
Apr 08, 2025 am 08:51 AM
可以通過以下步驟為 Vue 按鈕添加函數:將 HTML 模板中的按鈕綁定到一個方法。在 Vue 實例中定義該方法並編寫函數邏輯。
 vue中的watch怎麼用
Apr 07, 2025 pm 11:36 PM
Vue.js 中的 watch 選項允許開發者監聽特定數據的變化。當數據發生變化時,watch 會觸發一個回調函數,用於執行更新視圖或其他任務。其配置選項包括 immediate,用於指定是否立即執行回調,以及 deep,用於指定是否遞歸監聽對像或數組的更改。
 vue多頁面開發是啥意思
Apr 07, 2025 pm 11:57 PM
Vue 多頁面開發是一種使用 Vue.js 框架構建應用程序的方法,其中應用程序被劃分為獨立的頁面:代碼維護性:將應用程序拆分為多個頁面可以使代碼更易於管理和維護。模塊化:每個頁面都可以作為獨立的模塊,便於重用和替換。路由簡單:頁面之間的導航可以通過簡單的路由配置來管理。 SEO 優化:每個頁面都有自己的 URL,這有助於搜索引擎優化。
 React與Vue:Netflix使用哪個框架?
Apr 14, 2025 am 12:19 AM
NetflixusesAcustomFrameworkcalled“ Gibbon” BuiltonReact,notReactorVuedIrectly.1)TeamSperience:selectBasedonFamiliarity.2)ProjectComplexity:vueforsimplerprojects:reactforforforproproject,reactforforforcompleplexones.3)cocatizationneedneeds:reactoffipicatizationneedneedneedneedneedneeds:reactoffersizationneedneedneedneedneeds:reactoffersizatization needefersmoreflexibleise.4)
 vue返回上一頁的方法
Apr 07, 2025 pm 11:30 PM
Vue.js 返回上一頁有四種方法:$router.go(-1)$router.back()使用 <router-link to="/"> 組件window.history.back(),方法選擇取決於場景。
 vue.js怎麼引用js文件
Apr 07, 2025 pm 11:27 PM
在 Vue.js 中引用 JS 文件的方法有三種:直接使用 <script> 標籤指定路徑;利用 mounted() 生命週期鉤子動態導入;通過 Vuex 狀態管理庫進行導入。
 vue遍歷怎麼用
Apr 07, 2025 pm 11:48 PM
Vue.js 遍歷數組和對像有三種常見方法:v-for 指令用於遍歷每個元素並渲染模板;v-bind 指令可與 v-for 一起使用,為每個元素動態設置屬性值;.map 方法可將數組元素轉換為新數組。


