

Bootstrap中Typeahead元件的使用方法


Bootstrap 中的 Typeahead 组件就是通常所说的自动完成 AutoComplete,功能很强大,但是,使用上并不太方便。这里我们将介绍一下这个组件的使用。
相关推荐:《bootstrap基础教程》
第一,简单使用
首先,最简单的使用方式,就是直接在标记中声明,通过 data-provide="typeahead" 来声明这是一个 typeahead 组件,通过 data-source= 来提供数据。当然了,你还必须提供 bootstrap-typeahead.js 脚本。
<html>
<head>
<link href="bootstrap.min.css" rel="stylesheet" type="text/css" />
</head>
<body>
<div style="margin: 50px 50px">
<label for="product_search">Product Search: </label>
<input id="product_search" type="text" data-provide="typeahead"
data-source='["Deluxe Bicycle", "Super Deluxe Trampoline", "Super Duper Scooter"]'>
</div>
<script src="js/jquery-1.8.3.min.js"></script>
<script src="js/bootstrap-typeahead.js"></script>
</body>
</html>第二,使用脚本填充数据
通常,我们使用脚本来填充数据,那么,页面可以变成如下的形式。
<html>
<head>
<link href="bootstrap.min.css" rel="stylesheet" type="text/css" />
</head>
<body>

<div style="margin: 50px 50px">
<label for="product_search">Product Search: </label>
<input id="product_search" type="text" data-provide="typeahead">
</div>

<script src="js/jquery-1.8.3.min.js"></script>
<script src="js/bootstrap-typeahead.js"></script>

<script>
$(document).ready(function($) {
   // Workaround for bug in mouse item selection
   $.fn.typeahead.Constructor.prototype.blur = function() {
      var that = this;
      setTimeout(function () { that.hide() }, 250);
   };

   $('#product_search').typeahead({
      source: function(query, process) {
         return ["Deluxe Bicycle", "Super Deluxe Trampoline", "Super Duper Scooter"];
      }
   });
})
</script>

</body>
</html>注意,我们提供了一个 source 函数来提供数据,这个函数接收两个参数,第一个参数 query 表示用户的输入,第二个参数是 process 函数,这个 process 函数是 typeahead 提供的,用来处理我们的数据。
如果你希望通过 Ajax 调用从服务器端获取匹配的数据,那么,在异步完成的处理函数中,你需要获取一个匹配的字符串数组,然后,将这个数组作为参数,调用 process 函数。
第三,支持 Ajax 获取数据
说了半天,数据都是从本地获取的,到底如何从服务器端获取数据呢?
其实很简单,在 source 函数中,自己调用 Ajax 方法来获取数据,主要注意的是,在获取数据之后,调用 typeahead 的 process 函数处理即可。
$('#product_search').typeahead({
    source: function (query, process) {
        var parameter = {query: query};
        $.post('@Url.Action("AjaxService")', parameter, function (data) {
            process(data);
        });
    }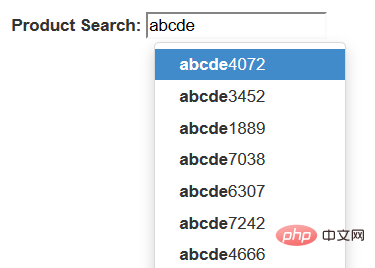
});当然了,在服务器上,你需要创建一个服务来提供数据,这里,我们演示使用随机数来生成一组随机数据的方法。
public ActionResult AjaxService(string query)
{
    System.Collections.ArrayList list
        = new System.Collections.ArrayList();
    System.Random random = new Random();

    for (int i = 0; i < 20; i++)
    {
        string item  = string.Format("{0}{1}", query, random.Next(10000));
        list.Add(item);
    }
    return this.Json(list);
}第四,使用 highlighter 和 updater
除了使用 source 函数之外,还可以使用 highlighter 函数来特别处理匹配项目的显示,使用 updater 函数,在选择了某个匹配项之后,做出一些后继的处理。

默认的 highlighter 是这样实现的,item 是匹配的项目,找到匹配的部分之后,使用 加粗了。 而 updater 的默认实现就更加简单了。 我们可以重写这两个函数,来实现自定义的处理。 实际上,你的数据可能是一组对象而不是一个字符串数组,下面的例子中,我们使用一个产品对象的数组来说明,每个产品对象有一个 id 编号,还有名称 name 和价格 price . 我们希望能够在提示中显示产品的更加详细的信息。 首先,修改我们的 source 函数,原来这个函数返回一个字符串的数组,现在我们返回一个产品 id 的数组,但是,process 函数期望得到一个字符串数组的参数,所以,我们将每个 id 都转换为字符串类型。 然后,typeahead 组件就会调用 matcher 函数来检查用户的输入是否与某个项目匹配,你可以使用产品的 id 在产品列表中获取产品对象,然后检查产品的名称与用户的输入是否匹配。 默认的 matcher 直接使用用户的输入来匹配,我们如果使用 id 的话,显然不能匹配,我们需要重写 matcher 函数。 matcher 接收一个当前项目的字符串,用户当前的输入为 this.query,匹配返回 true, 否则返回 false. 默认的 matcher 如下: 将它重写为永远匹配,直接返回 true。而在 highlighter 中将显示结果替换为希望的产品名称和价格组合。在下一步的 highlighter 中,我们使用 Underscore 组件中的 find 方法,通过产品的 id 在产品列表中获取产品对象,然后,显示产品名称和价格的组合。 默认的 updater 直接返回当前匹配的内容,我们这里是一个 id, 需要重写。 在用户选择之后,typeahead 将会调用 updater 函数,我们通过产品的 id 在产品列表中获取产品对象,然后 最后,updater 函数返回一个产品名称的字符串,为输入框提供内容。setSelectedProduct 是我们的一个自定义函数。 下面是全部的代码。 更多编程相关知识,请访问:编程入门!! 以上是Bootstrap中Typeahead元件的使用方法的詳細內容。更多資訊請關注PHP中文網其他相關文章!highlighter: function (item) {
var query = this.query.replace(/[\-\[\]{}()*+?.,\\\^$|#\s]/g, '\\$&')
return item.replace(new RegExp('(' + query + ')', 'ig'), function ($1, match) {
return '<strong>' + match + '</strong>'
})
}updater: function (item) {
return item
}<html>
<head>
<link href="bootstrap.min.css" rel="stylesheet" type="text/css" />
</head>
<body>
<div style="margin: 50px 50px">
<label for="product_search">Product Search: </label>
<input id="product_search" type="text" data-provide="typeahead">
</div>
<script src="js/jquery-1.8.3.min.js"></script>
<script src="js/bootstrap-typeahead.js"></script>
<script>
$(document).ready(function($) {
// Workaround for bug in mouse item selection
$.fn.typeahead.Constructor.prototype.blur = function() {
var that = this;
setTimeout(function () { that.hide() }, 250);
};
$('#product_search').typeahead({
source: function(query, process) {
return ["Deluxe Bicycle", "Super Deluxe Trampoline", "Super Duper Scooter"];
},
highlighter: function(item) {
return "==>" + item + "<==";
},
updater: function(item) {
console.log("'" + item + "' selected.");
return item;
}
});
})
</script>
</body>
</html>第五,使用对象数据
<html>
<head>
    <link href="~/Content/dist/css/bootstrap.min.css" rel="stylesheet" />
</head>
<body>

    <div style="margin: 50px 50px">
        <label for="product_search">Product Search: </label>
        <input id="product_search" type="text" data-provide="typeahead">
    </div>
    <script src="~/Content/dist/js/jquery.js"></script>
    <script src="~/Content/dist/js/bootstrap-typeahead.js"></script>
    <script src="~/Content/dist/js/underscore-min.js"></script>


    <script>
        $(document).ready(function ($) {
            // Workaround for bug in mouse item selection
            $.fn.typeahead.Constructor.prototype.blur = function () {
                var that = this;
                setTimeout(function () { that.hide() }, 250);
            };

            var products = [
            {
                id: 0,
                name: "Deluxe Bicycle",
                price: 499.98
            },
            {
                id: 1,
                name: "Super Deluxe Trampoline",
                price: 134.99
            },
            {
                id: 2,
                name: "Super Duper Scooter",
                price: 49.95
            }
            ];

            $('#product_search').typeahead({
                source: function (query, process) {
                    var results = _.map(products, function (product) {
                        return product.name;
                    });
                    process(results);
                },

                highlighter: function (item) {
                    return "==>" + item + "<==";
                },

                updater: function (item) {
                    console.log("'" + item + "' selected.");
                    return item;
                }
            });
        })
    </script>

</body>
</html>第六,高级用法
, matcher: function (item) {    return ~item.toLowerCase().indexOf(this.query.toLowerCase())
}highlighter: function (id) { var product = _.find(products, function (p) { return p.id == id;
}); return product.name + " ($" + product.price + ")";
}updater: function (item) { return item
}updater: function (id) {
var product = _.find(products, function (p) {
return p.id == id;
});
that.setSelectedProduct(product);
return product.name;
}<html>
<head>
<link href="~/Content/dist/css/bootstrap.min.css" rel="stylesheet" />
</head>
<body>
<div style="margin: 50px 50px">
<label for="product_search">Product Search: </label>
<input id="product_search" type="text" data-provide="typeahead">
<div id="product" style="border-width: 1; padding: 5px; border-style: solid"></div>
</div>
<script src="~/Content/dist/js/jquery.js"></script>
<script src="~/Content/dist/js/bootstrap-typeahead.js"></script>
<script src="~/Content/dist/js/underscore-min.js"></script>
<script>
$(document).ready(function ($) {
// Workaround for bug in mouse item selection
$.fn.typeahead.Constructor.prototype.blur = function () {
var that = this;
setTimeout(function () { that.hide() }, 250);
};
var products = [
{
id: 0,
name: "Deluxe Bicycle",
price: 499.98
},
{
id: 1,
name: "Super Deluxe Trampoline",
price: 134.99
},
{
id: 2,
name: "Super Duper Scooter",
price: 49.95
}
];
var that = this;
$('#product_search').typeahead({
source: function (query, process) {
$('#product').hide();
var results = _.map(products, function (product) {
return product.id + "";
});
process(results);
},
matcher: function (item) {
return true;
},
highlighter: function (id) {    var product = _.find(products, function (p) {        return p.id == id;
    });    return product.name + " ($" + product.price + ")";
},
updater: function (id) {
    var product = _.find(products, function (p) {
        return p.id == id;
    });
    that.setSelectedProduct(product);
    return product.name;
}
});
$('#product').hide();
this.setSelectedProduct = function (product) {
$('#product').html("Purchase: <strong>" + product.name + " ($" + product.price + ")</strong>").show();
}
})
</script>
</body>
</html>

熱AI工具

Undresser.AI Undress
人工智慧驅動的應用程序,用於創建逼真的裸體照片

AI Clothes Remover
用於從照片中去除衣服的線上人工智慧工具。

Undress AI Tool
免費脫衣圖片

Clothoff.io
AI脫衣器

Video Face Swap
使用我們完全免費的人工智慧換臉工具,輕鬆在任何影片中換臉!

熱門文章
熱工具

記事本++7.3.1
好用且免費的程式碼編輯器

SublimeText3漢化版
中文版,非常好用

禪工作室 13.0.1
強大的PHP整合開發環境

Dreamweaver CS6
視覺化網頁開發工具

SublimeText3 Mac版
神級程式碼編輯軟體(SublimeText3)


 vue中怎麼用bootstrap
Apr 07, 2025 pm 11:33 PM
vue中怎麼用bootstrap
Apr 07, 2025 pm 11:33 PM
在 Vue.js 中使用 Bootstrap 分為五個步驟:安裝 Bootstrap。在 main.js 中導入 Bootstrap。直接在模板中使用 Bootstrap 組件。可選:自定義樣式。可選:使用插件。
 bootstrap搜索欄怎麼獲取
Apr 07, 2025 pm 03:33 PM
bootstrap搜索欄怎麼獲取
Apr 07, 2025 pm 03:33 PM
如何使用 Bootstrap 獲取搜索欄的值:確定搜索欄的 ID 或名稱。使用 JavaScript 獲取 DOM 元素。獲取元素的值。執行所需的操作。
 bootstrap垂直居中怎麼弄
Apr 07, 2025 pm 03:21 PM
bootstrap垂直居中怎麼弄
Apr 07, 2025 pm 03:21 PM
使用 Bootstrap 實現垂直居中:flexbox 法:使用 d-flex、justify-content-center 和 align-items-center 類,將元素置於 flexbox 容器內。 align-items-center 類法:對於不支持 flexbox 的瀏覽器,使用 align-items-center 類,前提是父元素具有已定義的高度。
 bootstrap怎麼寫分割線
Apr 07, 2025 pm 03:12 PM
bootstrap怎麼寫分割線
Apr 07, 2025 pm 03:12 PM
創建 Bootstrap 分割線有兩種方法:使用 標籤,可創建水平分割線。使用 CSS border 屬性,可創建自定義樣式的分割線。
 bootstrap怎麼設置框架
Apr 07, 2025 pm 03:27 PM
bootstrap怎麼設置框架
Apr 07, 2025 pm 03:27 PM
要設置 Bootstrap 框架,需要按照以下步驟:1. 通過 CDN 引用 Bootstrap 文件;2. 下載文件並將其託管在自己的服務器上;3. 在 HTML 中包含 Bootstrap 文件;4. 根據需要編譯 Sass/Less;5. 導入定製文件(可選)。設置完成後,即可使用 Bootstrap 的網格系統、組件和样式創建響應式網站和應用程序。
 bootstrap怎麼插入圖片
Apr 07, 2025 pm 03:30 PM
bootstrap怎麼插入圖片
Apr 07, 2025 pm 03:30 PM
在 Bootstrap 中插入圖片有以下幾種方法:直接插入圖片,使用 HTML 的 img 標籤。使用 Bootstrap 圖像組件,可以提供響應式圖片和更多樣式。設置圖片大小,使用 img-fluid 類可以使圖片自適應。設置邊框,使用 img-bordered 類。設置圓角,使用 img-rounded 類。設置陰影,使用 shadow 類。調整圖片大小和位置,使用 CSS 樣式。使用背景圖片,使用 background-image CSS 屬性。
 bootstrap按鈕怎麼用
Apr 07, 2025 pm 03:09 PM
bootstrap按鈕怎麼用
Apr 07, 2025 pm 03:09 PM
如何使用 Bootstrap 按鈕?引入 Bootstrap CSS創建按鈕元素並添加 Bootstrap 按鈕類添加按鈕文本
 bootstrap怎麼調整大小
Apr 07, 2025 pm 03:18 PM
bootstrap怎麼調整大小
Apr 07, 2025 pm 03:18 PM
要調整 Bootstrap 中元素大小,可以使用尺寸類,具體包括:調整寬度:.col-、.w-、.mw-調整高度:.h-、.min-h-、.max-h-
