

詳解Angular中的路由守衛

本篇文章跟大家介紹一下Angular路由中的路由守衛。有一定的參考價值,有需要的朋友可以參考一下,希望對大家有幫助。

相關推薦:《angular教學》
一、路由守衛
當使用者滿足一定條件才被允許進入或離開一個路由。
路由守衛場景:
只有當使用者登入並擁有某些權限的時候才能進入某些路由。
一個由多個表單組成的嚮導,例如註冊流程,使用者只有在目前路由的元件中填寫了滿足要求的資訊才可以導航到下一個路由。
當使用者未執行儲存操作而試圖離開目前導覽時提醒使用者。
Angular提供了一些鉤子幫助控制進入或離開路由。這些鉤子就是路由守衛,可以透過這些鉤子實現上面場景。
- CanActivate: 處理導覽到某路由的情況。
- CanDeactivate: 處理從目前路由離開的情況。
- Resolve: 在路由啟動之前取得路由資料。
設定路由時候用到一些屬性,path, component, outlet, children, 路由守衛也是路由屬性。
二、CanActivate
實例:只讓登入使用者進入產品資訊路由。
新guard目錄。目錄下新建login.guard.ts。
LoginGuard類別實作CanActivate接口,傳回true或false,Angular根據回傳值判斷請求通過或不通過。
import { CanActivate } from "@angular/router";

export class LoginGuard implements CanActivate{
    canActivate(){
        let loggedIn :boolean= Math.random()<0.5;
        if(!loggedIn){
            console.log("用户未登录");
        }
        return loggedIn;
    }
}設定product路由。先把LoginGuard加入providers,在指定路由守衛。
canActivate可以指定多個守衛,值是一個陣列。
const routes: Routes = [
  { path: '', redirectTo : 'home',pathMatch:'full' },
  { path: 'chat', component: ChatComponent, outlet: "aux"},//辅助路由
  { path: 'home', component: HomeComponent },
  { path: 'product/:id', component: ProductComponent, children:[
    { path: '', component : ProductDescComponent },
    { path: 'seller/:id', component : SellerInfoComponent }
  ] ,canActivate: [LoginGuard]},
  { path: '**', component: Code404Component }
];效果:點商品詳情連結控制台會提醒使用者未登錄,無法進入商品詳情路由。

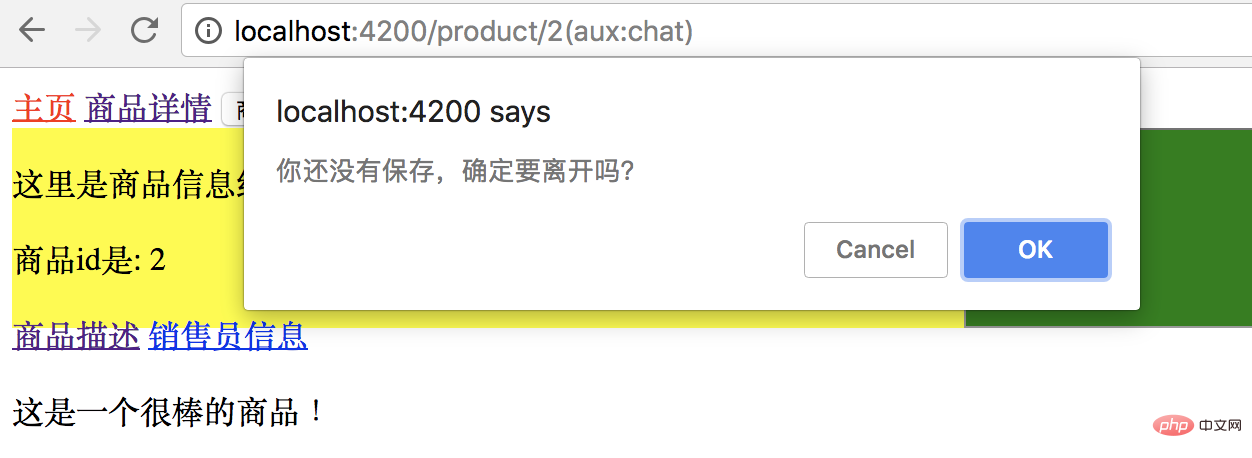
三、CanDeactivate
#離開時候的路由守衛。提醒使用者執行儲存操作後才能離開。
在guard目錄下新建一個unsave.guard.ts的檔案。
CanDeactivate介面有一個範式,指定目前元件的類型。
CanDeactivate方法第一個參數是介面指定的範式類型的元件,根據這個要保護的元件的狀態,或是呼叫方法來決定使用者是否能夠離開。
import { CanDeactivate } from "@angular/router";
import { ProductComponent } from "../product/product.component";
export class UnsaveGuard implements CanDeactivate<ProductComponent>{
//第一个参数 范型类型的组件
//根据当前要保护组件 的状态 判断当前用户是否能够离开
canDeactivate(component: ProductComponent){
return window.confirm('你还没有保存,确定要离开吗?');
}
}設定路由,同樣先加到provider,再設定路由。
import { NgModule } from '@angular/core';
import { Routes, RouterModule } from '@angular/router';
import { HomeComponent } from './home/home.component';
import { ProductComponent } from './product/product.component';
import { Code404Component } from './code404/code404.component';
import { ProductDescComponent } from './product-desc/product-desc.component';
import { SellerInfoComponent } from './seller-info/seller-info.component';
import { ChatComponent } from './chat/chat.component';
import { LoginGuard } from './guard/login.guard';
import { UnsaveGuard } from './guard/unsave.guard';

const routes: Routes = [
  { path: '', redirectTo : 'home',pathMatch:'full' },
  { path: 'chat', component: ChatComponent, outlet: "aux"},//辅助路由
  { path: 'home', component: HomeComponent },
  { path: 'product/:id', component: ProductComponent, children:[
    { path: '', component : ProductDescComponent },
    { path: 'seller/:id', component : SellerInfoComponent }
  ] ,canActivate: [LoginGuard],
     canDeactivate: [UnsaveGuard]},
  { path: '**', component: Code404Component }
];

@NgModule({
  imports: [RouterModule.forRoot(routes)],
  exports: [RouterModule],
  providers: [LoginGuard,UnsaveGuard]
})
export class AppRoutingModule { }效果:
點ok離開目前頁面,cancel留在目前頁面。
四、Resolve守衛
#http要求資料回傳有延遲,導致模版無法立刻顯示。
資料傳回之前模版上所有需要用插值表達式顯示某個controller的值的地方都是空的。用戶體驗不好。
resolve解決方法:在進入路由之前去伺服器讀數據,把需要的數據都讀好以後,帶著這些數據進到路由裡,立刻就把數據顯示出來。
實例:
在進入商品資訊路由之前,準備好商品資訊再進入路由。 拿不到訊息,或是拿訊息出問題了,直接跳到錯誤訊息頁面,或是彈出提示,就不再進入目標路由。
先在product.component.ts中宣告商品資訊類型。
export class Product{
  constructor(public id:number, public name:string){
  }
}在guard目錄下新建product.resolve.ts。 ProductResolve類別實作了Resolve介面。
Resolve也要宣告一個範式,範型就是resolve要解析出來的資料的型別。
import { Resolve, ActivatedRouteSnapshot, RouterStateSnapshot, Router } from "@angular/router";
import { Injectable } from "@angular/core";
import { Observable } from "rxjs/Observable";
import { Product } from "../product/product.component";
@Injectable()
export class ProductResolve implements Resolve<Product>{
constructor(private router: Router) {
}
resolve(route: ActivatedRouteSnapshot, state: RouterStateSnapshot): Observable<any> | Promise<any> | any {
let productId: number = route.params["id"];
if (productId == 2) { //正确id
return new Product(1, "iPhone7");
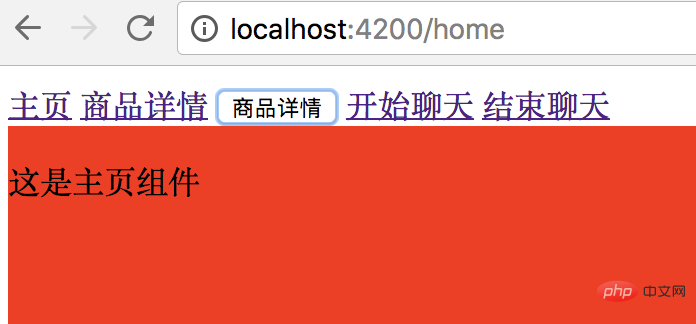
} else { //id不是1导航回首页
this.router.navigate(["/home"]);
return undefined;
}
}
}路由配置:Provider裡聲明,product路由裡配置。
resolve是一個對象,對象裡參數的名字就是想傳入的參數的名字product,用ProductResolve來解析生成。
import { NgModule } from '@angular/core';
import { Routes, RouterModule } from '@angular/router';
import { HomeComponent } from './home/home.component';
import { ProductComponent } from './product/product.component';
import { Code404Component } from './code404/code404.component';
import { ProductDescComponent } from './product-desc/product-desc.component';
import { SellerInfoComponent } from './seller-info/seller-info.component';
import { ChatComponent } from './chat/chat.component';
import { LoginGuard } from './guard/login.guard';
import { UnsaveGuard } from './guard/unsave.guard';
import { ProductResolve } from './guard/product.resolve';

const routes: Routes = [
  { path: '', redirectTo : 'home',pathMatch:'full' },
  { path: 'chat', component: ChatComponent, outlet: "aux"},//辅助路由
  { path: 'home', component: HomeComponent },
  { path: 'product/:id', component: ProductComponent, children:[
    { path: '', component : ProductDescComponent },
    { path: 'seller/:id', component : SellerInfoComponent }
  ] ,
    //  canActivate: [LoginGuard],
    //  canDeactivate: [UnsaveGuard],
    resolve:{ //resolve是一个对象
      product : ProductResolve   //想传入product,product由ProductResolve生成
    }},
  { path: '**', component: Code404Component }
];

@NgModule({
  imports: [RouterModule.forRoot(routes)],
  exports: [RouterModule],
  providers: [LoginGuard,UnsaveGuard,ProductResolve]
})
export class AppRoutingModule { }修改一下product.component.ts 和模版,顯示商品id和name。
import { Component, OnInit } from '@angular/core';
import { ActivatedRoute, Params } from '@angular/router';

@Component({
  selector: 'app-product',
  templateUrl: './product.component.html',
  styleUrls: ['./product.component.css']
})
export class ProductComponent implements OnInit {

  private productId: number;
  private productName: string;
  constructor(private routeInfo: ActivatedRoute) { }

  ngOnInit() {
    // this.routeInfo.params.subscribe((params: Params)=> this.productId=params["id"]);
    this.routeInfo.data.subscribe(
      (data:{product:Product})=>{
        this.productId=data.product.id;
        this.productName=data.product.name;
      }
    );
  }

}

export class Product{
  constructor(public id:number, public name:string){
  }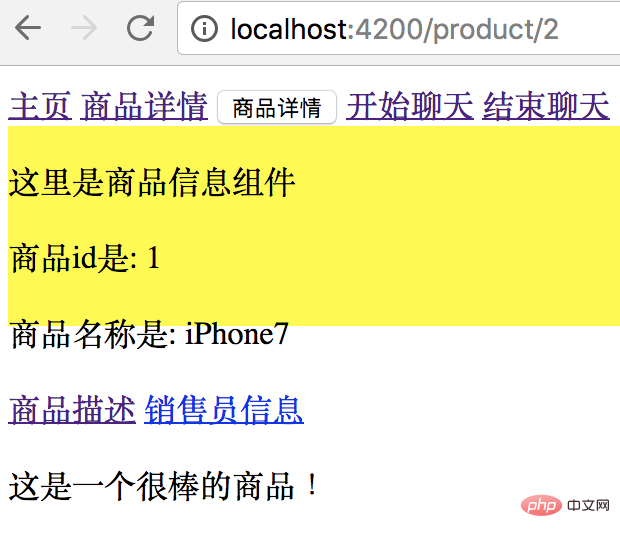
}<div class="product">
<p>
这里是商品信息组件
</p>
<p>
商品id是: {{productId}}
</p>
<p>
商品名称是: {{productName}}
</p>
<a [routerLink]="['./']">商品描述</a>
<a [routerLink]="['./seller',99]">销售员信息</a>
<router-outlet></router-outlet>
</div>效果:
點商品詳情鏈接,傳入商品ID為2,在resolve守衛中是正確id,會返回一條商品資料。
點商品詳情按鈕,傳入商品ID是3,是錯誤id,會直接跳到首頁。
本文轉載自:http://www.cnblogs.com/starof/p/9012193.html
#更多程式相關知識,請造訪:程式設計影片! !
以上是詳解Angular中的路由守衛的詳細內容。更多資訊請關注PHP中文網其他相關文章!

熱AI工具

Undresser.AI Undress
人工智慧驅動的應用程序,用於創建逼真的裸體照片

AI Clothes Remover
用於從照片中去除衣服的線上人工智慧工具。

Undress AI Tool
免費脫衣圖片

Clothoff.io
AI脫衣器

Video Face Swap
使用我們完全免費的人工智慧換臉工具,輕鬆在任何影片中換臉!

熱門文章
熱工具

記事本++7.3.1
好用且免費的程式碼編輯器

SublimeText3漢化版
中文版,非常好用

禪工作室 13.0.1
強大的PHP整合開發環境

Dreamweaver CS6
視覺化網頁開發工具

SublimeText3 Mac版
神級程式碼編輯軟體(SublimeText3)


 如何在Ubuntu 24.04上安裝Angular
Mar 23, 2024 pm 12:20 PM
如何在Ubuntu 24.04上安裝Angular
Mar 23, 2024 pm 12:20 PM
Angular.js是一種可自由存取的JavaScript平台,用於建立動態應用程式。它允許您透過擴展HTML的語法作為模板語言,以快速、清晰地表示應用程式的各個方面。 Angular.js提供了一系列工具,可協助您編寫、更新和測試程式碼。此外,它還提供了許多功能,如路由和表單管理。本指南將討論在Ubuntu24上安裝Angular的方法。首先,您需要安裝Node.js。 Node.js是一個基於ChromeV8引擎的JavaScript運行環境,可讓您在伺服器端執行JavaScript程式碼。要在Ub
 在Slim框架中實作API路由的方法
Aug 02, 2023 pm 05:13 PM
在Slim框架中實作API路由的方法
Aug 02, 2023 pm 05:13 PM
在Slim框架中實作API路由的方法Slim是一款輕量級的PHP微型框架,它提供了一個簡單且靈活的方式來建立Web應用程式。其中一個主要功能是實作API路由,使我們能夠將不同的請求對應到對應的處理程序。本文將介紹如何在Slim框架中實作API路由,並提供一些程式碼範例。首先,我們需要安裝Slim框架。可以透過Composer來安裝最新版本的Slim。打開終端機並
 使用Angular和Node進行基於令牌的身份驗證
Sep 01, 2023 pm 02:01 PM
使用Angular和Node進行基於令牌的身份驗證
Sep 01, 2023 pm 02:01 PM
身份驗證是任何網路應用程式中最重要的部分之一。本教程討論基於令牌的身份驗證系統以及它們與傳統登入系統的差異。在本教程結束時,您將看到一個用Angular和Node.js編寫的完整工作演示。傳統身份驗證系統在繼續基於令牌的身份驗證系統之前,讓我們先來看看傳統的身份驗證系統。使用者在登入表單中提供使用者名稱和密碼,然後點擊登入。發出請求後,透過查詢資料庫在後端驗證使用者。如果請求有效,則使用從資料庫中獲取的使用者資訊建立會話,然後在回應頭中傳回會話訊息,以便將會話ID儲存在瀏覽器中。提供用於存取應用程式中受
 Angular元件及其顯示屬性:了解非block預設值
Mar 15, 2024 pm 04:51 PM
Angular元件及其顯示屬性:了解非block預設值
Mar 15, 2024 pm 04:51 PM
Angular框架中元件的預設顯示行為不是區塊級元素。這種設計選擇促進了元件樣式的封裝,並鼓勵開發人員有意識地定義每個元件的顯示方式。透過明確設定CSS屬性 display,Angular組件的顯示可以完全控制,從而實現所需的佈局和響應能力。
 Java Apache Camel:打造靈活且有效率的服務導向架構
Feb 19, 2024 pm 04:12 PM
Java Apache Camel:打造靈活且有效率的服務導向架構
Feb 19, 2024 pm 04:12 PM
ApacheCamel是一個基於企業服務匯流排(ESB)的整合框架,它可以輕鬆地將不同的應用程式、服務和資料來源整合在一起,從而實現複雜的業務流程自動化。 ApacheCamel使用基於路由的設定方式,可以輕鬆定義和管理整合流程。 ApacheCamel的主要特點包括:靈活性:ApacheCamel可以輕鬆地與各種應用程式、服務和資料來源整合。它支援多種協議,包括Http、JMS、SOAP、FTP等。高效性:ApacheCamel非常高效,它可以處理大量的訊息。它使用非同步訊息傳遞機制,可以提高效能。可擴
 如何在ThinkPHP6中使用路由
Jun 20, 2023 pm 07:54 PM
如何在ThinkPHP6中使用路由
Jun 20, 2023 pm 07:54 PM
ThinkPHP6是一款強大的PHP框架,具有便利的路由功能,可輕鬆實現URL路由配置;同時,ThinkPHP6也支援多種路由模式,如GET、POST、PUT、DELETE等等。本文將介紹如何使用ThinkPHP6進行路由設定。一、ThinkPHP6路由模式GET方式:GET方式是用來取得資料的一種方式,常用於頁面展示。在ThinkPHP6中,可以使用如下
 如何在Vue專案中使用路由實現頁面切換動畫效果的客製化?
Jul 21, 2023 pm 02:37 PM
如何在Vue專案中使用路由實現頁面切換動畫效果的客製化?
Jul 21, 2023 pm 02:37 PM
如何在Vue專案中使用路由實現頁面切換動畫效果的客製化?引言:在Vue專案中,路由是我們常用的功能之一。透過路由可以實現頁面之間的切換,提供了良好的使用者體驗。而為了讓頁面切換更加生動,我們可以透過客製化動畫效果來實現。本文將介紹如何在Vue專案中使用路由實現頁面切換動畫效果的客製化。建立Vue專案首先,我們需要建立一個Vue專案。可以使用VueCLI來快速搭建
 PHP中靈活配置路由規則的實作方法與經驗總結
Oct 15, 2023 pm 03:43 PM
PHP中靈活配置路由規則的實作方法與經驗總結
Oct 15, 2023 pm 03:43 PM
PHP中靈活配置路由規則的實作方法和經驗總結引言:在Web開發中,路由規則是非常重要的一部分,它決定了URL與特定的PHP腳本的對應關係。在傳統的開發方式中,我們通常會在路由檔案中設定各種URL規則,然後將URL與對應的腳本路徑進行對應。但是,隨著專案的複雜度增加和業務需求的變化,如果每個URL都需要手動配置,將會變得非常麻煩且不靈活。那麼,在PHP中如何實
