在開發Angular 元件的過程中,我們習慣把元件的樣式寫在對應的css 檔案中,但一直不了解Angular 是怎麼做樣式隔離的,例如在A 元件中寫了h1 { color: red },這個樣式只會在A 元件中生效,而不會影響到其他的元件。為了探究原理,就有了這篇文章,以下內容是基於 Angular CLI 10.1.1 版本創建。
#先用Angular CLI 建立一個新的Angular 項目,刪除 app.component.html 中的所有內容,替換成如下內容:
1 2 |
|
在app.component.css 中新增以下內容:
1 2 3 |
|
運行時有以下html 程式碼:
1 2 3 4 |
|
可以看到在在app-root 元素上有一個名為_nghost-ydo-c11 的屬性(property), app-root 裡面的兩個元素都有一個名為_ngcontent-ydo-c11 的屬性。 【相關教學推薦:《angular教學》】
那麼這些屬性是用來做什麼的呢?
為了更好的理解,我們先建立一個獨立的元件,新檔案blue-button.component.ts,內容如下:
1 2 3 4 5 6 7 8 9 10 11 12 13 14 15 |
|
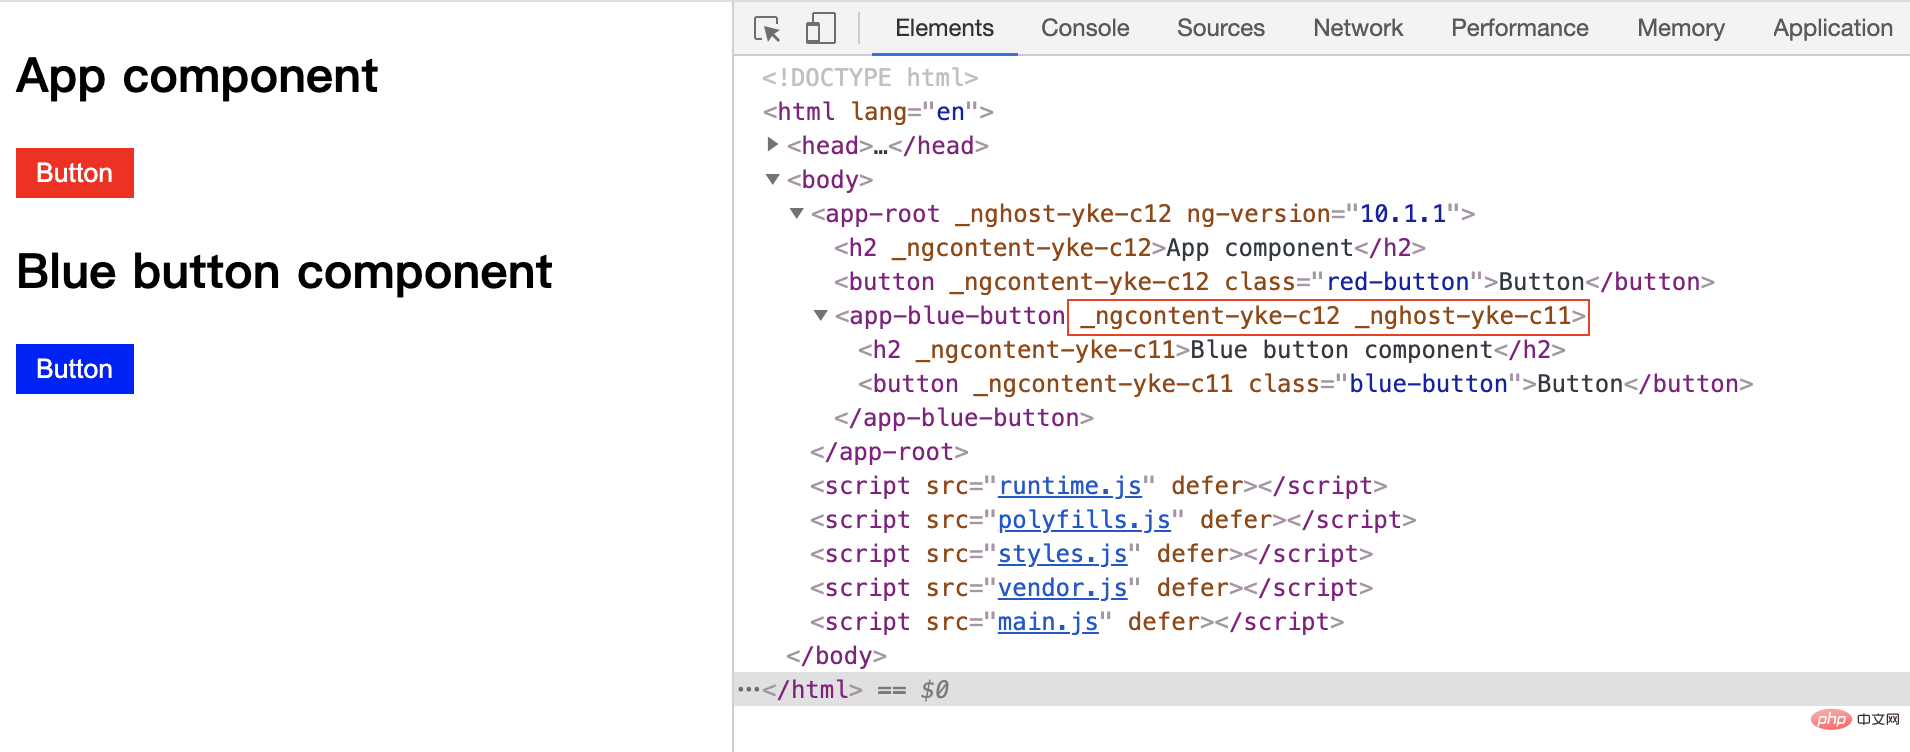
放到app.component.html 中運行後,會看到如下html 程式碼:

#可以看到app-blue-button 中也有一個以_nghost-xxx 開頭的屬性,還有一個和app-root 中其他元素相同的屬性。而在元件裡面的兩個元素都有一個名為 _ngcontent-yke-c11 的屬性。
由於每次運行,Angular 產生的屬性字串都是隨機的,所以後面的程式碼如果出現了類似的屬性都是按照這個截圖對應的。
透過觀察我們可以總結:
_nghost_xxx_ngcontent_xxx那麼這些屬性是怎麼用來樣式隔離的呢?
這些屬性可以和CSS 結合起來,例如當我們查看範例中藍色按鈕的樣式時,會看到這樣的css:
1 2 3 |
|
可以看出,Angular 透過這種方式使blue-button 類別只能套用在有這個屬性的元素上,而不會影響到其他元件中的元素。
知道了 Angular 對樣式隔離的行為,那麼 Angular 又是如何做到這些的呢?
在套用啟動時,Angular 將透過 styles 或 styleUrls 元件屬性來查看哪些樣式與哪些元件相關聯。之後Angular 會將這些樣式和該元件中元素特有的屬性套用在一起,將產生的 css 程式碼包裹在一個 style 標籤中並放到 header 裡。

以上就是 Angular 樣式封裝的原理。
在實際開發中,這種機制有時候並不能完全匹配我們的需求,針對這種情況, Angular 引入了幾種特殊的選擇器。
使用 :host 偽類別選擇器,用來作用於元件(宿主元素)本身。
例如,當我們想要為app-blue-button 加個邊框時,可以在這個元件的樣式中加入如下程式碼:
1 2 3 4 |
|
透過檢視執行時的程式碼,可以看到如下程式碼區塊:
1 2 3 4 5 6 |
|
有時候,基於某些來自元件檢視外部的條件應用樣式是很有用的。例如,在文件的 <body> 元素上可能有一個用於表示樣式主題 (theme) 的 CSS 類,你應該基於它來決定元件的樣式。
這時可以使用 :host-context() 偽類選擇器。它也以類似 :host() 形式使用。它在目前元件宿主元素的祖先節點中尋找 CSS 類, 直到文件的根節點為止。在與其它選擇器組合使用時,它非常有用。
在下面的範例中,會根據祖先元素的 CSS 類別是 blue-theme 還是 red-theme 來決定哪個 CSS 會生效。
1 2 3 4 5 6 7 8 9 10 11 12 13 14 15 16 17 |
|
然後在使用的地方:
1 2 3 |
|
在運行的時候按鈕背景是藍色的。
我们经常会使用一些第三方 UI 库,有时候我们想改变第三方组件的一些样式,这时候可以使用 ::ng-deep,但是要注意,Angular 已经把这个特性标记为已废弃了,可能在未来的版本就被完全移除掉。
1 2 3 |
|
通过查看运行时的代码:
1 2 3 |
|
可以看到,样式会作用在 app-root 里的所有元素上,包括 app-root 中使用的其他组件里的元素。
在实际开发中,灵活使用以上几种方式,基本上可以满足大部分场景。
更多编程相关知识,请访问:编程教学!!
以上是淺談Angular中元件樣式的工作原理的詳細內容。更多資訊請關注PHP中文網其他相關文章!


