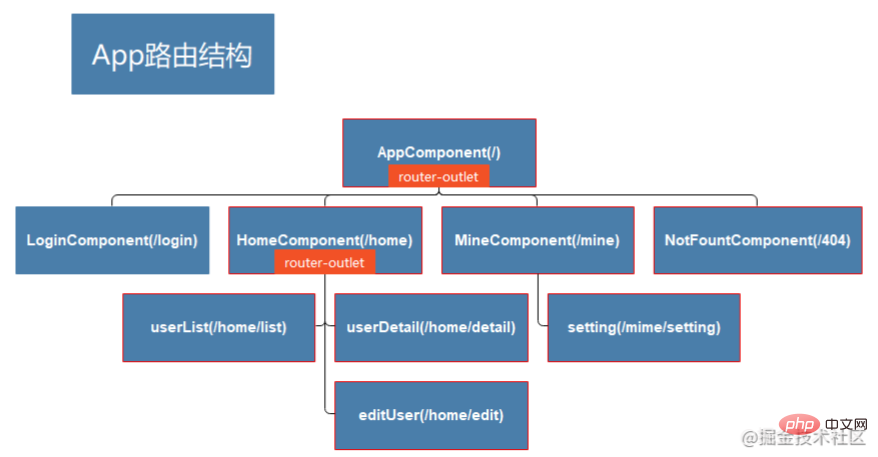
Angular中如何使用路由?這篇文章就來帶大家了解一下Angular中使用路由的方法,快速入門Angular路由,希望對大家有幫助!

路由的概念在前端的框架中得到了廣泛的應用,對於路由的感念不做闡述,路由的應用無外乎就是嵌套、傳參,高級一些的功能如懶加載、預先加載,再高級一些的如:路由守衛等。本篇我們就一起來看看Angular如何使用路由。 【相關教學推薦:《angular教學》】

建立專案&一級模組:
ng new angular-router-sample
ng g c pages/login
#ng g c pages/home
ng g c pages/mine
註:透過cli建立的元件會進行自動註冊。
#設定路由跳轉&路由出口(
router- outlet)
<div> <a [routerLink]="['/login']">登陆</a>| <a [routerLink]="['/home']">首页</a>| <a [routerLink]="['/mine']">我的</a> </div> <!-- 配置路由出口 --> <router-outlet></router-outlet>
一個最簡單的元件路由必備一個path(路由的Url)屬性和一個component(Url對應加載的元件)屬性:
const routes: Routes = [
  {
    path: 'login',
    component: LoginComponent,
  },
  {
    path: 'home',
    component: HomeComponent,
  },
  {
    path: 'mine',
    component: MineComponent,
  },
];當我們意外訪問了一個不存在的Url的時候我們的404頁面怎麼配置?
path支援一個特殊的通配符來支援“**”,當在路由表中沒有成功匹配的情況下會最後指向通配符對應的元件
const routes: Routes = [
  ...
  {
    path: '**',
    component: NotFountComponent,
  },
];注意:路由器匹配策略為先到先得,故不具體的路由配置靠後配置。
由於我們專案預設啟動後無具體路由匹配這樣並不友好,我們需要設定一個有效的默認路由來展示給使用者。
配置的預設路由應該在通配路由之上。
const routes: Routes = [
  ...
  { path: '', redirectTo: '/home', pathMatch: 'full' },
  ...
];#此時我們的路由設定全部
app-routing,這樣對於簡單的應用當然是可行的,但是隨著應用的迭代、模組的增加顯然配置在一起對於管理和擴展都是一項挑戰,模組的拆分就成來必然。
#透過cli為Home元件建立帶路由的模組配置:
ng generate module pages/home/home --module app --flat --routing
imports: [
    BrowserModule,
    HomeRoutingModule,
    AppRoutingModule,
]註:用cli建立的模組會自動配置到根模組,但我們手動的調整一下順序將AppRoutingModule移到最後,滿足先到先得的策略。
home-routingconst routes: Routes = [{
path: 'home',
component: HomeComponent,
}];:配置好後就可以把app -routing 中的Home元件配置移除了。
#執行一下指令建立子元件
ng g c pages/home/children/user-list
#ng g c pages/home/children/user-detail
#ng g c pages/home/children/edit-user
為Home路由器設定增加 children屬性來設定子元件路由
const routes: Routes = [{
  ...
  children: [
    {
      path: 'list',
      component: UserListComponent,
    },
    {
      path: 'detail',
      component: UserDetailComponent,
    },
    {
      path: 'edit',
      component: EditUserComponent,
    },
    {
      path: '',
      redirectTo: '/home/list',
      pathMatch: 'full'
    }
  ]
}];#同根元件一樣設定子模組路由出口
<div> <a [routerLink]="['/home/list']">列表</a>| <a [routerLink]="['/home/edit']">编辑</a>| <a [routerLink]="['/home/detail']">详情</a> </div> <!-- 配置路由出口 --> <router-outlet></router-outlet>
/:key的令牌佔位
{
  path: 'detail/:id',
  component: UserDetailComponent
}routerLink攜帶參數
<a [routerLink]="['/hero', hero.id]">
使用ActivatedRoute
前要在目標元件進行注入
方式1: 获取参数(路由参数变化可以被监听,适用于同一组件实例多次复用的情况)
this.route.paramMap.subscribe(
  (params: ParamMap) => {
    console.log('id :>> ', params.get('id'));
  }
)方式2: 获取参数(只获取到初始值)
const id = this.route.snapshot.paramMap.get('id')!;
ParamMap API:
| 成员 | 说明 |
|---|---|
has(name) | 如果参数名位于参数列表中,就返回 true。 |
get(name) | 如果这个 map 中有参数名对应的参数值(字符串),就返回它,否则返回 null。如果参数值实际上是一个数组,就返回它的第一个元素。 |
getAll(name) | 如果这个 map 中有参数名对应的值,就返回一个字符串数组,否则返回空数组。当一个参数名可能对应多个值的时候,请使用 getAll。 |
keys | 返回这个 map 中的所有参数名组成的字符串数组。 |
当前组件注入Router对象
无参数携带跳转:
this.router.navigate(['/home/list']);
携带参数跳转:
this.router.navigate(['/home/list', { id: this.userId, name: this.userName }]);注:矩阵URL标记法:;id=101;name=bom
懒加载的目的是将模块的挂载延迟到我们使用的时候,避免首次打开页面就进行整体加载导致页面长时间不可用。
对路由进行分组而不增加额外的路径片段
{
    path: 'home',
    loadChildren: () =>
      import('./pages/home/home.module').then((m) => m.HomeModule),
}微调
home-routing中home组件的path配置为""
const routes: Routes = [{
  path: '',
  component: HomeComponent,
  children: [
    ...
  ]
}];angular中配置懒加载后模块的加载被延迟到来使用时,但是有一些组件是需要优先加载并在使用的时候可以及时运行。
angular中的Router模块提供来两种预加载的策略:
完全不预加载,这是默认值。惰性加载的特性区仍然会按需加载。
预加载所有惰性加载的特性区。
修改方式:RouterModule.forRoot()的参数二的对象支持设置加载模式的属性preloadingStrategy,
PreloadAllModules: 预加载有所模块
NoPreloading: 默认,不进行预加载
这么鸡肋的属性必须要支持自定义,我们来看一下:
在需要预加载的路由配置对象中添加data对象并增加preload属性,值设置为true表示开启预加载。
通过cli来生成一个服务用来完成我们的预加载策略:ng generate service selective-preloading-strategy
将我们创建的服务实现接口PreloadingStrategy
自定义的策略和默认支持的两种策略使用方法一致。
import { Injectable } from '@angular/core';
import { PreloadingStrategy, Route } from '@angular/router';
import { Observable, of } from 'rxjs';

@Injectable({
  providedIn: 'root',
})
export class SelectivePreloadingStrategyService implements PreloadingStrategy {
  preloadedModules: string[] = [];

  preload(route: Route, fn: () => Observable<any>): Observable<any> {
    // 通过检查路由配置来决定是否做预加载
    if (route.data && route.data.preload && route.path != null) {
      // 参数1: 要加载的路由
      this.preloadedModules.push(route.path);
      // 参数2: 加载器
      return fn();
    } else {
      return of(null);
    }
  }
}以上就是最近对Angular路由的学习整理,对于路由还有一块守卫没有提到,我们抽时间再来整理一下。
更多编程相关知识,请访问:编程入门!!
以上是淺談Angular中如何使用路由?的詳細內容。更多資訊請關注PHP中文網其他相關文章!


