手把手教你使用純CSS繪製可愛玉兔(附程式碼)
如何用純CSS畫一隻可愛玉兔?以下這篇文章就手把手教你使用純CSS畫出可愛玉兔,希望對大家有幫助!

這裡有段小故事跟大家科普一下哦:
玉兔本是後羿,因為嫦娥奔月,而又思念後羿,後羿為了和嫦娥在一起,情願變成了她最愛的小動物--玉兔.可惜嫦娥始終不知玉兔就是她日夜思念的後羿!
下面就讓我帶領大家實現一下可愛的玉兔吧。
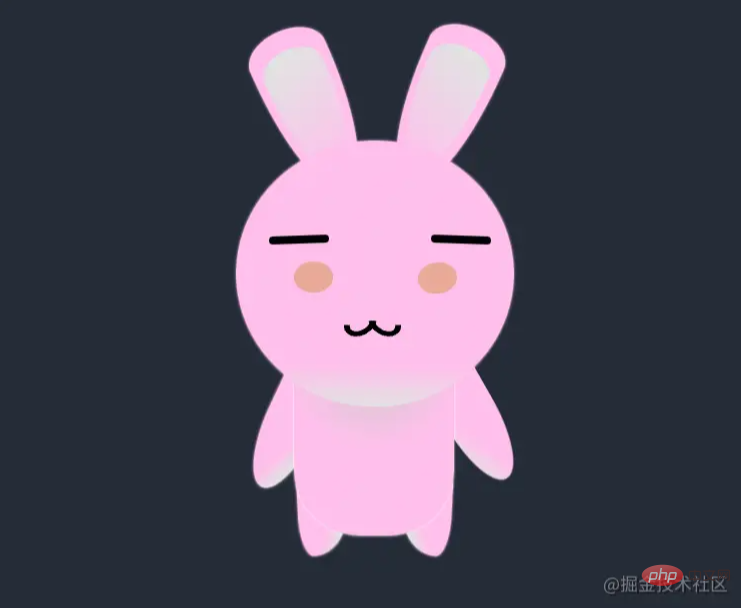
玉兔效果圖:

#實作程式碼:
html標籤
<div class="rabit">
		<div class="ear"></div>
		<div class="innerear"></div>
		<div class="ear right"></div>
		<div class="innerear right"></div>
		<div class="eye"></div>
		<div class="eye right"></div>
		<div class="shy"></div>
		<div class="shy right"></div>
		<div class="mouth"></div>
		<div class="mouth right"></div>
		<div class="head"></div>
		<div class="body"></div>
		<div class="arm"></div>
		<div class="arm right"></div>
		<div class="leg"></div>
		<div class="leg right"></div>
	</div>
css佈局
* {
		padding: 0;
		margin: 0;
	}

	body {
		background: rgb(38, 44, 56);
	}
		/* 大盒子 */
	.rabit {
		width: 300px;
		height: 300px;
		position: relative;
		margin: 120px auto;
}頭
.head {
		width: 222px;
		height: 213px;
		border-radius: 50%;
		background: linear-gradient(1deg, #e2e2e2 1%, rgb(255, 192, 236) 16%, rgb(255, 192, 236));
		box-shadow: 0 0 2px 0 rgb(255, 192, 236);
		position: absolute;
		z-index: 2;
		left: 39px;
		top: 43px;
}耳朵
# /* 耳朵 */
.ear {
width: 65px;
height: 128px;
background: rgb(255, 192, 236);
box-shadow: 0 0 2px 0 rgb(255, 192, 236);
border-radius: 80px 80px 65px 65px/53px 53px 254px 254px;
position: absolute;
left: 65px;
top: -49px;
transform: rotateZ(-24deg);
}
/* 右耳 */
.ear.right {
transform: scale(-1, 1) rotateZ(-24deg);
left: 173px;
top: -51px;
}
/* 耳朵阴影 */
.innerear {
width: 50px;
height: 100px;
background: rgb(255, 192, 236);
box-shadow: 0 0 2px 0 rgb(255, 192, 236);
background: linear-gradient(-196deg, #e2e2e2 9%, rgb(255, 192, 236));
border-radius: 80px 80px 65px 65px/53px 53px 254px 254px;
transform: rotateZ(-24deg);
position: absolute;
left: 73px;
top: -33px;
}
/* 右面阴影 */
.innerear.right {
transform: scale(-1, 1) rotateZ(-24deg);
left: 179px;
top: -35px;
}眼睛
/* 眼睛 */
	.eye {
		width: 48px;
		height: 6px;
		background: rgb(0, 0, 0);
		border-radius: 3px;
		position: absolute;
		left: 65px;
		top: 119px;
		z-index: 3;
		transform: rotate(-2deg);
	}
/* 右边眼睛 */
	.eye.right {
		left: 195px;
		top: 119px;
		transform: rotate(2deg);
}害羞圓點
/* 害羞圆 */
	.shy {
		width: 31px;
		height: 25px;
		border-radius: 50%;
		background-color: #e9a998;
		position: absolute;
		left: 85px;
		top: 140px;
		z-index: 3;
	}
/* 右边害羞圆 */
	.shy.right {
		left: 184px;
		top: 141px;
		transform: rotate(-8deg);
}嘴巴
/* 嘴 */
	.mouth {
		width: 16px;
		height: 10px;
		border: 4px solid black;
		border-right: 4px solid black;
		border-bottom: 4px solid black;
		border-left: 4px solid transparent;
		border-top: 4px solid transparent;
		border-radius: 50%;
		transform: scale(-1.2, 1) rotate(43deg);
		position: absolute;
		left: 126px;
		top: 180px;
		z-index: 3;
	}
/* 嘴右边 */
	.mouth.right {
		transform: scale(1.2, 1) rotate(43deg);
		position: absolute;
		left: 146px;
		top: 180px;
}#肚子
.body {
		width: 128px;
		height: 140px;
		box-shadow: 0 0 2px 0 rgb(255, 255, 255);
		background: -webkit-radial-gradient(50% 0%, farthest-side circle, #CDC9C9 2%, rgb(255, 192, 236) 50%, rgb(255, 192, 236));
		position: absolute;
		left: 85px;
		top: 219px;
		z-index: 1;
		border-radius: 0px 0px 53px 54px/0px 0px 53px 53px;
}手臂
/* 手 */
	.arm {
		width: 43px;
		height: 100px;
		box-shadow: 0 0 2px 0 rgb(255, 192, 236);
		background: linear-gradient(-66deg, #e2e2e2 18%, rgb(255, 192, 236) 37%, rgb(255, 192, 236));
		border-radius: 120px 120px 280px 280px/120px 120px 800px 800px;
		position: absolute;
		left: 59px;
		top: 225px;
		transform: rotate(25deg);

	}

	/* 右手 */
	.arm.right {
		left: 200px;
		top: 225px;
		background: linear-gradient(66deg, #e2e2e2 8%, rgb(255, 192, 236) 37%, rgb(255, 192, 236));
		transform: rotate(-17deg);
		animation: hop 2s linear infinite;
	}

	@keyframes hop {
		20% {
			transform: rotate(-40deg) translateX(18px);
			box-shadow: -0.2em 1em 0 -1em #333;
		}
}腿
	/* 腿 */
	.leg {
		width: 38px;
		height: 62px;
		box-shadow: 0 0 2px 0 rgb(255, 192, 236);
		background: linear-gradient(-66deg, #e2e2e2 18%, rgb(255, 192, 236) 37%, rgb(255, 192, 236));
		border-radius: 120px 120px 680px 280px/120px 120px 800px 800px;
		position: absolute;
		left: 88px;
		top: 313px;
		transform: rotate(-3deg);
	}

	/* 右腿 */
	.leg.right {
		background: linear-gradient(-66deg, #e2e2e2 18%, rgb(255, 192, 236) 37%, rgb(255, 192, 236));
		transform: scale(-1, 1) rotate(-3deg);
		left: 173px;
		top: 313px;
}是不是很簡單啊?你實現了嗎!
更多程式相關知識,請造訪:程式設計影片! !
以上是手把手教你使用純CSS繪製可愛玉兔(附程式碼)的詳細內容。更多資訊請關注PHP中文網其他相關文章!

熱AI工具

Undresser.AI Undress
人工智慧驅動的應用程序,用於創建逼真的裸體照片

AI Clothes Remover
用於從照片中去除衣服的線上人工智慧工具。

Undress AI Tool
免費脫衣圖片

Clothoff.io
AI脫衣器

Video Face Swap
使用我們完全免費的人工智慧換臉工具,輕鬆在任何影片中換臉!

熱門文章

熱工具

記事本++7.3.1
好用且免費的程式碼編輯器

SublimeText3漢化版
中文版,非常好用

禪工作室 13.0.1
強大的PHP整合開發環境

Dreamweaver CS6
視覺化網頁開發工具

SublimeText3 Mac版
神級程式碼編輯軟體(SublimeText3)
 vue中怎麼用bootstrap
Apr 07, 2025 pm 11:33 PM
在 Vue.js 中使用 Bootstrap 分為五個步驟:安裝 Bootstrap。在 main.js 中導入 Bootstrap。直接在模板中使用 Bootstrap 組件。可選:自定義樣式。可選:使用插件。
 HTML,CSS和JavaScript的角色:核心職責
Apr 08, 2025 pm 07:05 PM
HTML定義網頁結構,CSS負責樣式和佈局,JavaScript賦予動態交互。三者在網頁開發中各司其職,共同構建豐富多彩的網站。
 了解HTML,CSS和JavaScript:初學者指南
Apr 12, 2025 am 12:02 AM
WebDevelovermentReliesonHtml,CSS和JavaScript:1)HTMLStructuresContent,2)CSSStyleSIT和3)JavaScriptAddSstractivity,形成thebasisofmodernWebemodernWebExexperiences。
 bootstrap怎麼寫分割線
Apr 07, 2025 pm 03:12 PM
創建 Bootstrap 分割線有兩種方法:使用 標籤,可創建水平分割線。使用 CSS border 屬性,可創建自定義樣式的分割線。
 bootstrap怎麼設置框架
Apr 07, 2025 pm 03:27 PM
要設置 Bootstrap 框架,需要按照以下步驟:1. 通過 CDN 引用 Bootstrap 文件;2. 下載文件並將其託管在自己的服務器上;3. 在 HTML 中包含 Bootstrap 文件;4. 根據需要編譯 Sass/Less;5. 導入定製文件(可選)。設置完成後,即可使用 Bootstrap 的網格系統、組件和样式創建響應式網站和應用程序。
 bootstrap怎麼插入圖片
Apr 07, 2025 pm 03:30 PM
在 Bootstrap 中插入圖片有以下幾種方法:直接插入圖片,使用 HTML 的 img 標籤。使用 Bootstrap 圖像組件,可以提供響應式圖片和更多樣式。設置圖片大小,使用 img-fluid 類可以使圖片自適應。設置邊框,使用 img-bordered 類。設置圓角,使用 img-rounded 類。設置陰影,使用 shadow 類。調整圖片大小和位置,使用 CSS 樣式。使用背景圖片,使用 background-image CSS 屬性。
 bootstrap按鈕怎麼用
Apr 07, 2025 pm 03:09 PM
如何使用 Bootstrap 按鈕?引入 Bootstrap CSS創建按鈕元素並添加 Bootstrap 按鈕類添加按鈕文本
 bootstrap怎麼調整大小
Apr 07, 2025 pm 03:18 PM
要調整 Bootstrap 中元素大小,可以使用尺寸類,具體包括:調整寬度:.col-、.w-、.mw-調整高度:.h-、.min-h-、.max-h-


