Bootstrap中怎麼使用Toasts元件? (例講解)
Bootstrap中怎麼使用Toasts元件?以下這篇文章跟大家介紹一下Bootstrap5中吐司訊息Toasts元件的用法,希望對大家有幫助!

1 吐司訊息(Toasts)範例
#吐司(Toasts)是一種輕量級通知,旨在模仿行動和桌面作業系統已經普及的推播通知。它們是用flexbox構建的,所以它們很容易對齊和定位。 【相關推薦:《bootstrap教學》】
和彈出提示一樣,吐司訊息也需要自己初始化,不知為何官網的初始化方法無效,我在國外網站找到一個可行的方法。
<!doctype html>
<html>
<head>
<meta charset="utf-8">
<meta name="viewport" content="width=device-width, initial-scale=1">
<meta name="keywords" content="">
<meta name="description" content="">
<link href="../bootstrap5/bootstrap.min.css" rel="stylesheet">
<title>Popovers</title>
</head>
<body>
<div>
<br><br><br><br>
<button type="button" class="btn btn-primary" id="liveToastBtn">显示吐司消息</button>
<div class="position-fixed bottom-0 end-0 p-3" style="z-index: 5">
<div id="liveToast" class="toast hide" data-bs-animation="false" role="alert" aria-live="assertive" aria-atomic="true">
<div>
<strong>吐司消息提示</strong>
<small>11 mins ago</small>
<button type="button" data-bs-dismiss="toast" aria-label="Close"></button>
</div>
<div>
你有一条短消息!
</div>
</div>
</div>
</div>
<script src="../bootstrap5/bootstrap.bundle.min.js" ></script>
<script>
document.querySelector("#liveToastBtn").onclick = function() {
new bootstrap.Toast(document.querySelector('.toast')).show();
}
</script>
</body>
</html>
2 設定選項
選項可以透過資料屬性或是JavaScript傳遞。對於資料屬性,將選項名稱附加到data-bs-,如:data-bs-animation=""。
- data-bs-animation="true" 在吐司上應用CSS fade轉換效果
- data-bs-autohide="true" 自動隱藏吐司
- data-bs-delay="5000" ,延遲隱藏吐司5s(預設單位毫秒)
以上值為預設值,如果你對磨人的效果滿意,根本不需要寫那個,27.3.1範例中,我設定了data-bs-autohide="false"設定不自動將吐司隱藏,這樣好方便截圖,否則滑鼠只要在任何地方一點,訊息框就消失了。
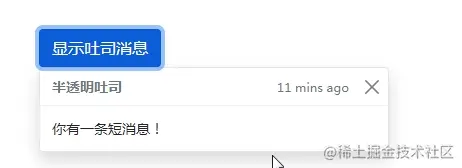
3 半透明的
吐司也可以是半透明的,因此能混合在它們可能出現的任何東西上。在支援CSS屬性backdrop-filter的瀏覽器,也會嘗試對吐司下方的元素進行模糊效果。
<!doctype html>
<html>
<head>
<meta charset="utf-8">
<meta name="viewport" content="width=device-width, initial-scale=1">
<meta name="keywords" content="">
<meta name="description" content="">
<link href="../bootstrap5/bootstrap.min.css" rel="stylesheet">
<title>吐司消息</title>
</head>
<body>
<div>
<br><br><br><br>
<button type="button" class="btn btn-primary" id="liveToastBtn">显示吐司消息</button>
<div role="alert" aria-live="assertive" aria-atomic="true">
<div>
<strong>半透明吐司</strong>
<small>11 mins ago</small>
<button type="button" data-bs-dismiss="toast" aria-label="Close"></button>
</div>
<div>
你有一条短消息!
</div>
</div>
</div>
<script ></script>
<script>
document.querySelector("#liveToastBtn").onclick = function() {
new bootstrap.Toast(document.querySelector('.toast')).show();
}
</script>
</body>
</html>
4 堆疊
可以透過將吐司包裝於toast-container容器來推疊它們,這將會在垂直方向上增加一些間距。
<!doctype html>
<html>
<head>
<meta charset="utf-8">
<meta name="viewport" content="width=device-width, initial-scale=1">
<meta name="keywords" content="">
<meta name="description" content="">
<link href="../bootstrap5/bootstrap.min.css" rel="stylesheet">
<title>吐司消息</title>
</head>
<body>
<div>
<br><br><br><br>
<button type="button" class="btn btn-primary" id="liveToastBtn1">显示吐司消息1</button>
<button type="button" class="btn btn-primary" id="liveToastBtn2">显示吐司消息2</button>
<div>
<div id="toast1" role="alert" aria-live="assertive" aria-atomic="true">
<div>
<strong>吐司消息</strong>
<small>刚刚发送</small>
<button type="button" data-bs-dismiss="toast" aria-label="Close"></button>
</div>
<div>
第一条消息
</div>
</div>
<div id="toast2" role="alert" aria-live="assertive" aria-atomic="true">
<div>
<strong>吐司消息</strong>
<small>2分钟前</small>
<button type="button" data-bs-dismiss="toast" aria-label="Close"></button>
</div>
<div>
第二条消息
</div>
</div>
</div>
</div>
<script src="../bootstrap5/bootstrap.bundle.min.js" ></script>
<script>
document.querySelector("#liveToastBtn1").onclick = function() {
new bootstrap.Toast(document.querySelector('#toast1')).show();
}
document.querySelector("#liveToastBtn2").onclick = function() {
new bootstrap.Toast(document.querySelector('#toast2')).show();
}
</script>
</body>
</html>
5 自訂內容
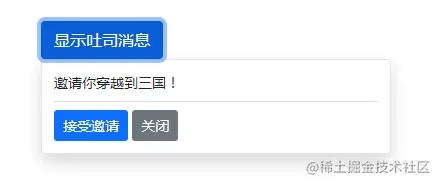
透過移除子元件、調整通用類別或增加標記以自訂吐司。
<!doctype html>
<html>
<head>
<meta charset="utf-8">
<meta name="viewport" content="width=device-width, initial-scale=1">
<meta name="keywords" content="">
<meta name="description" content="">
<link href="../bootstrap5/bootstrap.min.css" rel="stylesheet">
<title>吐司消息</title>
</head>
<body>
<div>
<br><br><br><br>
<button type="button" class="btn btn-primary" id="liveToastBtn">显示吐司消息</button>
<div role="alert" aria-live="assertive" aria-atomic="true">
<div>
邀请你穿越到三国!
<div class="mt-2 pt-2 border-top">
<button type="button" class="btn btn-primary btn-sm">接受邀请</button>
<button type="button" class="btn btn-secondary btn-sm" data-bs-dismiss="toast">关闭</button>
</div>
</div>
</div>
</div>
<script ></script>
<script>
document.querySelector("#liveToastBtn").onclick = function() {
new bootstrap.Toast(document.querySelector('.toast')).show();
}
</script>
</body>
</html>
6 配色方案
基於以上的範例,您也可以透過我們的顏色通用類別建立不同的吐司配色方案。以下我們將bg-danger與text-white加入toast,再把text-white加到關閉按鈕上。為了讓邊緣清晰顯示,透過border-0移除了預設的邊框。
<!doctype html>
<html>
<head>
<meta charset="utf-8">
<meta name="viewport" content="width=device-width, initial-scale=1">
<meta name="keywords" content="">
<meta name="description" content="">
<link href="../bootstrap5/bootstrap.min.css" rel="stylesheet">
<title>吐司消息</title>
</head>
<body>
<div>
<br><br><br><br>
<button type="button" class="btn btn-primary" id="liveToastBtn">显示吐司消息</button>
<div class="toast align-items-center text-white bg-danger border-0" role="alert" aria-live="assertive" aria-atomic="true">
<div>
<div>
这里是红色背景的
</div>
<button type="button" class="btn-close btn-close-white me-2 m-auto" data-bs-dismiss="toast" aria-label="Close"></button>
</div>
</div>
</div>
<script src="../bootstrap5/bootstrap.bundle.min.js" ></script>
<script>
document.querySelector("#liveToastBtn").onclick = function() {
new bootstrap.Toast(document.querySelector('.toast')).show();
}
</script>
</body>
</html>
7 設定顯示位置
預設吐司訊息顯示在瀏覽器右下角,根據需求,使用自訂的CSS指定吐司位置。右上角通常用於通知,頂部的中間也是如此。如果您一次只要展示一個吐司,請將定位樣式放在toast上。
<form>
<div >
<label for="selectToastPlacement">Toast placement</label>
<select  id="selectToastPlacement">
<option value="" selected>Select a position...</option>
<option value="top-0 start-0">Top left</option>
<option value="top-0 start-50 translate-middle-x">Top center</option>
<option value="top-0 end-0">Top right</option>
<option value="top-50 start-0 translate-middle-y">Middle left</option>
<option value="top-50 start-50 translate-middle">Middle center</option>
<option value="top-50 end-0 translate-middle-y">Middle right</option>
<option value="bottom-0 start-0">Bottom left</option>
<option value="bottom-0 start-50 translate-middle-x">Bottom center</option>
<option value="bottom-0 end-0">Bottom right</option>
</select>
</div>
</form>
<div aria-live="polite" aria-atomic="true" >
<div  id="toastPlacement">
<div >
<div >
  <img class="rounded me-2 lazy"  src="/static/imghw/default1.png"  data-src="..."    alt="...">
  <strong class="me-auto">Bootstrap</strong>
  <small>11 mins ago</small>
</div>
<div class="toast-body">
  Hello, world! This is a toast message.
</div>
</div>
</div>
</div>
上面是官方例子,Bootstrap5 Toasts我也沒找到其中驅動的js程式碼。不過可以給大家參考一下,有興趣的可以去研究一下,在這裡我根據上面的程式碼,修改了個顯示在左上角的。
<!doctype html>
<html>
<head>
<meta charset="utf-8">
<meta name="viewport" content="width=device-width, initial-scale=1">
<meta name="keywords" content="">
<meta name="description" content="">
<link href="../bootstrap5/bootstrap.min.css" rel="stylesheet">
<title>吐司消息</title>
</head>
<body>
<div>
<br><br><br><br>
<button type="button" class="btn btn-primary" id="liveToastBtn">显示吐司消息</button>
<div class="position-fixed top-0 start-0 p-3" style="z-index: 5">
<div id="liveToast" class="toast hide" data-bs-animation="false" role="alert" aria-live="assertive" aria-atomic="true">
<div>
<strong>吐司消息提示</strong>
<small>11 mins ago</small>
<button type="button" data-bs-dismiss="toast" aria-label="Close"></button>
</div>
<div>
你有一条短消息!
</div>
</div>
</div>
</div>
<script src="../bootstrap5/bootstrap.bundle.min.js" ></script>
<script>
document.querySelector("#liveToastBtn").onclick = function() {
new bootstrap.Toast(document.querySelector('.toast')).show();
}
</script>
</body>
</html>更多關於bootstrap的相關知識,可在:bootstrap基礎教學! !
以上是Bootstrap中怎麼使用Toasts元件? (例講解)的詳細內容。更多資訊請關注PHP中文網其他相關文章!

熱AI工具

Undresser.AI Undress
人工智慧驅動的應用程序,用於創建逼真的裸體照片

AI Clothes Remover
用於從照片中去除衣服的線上人工智慧工具。

Undress AI Tool
免費脫衣圖片

Clothoff.io
AI脫衣器

AI Hentai Generator
免費產生 AI 無盡。

熱門文章

熱工具

記事本++7.3.1
好用且免費的程式碼編輯器

SublimeText3漢化版
中文版,非常好用

禪工作室 13.0.1
強大的PHP整合開發環境

Dreamweaver CS6
視覺化網頁開發工具

SublimeText3 Mac版
神級程式碼編輯軟體(SublimeText3)

熱門話題
 bootstrap搜索欄怎麼獲取
Apr 07, 2025 pm 03:33 PM
如何使用 Bootstrap 獲取搜索欄的值:確定搜索欄的 ID 或名稱。使用 JavaScript 獲取 DOM 元素。獲取元素的值。執行所需的操作。
 bootstrap垂直居中怎麼弄
Apr 07, 2025 pm 03:21 PM
使用 Bootstrap 實現垂直居中:flexbox 法:使用 d-flex、justify-content-center 和 align-items-center 類,將元素置於 flexbox 容器內。 align-items-center 類法:對於不支持 flexbox 的瀏覽器,使用 align-items-center 類,前提是父元素具有已定義的高度。
 vue中怎麼用bootstrap
Apr 07, 2025 pm 11:33 PM
在 Vue.js 中使用 Bootstrap 分為五個步驟:安裝 Bootstrap。在 main.js 中導入 Bootstrap。直接在模板中使用 Bootstrap 組件。可選:自定義樣式。可選:使用插件。
 bootstrap怎麼寫分割線
Apr 07, 2025 pm 03:12 PM
創建 Bootstrap 分割線有兩種方法:使用 標籤,可創建水平分割線。使用 CSS border 屬性,可創建自定義樣式的分割線。
 bootstrap怎麼調整大小
Apr 07, 2025 pm 03:18 PM
要調整 Bootstrap 中元素大小,可以使用尺寸類,具體包括:調整寬度:.col-、.w-、.mw-調整高度:.h-、.min-h-、.max-h-
 bootstrap怎麼插入圖片
Apr 07, 2025 pm 03:30 PM
在 Bootstrap 中插入圖片有以下幾種方法:直接插入圖片,使用 HTML 的 img 標籤。使用 Bootstrap 圖像組件,可以提供響應式圖片和更多樣式。設置圖片大小,使用 img-fluid 類可以使圖片自適應。設置邊框,使用 img-bordered 類。設置圓角,使用 img-rounded 類。設置陰影,使用 shadow 類。調整圖片大小和位置,使用 CSS 樣式。使用背景圖片,使用 background-image CSS 屬性。
 bootstrap怎麼設置框架
Apr 07, 2025 pm 03:27 PM
要設置 Bootstrap 框架,需要按照以下步驟:1. 通過 CDN 引用 Bootstrap 文件;2. 下載文件並將其託管在自己的服務器上;3. 在 HTML 中包含 Bootstrap 文件;4. 根據需要編譯 Sass/Less;5. 導入定製文件(可選)。設置完成後,即可使用 Bootstrap 的網格系統、組件和样式創建響應式網站和應用程序。
 bootstrap怎麼看日期
Apr 07, 2025 pm 03:03 PM
答案:可以使用 Bootstrap 的日期選擇器組件在頁面中查看日期。步驟:引入 Bootstrap 框架。在 HTML 中創建日期選擇器輸入框。 Bootstrap 將自動為選擇器添加樣式。使用 JavaScript 獲取選定的日期。


