bootstrap可對表單設定哪三種狀態
bootstrap可對表單設定的三種狀態:1、焦點狀態,該狀態告訴使用者可輸入或選擇東西;2、停用狀態,該狀態告訴使用者不可以輸入或選擇東西;3、驗證狀態,該狀態告訴用戶,其進行的操作是否正確。

本教學操作環境:Windows7系統、bootsrap3.3.7版、DELL G3電腦
Bootstrap中的表單控制項狀態主要有三種:焦點狀態,停用狀態,驗證狀態。
一、焦點狀態:該狀態告訴使用者可輸入或選擇東西
#焦點狀態透過偽類“:focus”以實現。
bootstrap.css對應原始碼:
.form-control:focus {
    border-color: #66afe9;
    outline: 0;   //删除了outline的默认样式
    -webkit-box-shadow: inset 0 1px 1px rgba(0,0,0,.075), 0 0 8px rgba(102, 175, 233, .6);  //添加了阴影效果
    box-shadow: inset 0 1px 1px rgba(0,0,0,.075), 0 0 8px rgba(102, 175, 233, .6);
}#使用方法:為控制項新增類別名稱「form-control」。
eg:
<input class="form-control" type="text" placeholder="不是焦点状态下效果">
<input class="form-control" type="text" placeholder="焦点状态下效果">
效果圖如下所示:(焦點狀態下為藍色邊框效果)

焦點狀態下,file、radio、checkbox控制項的效果與普通的input空間不完全一樣,因為bootstrap對它們做了特殊處理。
bootstrap.css對應原始碼:
input[type="file"]:focus,
input[type="radio"]:focus,
input[type="checkbox"]:focus {outline: thin dotted;outline: 5px auto -webkit-focus-ring-color;outline-offset: -2px;
}#二、停用狀態:此狀態告訴使用者不可以輸入或選擇東西
#禁用狀態是透過在表單控制項上新增"disabled"屬性以實現。
bootstrap.css對應原始碼:
.form-control[disabled],
.form-control[readonly],
fieldset[disabled] .form-control {
    cursor: not-allowed;
    background-color: #eee;
    opacity: 1;
}使用方法:在需要停用的表單控制項上加上"diabled"屬性即可。
eg:
<input class="form-control" type="text" placeholder="不是焦点状态下效果">
<input class="form-control" type="text" placeholder="表单已禁用,不能输入"  disabled>
效果圖如下所示:

#說明:停用狀態下控制項背景色為灰色,且手型變成不准輸入的形狀,若表單控制不使用類別名稱"form-control",則停用的控制項只有一個不准輸入的手型。
PS:在Bootstrap中,若fieldset設定了"disabled"屬性,則整個域都處於停用狀態。
eg:
<form role="form">
    <fieldset disabled>
        <div class="form-group">
            <label for="disabledTextInput">禁用的输入框</label>
            <input type="text" id="disabledTextInput" class="form-control" placeholder="禁止输入">
        </div>
        <div class="form-group">
            <label for="disabledSelect">禁用的下拉框</label>
            <select id="disabledSelect" class="form-control">
                <option>不可选择</option>
            </select>
        </div>
        <div class="checkbox">
            <label>
                <input type="checkbox">无法选择
            </label>
        </div>
        <button type="submit" class="btnbtn-primary">提交</button>
    </fieldset>
</form>效果如下圖所示:

#PS:對於一個停用的域,若在legend中有輸入框,則此輸入框是無法被停用的。
eg:
<form role="form">
    <fieldset disabled>
        <legend><input type="text" class="form-control" placeholder="我没被禁用" /></legend>
        <div class="form-group">
            <label for="disabledTextInput">禁用的输入框</label>
            <input type="text" id="disabledTextInput" class="form-control" placeholder="禁止输入">
        </div>
        <div class="form-group">
            <label for="disabledSelect">禁用的下拉框</label>
            <select id="disabledSelect" class="form-control">
                <option>不可选择</option>
            </select>
        </div>
        <div class="checkbox">
            <label>
                <input type="checkbox">无法选择
            </label>
        </div>
        <button type="submit" class="btnbtn-primary">提交</button>
  </fieldset>
</form>效果圖如下圖:

#三、驗證狀態:該狀態告訴用戶,他們的操作是否正確
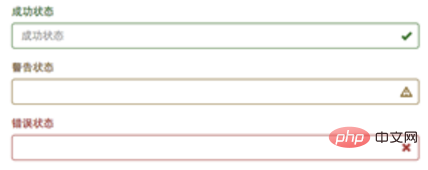
在Bootstrap中提供3種驗證狀態樣式:① .has-success :成功狀態(綠色)② .has-error : 錯誤狀態(紅色)③ .has-warning : 警告狀態(黃色)
#使用方法:在form -group容器上新增對應的狀態類別名稱即可。
eg:
<form role="form">
    <div class="form-group has-success">
        <label class="control-label" for="inputSuccess1">成功状态</label>
        <input type="text" class="form-control" id="inputSuccess1" placeholder="成功状态" >
    </div>
    <div class="form-group has-warning">
        <label class="control-label" for="inputWarning1">警告状态</label>
        <input type="text" class="form-control" id="inputWarning1" placeholder="警告状态">
    </div>
    <div class="form-group has-error">
        <label class="control-label" for="inputError1">错误状态</label>
        <input type="text" class="form-control" id="inputError1" placeholder="错误状态">
    </div>
</form>說明:從效果可看出,三種樣式除了顏色不同外,效果都一樣。 
eg:
<form role="form">
    <div class="form-group has-success has-feedback">
        <label class="control-label" for="inputSuccess">成功状态</label>
        <input type="text" class="form-control" id="inputSuccess" placeholder="成功状态" >
        <span class="glyphicon glyphicon-ok form-control-feedback"></span>
    </div>
    <div class="form-group has-warning has-feedback">
        <label class="control-label" for="inputWarning">警告状态</label>
        <input type="text" class="form-control" id="inputWarning" placeholder="警告状态" >
        <span class="glyphicon glyphicon-warning-sign form-control-feedback"></span>
  </div>
  <div class="form-group has-error has-feedback">
        <label class="control-label" for="inputError">错误状态</label>
        <input type="text" class="form-control" id="inputError" placeholder="错误状态" >
        <span class="glyphicon glyphicon-remove form-control-feedback"></span>
  </div>
</form><span class="glyphicon glyphicon-remove form-control-feedback"></span>
以上是bootstrap可對表單設定哪三種狀態的詳細內容。更多資訊請關注PHP中文網其他相關文章!

熱AI工具

Undresser.AI Undress
人工智慧驅動的應用程序,用於創建逼真的裸體照片

AI Clothes Remover
用於從照片中去除衣服的線上人工智慧工具。

Undress AI Tool
免費脫衣圖片

Clothoff.io
AI脫衣器

Video Face Swap
使用我們完全免費的人工智慧換臉工具,輕鬆在任何影片中換臉!

熱門文章

熱工具

記事本++7.3.1
好用且免費的程式碼編輯器

SublimeText3漢化版
中文版,非常好用

禪工作室 13.0.1
強大的PHP整合開發環境

Dreamweaver CS6
視覺化網頁開發工具

SublimeText3 Mac版
神級程式碼編輯軟體(SublimeText3)
 bootstrap搜索欄怎麼獲取
Apr 07, 2025 pm 03:33 PM
如何使用 Bootstrap 獲取搜索欄的值:確定搜索欄的 ID 或名稱。使用 JavaScript 獲取 DOM 元素。獲取元素的值。執行所需的操作。
 vue中怎麼用bootstrap
Apr 07, 2025 pm 11:33 PM
在 Vue.js 中使用 Bootstrap 分為五個步驟:安裝 Bootstrap。在 main.js 中導入 Bootstrap。直接在模板中使用 Bootstrap 組件。可選:自定義樣式。可選:使用插件。
 bootstrap垂直居中怎麼弄
Apr 07, 2025 pm 03:21 PM
使用 Bootstrap 實現垂直居中:flexbox 法:使用 d-flex、justify-content-center 和 align-items-center 類,將元素置於 flexbox 容器內。 align-items-center 類法:對於不支持 flexbox 的瀏覽器,使用 align-items-center 類,前提是父元素具有已定義的高度。
 bootstrap怎麼插入圖片
Apr 07, 2025 pm 03:30 PM
在 Bootstrap 中插入圖片有以下幾種方法:直接插入圖片,使用 HTML 的 img 標籤。使用 Bootstrap 圖像組件,可以提供響應式圖片和更多樣式。設置圖片大小,使用 img-fluid 類可以使圖片自適應。設置邊框,使用 img-bordered 類。設置圓角,使用 img-rounded 類。設置陰影,使用 shadow 類。調整圖片大小和位置,使用 CSS 樣式。使用背景圖片,使用 background-image CSS 屬性。
 bootstrap怎麼寫分割線
Apr 07, 2025 pm 03:12 PM
創建 Bootstrap 分割線有兩種方法:使用 標籤,可創建水平分割線。使用 CSS border 屬性,可創建自定義樣式的分割線。
 bootstrap怎麼設置框架
Apr 07, 2025 pm 03:27 PM
要設置 Bootstrap 框架,需要按照以下步驟:1. 通過 CDN 引用 Bootstrap 文件;2. 下載文件並將其託管在自己的服務器上;3. 在 HTML 中包含 Bootstrap 文件;4. 根據需要編譯 Sass/Less;5. 導入定製文件(可選)。設置完成後,即可使用 Bootstrap 的網格系統、組件和样式創建響應式網站和應用程序。
 bootstrap怎麼調整大小
Apr 07, 2025 pm 03:18 PM
要調整 Bootstrap 中元素大小,可以使用尺寸類,具體包括:調整寬度:.col-、.w-、.mw-調整高度:.h-、.min-h-、.max-h-
 bootstrap按鈕怎麼用
Apr 07, 2025 pm 03:09 PM
如何使用 Bootstrap 按鈕?引入 Bootstrap CSS創建按鈕元素並添加 Bootstrap 按鈕類添加按鈕文本


